
I kept asking artists for a grand Zeus head and walking out with faces that read flat in photos. It took one shop pointing out line weight, another showing a three-session shading plan, and me finally choosing placement that actually moves with the body. After that, Zeus designs started to translate from frame-filling in my head to tattoos that still read in everyday light and look intentional months later.
These ideas are aimed at people who want classical reference work that fits modern placements and budgets, from tiny ankle icons to multi-session sleeves. Expect pieces that range from quick 20 minute sittings to multi-appointment projects, with a few options that are coverable for work. I pulled these styles from sketches, shop visits across five shops I have visited, and the kinds of aftercare routines that actually keep edge detail crisp.
1. Micro-Realism Zeus Bust On Inner Forearm

A small, micro-realism bust uses single-needle linework to capture expression without overwhelming the arm. It reads as a tightly cropped portrait with 3RL outlines and a 70/30 gray-wash to line ratio for soft shadows. This fits someone wanting a classical nod that stays subtle, usually one to two sessions totaling 1.5 to 3 hours. For aftercare, I like tattoo aftercare balm because it seals without gloss and keeps the gray gradients soft. Photographs show more texture than the stencil, so plan for reference photos that match your lighting.
Style/Technique: Micro realism bust
Pain Level: 4/10
Session Time: 1 to 2 hours
Best For: Inner forearm / first small portrait
Mistake to Avoid: Asking for thicker lines to "make it pop" which flattens micro detail.
2. Minimal Lightning Bolt With Greek Key Band

This pairs a tiny lightning bolt profile with a slim Greek key band as a modern signature piece. The bolt uses 1.5mm negative space and a single-pass 3RL for clean edges, while the key sits at a 2mm repeat so it reads around the wrist. It feels modern and wearable, great for someone who wants mythology hinted at instead of a portrait. Add a stencil transfer paper to your artist's kit to ensure crisp repeat patterns. Be mindful of cultural patterns when redesigning the key motif to avoid unintentional appropriation.
Style/Technique: Minimal symbol work
Pain Level: 2/10
Session Time: 30 minutes to 1 hour
Best For: Wrist / visible-but-small placements
Mistake to Avoid: Scaling the key too tight so the pattern blurs with movement.
3. Neo-Classical Zeus Portrait With Geometric Frame
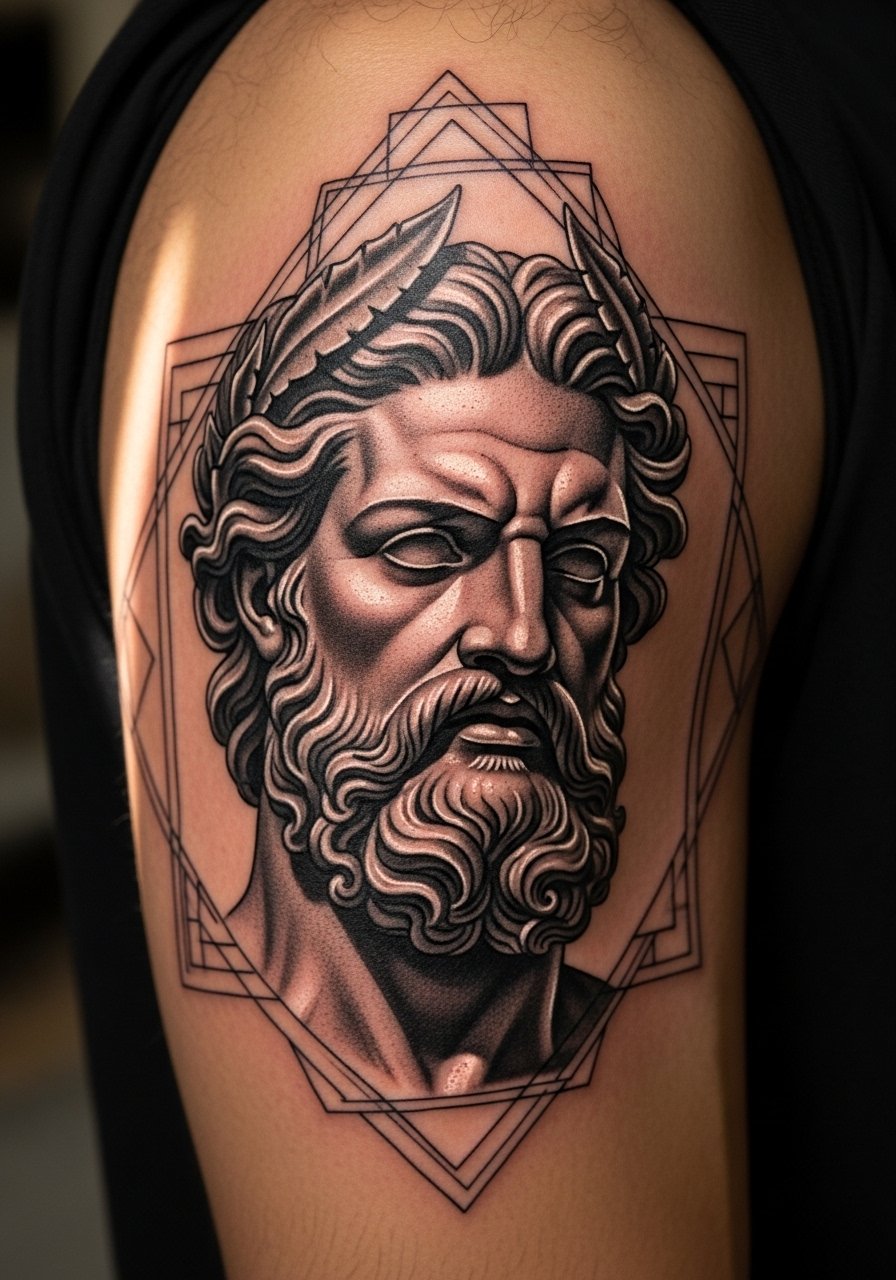
A neo-classical portrait framed by geometric lines brings antique sculpture into a clean composition. The frame gives the eye a reference point so the face does not read as floating in photos. This is a two to three hour session when done with a tight palette, and a light gray-wash blend at a 60/40 shading ratio keeps the marble illusion intact. I recommend a small tube of gray wash ink set for consistent tones in touch-ups. This suits someone looking for a statement on the upper arm without a full sleeve commitment.
Style/Technique: Neo-classical portrait
Pain Level: 5/10
Session Time: 2 to 3 hours
Best For: Upper arm / visible portrait collectors
Mistake to Avoid: Over-framing with thick bars that pull attention away from the face.
4. Watercolor Sky Behind Zeus Head On Shoulder Blade

A watercolor backdrop gives a mythic feel without adding heavy black. The Zeus head remains in grayscale while a muted blue and gray wash suggests clouds and lightning. Plan for at least two sessions, the first for the portrait and the second for color glazing and touch-up. Pick inks designed for softer saturation and expect some color fade that benefits from a 6 to 12 month revisit. I often suggest artists use a watercolor tattoo ink set for predictable blending. This is ideal for people who want artful color without a full-color portrait.
Style/Technique: Color wash with grayscale portrait
Pain Level: 4/10
Session Time: 1.5 to 3 hours across sessions
Best For: Shoulder blade / mid-back placements
Mistake to Avoid: Choosing highly fluorescent inks that age unevenly.
5. Negative-Space Laurel Crown Ring On Finger
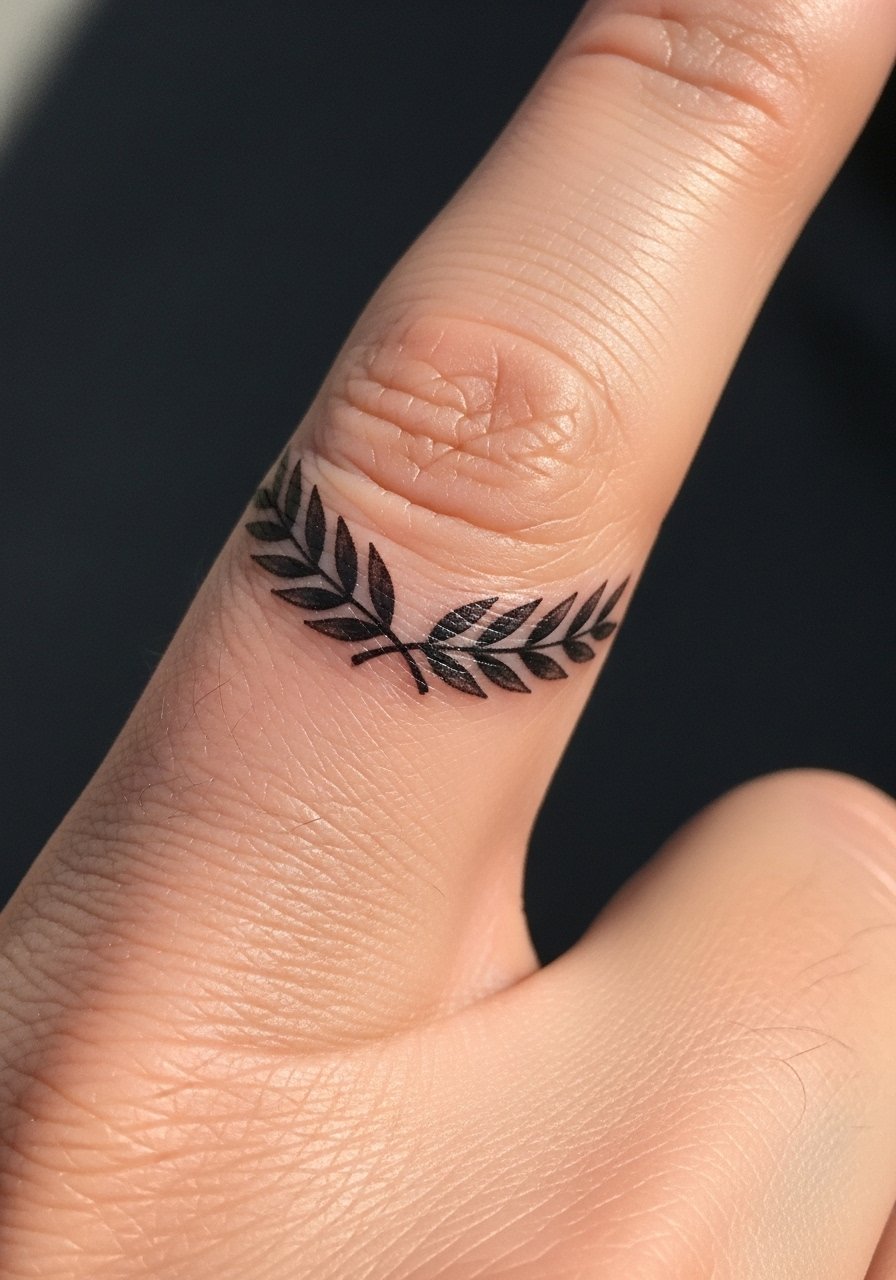
A negative-space laurel ring reads as a delicate symbol and keeps the classical reference tiny and wearable. Lines use single-pass 3RL for crisp edges and intentional uninked gaps of about 1.5mm to preserve leaf separation. This is a good low-commitment piece for someone who wants mythic symbolism in day-to-day life. For aftercare, small spots do best with a breathable sterile bandage during the first 24 hours to avoid rubbing. Finger tattoos require touch-ups over time, so budget for a revisit in 6 to 12 months.
Style/Technique: Negative-space micro ring
Pain Level: 3/10
Session Time: 20 to 40 minutes
Best For: Finger / discreet symbolic wear
Mistake to Avoid: Asking for leaves too tightly packed so they merge with wear.
6. Linework Zeus Profile Behind Ear
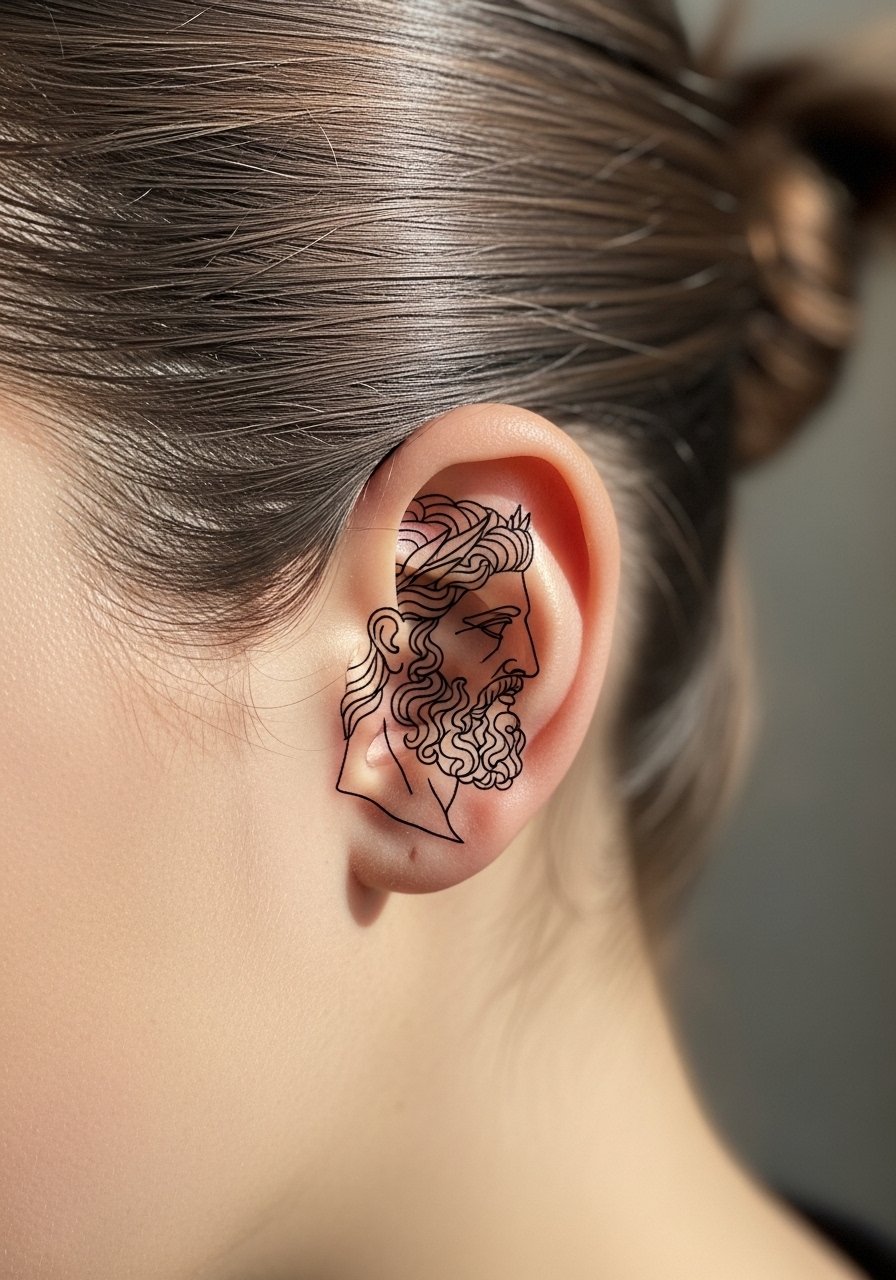
A tiny profile tucked behind the ear reads as a private charm. Linework should be single-pass and lean on 1RL to keep weight minimal, which suits someone needing a coverable piece for work. Sessions are short, often 20 to 30 minutes. If you are sensitive, a thin patch of numbing cream applied by your artist can help and a gentle numbing cream eases the process. Placement behind the ear ages well if you avoid heavy headphones and tight hair bands.
Style/Technique: Minimal single-line profile
Pain Level: 2/10
Session Time: 20 to 30 minutes
Best For: Behind ear / coverable placements
Mistake to Avoid: Positioning too low where hair will constantly rub and blur the ink.
7. Full-Arm Zeus In Storm Scene Sleeve
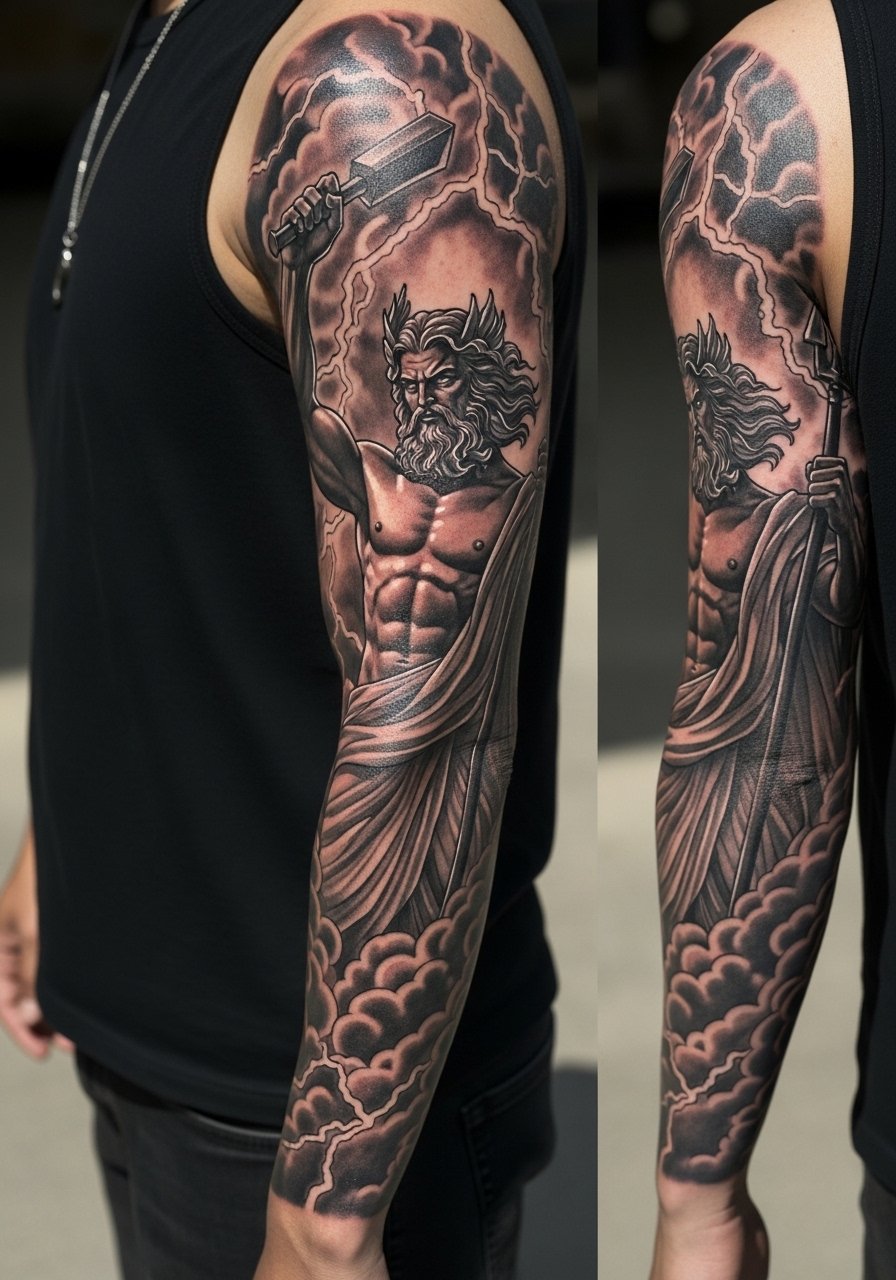
A sleeve idea frames Zeus as the eye of a storm with layered clouds, lightning bolts, and figurework that wraps the arm. Break this into three sessions, roughly 3 to 5 hours each, to protect skin and maintain contrast. Use a mix of tight liners and magnum shaders, keeping a 60/40 shading-to-line balance so details do not wash out. For equipment, experienced artists often prefer a rotary tattoo machine kit for consistent stroke. This is for someone ready to commit time and budget to a cohesive narrative piece.
Style/Technique: Narrative sleeve with layered clouds
Pain Level: 6/10
Session Time: 9 to 15 hours across sessions
Best For: Full arm / collectors of narrative work
Mistake to Avoid: Trying to finish a sleeve in one marathon session which causes excess trauma and loss of detail.
If any of these gear mentions have you ready to shop, here are the tools and supplies I actually reach for.
Zeus Tattoo Starter Kit
Tools:
- rotary tattoo machine kit (~$70-150), reliable and quiet for shading and lining.
- single-needle cartridge set (~$12-30), for micro realism and fine outline.
- stencil transfer paper (~$8-20), keeps repeats crisp.
Consumables & Aftercare:
- green soap cleanser (~$8-15), gentle cleaning during sessions.
- tattoo aftercare balm (~$10-20), breathable and low shine.
- sterile bandage pads (~$6-12), for first day coverage.
- disposable nitrile gloves (~$12-25), regular single-use protection.
- gray wash ink set (~$20-50), consistent tones for classic portraits.
Zeus Tattoo Healing Tips
Thin protective layers win out. A breathable sterile bandage for the first 12 to 24 hours keeps scabbing minimal and lets your piece breathe.
Use a gentle balm rather than heavy ointment in the second week. Apply a pea-sized amount of tattoo aftercare balm twice daily, and you will preserve gray gradients better than slathering thick ointments.
Plan reference photos in the same light you want the tattoo to read in. If you want a soft marble look, supply sunlit photos not flash photos. A small photo printout works for appointments.
When choosing placement consider movement. Ribs and hands shift more over time so pick slightly bolder line weight. A single-needle cartridge set gives fine detail but expect a touch-up later if placed on high-motion areas.
Keep sun off fresh ink for months. If you will be outdoors often, invest in a broad-spectrum physical sunblock stick for long-term tone retention.
