
I kept booking appointments for small tattoos and walking out disappointed, because I had been asking for the wrong thing. I wanted meaning, not a tiny sticker. The moment it clicked was when an artist sketched one single confident line instead of copying a pin, and suddenly the design read like a sentence instead of a doodle.
These picks are for people who want low-fuss ink that reads personal up close, stays quiet at work, and heals without drama. Most designs are quick sessions, budget friendly, and easy to cover with sleeves when needed. I learned a lot across five shops I have visited, and I built these ideas to fit weekday jobs, short appointments, and aftercare routines that actually work.
1. Tiny Wave On The Inner Wrist
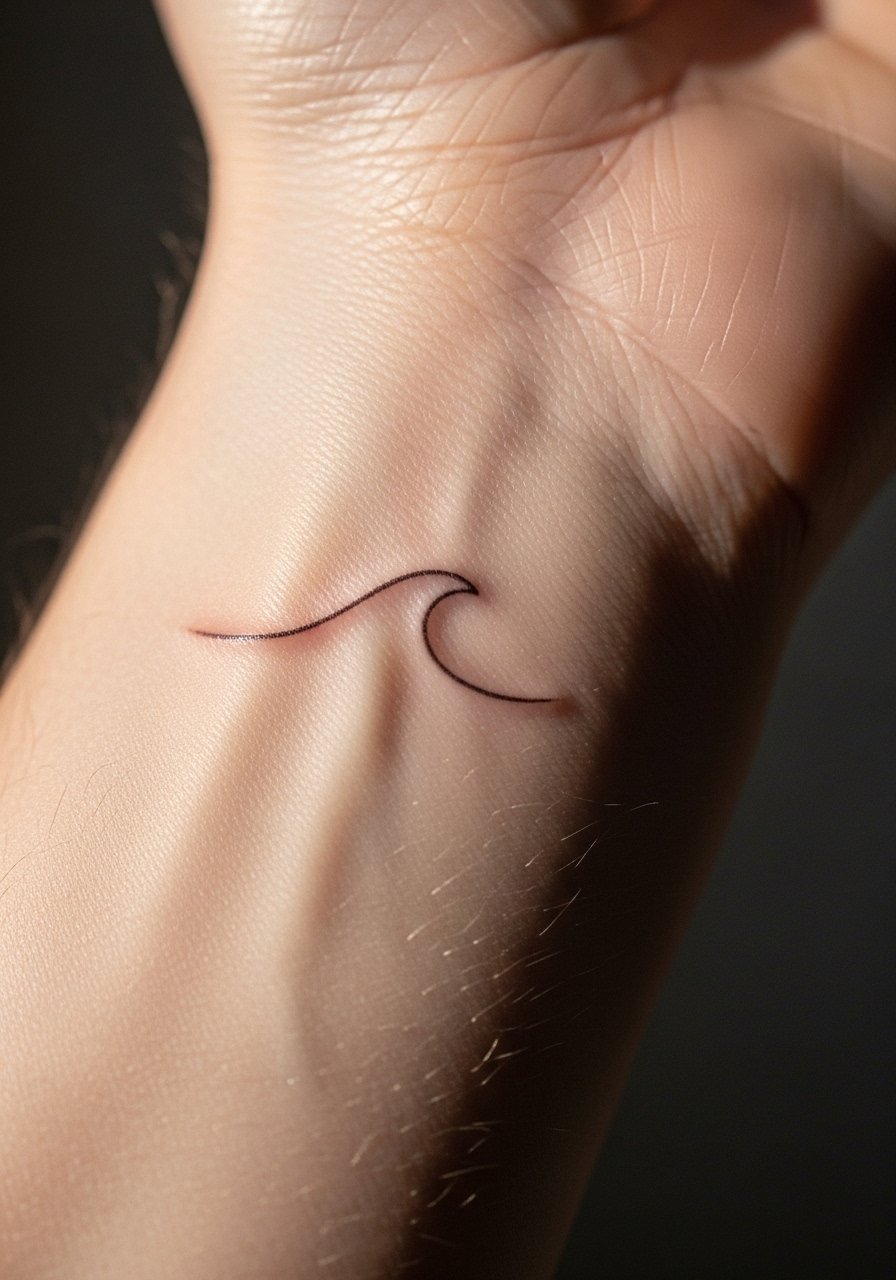
Style/Technique: Fine line single-needle
Pain Level: 2/10
Session Time: 15 to 30 minutes
Best For: Inner wrist, people who want a discreet symbol
A single confident curve reads like the ocean without shouting. It works because the eye follows the continuous line, so a 0.25mm single-needle keeps it crisp. Visually it feels calm and portable, a good fit if you want something coverable for work. Budgetwise expect a short session and a simple touch-up if lines blur during healing. Bring a photo and ask for a 3RL if you want a slightly bolder look. I usually pack a small hypoallergenic aftercare balm for the first two weeks.
Mistake to Avoid: Asking for the smallest possible line without checking needle size, which often ends up looking indistinct after healing.
2. Constellation Behind The Ear
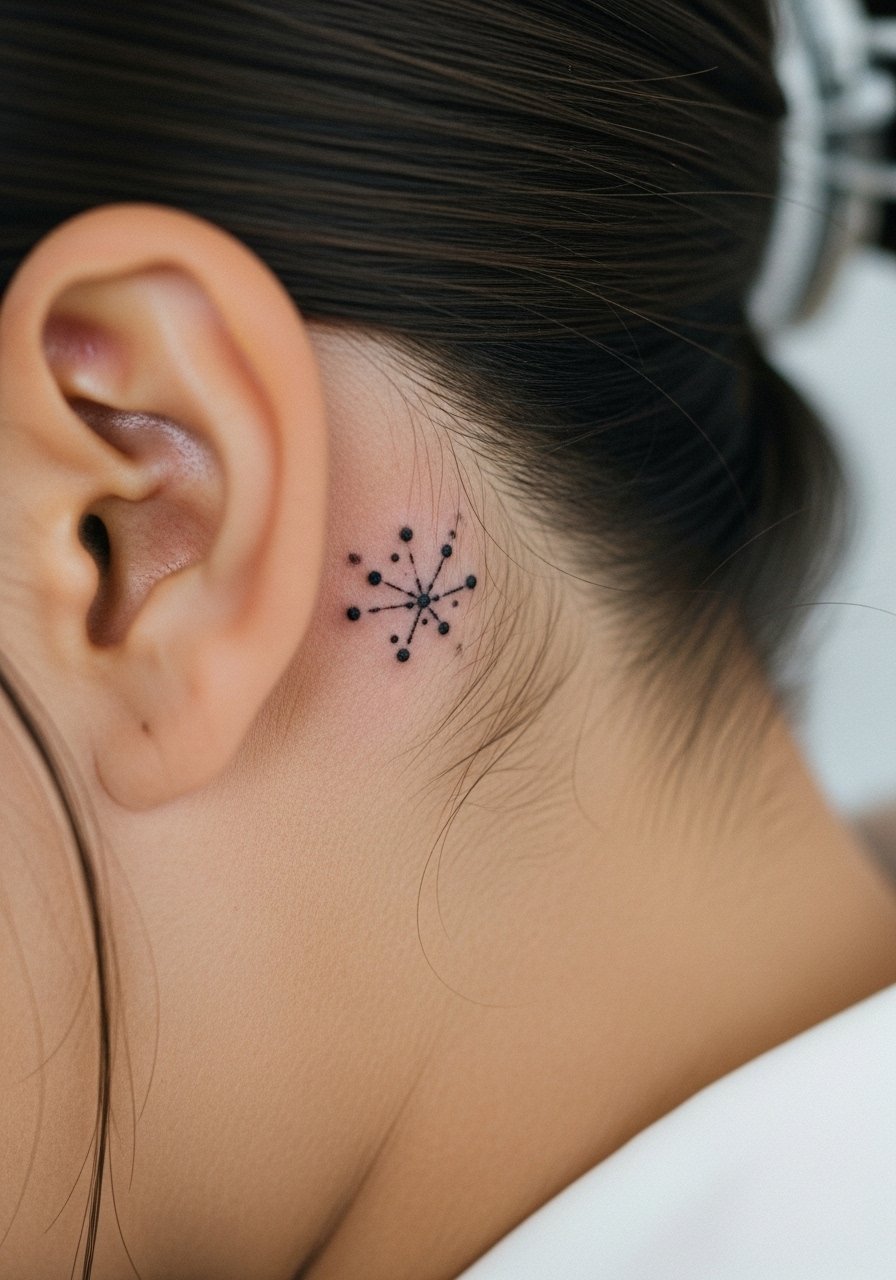
Style/Technique: Dotwork micro constellation
Pain Level: 1/10
Session Time: 20 to 40 minutes
Best For: Behind the ear, people wanting subtle placement
A constellation is a compact way to pack meaning into a tiny canvas, and it ages gracefully because dotwork softens with time. Using single-point dots spaced about 1 to 2 millimeters apart avoids the tattoo bleeding into a smudge. It is ideal for someone who prefers hair to hide the piece when needed. For aftercare in that tight spot, a travel-size gentle cleansing foam is handy because it rinses without tugging.
Mistake to Avoid: Rushing the spacing and ending up with dots placed too close together, which blur during healing.
3. Single-Continuous Face Line On The Forearm
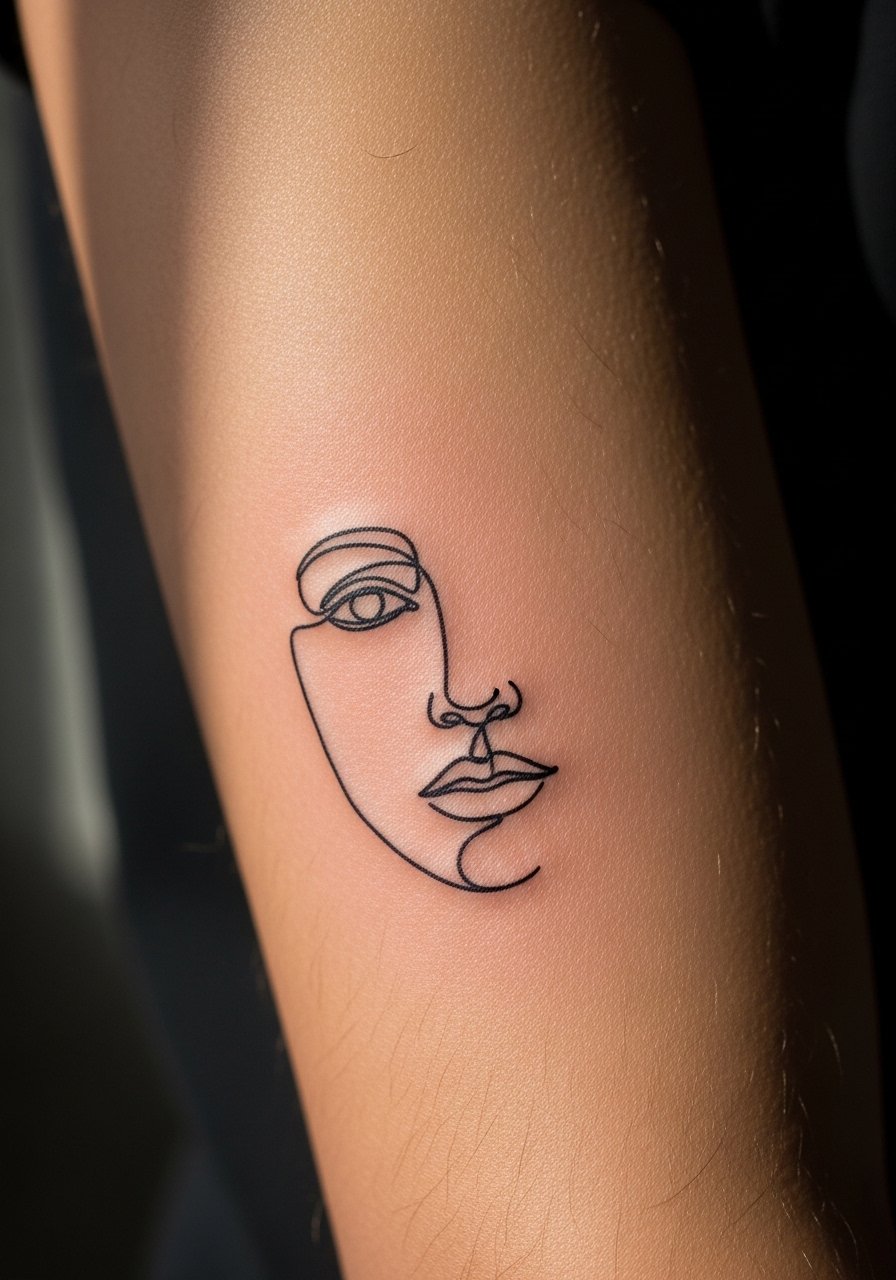
Style/Technique: One-line minimal portrait
Pain Level: 3/10
Session Time: 30 to 60 minutes
Best For: Outer forearm, people who want wearing-art that looks modern
A single unbroken line can suggest a whole face with three strokes, which looks elegant at wrist-to-forearm scale. What makes this work is intentional negative space, so tell your artist to plan where the line breathes instead of overworking details. It reads modern and feels personal without literal portraiture. If you want to care for it, a fragrance-free lotion keeps the skin supple while the line settles.
Mistake to Avoid: Asking for tiny facial details, which in minimalist work read as noise instead of identity.
4. Micro Script Tucked On The Rib

Style/Technique: Small script single-needle
Pain Level: 4/10
Session Time: 20 to 40 minutes
Best For: Rib, people wanting private, meaningful words
A single short word in tidy micro script reads intimate when placed on the rib. The rib breathes and moves, so a slightly heavier 3RL works better than a single-needle for longevity. This placement is great if you want the piece to be personal and mostly hidden under clothing. If you plan matching words with a friend, bring the exact font file and ask the artist to scale letters so counters stay open. I carry a thin sterile tattoo stencil paper sample to make sure sizing is right for my body.
Mistake to Avoid: Choosing a dense script font at micro scale, which turns into a smudge after healing.
5. Micro Botanical Ankle Sprig
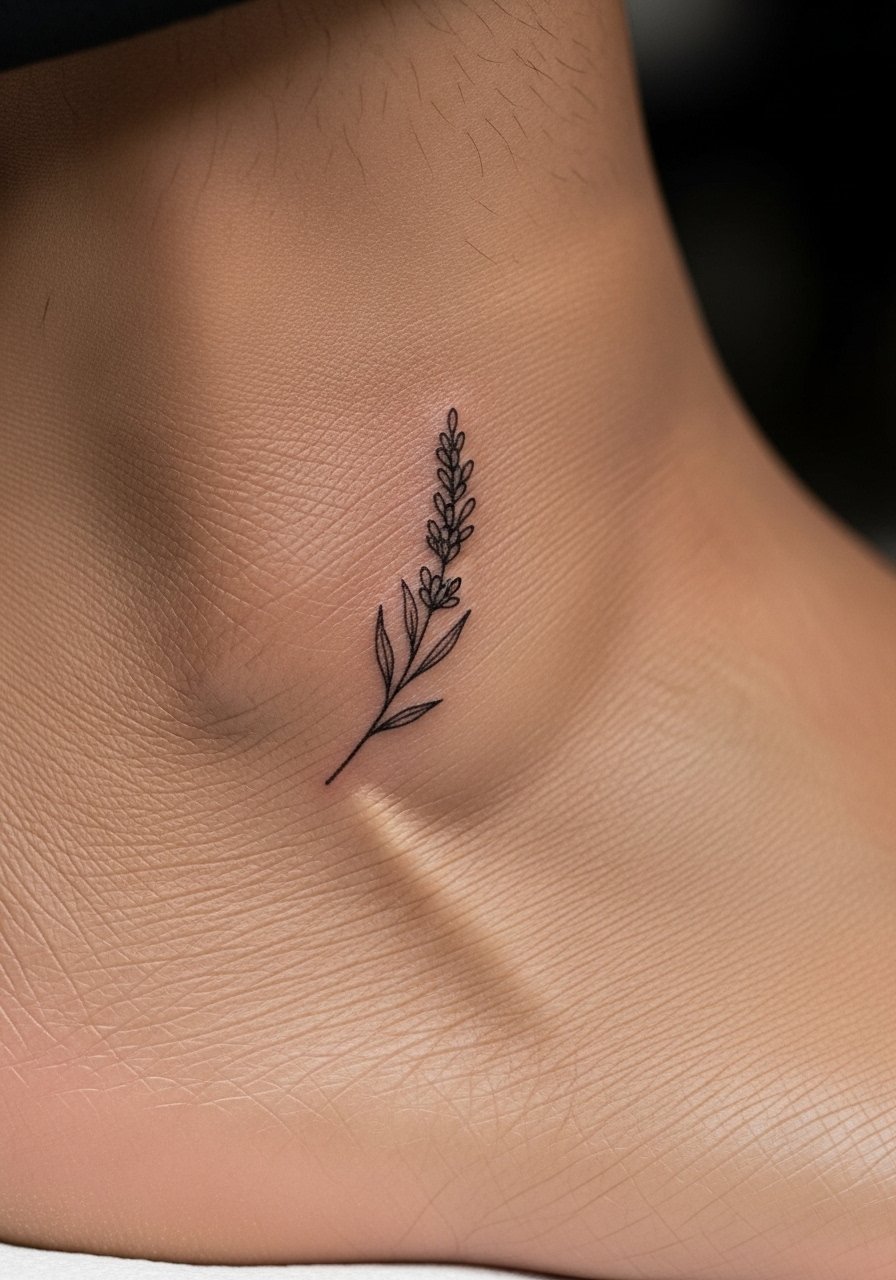
Style/Technique: Fine line botanical
Pain Level: 2/10
Session Time: 20 to 35 minutes
Best For: Ankle, people who like delicate natural motifs
A little twig or leaf uses thin stems and negative space to create movement without detail. Plant motifs tolerate small scale because the eye fills in texture. Ask for tapered stems with slightly varied line weight so the sprig reads alive. For aftercare on ankles, a low-profile bandage and a thin layer of fragrance-free healing ointment prevent rubbing against shoes.
Mistake to Avoid: Placing too close to bone where swelling and scabbing hide fine stems during healing.
6. Tiny Geometric On The Finger
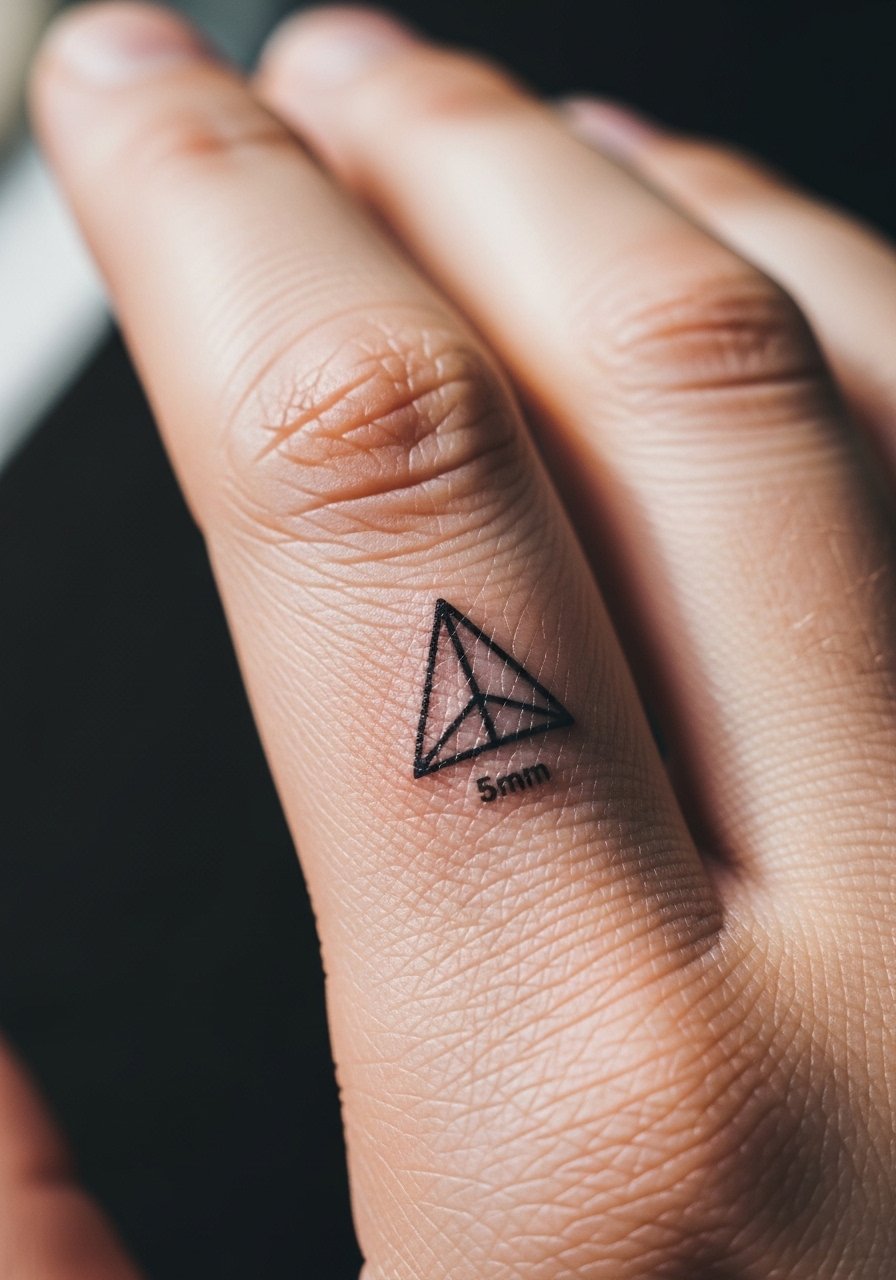
Style/Technique: Micro geometric linework
Pain Level: 5/10
Session Time: 15 to 30 minutes
Best For: Finger, people who want visible small marks
Finger tattoos read loud because hands move. A small triangle or chevron works because it is mostly straight lines, which sting but can last if placed on the fleshy side of the finger rather than the pad. Expect a faster fade on the fingers and plan a touch-up at 6 to 12 months. For a temporary boost while it settles, I use a thin liquid bandage for tattoos during the first week to prevent scabs from catching.
Mistake to Avoid: Choosing intricate dotwork on the finger pad, which fades rapidly and blurs.
7. Collarbone Morse Code For An Important Date

Style/Technique: Minimal Morse code line
Pain Level: 3/10
Session Time: 10 to 20 minutes
Best For: Collarbone, people wanting coded phrases or dates that read personal
Morse code converts words into tidy dot-and-dash sequences that look abstract to anyone not in on it. It is a quiet, clever way to carry a date or name without obvious script. Keep spaces consistent, about 2 to 3 millimeters between characters, so the pattern stays legible long term. Collarbone placement looks elegant with a thin chain, and it is easy to cover with a top when needed. For aftercare, a pH-balanced soap preserves ink without drying.
Mistake to Avoid: Compressing characters to squeeze more text, which ruins the code’s readability after healing.
If any of these have you ready to shop for the basics, here are the tools and aftercare I reach for.
Minimal Tattoo Supplies And Aftercare
Needles & Stencils:
- sterile tattoo needle set (~$12-25), handy when you need to show an artist equipment options.
- tattoo stencil paper (~$8-15), bring your exact placement sketch.
Aftercare Basics:
- hypoallergenic tattoo balm (~$10-18), used lightly after the initial crust falls.
- fragrance-free healing ointment (~$8-16) for the first 3 to 5 days.
- gentle foam cleanser (~$7-12), rinse without rubbing.
Extras:
- liquid bandage for tattoos (~$9-15), for parts that catch clothing.
- pH-balanced soap (~$5-10), to avoid over-drying.
8. Micro Cover-Up Using Stipple Dotwork
Style/Technique: Stipple dotwork cover-up
Pain Level: 3/10
Session Time: 30 to 90 minutes
Best For: Upper arm, people replacing amateur ink
If you have a tiny old tattoo that you regret, micro stipple dotwork can blur and recompose old lines without going dark. The trick is layering dots with slightly varied density to mask old ink and create a new texture. It is a subtle approach that preserves skin breathing. Expect multiple short sessions if the old ink is saturated. For planning, bring a photo of the old mark and ask about spacing ratios; I once asked for 2:1 dot density in the darkest zone and it worked well.
Mistake to Avoid: Asking for a tiny full-coverage black patch, which reads heavy and often looks like a mistake.
9. Tiny Portrait Dotwork Near The Clavicle

Style/Technique: Micro dotwork portrait
Pain Level: 4/10
Session Time: 45 to 90 minutes
Best For: Clavicle, people wanting a small likeness that is intimate
A tiny portrait done in dotwork can be surprisingly legible because the skin reads the dots as tone, not line. This is a more advanced micro technique, so pick an artist experienced in micro-realism. It creates a soft, wearable memory that sits nicely at collarbone level. Because portraits rely on tonal mapping, expect a slightly longer session and a small touch-up. I slip a gentle moisturizer into my bag for post-healing texture smoothing.
Mistake to Avoid: Requesting full photorealism at postcard size, which loses definition when scaled down.
10. Scar-Friendly Minimal Symbol Over Scarring

Style/Technique: Scar-adaptive minimal symbol
Pain Level: 3/10
Session Time: 20 to 40 minutes
Best For: Over faint scars, people wanting to reframe a mark
Designs that follow scar texture rather than trying to hide it feel intentional. Artists who work across scar tissue will vary needle depth and line pace so ink settles around the scar's raised or indented areas. A simple geometric or small symbol reframes the area without forcing coverage that will blow out. Always consult about scar maturity; immature scars may need another year before tattooing. A silicone-based scar sheet can help soften the area beforehand.
Mistake to Avoid: Tattooing a highly raised, recent scar, which leads to uneven ink uptake and distorted lines.
11. Minimal Matching Anklet Lines For Partners

Style/Technique: Thin anklet line, paired work
Pain Level: 2/10
Session Time: 10 to 20 minutes each
Best For: Ankles, partners or friends who want matching discreet marks
Matching anklet lines are sweet because they sit low and can be shown off or covered easily. Keep the line thin and consistent by asking for the same artist for both people so line weight and spacing match. Small details like a 1mm break or a single dot can personalize each piece while keeping them clearly connected. For post-care, slip-on shoes that do not rub the area speed healing. I usually gift a tiny travel aftercare kit when someone gets matching work.
Mistake to Avoid: Letting two different artists freehand each anklet without matching line weight, which makes pairs look mismatched.
Small-Ink Healing Habits
Patch-test placement first. If you are unsure how a finish will look on your skin tone, ask the artist for a small test dot on the same area. A light test saves a full design redo and makes color choices clearer. Grab a sterile tester kit for planning sessions.
Start with short showers and gentle cleansing in week one. Use a pH-balanced soap and a thin layer of healing balm. I recommend pH-balanced soap for the first two weeks.
Plan clothing around rubbing points. Wear soft fabrics and avoid tight waistbands over new ink. A pack of plain cotton low-rise underwear is an easy change for rib and hip tattoos.
Ask about cultural sensitivity if you want a symbol that references another tradition. Some designs carry cultural meaning and require care and permission. Read and ask your artist instead of assuming a motif is decorative. Keep a small notebook with reference images and notes for the shop.
