
The moment it clicked was when my artist sketched the phrase in my own handwriting, then sized it to 4.5 centimeters so the letters would read like a whisper across the forearm. Small change, huge difference. After three half-finished ideas and one regret, I learned that scale, line weight, and placement are what make a tattoo feel personal instead of pasted on.
These picks are for anyone who wants a readable forearm piece that ages well and stays work-appropriate when needed, not just a flashy photo. I pulled these choices from across five shops I have visited, so they span simple walk-in sessions to custom appointments that need a few hours and a small budget. Expect some pieces to take 20 minutes, others several hours, and plan for aftercare and sun protection.
1. Tiny Compass With Coordinates

Style/Technique: Fine line navigational
Pain Level: 3/10
Session Time: 20 to 45 minutes
Best For: Visible forearm, travel-minded people
A small compass with latitude and longitude reads intentional and private at the same time. Keep the compass face around 3.5 to 5 centimeters so the tiny directional points do not blur over time. Visually it works because the negative space around the needle makes the piece pop against skin. This suits beginners and those who want something coverable with a sleeve shirt. For quick upkeep, use a tattoo aftercare balm after the first week and a fragrance-free cleansing soap during healing.
Mistake to Avoid: Asking for the compass twice as large, which fills the forearm and loses delicacy.
2. Single-Line Portrait Silhouette

Style/Technique: Continuous line portrait
Pain Level: 4/10
Session Time: 45 minutes to 1.5 hours
Best For: People who want a subtle portrait without heavy realism
A continuous single-line portrait flattens visual clutter and reads like a memory instead of a photograph. Scale it to roughly 6 to 8 centimeters tall so facial negative space stays readable, and ask your artist for 0.25 to 0.35 mm line weight for longevity. It feels intimate and low-key, good for someone who wants a portrait but not the full realism route. For touch-ups and color hold, try a gentle spf mineral sunscreen once healed.
Mistake to Avoid: Requesting ultra-fine hairline strokes smaller than 0.2 mm, which can vanish over a couple of years.
3. Morse Code Message Band

Style/Technique: Minimal symbolic band
Pain Level: 2/10
Session Time: 20 to 40 minutes
Best For: Secret messages, work-visible tattoos
Morse code turns words into rhythm. Dots and dashes spaced 8 to 12 millimeters apart read as an intentional pattern rather than random marks. It looks modern and doubles as a bracelet when worn with long sleeves. This is a fast, budget-friendly idea that is easy to hide with clothing if needed. Pair it with a clear water-based tattoo ointment for the first week of healing.
Mistake to Avoid: Crowding symbols too tightly, which makes translation impossible and the design muddy.
4. Birth-Flower Sprig With Date

Style/Technique: Botanical micro realism
Pain Level: 3/10
Session Time: 30 to 60 minutes
Best For: Parents or memorial pieces, medium forearm visibility
A tiny sprig of the birth month flower, about 5 to 7 centimeters long, is readable and sweet without being floral overload. Fine shading in 10 to 20 percent contrast keeps petals readable as skin ages. It gives a gentle, grounded feeling and suits people who want a personal symbol rather than a name. For healing, use a fragrance-free moisturizer daily after the initial ointment stage.
Mistake to Avoid: Asking for full-color heavy petals at micro scale, which can blur and lose detail.
5. EKG Line With Name Integration

Style/Technique: Script-integrated line work
Pain Level: 4/10
Session Time: 30 minutes to 1 hour
Best For: Medical memories, loved-one tributes
An EKG line that flows into a name or date reads like a life-graph. Keep the zigzag peaks at about 6 to 8 millimeters high so the rhythm is clear. The visual feels emotional and wearable, and it ages cleanly as long as the script transition uses slightly thicker strokes. A light-touch tattoo cover stick can hide it for formal events while healed.
Mistake to Avoid: Requesting ultra-thin script for the name portion which disappears against the heartbeat peaks.
6. Handwritten Line From a Letter

Style/Technique: Handwriting replication
Pain Level: 3/10
Session Time: 20 to 50 minutes
Best For: Sentimental tattoos, coverable by long sleeves
Turning a loved one’s actual handwriting into a tattoo is rare but powerful. Scan the sample at high resolution and have your artist trace and resize it to 3.5 to 6 centimeters so spacing between letters stays airy. Cultural-sensitivity note: do not copy sacred scripts from other cultures as a decorative element. This approach fits people who want a literal connection to a memory. Use a sterile stencil transfer gel if your artist works from home or prefers printed stencils.
Mistake to Avoid: Asking the artist to freehand copy a faint original without a clear scanned reference, which loses the true handwriting character.
7. Micro Constellation Map With Date

Style/Technique: Micro dotwork constellation
Pain Level: 2/10
Session Time: 20 to 40 minutes
Best For: Travel lovers, astrology fans, subtle wrist-to-elbow pieces
A tiny constellation with a small date anchors an event to the sky. Keep star dots at roughly 1.5 to 2 millimeters and lines thin but not hairline, about 0.25 to 0.3 mm. That keeps them legible for years. The feeling is quietly cosmic and maps well to forearm curvature. Add a small spf tattoo sunscreen to your daily routine once healed.
Mistake to Avoid: Asking for dots the size of pinpricks, which merge into pigment spots over time.
If you are ready to shop for the basics before booking a session, these are the products I actually recommend having on hand for planning and healing.
Essential Forearm Tattoo Kit
Aftercare Basics:
- Tattoo aftercare balm (~$10-20). Gentle, non-greasy for days 3 to 21.
- Fragrance-free cleansing soap (~$6-12). For daily cleaning during healing.
- Sterile stencil transfer gel (~$8-15). Useful if you want to print a handwriting sample.
Protection & Touch-Ups:
- Mineral sunscreen SPF 50 (~$12-20). Prevents fading long term.
- Tattoo cover stick (~$8-18). Good for events while healed.
- Water-based tattoo ointment (~$6-14). First 48 hours protection.
Planning Tools:
- Small ruler for sizing (~$4-8). Measure 3.5 to 8 centimeters before you commit.
- Fine-point sketching pen (~$5-10). Trace samples for the artist.
- Tattoo aftercare guidebook (~$10-18). Short reads on care and sun protection.
8. Topographic Wave Band
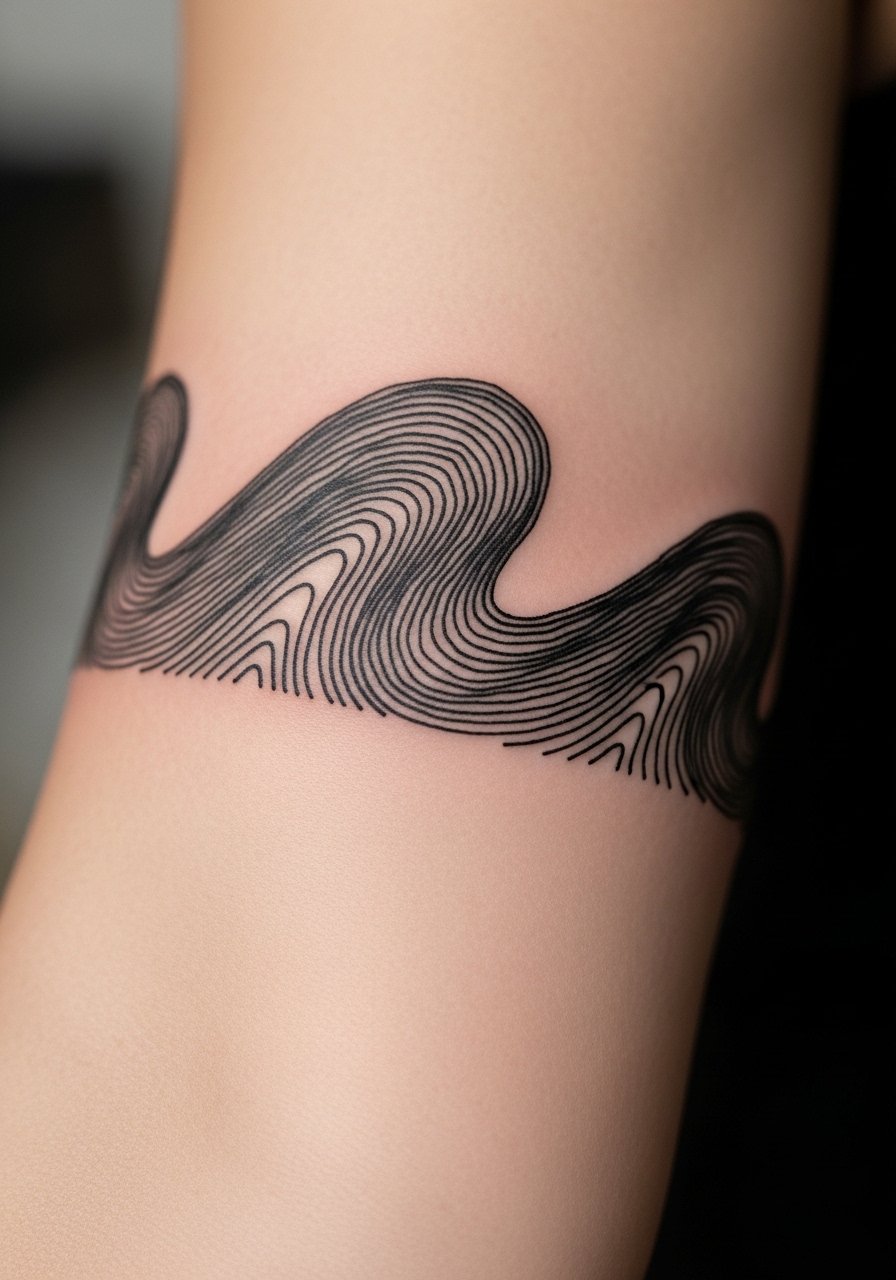
Style/Technique: Geometric contour lines
Pain Level: 3/10
Session Time: 30 minutes to 1 hour
Best For: Outdoor people, landscape lovers, medium-width forearms
Topographic lines turned into a wave or band are tactile and modern. Keep contour spacing at 4 to 6 millimeters so the sense of depth survives skin settling. The result is tactile and calm, and it works for people who want nature without literal imagery. Budget-friendly because it is mostly line work. Store-bought fragrance-free moisturizer keeps lines crisp after healing.
Mistake to Avoid: Tightening contours to 1 to 2 millimeters which causes lines to blur together.
9. Small Animal Silhouette With Paw Print

Style/Technique: Minimal silhouette with dotwork
Pain Level: 3/10
Session Time: 20 to 40 minutes
Best For: Pet tributes, compact forearm placement
A clean silhouette with a companion paw print reads like a memory, not a portrait. Keep the silhouette at 4 to 6 centimeters so recognizable features remain. Dotwork shading, around 10 percent density, suggests texture without heavy ink. This feels warm and private and does not dominate the forearm. For touch-ups consider a small tattoo aftercare balm.
Mistake to Avoid: Filling the silhouette with dense color at micro scale, which ages inconsistently.
10. Minimalist Arrow With Compass Points
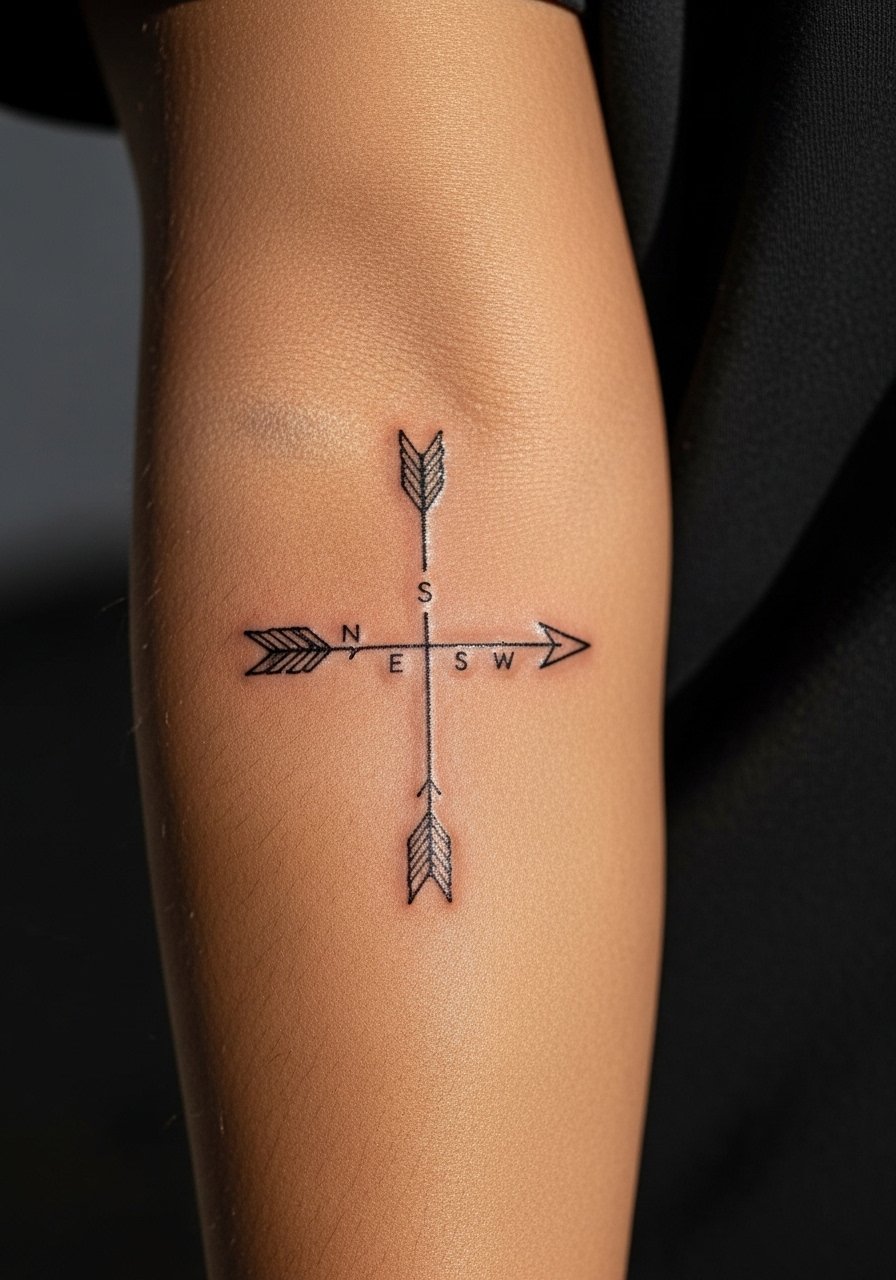
Style/Technique: Minimal directional symbol
Pain Level: 2/10
Session Time: 15 to 30 minutes
Best For: People who want symbolic direction without heavy detail
A simple arrow with small compass letters feels like holding a decision in your arm. Keep letters at about 2 to 3 millimeters so they read as hinting letters rather than words. This idea is inexpensive and perfect for first-timers. Pair with a spf mineral sunscreen for long-term preservation.
Mistake to Avoid: Requesting miniature block letters that become smudges as ink spreads.
11. UV-Reactive Accent Star
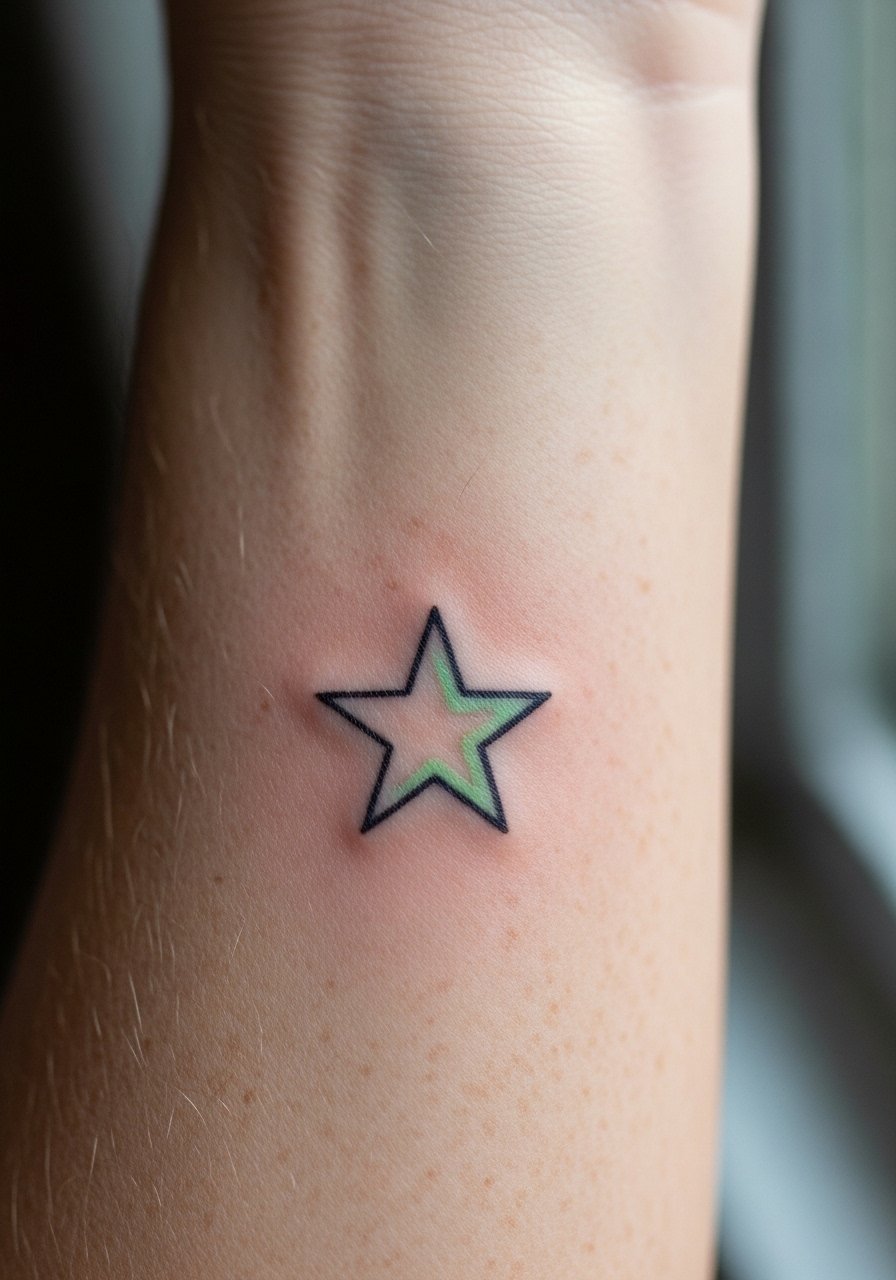
Style/Technique: UV-visible accent work
Pain Level: 3/10
Session Time: 30 to 60 minutes
Best For: Nightlife-friendly designs, subtle daytime look
Adding a tiny UV-reactive dot or accent gives a private reveal under blacklight. Use only reputable inks and talk to your artist about safety. During the day the accent is nearly invisible, so it is great for people who want a hidden twist. Healing appearance is similar to fine-line ink if the UV portion is small. Keep an aftercare balm on hand.
Mistake to Avoid: Asking for large swaths of UV ink which can look inconsistent and require heavier touch-ups.
12. Script Arcing With Muscle Follow

Style/Technique: Flowing script aligned to anatomy
Pain Level: 4/10
Session Time: 30 minutes to 1 hour
Best For: People who want text that moves with the arm
When text follows the forearm’s muscle curve it looks organic rather than pasted in. Ask your artist to map the script to the muscle fiber so each word rises and falls naturally. Keep stroke width at 0.3 to 0.5 mm for longevity and readability. This approach suits people who want visible statements that still read smooth. A quick detail eraser pen can hide the script for a formal setting when healed.
Mistake to Avoid: Insisting the artist place script in a straight line across a curved area, which distorts when the arm moves.
13. Geometric Sacred-Shape With Sensitivity Note

Style/Technique: Geometric sacred-shape
Pain Level: 3/10
Session Time: 45 minutes to 1.5 hours
Best For: People drawn to symmetry and subtle spirituality
Geometric patterns feel timeless, but be careful with symbols tied to living traditions. If the shape references a religion or culture, ask about meaning and whether it is appropriate for general wear. Keep the central motif 4 to 6 centimeters across so line symmetry stays crisp. The result is intentional and meditative. Use a fragrance-free cleanser while healing.
Mistake to Avoid: Choosing a sacred symbol as decoration without understanding its cultural weight.
14. White Ink Scar-Blend

Style/Technique: White-ink scar blending
Pain Level: 3/10
Session Time: 30 to 60 minutes
Best For: Scar camouflage, people with pale scars
White ink can soften contrast between scar tissue and surrounding skin, but results vary by skin tone and scar age. This is more of a corrective procedure than decoration. Discuss scar texture with your artist and expect subtlety rather than full concealment. The look is quiet and personal, and you may need one to two touch-ups. A silicone-based scar sheet is useful after full healing.
Mistake to Avoid: Expecting full coverage like makeup from white-ink blending, which rarely happens in one session.
15. Mini Map Segment With Pin

Style/Technique: Minimal cartographic pin
Pain Level: 3/10
Session Time: 20 to 45 minutes
Best For: City-born or travel memory pieces, small forearm placements
A tiny map slice with a pin marks a place without spelling it out. Keep the map area compact, around 4 to 6 centimeters, and favor simplified coastlines or street blocks so shapes stay recognizable. It feels private and narrative, like carrying a spot in your pocket. For preservation use a mineral sunscreen once healed.
Mistake to Avoid: Requesting dense map detail in a very small area, which loses legibility quickly.
Forearm Tattoo Care Habits
Thin healing layers keep tattoos breathable. Apply a pea-sized amount of water-based tattoo ointment in light layers rather than globbing it on.
Grab a small metric ruler before your consult. Measuring your intended piece in centimeters on your arm avoids the "too big" surprise.
Most people clean a fresh tattoo twice a day with gentle soap. Use a fragrance-free cleansing soap and pat dry with a clean towel.
What many do wrong is skip sunscreen after healing. Keep a mineral SPF 50 in your bag and apply to healed work to slow fading.
If you must hide a tattoo for a day, a small tattoo cover stick will do more than heavy makeup and is less likely to rub off.
