
I kept choosing placements that looked perfect in pictures and then rubbed raw by week two. After a half-faded wrist piece and a hip design that hugged every waistband, I started mapping tattoos like furniture, thinking about movement, fabric, and how I live. That changed everything, because a good placement is part design choice and part daily habits meeting a tiny biology lesson.
If you want tattoos that still look deliberate after years, these placements lean practical and creative. I pulled these from sessions across five shops I have visited, and most sit in the low-to-mid pain range with single-session times under three hours. Budget varies, from small flash pieces under $150 to larger spots that require planning. Most people spend somewhere between $500 and $800 when they finally commit to refreshing a room.
1. Inner Wrist, Fine Line Script
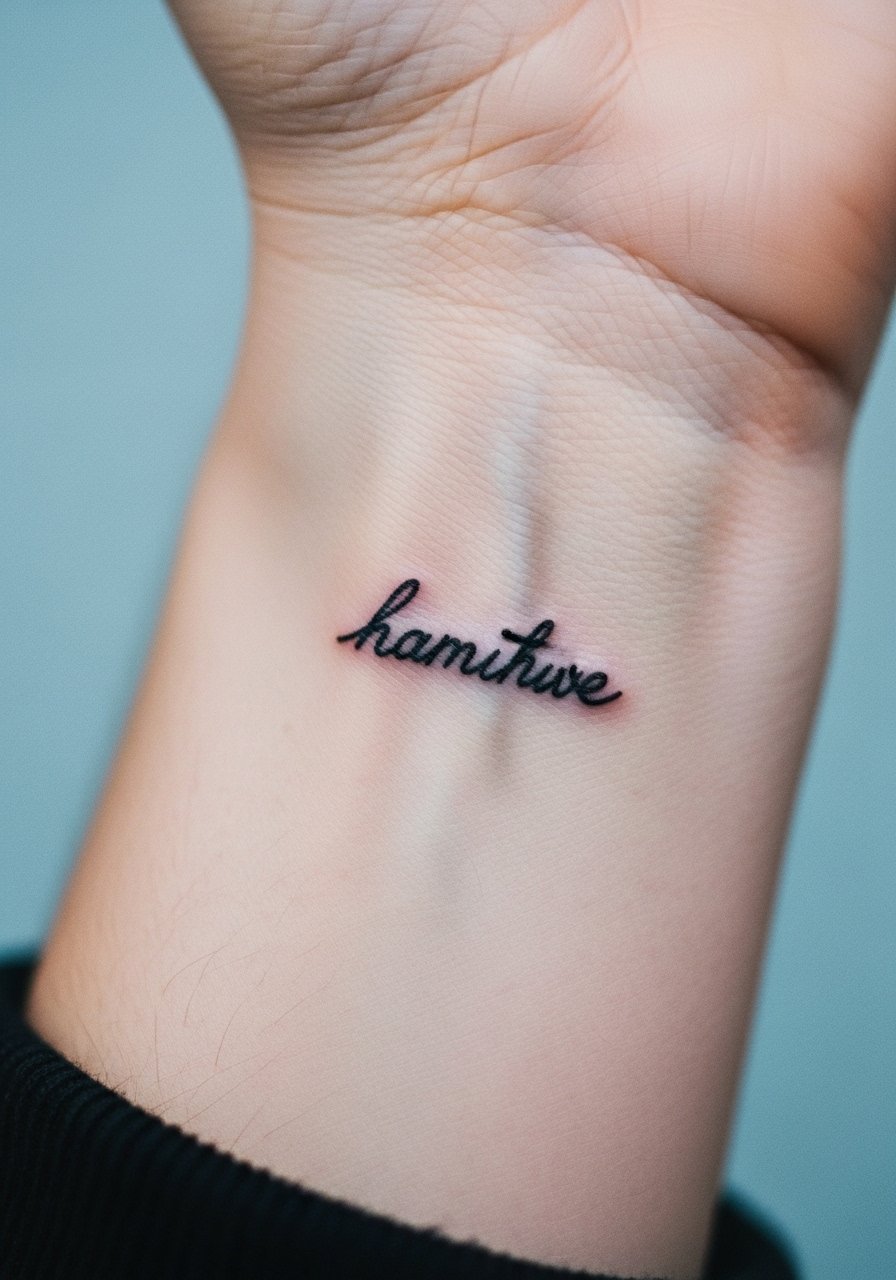
Style/Technique: Fine line script
Pain Level: 4/10
Session Time: 0.5 to 1 hour
Best For: Small phrases, visible work-friendly pieces
A slim script on the inner wrist reads intimate and still photographs well, especially if the letters are 2 to 3 mm tall. It works if you want something visible every day and fit for bracelets. Plan for touch-ups sooner, because wrist skin and frequent washing speed fading. I pair this placement with a single-line, 1.5 mm stroke width so details hold without bleeding.
Mistake to Avoid: Rushing a dense design into the wrist. Choose open, single-line work to avoid blowout and faster fade.
2. Outer Forearm, Mid-Size Image
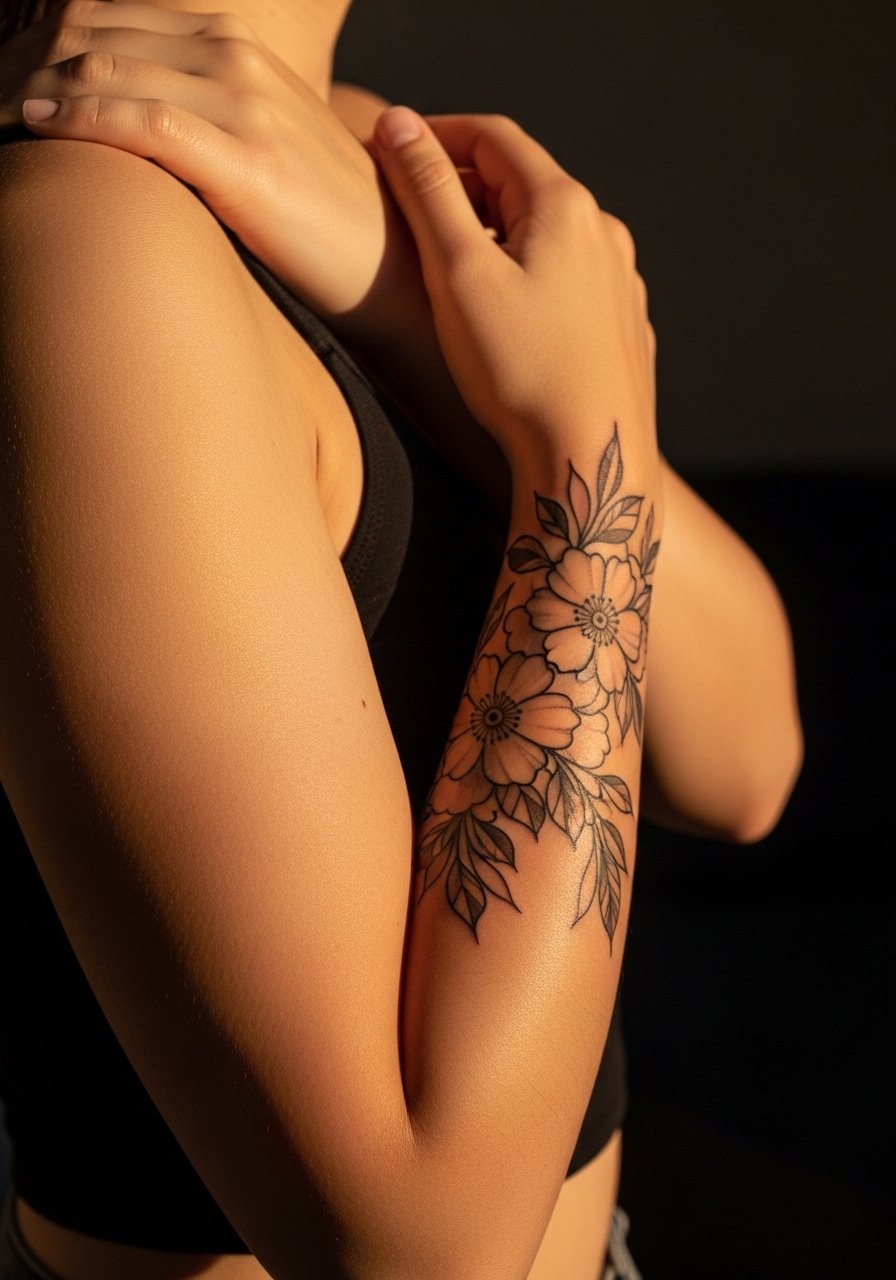
Style/Technique: Blackwork or color mid-size
Pain Level: 3/10
Session Time: 1 to 2 hours
Best For: First-timers, visible art that layers with sleeves
The outer forearm is predictable for healing and mostly easy to cover with long sleeves if required. A 3 to 4 inch piece sits naturally along the arm, so composition follows the bone line. I like pairing a bolder outline with 25 to 40 percent shading for longevity. It photographs cleanly and holds its shape because friction is low here.
Mistake to Avoid: Placing a wide design across the elbow crease. Keep the art off bending joints to prevent distortion.
3. Inner Bicep, Hidden Detail
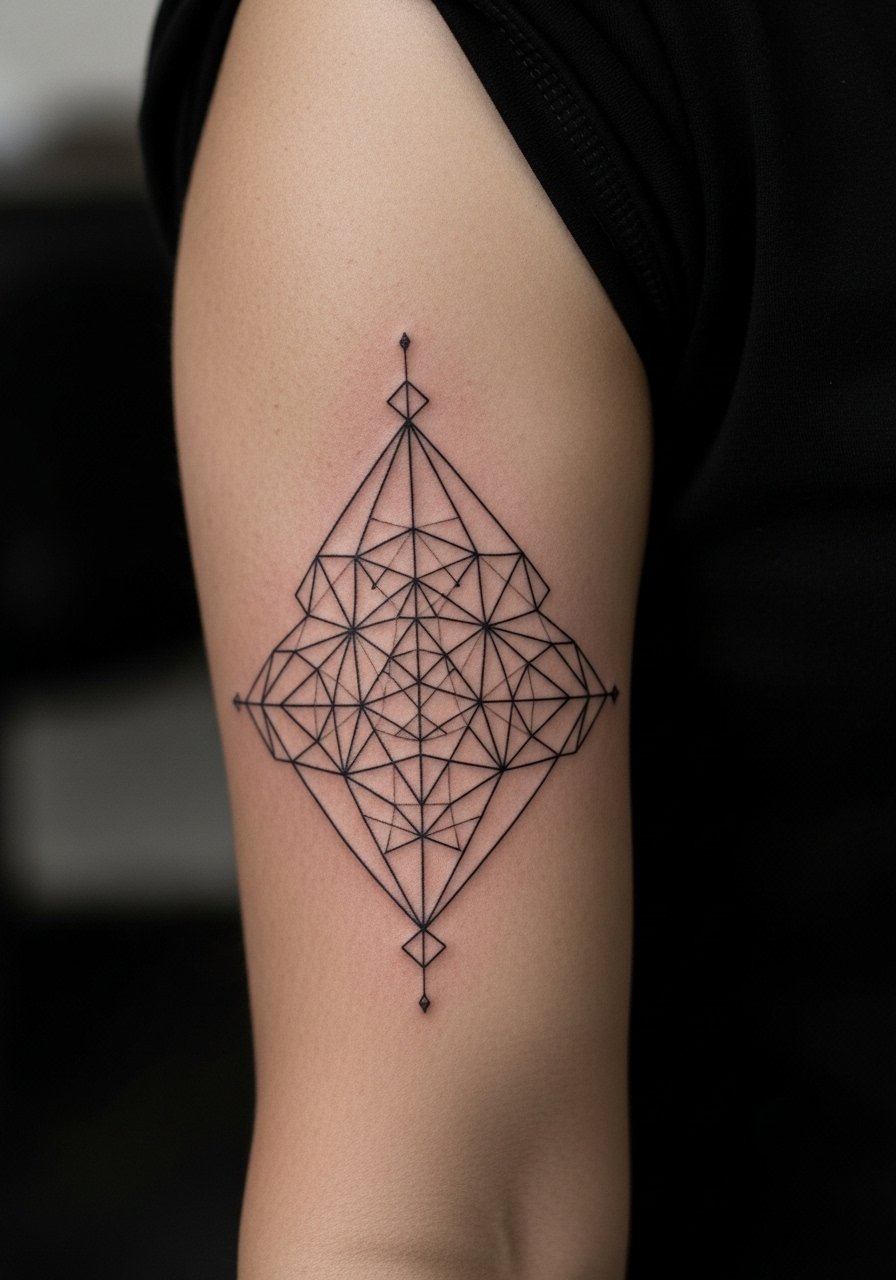
Style/Technique: Linework or small geometry
Pain Level: 5/10
Session Time: 1 to 1.5 hours
Best For: People who want privacy and occasional reveal
The inner bicep is a sneaky great spot if you like private placement. It stretches with the muscle so choose compact motifs, roughly 2 to 3 inches, to avoid warping when you flex. Expect a little more tenderness while healing, but the payoff is an artist-friendly canvas that generally ages smoothly when protected from the sun.
Mistake to Avoid: Going too wide. Keep designs compact to avoid skin movement breaking the lines.
4. Outer Thigh, Larger Canvas
Style/Technique: Illustrative panel
Pain Level: 4/10
Session Time: 2 to 3 hours
Best For: Medium to large pieces, people who wear shorts sometimes
Outer thigh gives you a lot of real estate with low daily friction. Designs 5 to 7 inches long work well here and can be extended later into a larger leg piece. For color work, expect healing to take 2 to 3 weeks of careful clothing choices. I like a heavier outline with 30 percent tonal fills so color saturation survives weekly contact with clothes.
Mistake to Avoid: Letting waistband sit over fresh ink. Schedule sessions when you can wear loose bottoms for a week.
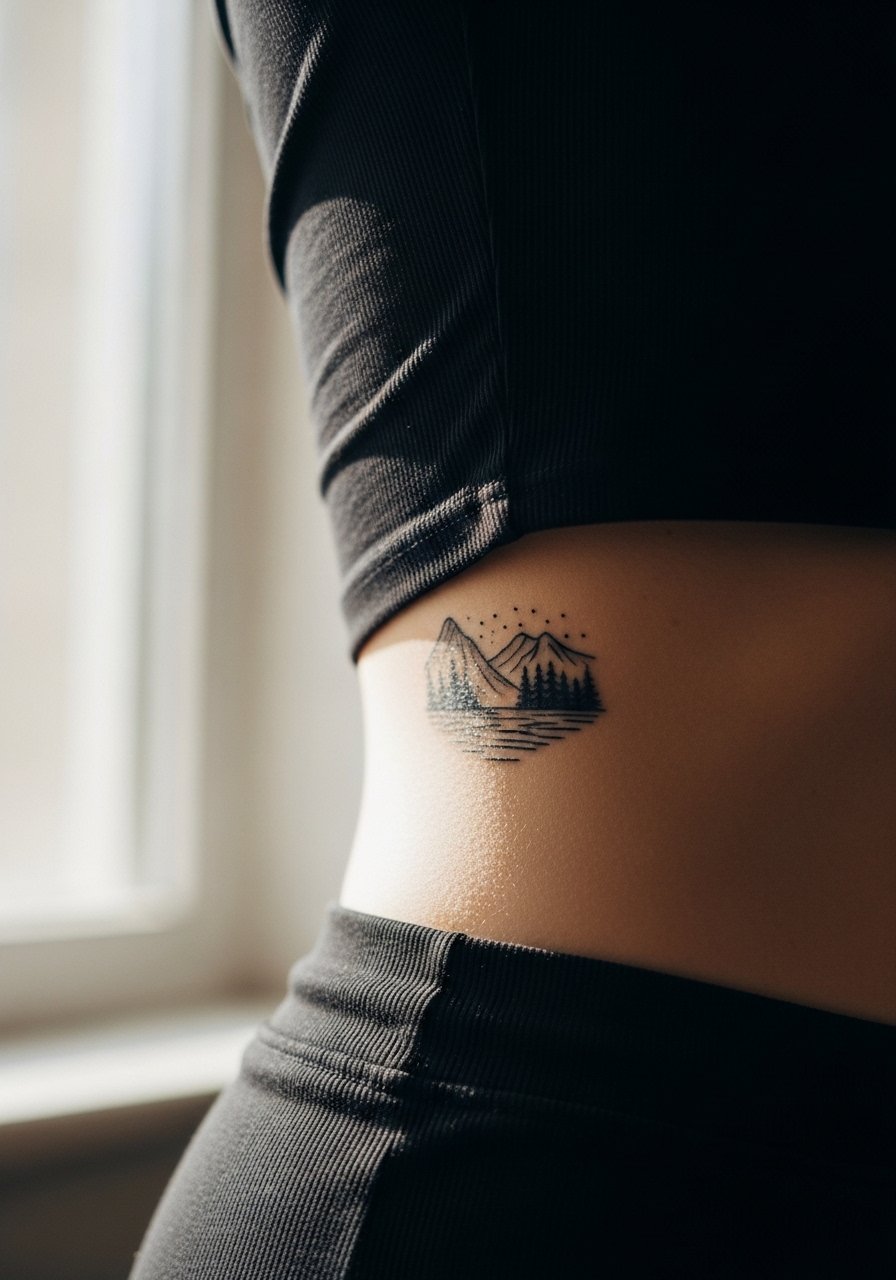
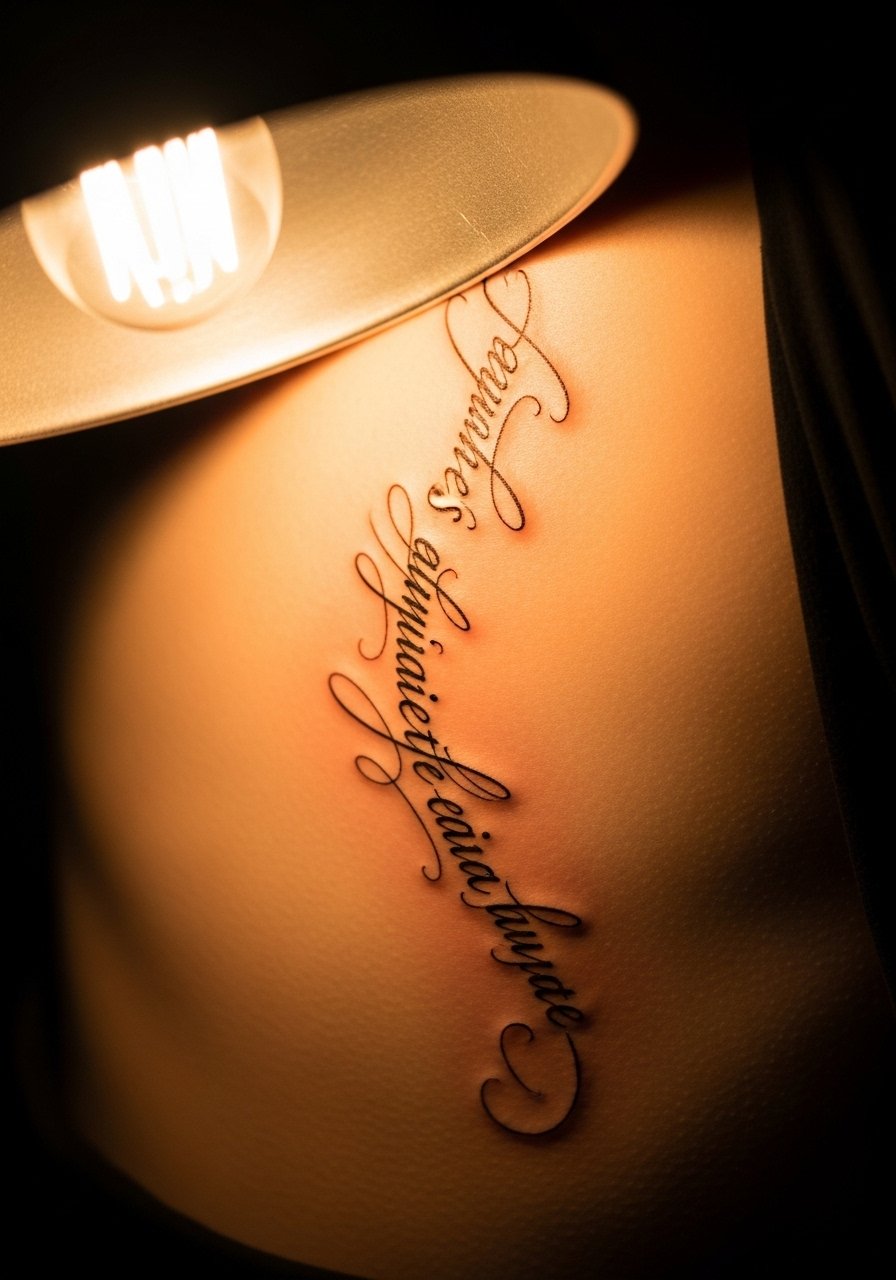
5. Ribcage, Curved Statement
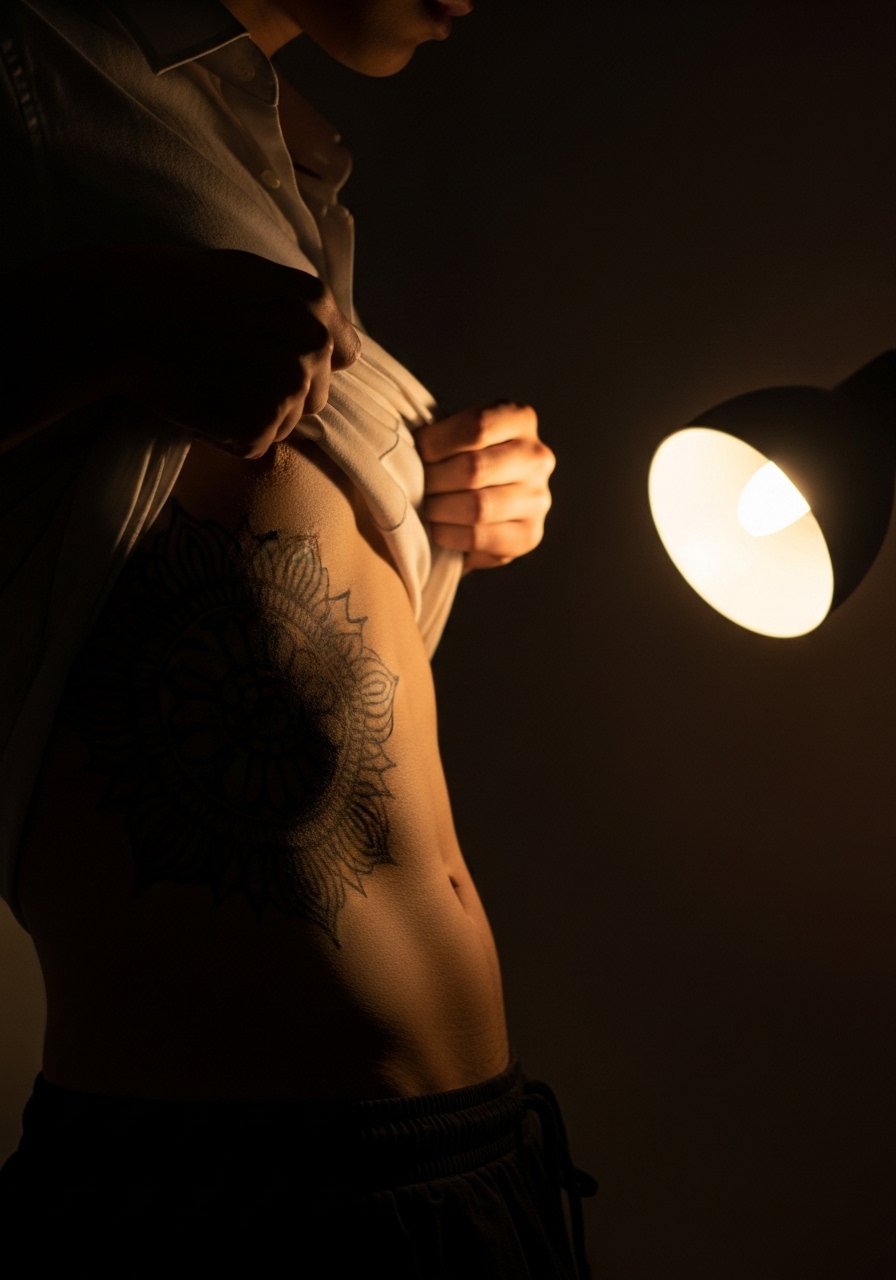
Style/Technique: Flowing script or contour illustration
Pain Level: 7/10
Session Time: 1 to 2 hours
Best For: Coverable statement pieces, people willing to sit through sharper pain
Ribcage pieces read dramatic because the curve of the ribs accentuates flow. They also come with a real pain trade-off, so plan short lines or spaced sessions. Keep designs narrow, 2 to 5 inches across, and oriented along the rib line so clothing and breathing don't blur the composition. Expect longer aftercare downtime for tender spots.
Mistake to Avoid: Choosing heavy solid black patches here. The movement in the area causes denser fills to feel heavier during healing.
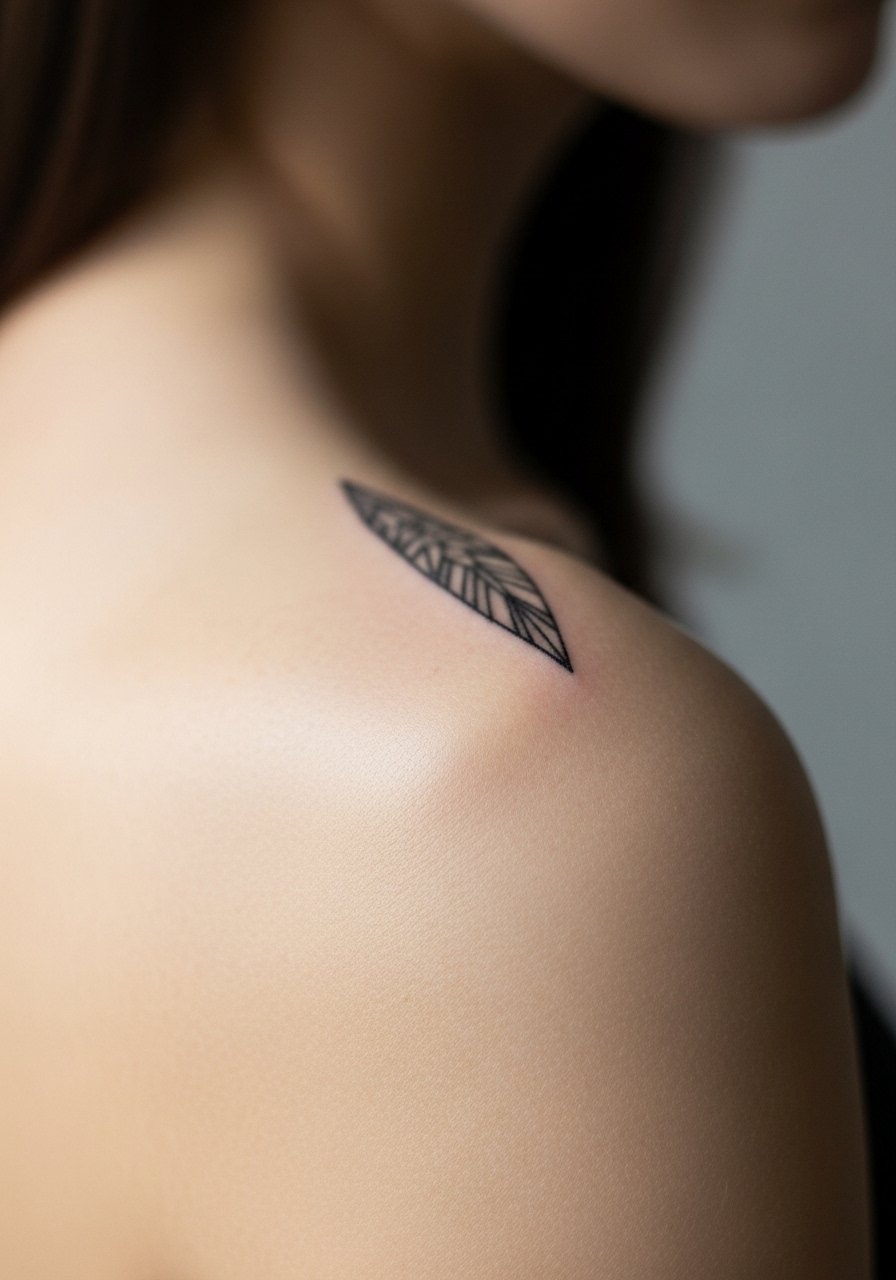
6. Collarbone, Airy Motif

Style/Technique: Delicate illustrative
Pain Level: 5/10
Session Time: 0.75 to 1.5 hours
Best For: Pieces you want to peek out of tops, photo-visible work
A collarbone tattoo reads light and directional. Keep elements thin, about 1 to 2 mm in line weight, and positioned to follow the bone so jewelry does not constantly rub it. Because the skin is thin, expect sharper sensation during the session. It photographs well in natural light and adds a subtle frame to necklines.
Mistake to Avoid: Placing designs too close to where necklaces sit. Let at least a 1 cm gap from typical jewelry lines.
7. Side of Finger, Tiny Icons
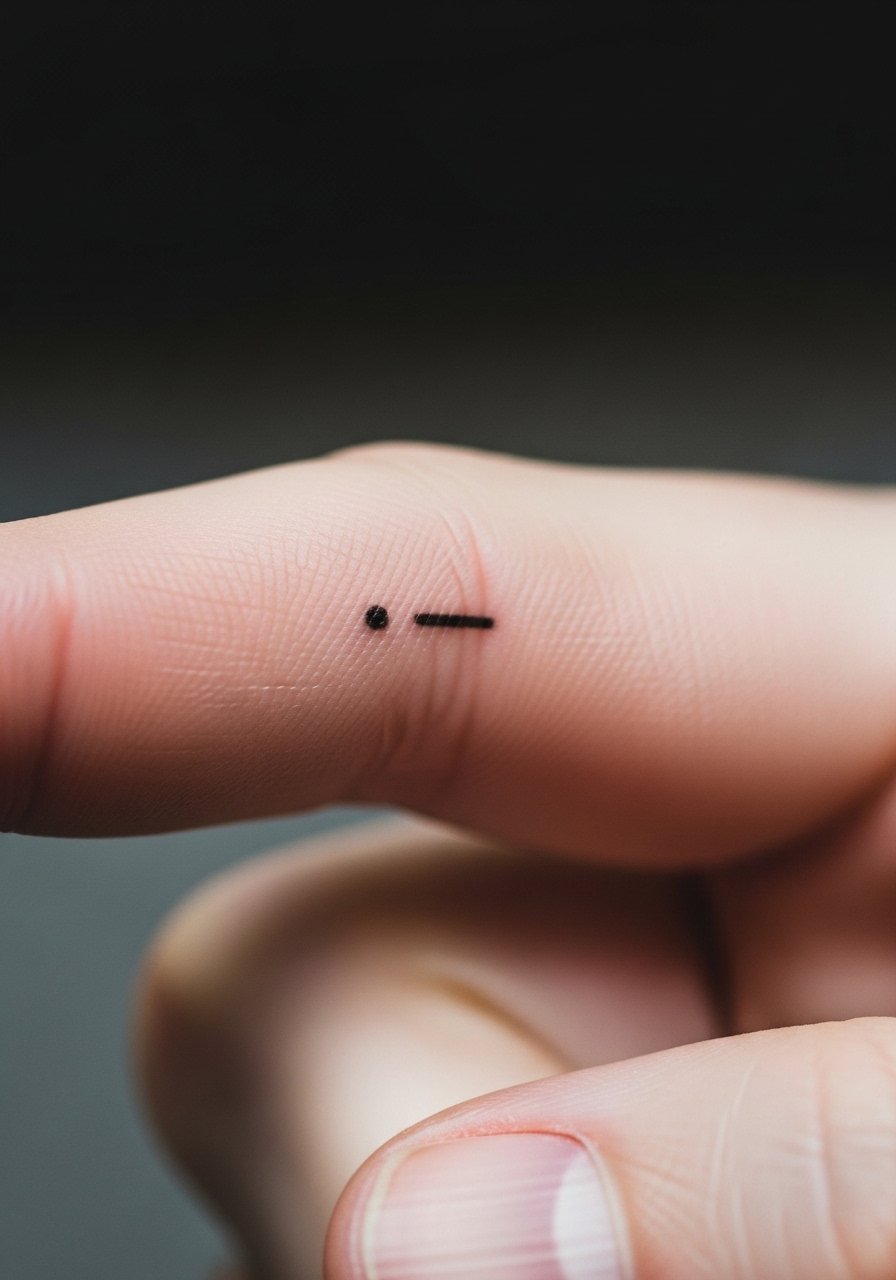
Style/Technique: Minimal iconography
Pain Level: 6/10
Session Time: 0.25 to 0.5 hour
Best For: Hidden tiny marks and trend pieces
Finger placements are trendy but high maintenance. Expect faster fading due to washing and constant use. Keep designs no wider than 3 mm and use single-needle or 3RL groupings to limit blowout. Plan touch-ups yearly depending on lifestyle. They are instant conversation starters but not the most durable option.
Mistake to Avoid: Demanding complex shading on fingers. Stick to simple lines or dots to maintain clarity.
8. Upper Back, Central Motif
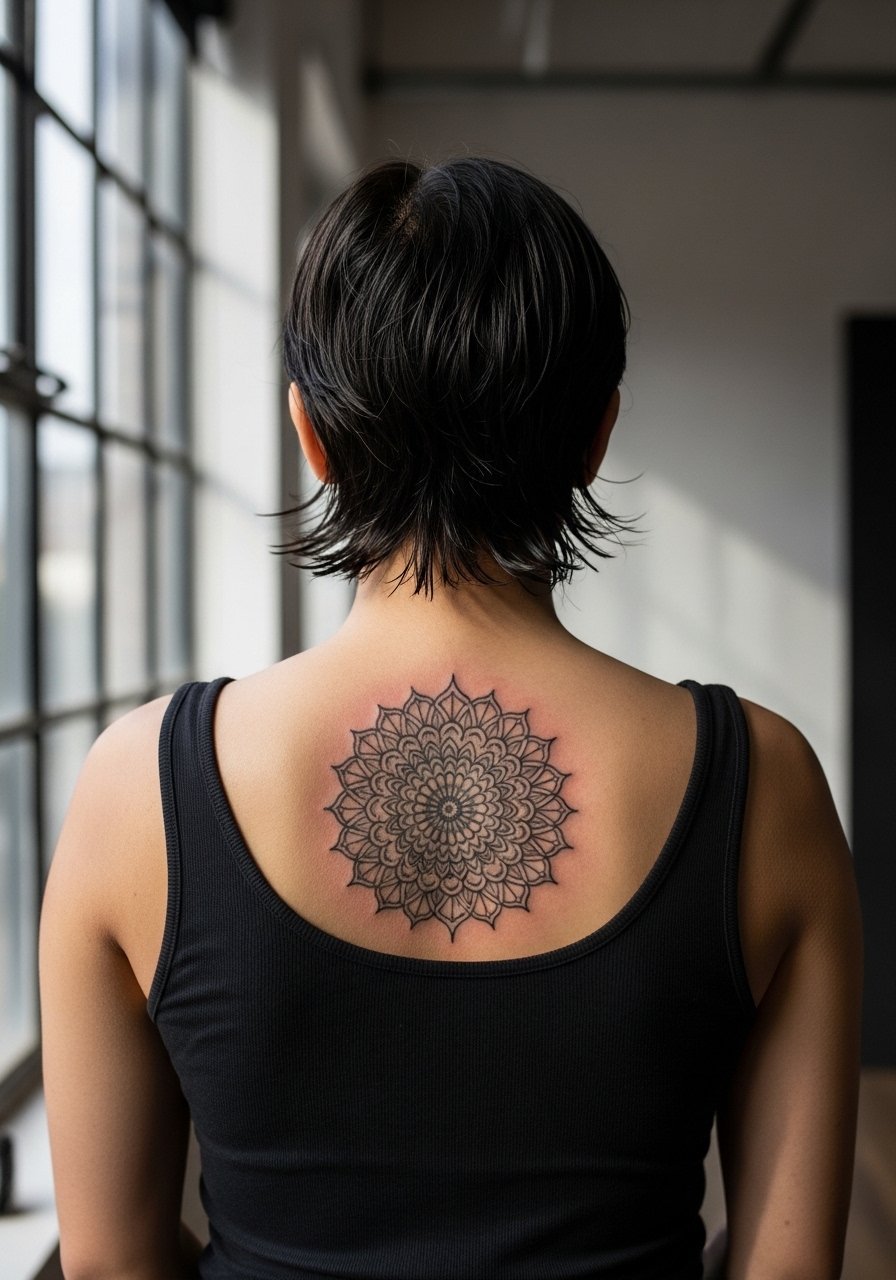
Style/Technique: Symmetrical mandala or central motif
Pain Level: 4/10
Session Time: 2 to 3 hours
Best For: Symmetrical designs that can be shown in bathsuits or covered for work
The upper back is forgiving for larger, balanced work. A 6 to 8 inch central motif sits well between the shoulder blades and resists daily friction. I recommend an even mix of line weight, such as a 1 mm outline with 40 percent dotwork fill, so texture ages evenly. It also pairs well with later sleeves or neck pieces.
Mistake to Avoid: Starting a long spine piece off-center. Measure carefully and mark with the artist before inking.
9. Nape of Neck, Small Mark
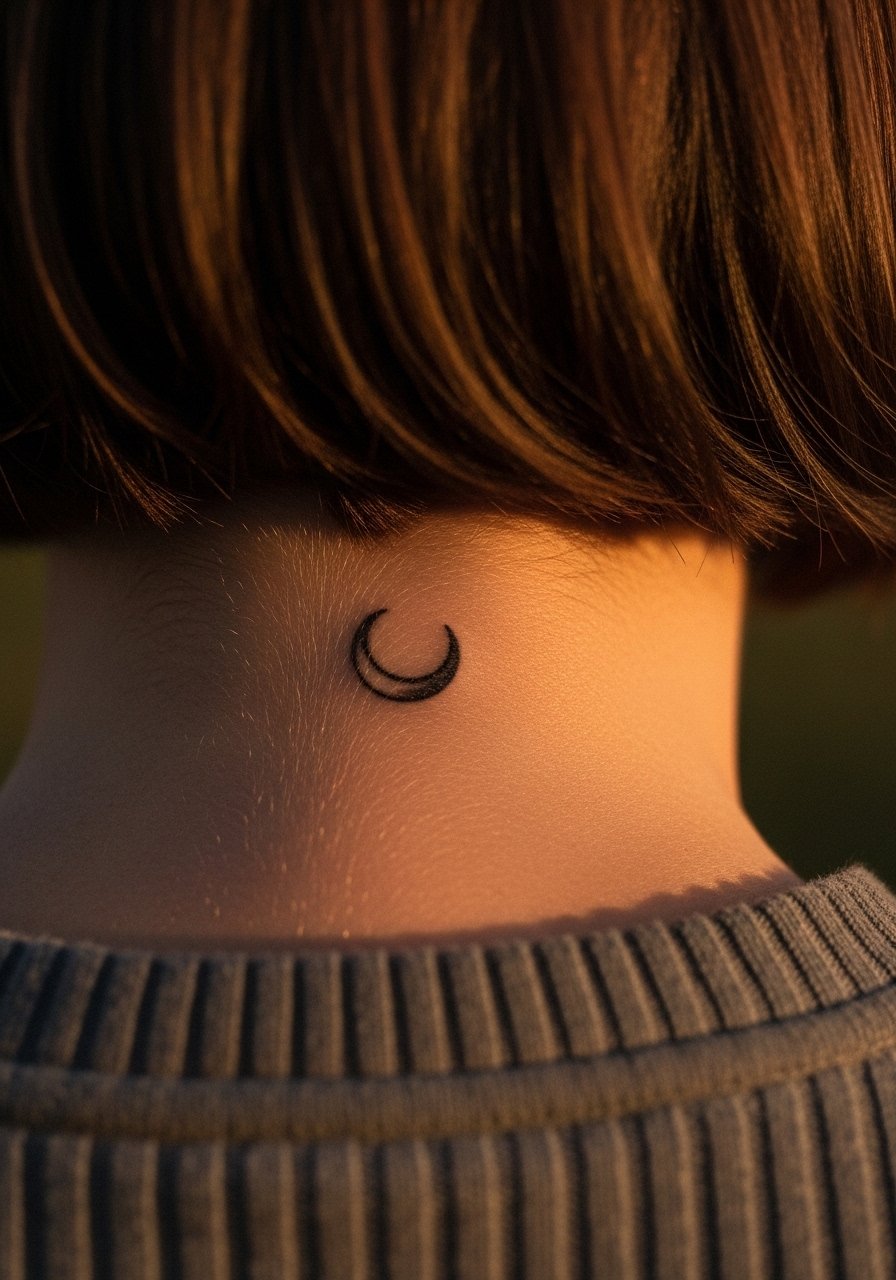
Style/Technique: Small, coverable mark
Pain Level: 3/10
Session Time: 0.25 to 0.75 hour
Best For: People who alternate hair up and down, or need easy cover
A nape tattoo is easy to hide with hair and subtle when shown. Keep it smaller than 2 inches so it sits within the hairline when you want privacy. Expect minimal swelling but plan to avoid tight collars while healing. This spot is a reliable low-friction choice for first-timers.
Mistake to Avoid: Choosing an overly detailed image that loses clarity under hair and over time.
10. Ankle, Vertical Motif
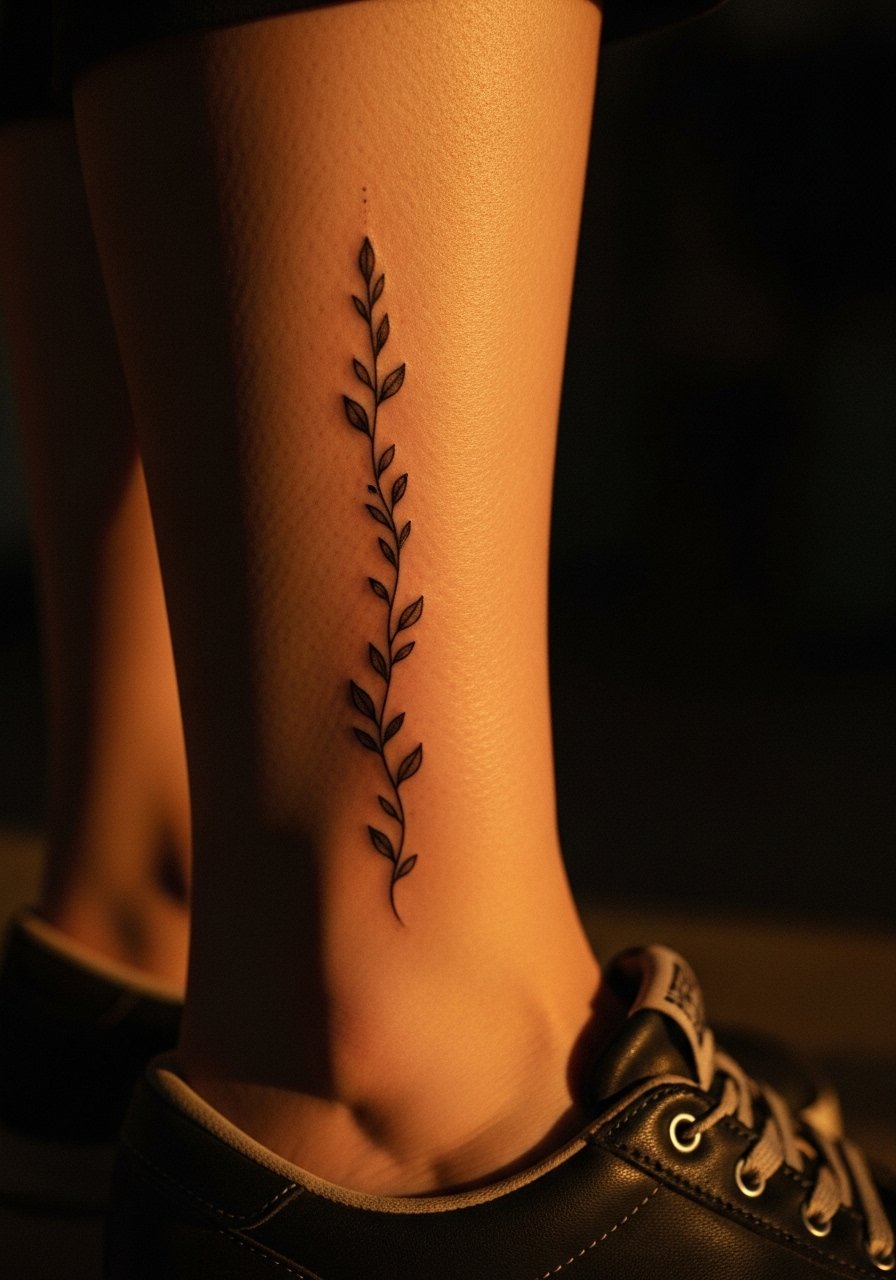
Style/Technique: Small vertical artwork
Pain Level: 4/10
Session Time: 0.5 to 1 hour
Best For: People who wear cropped pants or sandals
An ankle piece looks delicate but will meet socks and shoes, so situate art on the outer ankle rather than directly over the bone or tendon. Keep pieces less than 4 inches and avoid heavy color blocks. I like using 20 to 30 percent shading so the ink settles without needing dense packing that rubs during walks.
Mistake to Avoid: Positioning a design where straps or shoes will constantly abrade it during healing.
11. Calf, Long Vertical Piece
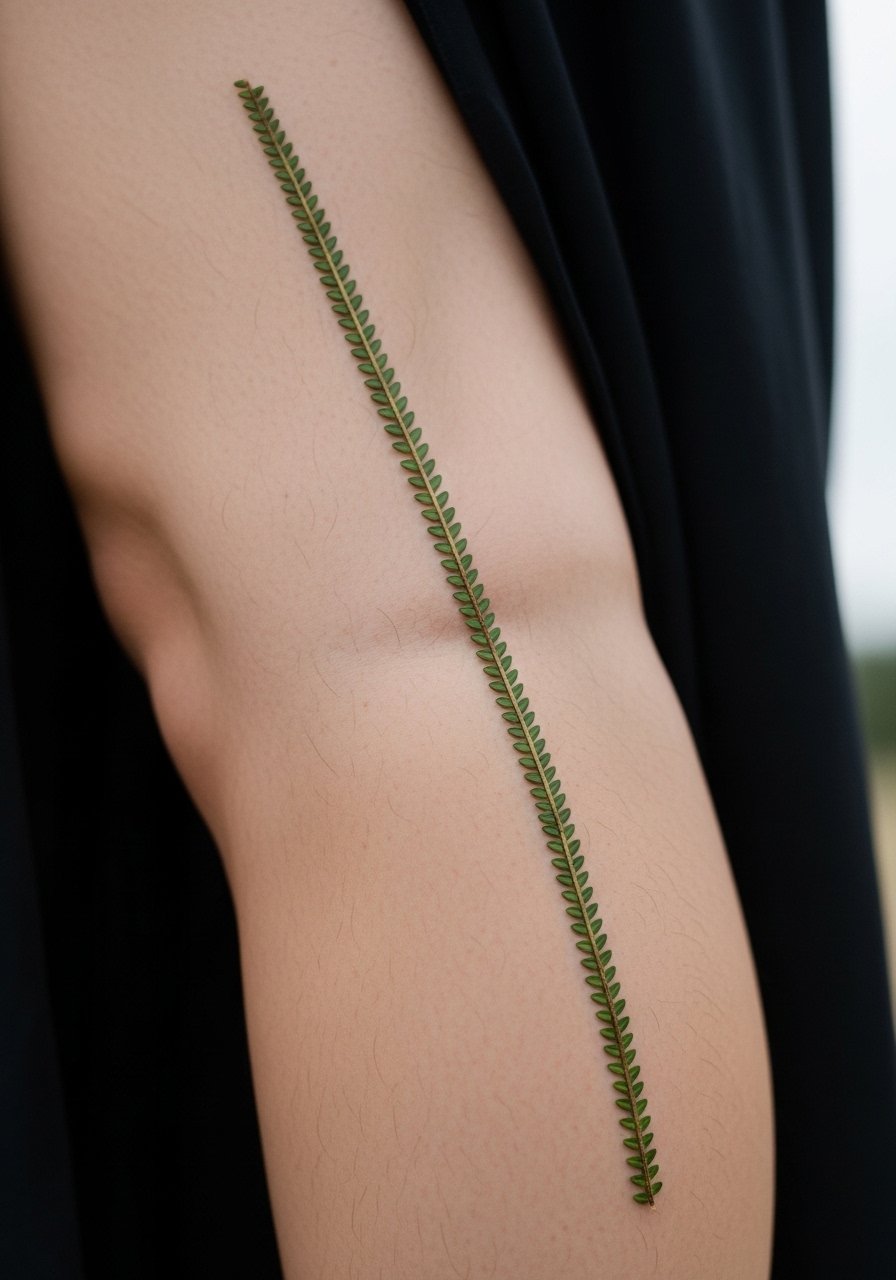
Style/Technique: Vertical botanical or script
Pain Level: 3/10
Session Time: 1 to 2 hours
Best For: Taller canvases and pants-friendly pieces
The calf is a resilient spot with room for 6 to 10 inch vertical artwork. It tolerates daily movement well, and sunscreens are easy to apply. For color saturation, the thicker skin accepts ink reliably. Consider how boots or high socks will interact during the first two weeks.
Mistake to Avoid: Picking a design that crosses the crease behind the knee. The pop of movement there can distort images.
12. Behind Ear, Secret Dot
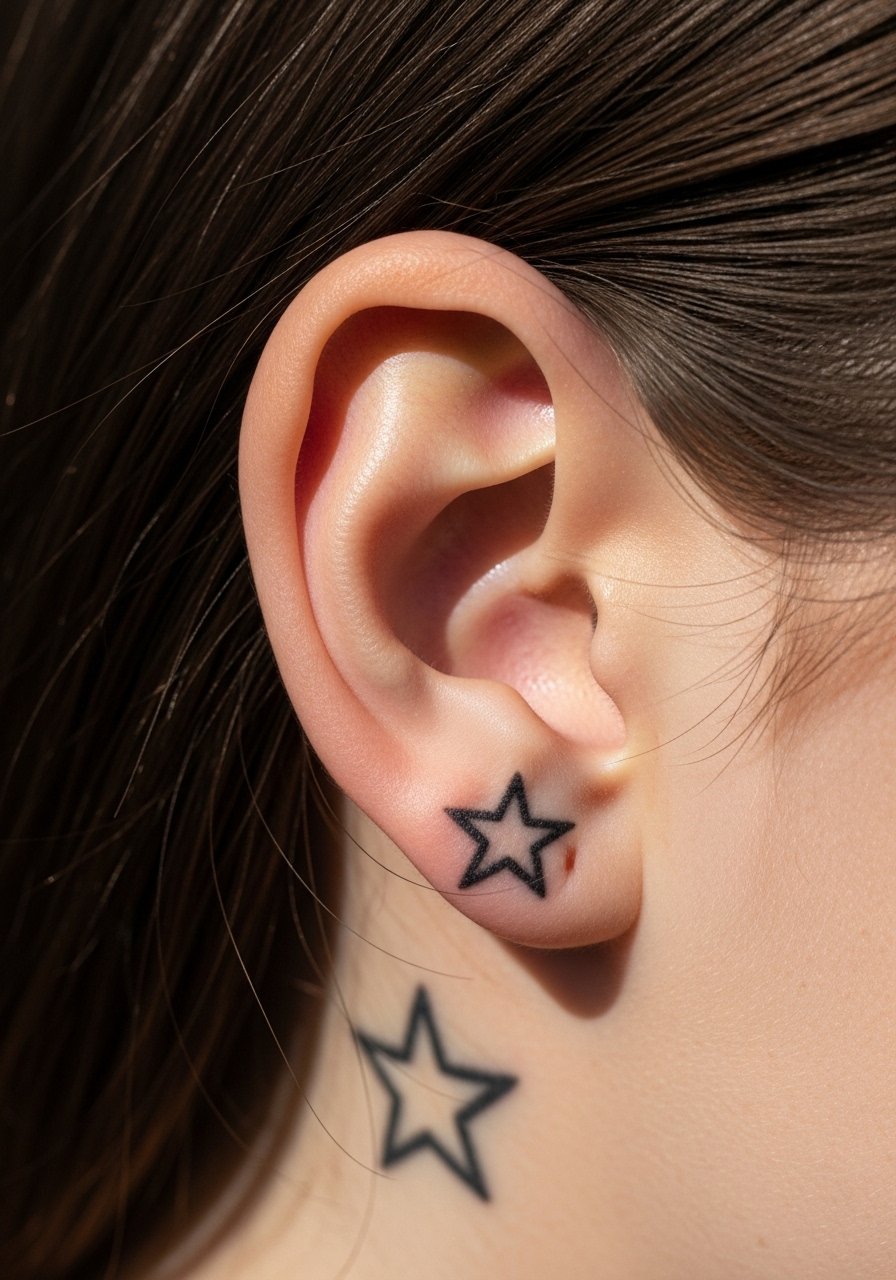
Style/Technique: Micro symbol
Pain Level: 5/10
Session Time: 0.25 to 0.5 hour
Best For: People who want sneaky details or ear jewelry complements
Behind-the-ear tattoos are tiny and intimate, often under 1 inch. Because the skin is thin and the area sensitive, shading should be minimal. They heal fast with basic care but can be slightly noisy during inking. These are great for accents that peek out with the right hairstyle.
Mistake to Avoid: Expecting heavy detail. Keep the motif simple to avoid lines spreading.
13. Sternum, Centered Statement
Style/Technique: Ornamental or small script
Pain Level: 8/10
Session Time: 1 to 2 hours
Best For: Pieces that peek under low tops, intimate placement
Sternum tattoos are bold and can be more painful because of thin skin and proximity to bone. Designs 3 to 5 inches across centered under the sternum follow natural curves and hold symmetry. Expect tenderness and extra care for chafing from bras. I recommend dividing larger projects into two sessions to manage comfort.
Mistake to Avoid: Packing large solid fills in the sternum during a single long session. Break it into parts to preserve line quality.
14. Side Rib Mini Scene
Style/Technique: Mini illustrative scene
Pain Level: 7/10
Session Time: 1 to 1.5 hours
Best For: Coverable art with movement-friendly layout
A mini landscape on the ribs uses the curve to create depth. Keep it within a 3 to 4 inch vertical band to avoid needing multiple sessions. The advantage is easy concealment under clothing and meaningful placements that read like a secret. Expect sensitive healing but strong visual payoff.
Mistake to Avoid: Choosing a wide panoramic piece that will stretch and distort when you move.
15. Shoulder Cap, Classic Placement
Style/Technique: Bold motif, classic placement
Pain Level: 3/10
Session Time: 1 to 2 hours
Best For: Easy-to-show or cover pieces, suits most body types
The shoulder cap is classic for a reason. It flatters many shapes and resists rubbing from clothing. Designs 3 to 5 inches here read well in photos and can extend into sleeves. I like a balanced ratio of 60 percent outline to 40 percent fill so the piece holds contrast while aging.
Mistake to Avoid: Centering a piece too far forward. Let the curve of the shoulder carry the design rather than flatten it.
16. Upper Thigh Inner, Private Art
Style/Technique: Private, sensual motifs
Pain Level: 6/10
Session Time: 0.75 to 1.5 hours
Best For: Coverable pieces, intimate designs
Inner upper thigh tattoos are easy to hide and heal behind loose clothing. The skin is softer, so pick simpler lines or gentle stippling to avoid blowout. This is a good spot for pieces 2 to 4 inches wide that you want to keep private but accessible for touch-ups.
Mistake to Avoid: Wearing tight underwear during the first week. Opt for loose, breathable fabrics.
17. Hand Back, Small Graphic
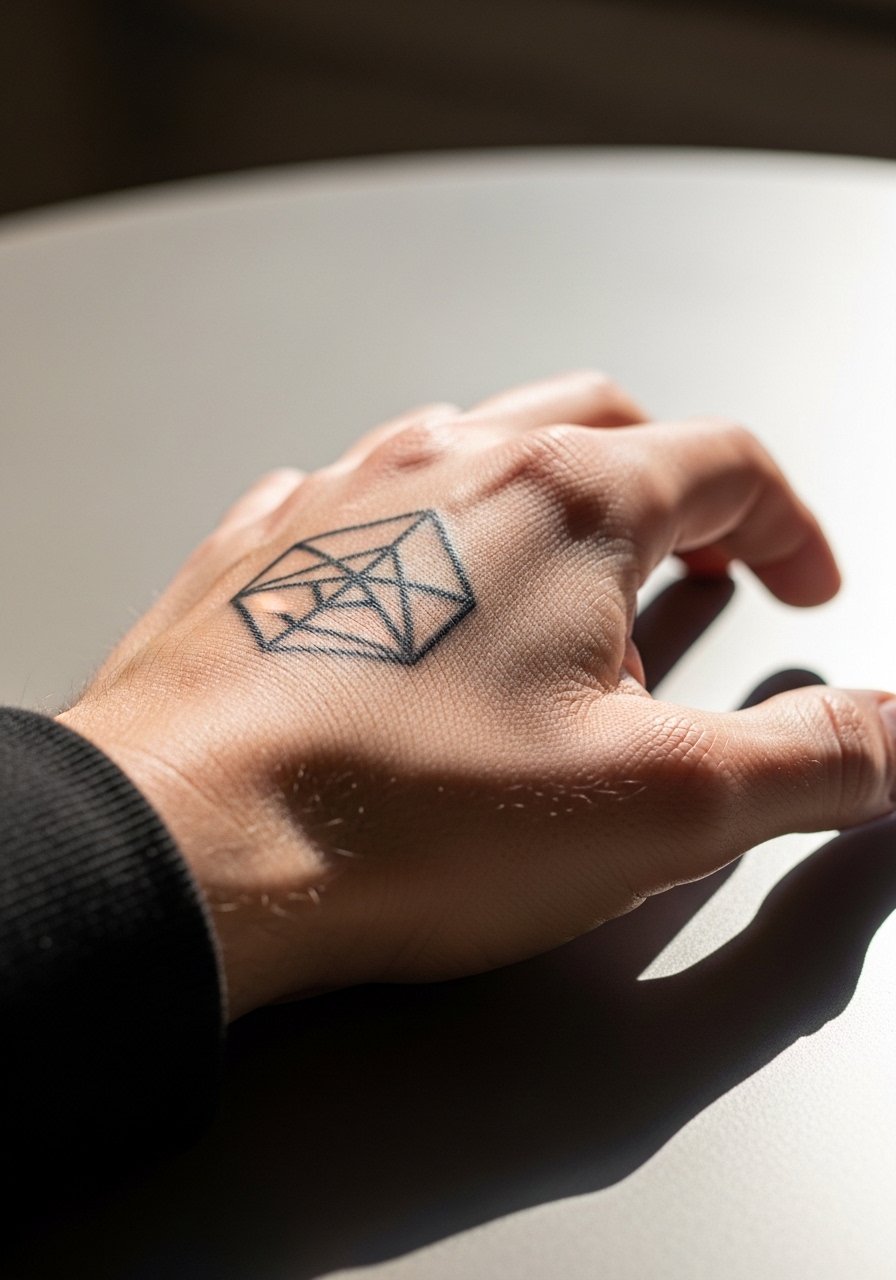
Style/Technique: Small graphic elements
Pain Level: 6/10
Session Time: 0.5 to 1 hour
Best For: Bold small marks, visible personal statements
Back-of-hand tattoos are very visible and will fade faster due to constant use. Choose thick lines, around 1.5 mm, and accept touch-ups as part of the plan. They are great for clear symbols but not for intricate shading. Think of them as wearable accessories that require maintenance.
Mistake to Avoid: Expecting fine shading to last. Opt for bold linework to improve longevity.
18. Foot Instep, Low Profile

Style/Technique: Thin line botanical
Pain Level: 5/10
Session Time: 0.5 to 1 hour
Best For: Seasonal show-offs, beach-ready pieces
Instep tattoos love sandals but suffer from shoe wear and water exposure. Keep designs smaller than 3 inches and avoid heavy fills. Healing slows if shoes rub the area, so plan barefoot-friendly downtime. For long-term care, sunscreen is essential once healed.
Mistake to Avoid: Scheduling a long walk or run soon after. Keep activity low for two weeks.
19. Sternum Side, Curved Script
Style/Technique: Curved script along natural lines
Pain Level: 7/10
Session Time: 0.75 to 1.5 hours
Best For: Personal statements that follow body lines
Placing script along the sternum side makes words feel like they belong to the body. Use thin, deliberate letterforms at roughly 2 to 3 mm height to keep readability. Watch for swelling and wear supportive clothing that does not press directly on the letters during healing.
Mistake to Avoid: Choosing overly ornate calligraphy that tightens when the skin moves. Pick simpler letterforms.
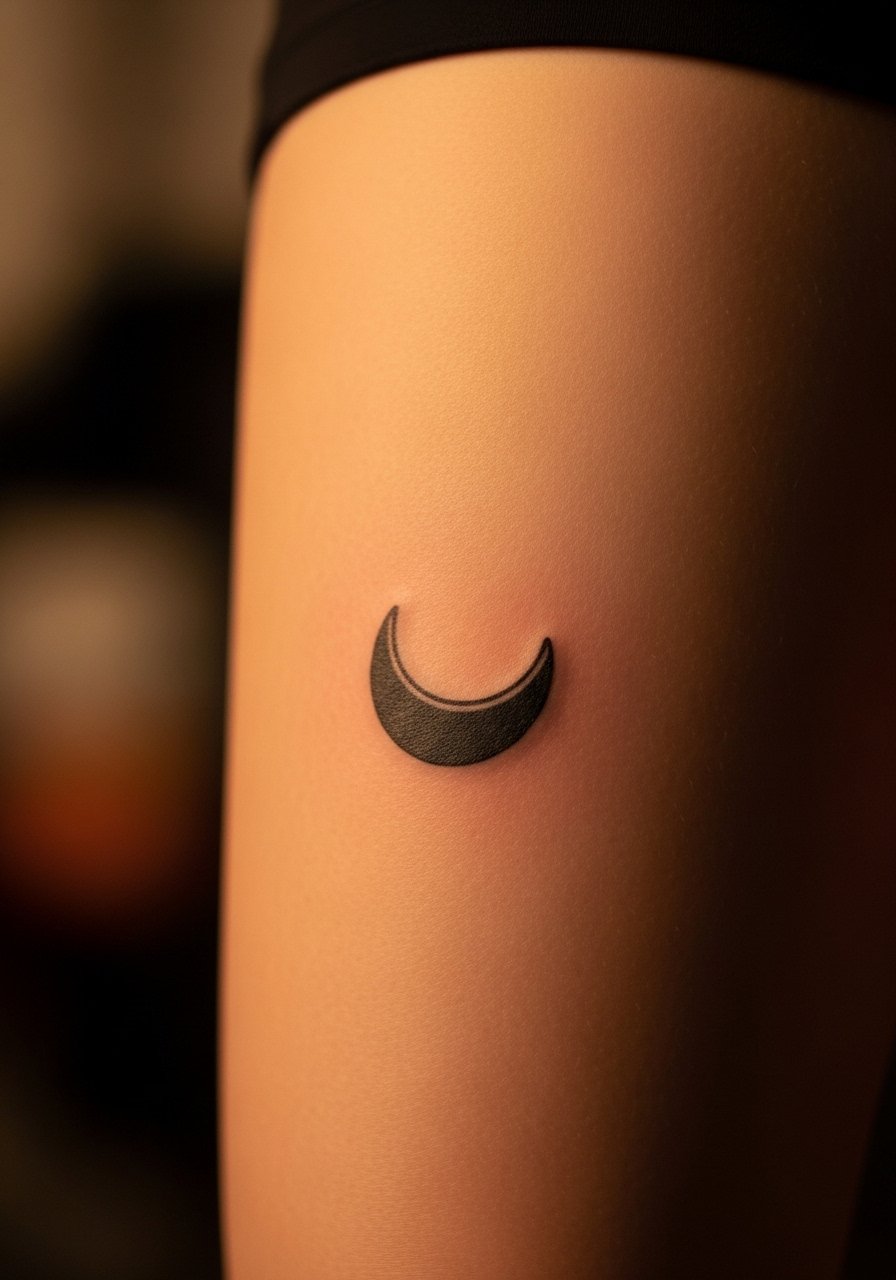
20. Hip Bone, Tiny Crescent
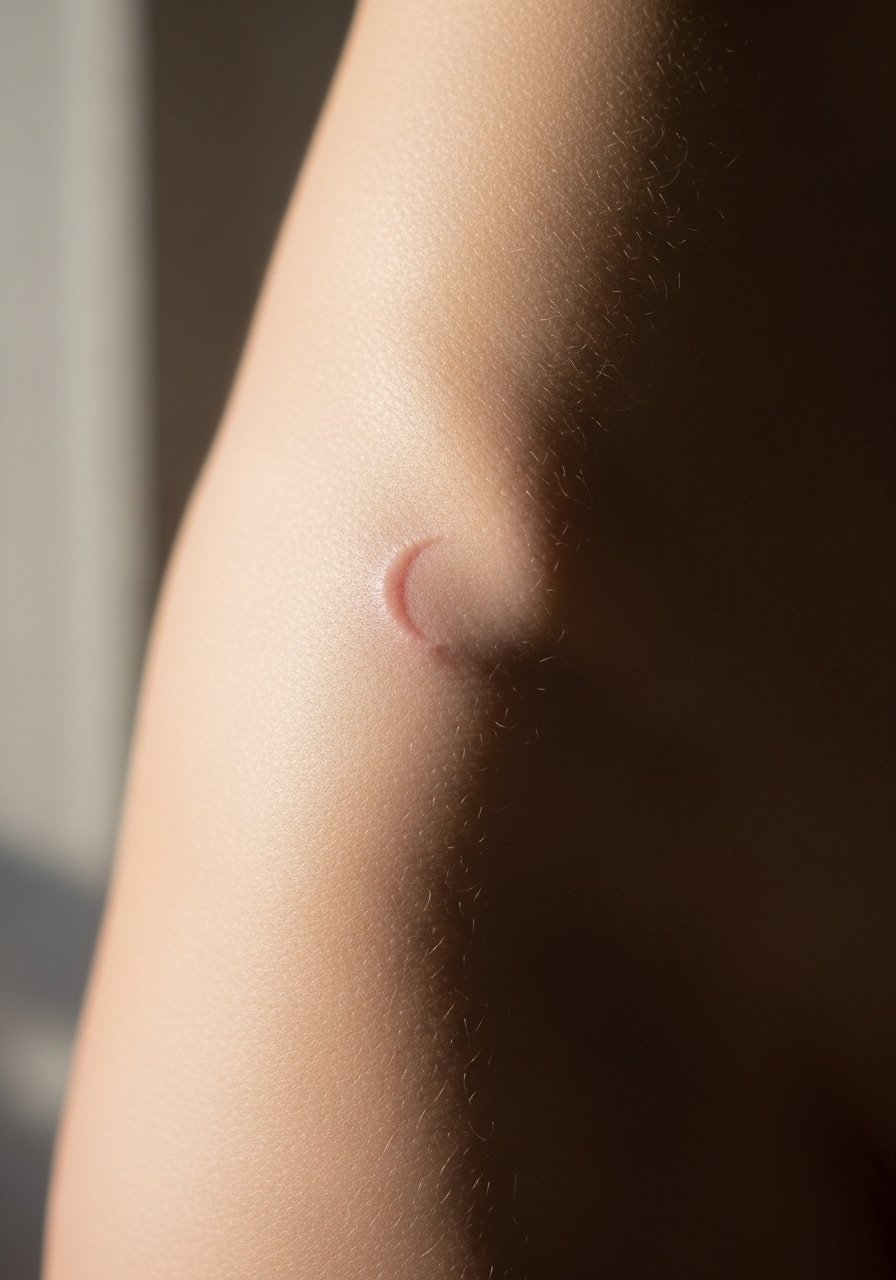
Style/Technique: Small crescent or mark
Pain Level: 4/10
Session Time: 0.25 to 0.75 hour
Best For: Pieces that peek out with low-rise pants or swimwear
The hip bone is a subtle place for tiny symbols and tends to heal cleanly if you avoid tight waistbands. Keep the mark under 1.5 inches and position to avoid direct contact with elastic. It is a quiet, personal place that photographs as a peek of personality.
Mistake to Avoid: Letting the waistband of pants run over fresh ink. Wear low-pressure clothing for a week.
21. Behind Knee, Small Panel
Style/Technique: Small ornamental band behind the knee
Pain Level: 6/10
Session Time: 0.75 to 1.25 hours
Best For: Unique placements that move with you
Behind-the-knee tattoos can look great but they sit on a mobile area that creases. Keep panels under 3 inches tall and expect longer healing because bending stresses the skin. I recommend light linework and minimal fill so the design ages with less risk of cracking.
Mistake to Avoid: Using heavy black fills in a crease area. It will crack and require early touch-up.
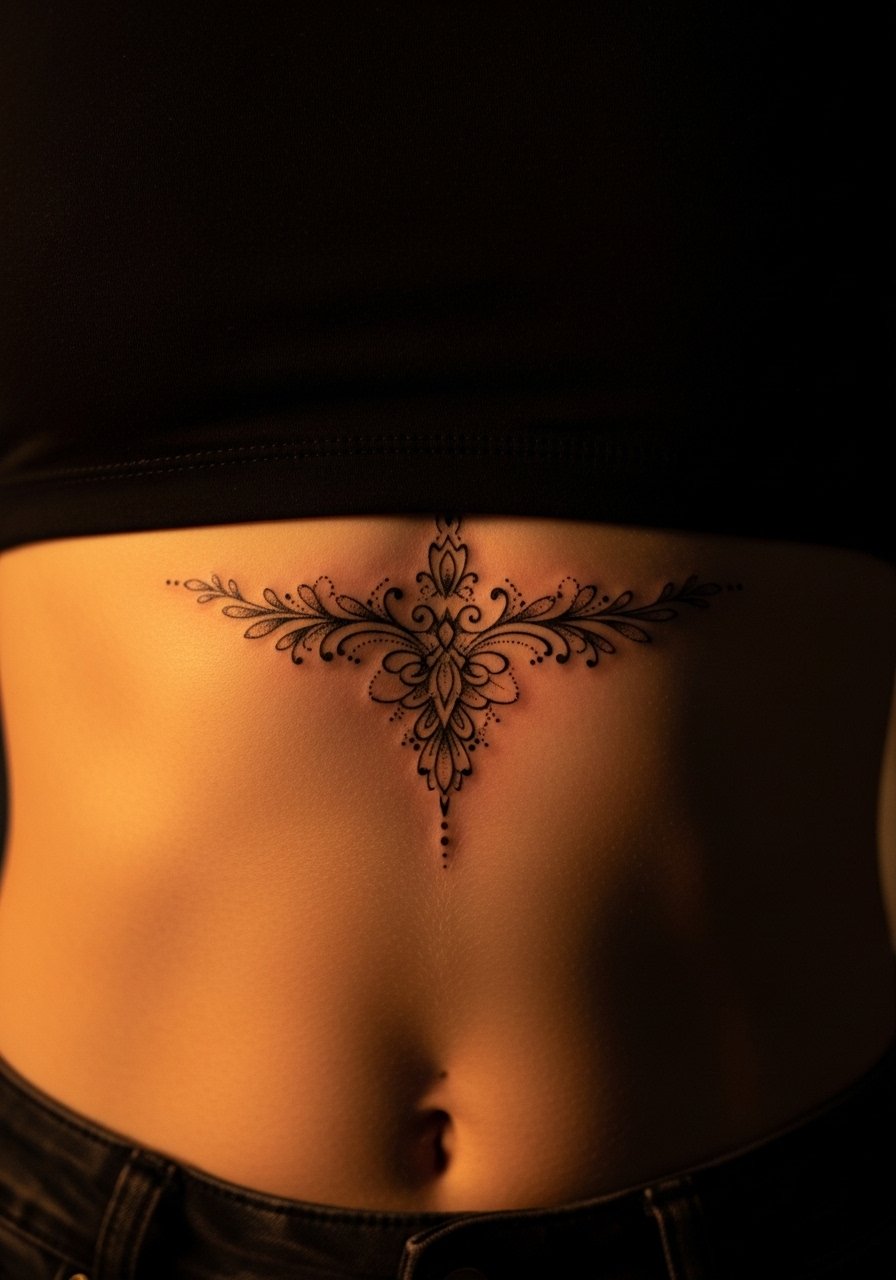
22. Lower Back, Horizontal Bar
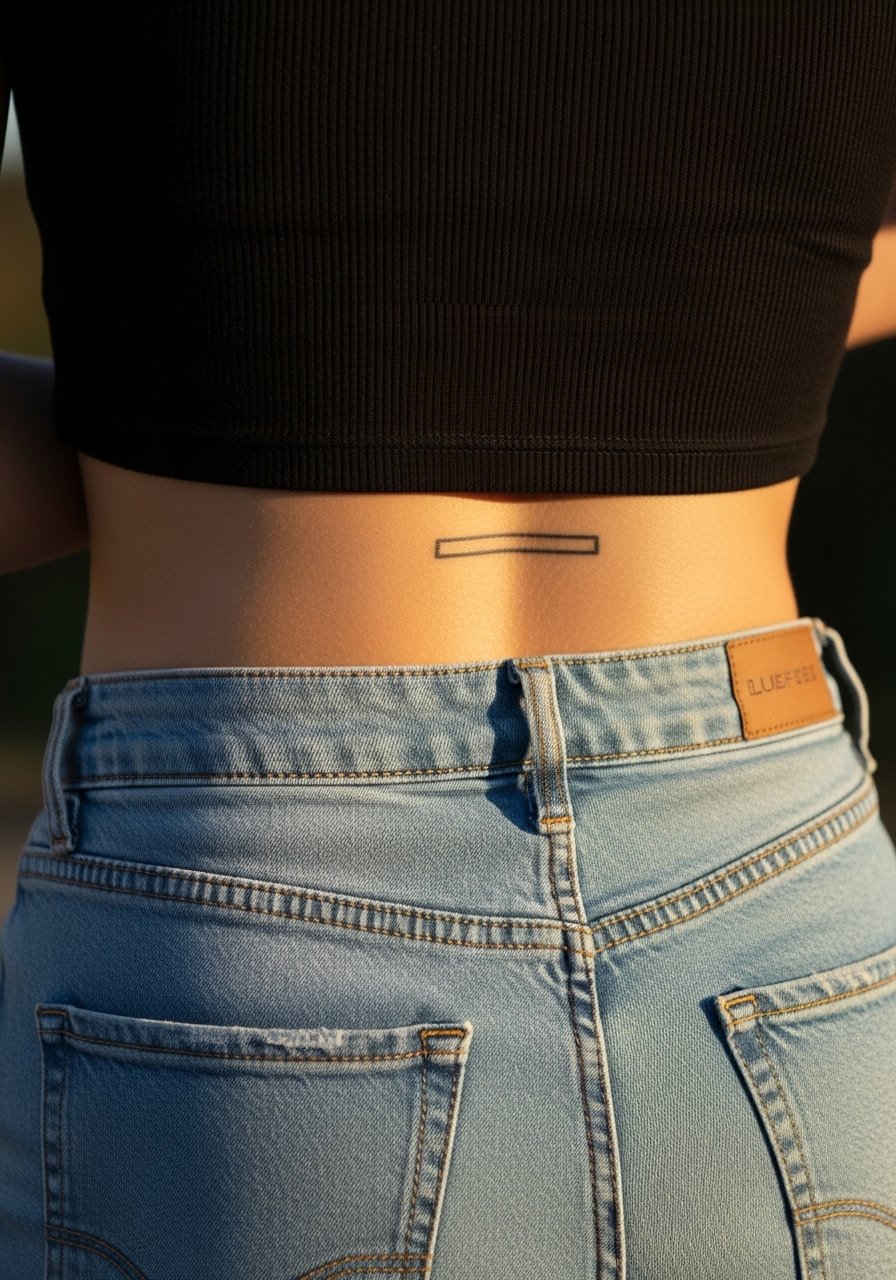
Style/Technique: Minimal horizontal element
Pain Level: 4/10
Session Time: 0.5 to 1 hour
Best For: Clean, low-profile accents that peek over waistlines
A slim horizontal line or small motif on the lower back is easy to hide and easy to show. Keep the width under 5 inches and centered with the spine to maintain symmetry. It is a forgiving area for small geometric pieces and rarely sees direct friction if your clothing fits normally.
Mistake to Avoid: Placing asymmetrically without checking how clothing sits on your hips. Measure first and mark with the artist.
23. Shoulder Blade Edge, Sliver Design
Style/Technique: Slim sliver or edge art
Pain Level: 4/10
Session Time: 0.5 to 1 hour
Best For: Pieces that peek under straps or when you turn
Edge placements along the shoulder blade are subtle and photograph well in motion. A sliver of art 3 to 6 inches long follows the shoulder blade and avoids constant friction. It is an approachable choice for someone building a back piece over time.
Mistake to Avoid: Extending a sliver too far inward. Keep it on the edge to maintain that peek effect.
24. Chest Pocket Area, Small Emblem
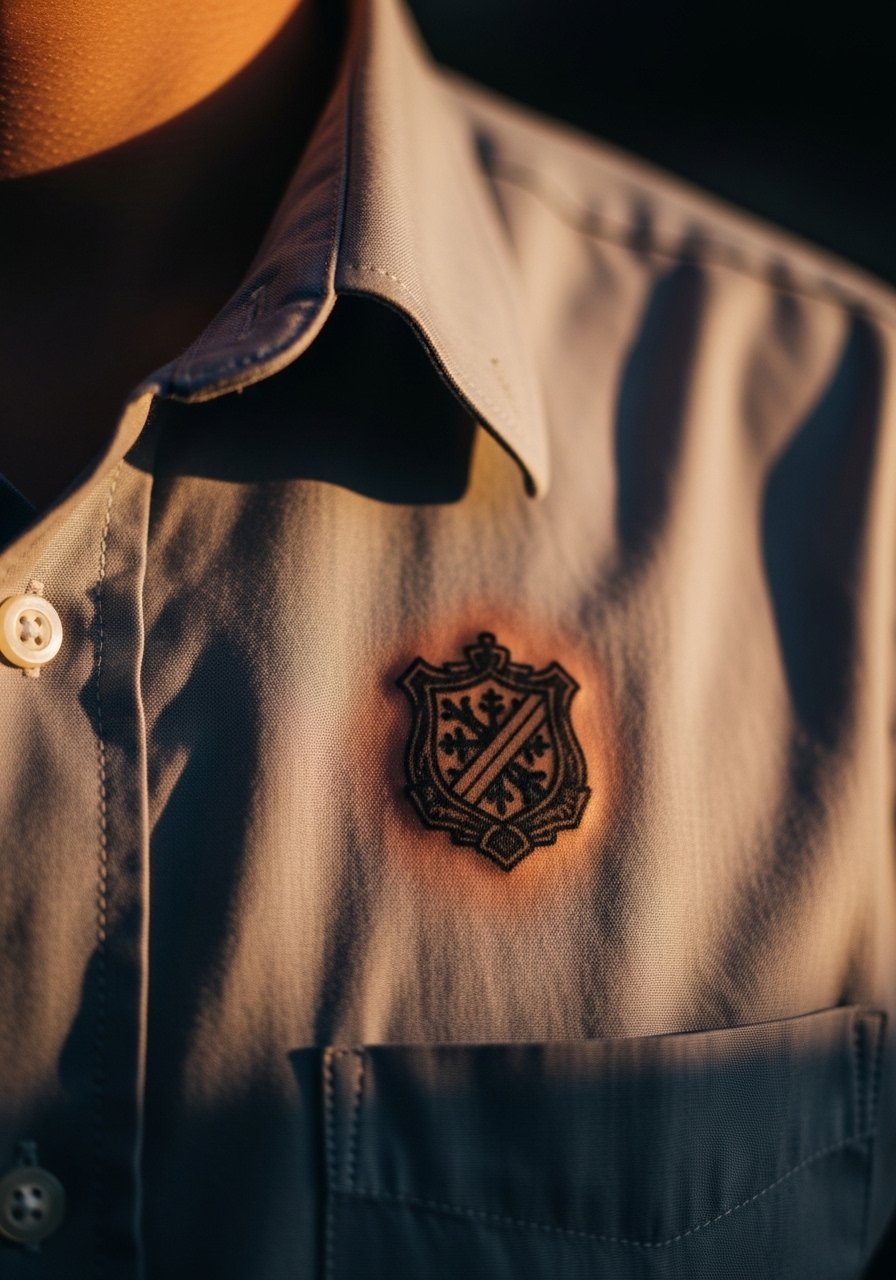
Style/Technique: Small emblem or crest
Pain Level: 5/10
Session Time: 0.5 to 1 hour
Best For: Wearable emblem near shirts and jackets
A small emblem over the chest pocket area reads intentional and easy to style. Keep it under 2 inches square and centered relative to your shirt pockets. This placement is great for logos, tiny florals, or initials. It also resists direct abrasion from bags and straps if placed thoughtfully.
Mistake to Avoid: Picking a detailed crest that needs high contrast to read. Simplify details for lasting clarity.
Your Aftercare Kit
- Honestly the best simple routine I kept. Unscented tattoo aftercare ointment (~$10-15). Use thin layers for the first three days.
- For gentle cleansing, mild fragrance-free soap, pack of two (~$8-12). Pat dry, do not rub.
- For sun protection once healed, broad-spectrum mineral sunscreen SPF 50 (~$12-20). Reapply after swimming.
- For clothing during healing, seamless cotton boxer-briefs or underwear, multipack (~$20-35) depending on pack size.
- For touch-up planning, sketchbook and fine-tip pen set (~$12-18). Bring reference notes to appointments.
- To soothe itchy healing skin, colloidal oatmeal body wash (~$9-15). Use lukewarm showers.
Aftercare Tips From Real Healing
Keep it covered for the first few hours. The right non-stick sterile dressing prevents early contamination and helps scabbing form cleanly.
Grab a pack of unscented cotton tees for post-session wear. Clean, loose shirts reduce friction and make showering easier.
Observation-first: I learned to apply a pea-sized amount of aftercare ointment so tattoos breathe and do not get smothered. Thin coats beat thick ones.
Contrast-first: Everyone thinks salt water will ruin early healing. Let swimming wait two to three weeks and use physical barriers rather than chemical tricks.
Format B link-first: A soft travel pillow can save you neck strain during longer sessions. Bring it for comfort and to help you sit still.
