
I kept ruining a good stamped design by rushing the base coat. I would slap on one thick swipe of color, try to stamp over it, and the image blurred like watercolor. One Saturday a tech who works at a salon downtown showed me to use two thin base layers, let them set for five minutes, then press the stamper with a light roll. The whole thing stopped looking homemade overnight.
These ideas sit between beginner and intermediate, most looks doable in 20 to 40 minutes once you have the kit. Budget-wise, expect to spend under $60 to assemble a reliable stamping setup, with a few nicer plates or polish shades pushing the total higher. These options work on short and medium nails, natural or gel-cured, and include notes for skill and dry time when it matters.
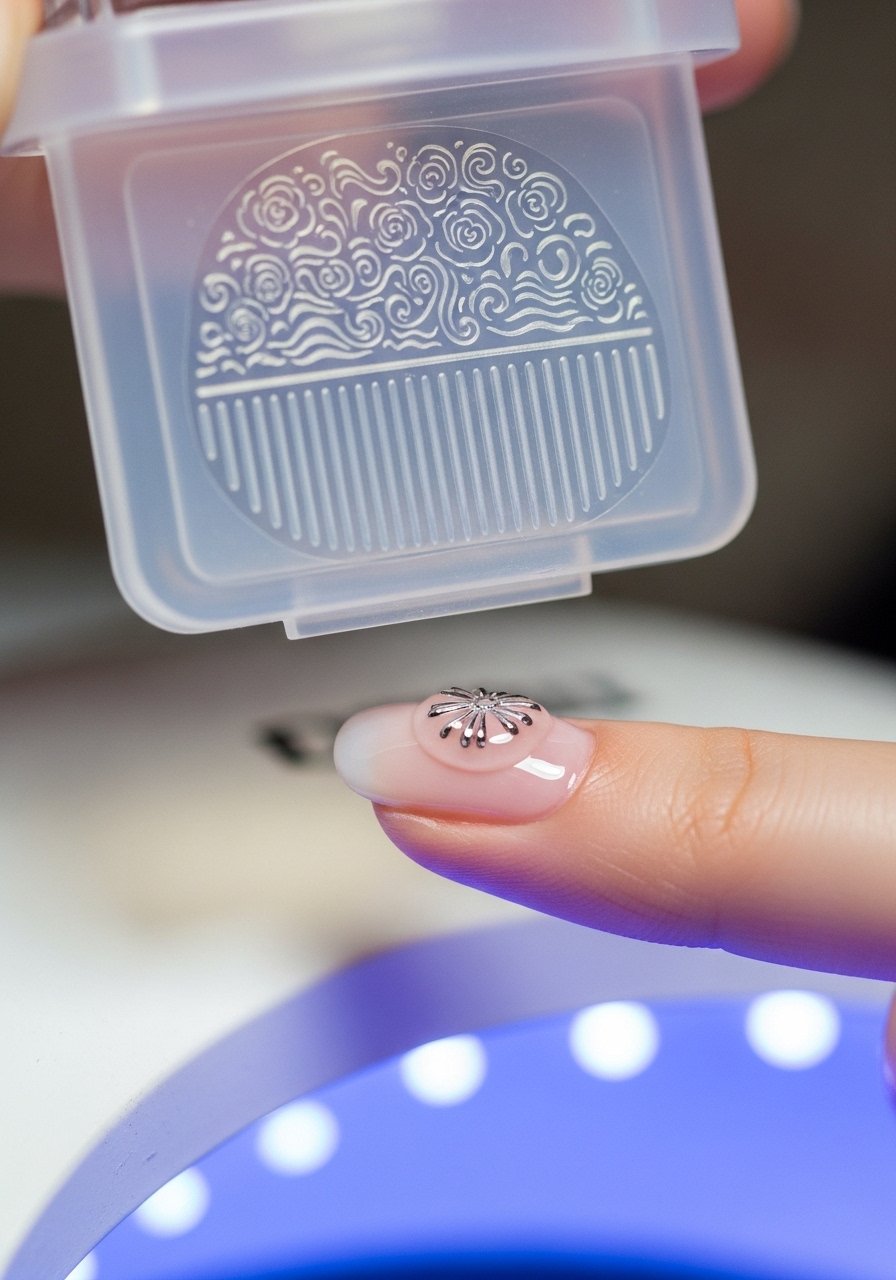
1. Reverse Stamping With a Glossy Drop Finish

Style/Vibe: Delicate floral, glossy
Best For: Short to medium nails, special occasions
Skill: Intermediate
Reverse stamping puts the painted detail on the stamper first, then seals it with a gloss coat so you place a crisp, raised design onto the nail. It is great for tiny detailed flowers or metallic accents that look three dimensional. Use a small nail art brush and a thin layer of top coat on the painted motif so it firms up, then gently press it onto tacky cured gel or a barely-dry regular base. Try a 2 second press and a soft roll toward the cuticle for even adhesion. I tested this across natural and gel nails and the technique translated.
Mistake to Avoid: Painting directly on the thumb-sized stamper without sealing the design first makes the motif smear when you transfer it.
2. Gradient Background With Silhouette Stamping
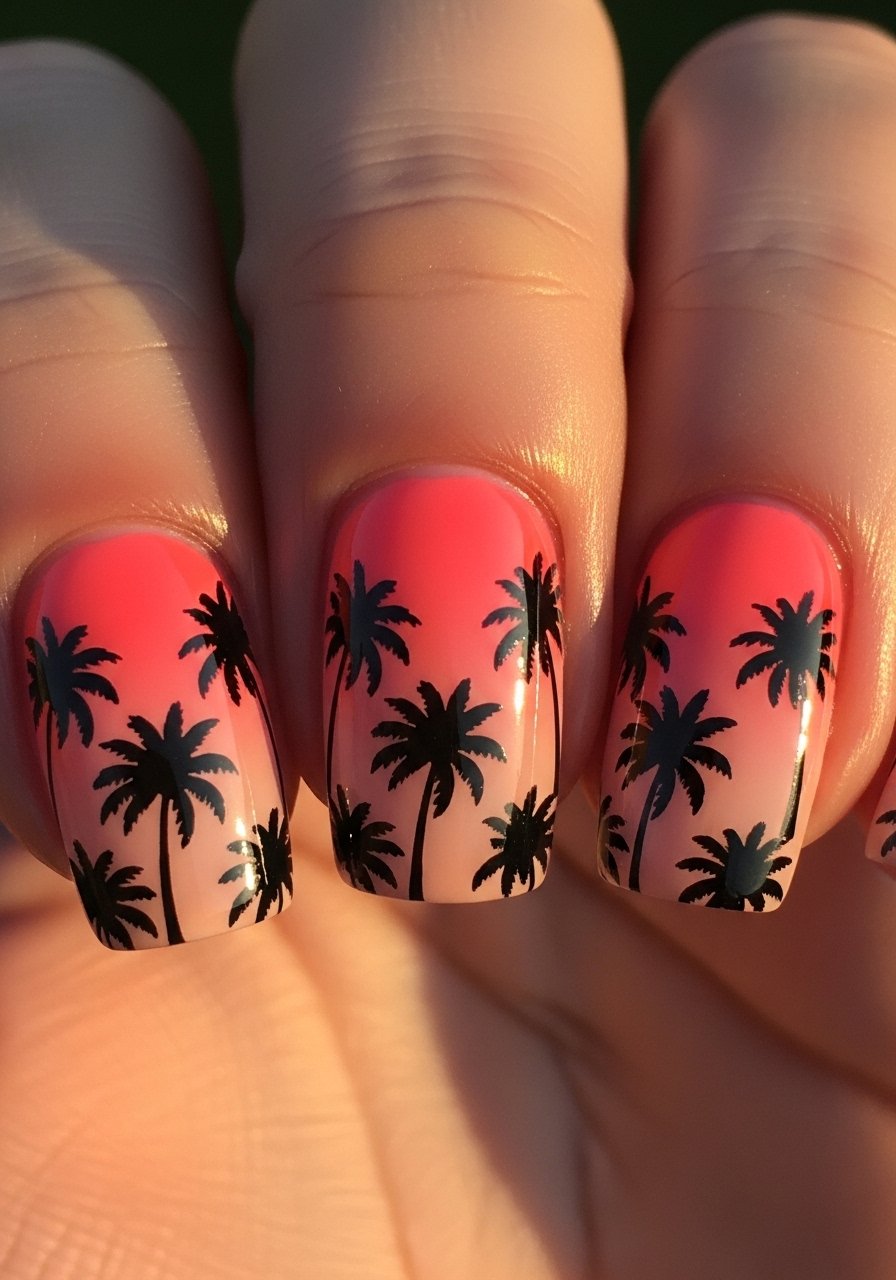
Style/Vibe: Beachy gradient with high-contrast motif
Best For: Medium to long nails, vacation looks
Skill: Beginner to intermediate
A sponge gradient base keeps stamping bold and readable. Use two thin coats of each color, dabbed with a makeup sponge, then let it dry fully. Use a dense black stamping polish for the silhouette and a firm scraper card to remove excess. Press the stamper down for about 1.5 to 2 seconds and roll once toward the cuticle. This works well when you want a showy background without complicated freehand. For shorter nails, pick simpler silhouettes to avoid crowded patterns. Pair with a fast-dry top coat to lock the contrast.
Mistake to Avoid: Trying to sponge over a still-tacky base, which drags color and ruins the silhouette.
3. Metallic Half-Moon Stamping on Negative Space

Style/Vibe: Modern metallic with negative space
Best For: Short nails, office-friendly statement
Skill: Beginner
Half-moon stamping uses a curved motif at the cuticle for a modern nod to retro moon manicures. Paint a sheer base, then use a metallic stamping polish to apply the half-moon shape. Pick a plate with small crescent etchings so the motif sits cleanly on a short nail. The look reads expensive with minimal effort. A medium-size clear stamper helps you align the curve against the natural lunula. Finish with a thin layer of top coat to avoid filling in the negative area.
Mistake to Avoid: Using a wide crescent that fills the whole cuticle, which erases the negative-space effect.
4. Tiny Allover Floral for Natural Nails

Style/Vibe: Subtle, garden-inspired
Best For: Short and medium nails, everyday wear
Skill: Beginner
Allover micro-stamping can make nails look polished and natural. Use a nude or sheer pink base, then stamp small floral motifs in white or soft brown spaced irregularly. The trick is to use thin layers of base polish and a quick-dry top coat to avoid smudging. For the most natural result, keep motifs small and rotate plates so repeats are not obvious. This is a great fix when you want pattern without commitment or long length.
Mistake to Avoid: Placing motifs in a strict grid, which reads stamped and mechanical instead of organic.
5. Tone-on-Tone Matte Stamping
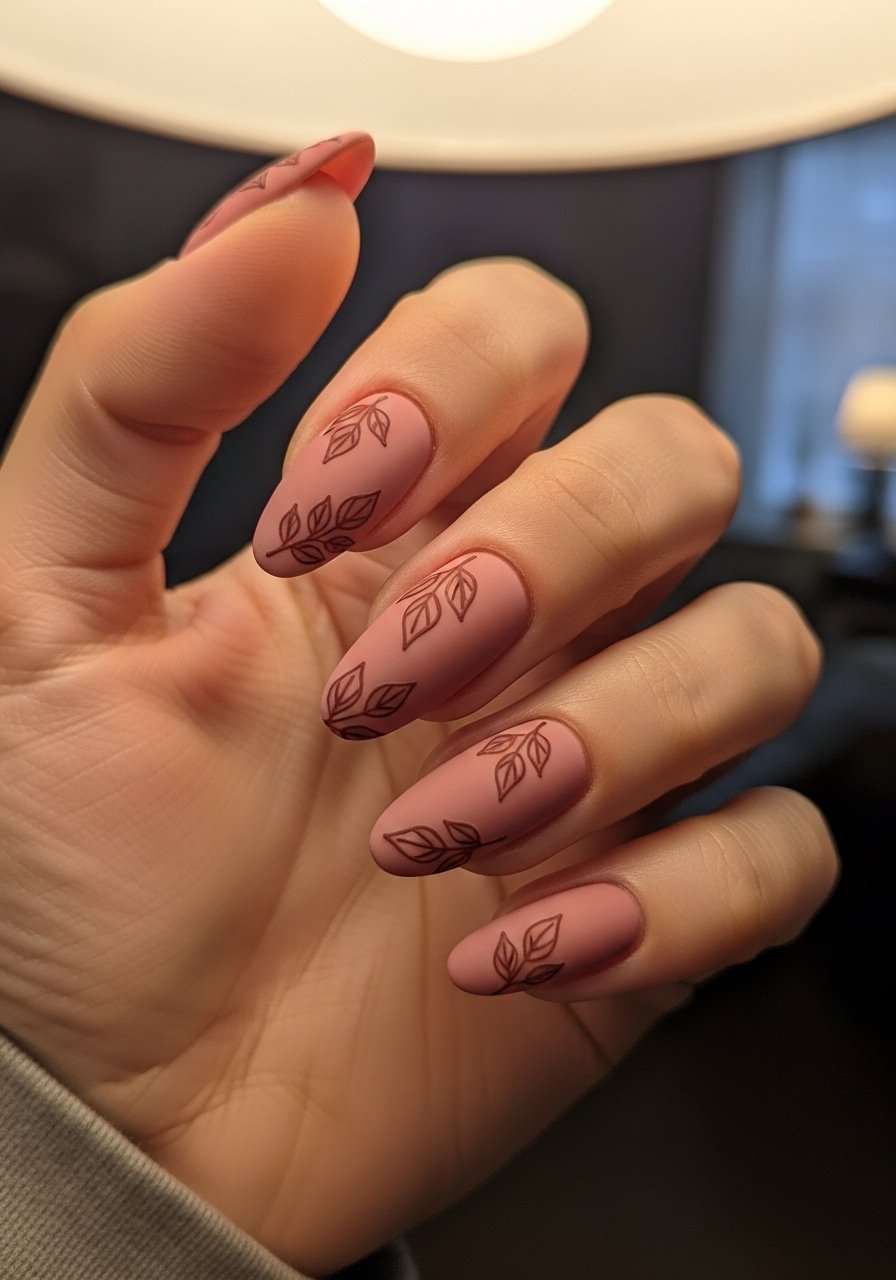
Style/Vibe: Subtle texture play
Best For: Medium nails, autumn palette
Skill: Intermediate
Tone-on-tone matte stamping uses a slightly darker or lighter matte polish for the stamp over a matte base, creating an understated texture. Apply a glossy base to get crisp transfer, stamp, then cure and buff lightly before finishing with a matte top coat. The result feels quiet and intentional. This method is great for work-appropriate looks and hides small chips better than glossy finishes. For best results press for around 2 seconds then roll once.
Mistake to Avoid: Stamping onto a fully matte fresh base, which can give patchy transfer and uneven finish.
6. Chrome Powder With a Crisp Black Stamp
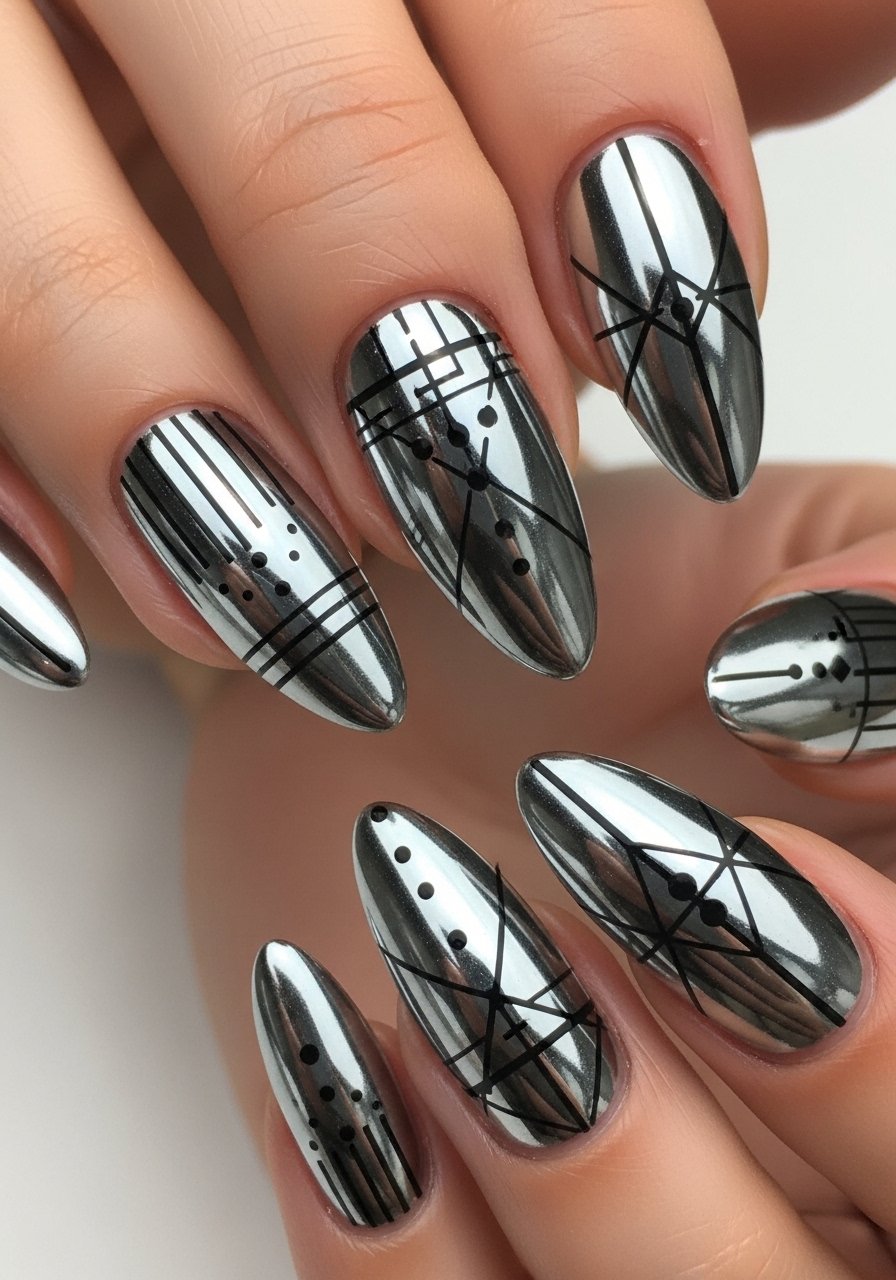
Style/Vibe: Futuristic with graphic detail
Best For: Medium to long nails, night out
Skill: Intermediate
Apply a black gel base, cure, then rub in chrome powder with a no-lint applicator to get a mirror finish. Use a thin top coat only on areas that will remain chrome so the stamped image sits on top where needed. A firm, clear stamper gives sharp transfer over chromes. Because chrome powders can lift if you overwork the surface, stamp lightly and then seal with two thin cured layers. This combo reads editorial and stays intact if you cure well.
Mistake to Avoid: Rubbing chrome powder over an uncured base, which wrings moisture and dulls the shine.
7. Glitter Placement With Clear Stamper Precision

Style/Vibe: Festive but controlled
Best For: Accent nails on medium or long lengths
Skill: Intermediate
Use a clear stamper to pick up a stamped outline, then fill the shape with a tiny dab of clear polish and place micro glitter or flakes precisely. This keeps glitter from spreading and looks like careful placement without hours of work. Use tweezers and a toothpick to nudge any stubborn pieces. A gel top coat cured in 30 to 60 seconds secures chunky bits and prevents snagging. This method is a competitors-miss because most tutorials skip precision placement.
Mistake to Avoid: Dumping glitter onto the wet top coat, which clogs and creates a bumpy finish.
8. Oversized Pattern on Short Nails for High Impact

Style/Vibe: Bold cropped pattern
Best For: Short nails, statement looks
Skill: Beginner
An oversized motif cropped at the edges makes short nails feel dramatic. Choose plates with big, bold etches and center a portion of the design on each nail instead of trying to fit the whole pattern. Use a medium clear stamper for placement accuracy and a slightly thicker stamping polish so the large area fills evenly. This is ideal when you want impact without length. It also solves the frustration of tiny motifs disappearing on short nails.
Mistake to Avoid: Trying to stamp the entire large motif, which crowds the nail and looks busy.
9. Retro Dot Matrix With Two-Color Layering
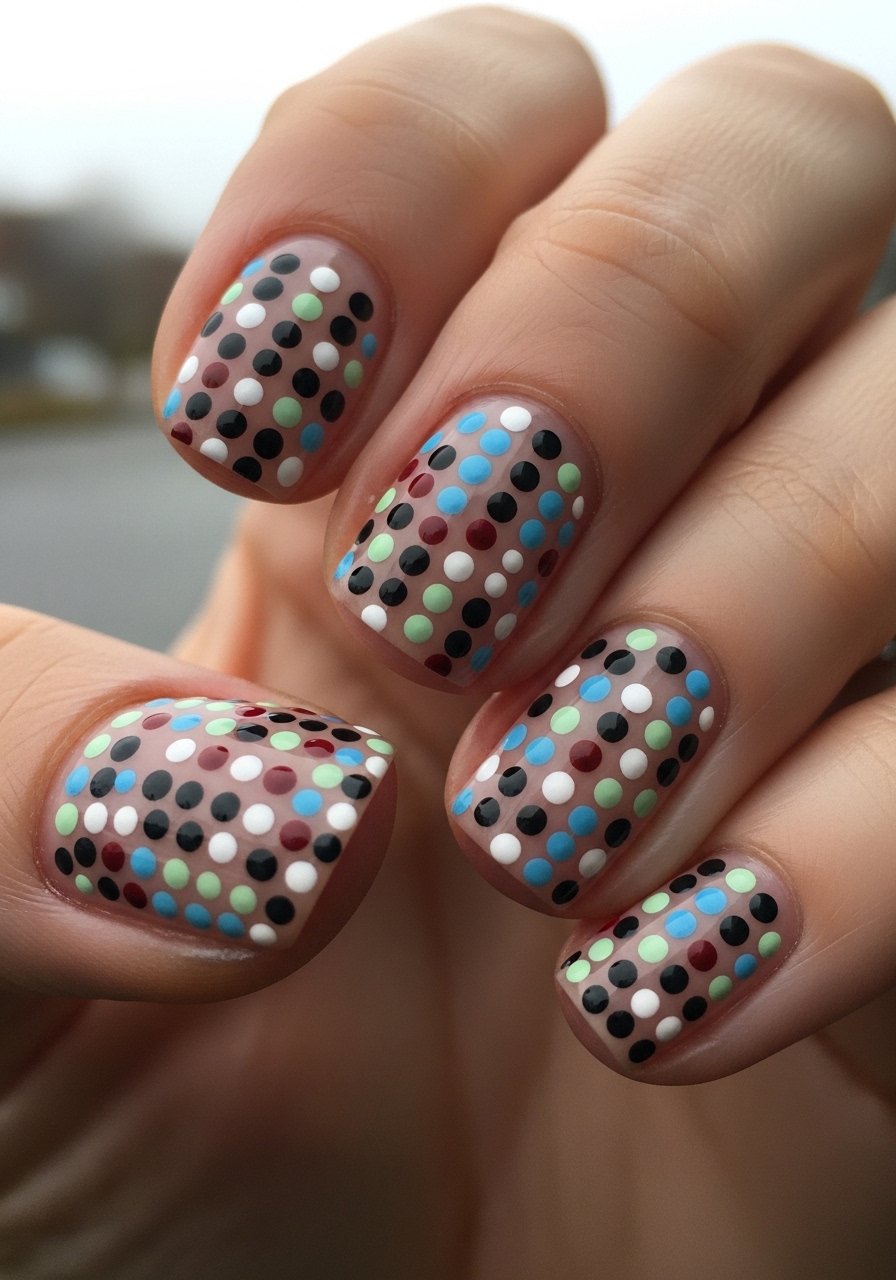
Style/Vibe: Retro graphic with modern colors
Best For: Short to medium nails, casual weekend
Skill: Beginner
Stamp a dot matrix in one color, let it set, then stamp a second color offset by two to three millimeters. The layered dots create depth without freehand. Use a firm plastic scraper and press the stamper firmly for 2 seconds to pick up tiny dots. This technique is forgiving if alignment is off by a hair. Choose contrasting finishes like glossy over matte for extra interest.
Mistake to Avoid: Attempting to layer without letting the first layer set, resulting in smudging.
10. Stamp Over Gel Before Final Cure for Extra Durability
Style/Vibe: Durable, salon-minded
Best For: Gel users, longer wear
Skill: Intermediate
When using gel, try stamping onto a tacky layer before the final full cure. A tech who works at a salon downtown recommended curing to a slightly tacky gel state for 10 to 15 seconds, stamping the image, then curing fully. The result is a stamped image that sits in the gel matrix and resists peeling. Test the timing on a swatch first. This trick helps when top coats tug at stamp lines.
Mistake to Avoid: Stamping onto a fully wet gel layer, which smears the image instead of embedding it.
11. Layered Stamping for 3D-Look Depth

Style/Vibe: Rich and dimensional
Best For: Medium to long nails, skilled mani fans
Skill: Advanced
Layer multiple stamps in graduated tones to create depth. Start with a pale background stamp, cure if using gel, then stamp progressively darker layers in the foreground. Use different plates for texture and a precise clear stamper for alignment. The key detail is drying time between layers and a light press of only about 1.5 seconds for upper layers to avoid obliterating the underlying image. This solves the flat-stamp look many tutorials miss.
Mistake to Avoid: Applying every layer with the same heavy pressure, which flattens the details.
12. Metallic Edge Stamping to Frame the Nail

Style/Vibe: Framed, jewelry-like
Best For: Short to medium nails, formal events
Skill: Beginner
A thin metallic frame around the edge reads like a tiny piece of jewelry. Use a fine-line etching on a plate and a metallic stamping polish. Line up the frame so it sits about 1 millimeter from the free edge; that spacing keeps the metallic from chipping. Finish with a flexible top coat to prevent edge lift. This technique fixes uneven free-edge shapes visually and makes nails look neat in photos.
Mistake to Avoid: Stamping too close to the edge, which causes early chipping and peeling.
13. Foil-Transfer Hybrid With Stamped Pattern

Style/Vibe: Luxe hybrid texture
Best For: Accent nails, medium length
Skill: Intermediate
Apply foil transfer adhesive to small zones, press foil for an instant metallic patch, then stamp a lace or text motif over it once set. The contrast between foil and sharp stamp reads high-end. Use a clear stamper so you can center the pattern on the foil area. Keep adhesive patches small to avoid foil flaking and seal with a gel top coat for extra bond. This approach pairs mixed textures that many articles do not cover.
Mistake to Avoid: Trying to stamp over unresolved foil adhesive, which lifts both foil and image.
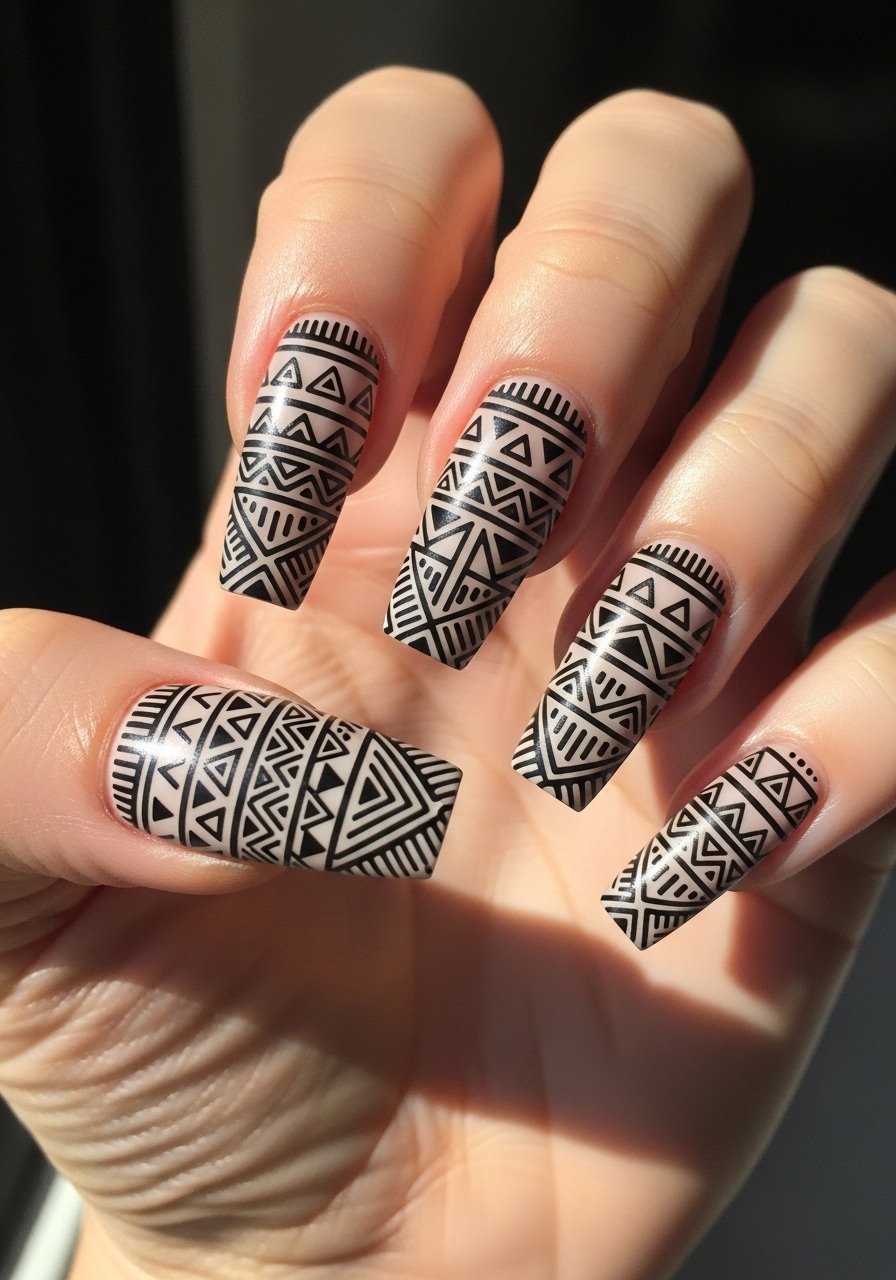
14. Edge-to-Edge Geometric Wraps for Long Nails
Style/Vibe: Continuous pattern, modern
Best For: Long nails, fashion-forward looks
Skill: Advanced
Choose plates with wraparound etchings for continuous side-to-side geometry. For long nails, stamp in two passes if needed, aligning the middle seam carefully. Use a flexible stamper head and slight roll to cover the contour. This gives a salon-level repeat pattern that looks custom. If you want a glued-on feel, seal with a thick base coat under the stamp and a thin top layer afterward.
Mistake to Avoid: Using a hard, small stamper that will not cover the nail curve, which causes breaks in the pattern.
15. Monochrome Micro-Detail for Work-Friendly Nails

Style/Vibe: Minimal and clean
Best For: Short to medium nails, workplace
Skill: Beginner
Micro-stamping in one color keeps nails understated and professional. Pick a neutral base like soft gray, taupe, or beige, then stamp small linear motifs in black or deep brown. The trick is thin coats so the motif sits cleanly. This idea solves the complaint of stamping looking too loud for work. A final thin top coat keeps lines sharp and prevents snagging on fabric.
Mistake to Avoid: Choosing a base too glossy and dark, which reduces contrast and makes tiny lines indistinct.
16. Lace Accent With Soft Sheer Base

Style/Vibe: Romantic and subtle
Best For: Short and medium nails, bridal or date night
Skill: Intermediate
Stamp delicate lace onto a sheer base for a refined accent. Pick a plate with fine etches and use a steady hand when scraping to avoid smearing. A tiny dot of gel-based top coat along the lace helps build dimension before a final seal. The look pairs well with neutral rings and soft fabrics. This fix answers people who complain that lace looks heavy or dated when scaled wrong.
Mistake to Avoid: Using thick stamping polish, which fills fine lace lines and loses detail.
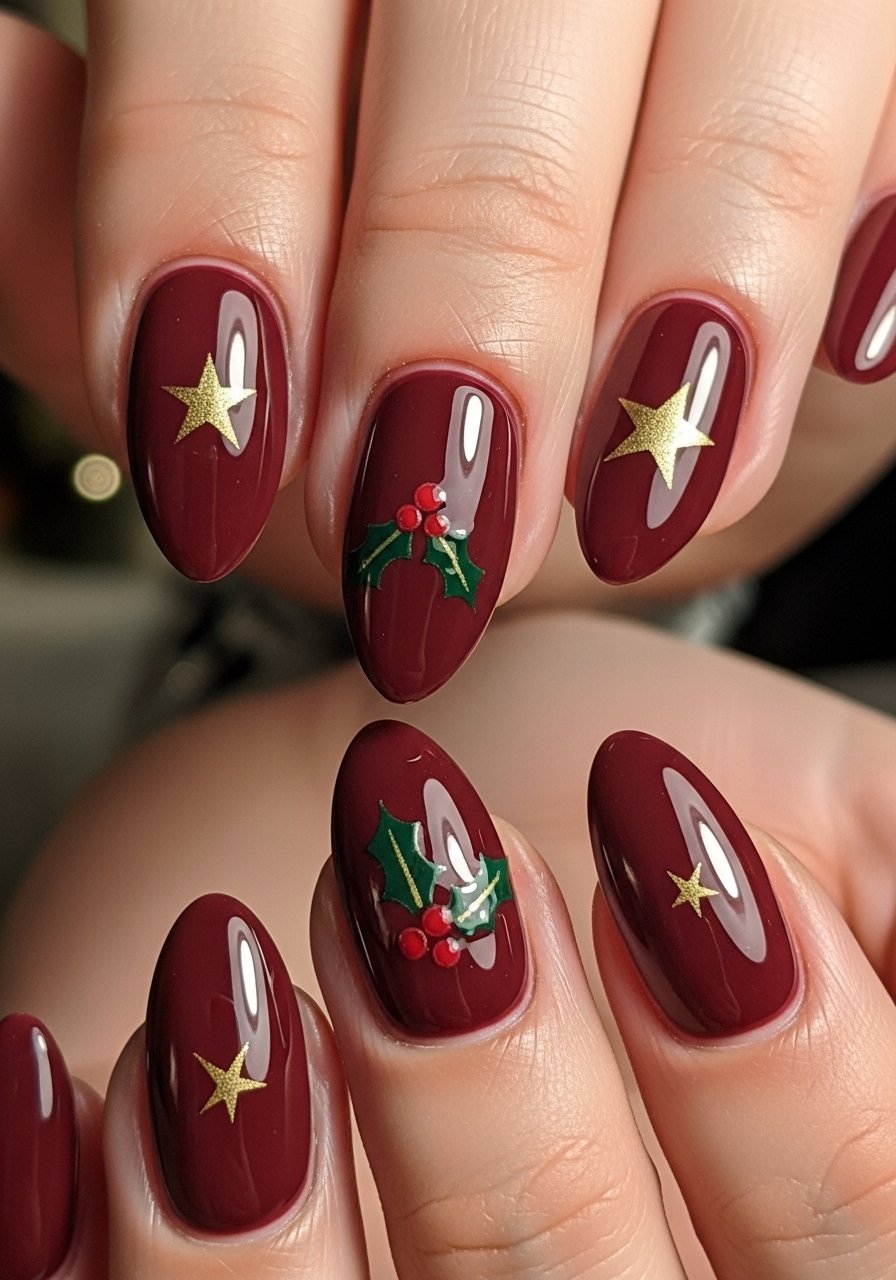
17. Holiday Motifs Simplified With One-Stroke Stamps
Style/Vibe: Seasonal and simple
Best For: Short nails, quick seasonal mani
Skill: Beginner
Holiday stamping can be quick if you choose single-stroke icons. Stamp one accent per hand rather than full coverage. Keep plates themed but scaled down and opt for metallic red, green, or silver stamping polishes for an instant festive look. This technique is perfect for people with limited time who want a nod to the season without obvious holiday overload.
Mistake to Avoid: Trying to stamp dense scenes on all nails, which looks busy and takes too long to finish.
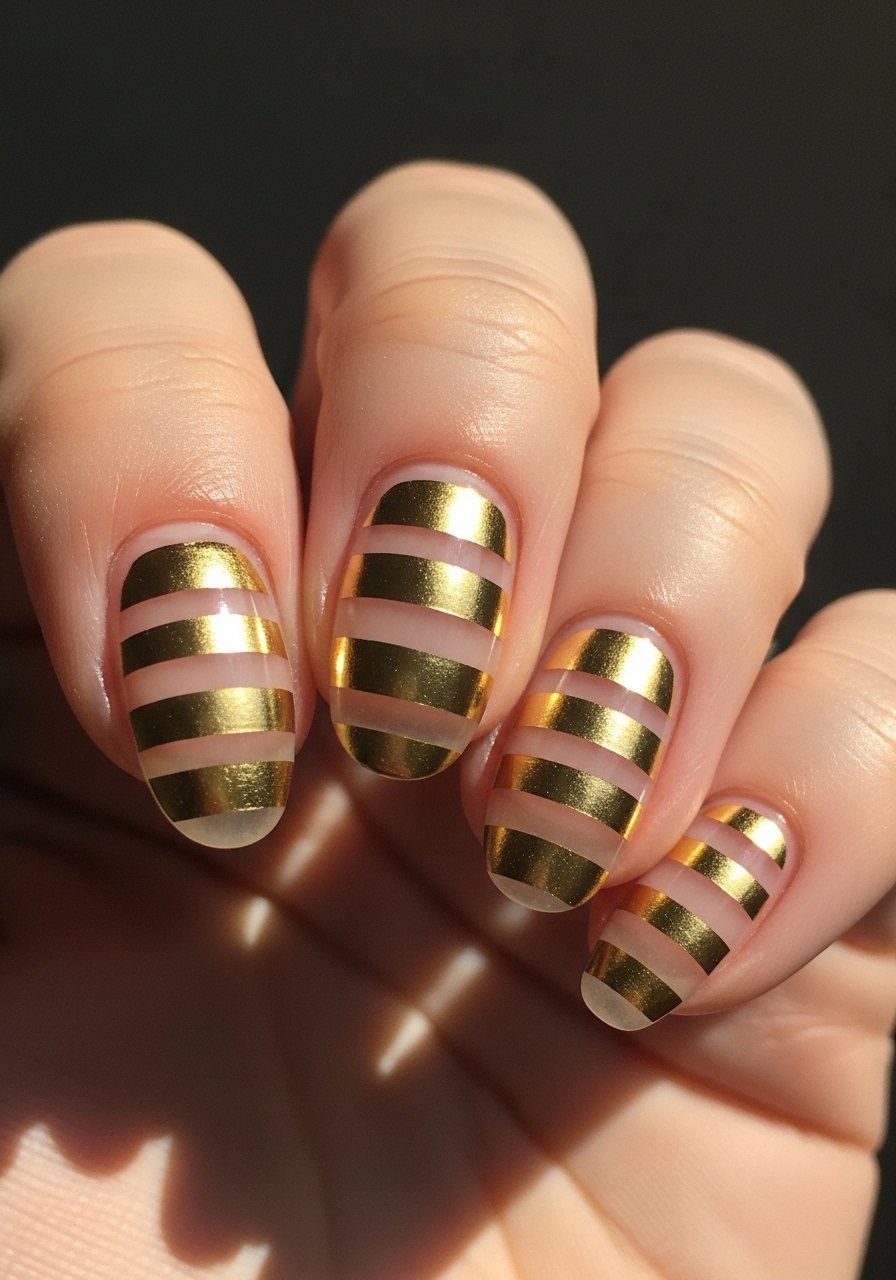
18. Negative Space Stripes With Metallic Fill
Style/Vibe: Graphic and modern
Best For: Short to medium nails, gallery-style looks
Skill: Intermediate
Create negative-space stripes by masking thin bands with tape, stamping metallic in the exposed stripes, then removing tape for sharp lines. Use a thin metal scraper and quick, firm press to avoid bleeding under tape. The metallic fill pops against the negative gaps and reads intentional even from a distance. This method makes stripes precise and avoids uneven freehand painting.
Mistake to Avoid: Removing tape too soon while polish is still wet, which drags the metallic into the negative area.
19. Mixed-Media Accents: Studs Anchored by a Stamp

Style/Vibe: Jewelry-adjacent accent
Best For: Medium nails, nights out
Skill: Intermediate
Stamp a delicate border, then press a tiny stud into a dab of gel or strong nail glue at the center. Cure if using gel, then top coat around the embellishment. This anchors hardware and prevents it from feeling like an afterthought. Use a small dotting tool to place glue and a tweezer to position studs. This approach is one of the competitor gaps because many guides show studs or stamping but not how to combine them cleanly.
Mistake to Avoid: Gluing studs directly onto the top coat, which lifts them when the coat peels.
20. Quick-Stamp Setup for Weeknight Manis

Style/Vibe: Fast and accessible
Best For: Short to medium nails, busy schedules
Skill: Beginner
Keep a tiny kit with one versatile plate, a medium clear stamper, a black stamping polish, and a fast-dry top coat for quick weeknight stamping. Prepped nails with two thin base coats and a 60-second drying window let you stamp in 10 minutes. I tested this routine across three weeknights and it saved time without looking rushed. Good for people who want pattern without a salon trip.
Mistake to Avoid: Carrying too many tools for a quick job, which increases setup time and stress.
21. Freehand Touches Over a Stamped Base

Style/Vibe: Hand-finished stamped base
Best For: Medium nails, creative hobbyists
Skill: Intermediate
Stamp the main motif, then add small freehand lines or dots with a 0.5 mm brush to personalize the pattern. This makes the mani look customized and hides micro-sheeting or gaps. Use acrylic paint or thin polish for quick drying. It is a neat way to bridge stamping with hand art for people who feel stamping is too mechanical.
Mistake to Avoid: Overworking freehand details, which can clutter the stamped design.
22. Stamping on Acrylized Surfaces for Sculpted Looks

Style/Vibe: Sculpted salon finish with pattern
Best For: Acrylic or sculpted long nails
Skill: Advanced
Stamping on acrylic requires a flat surface or very light rolling with a flexible stamper to follow slight curvature. Press gently and avoid heavy scraping that drags. Seal the stamped image under a thin gel layer before normal top coat to lock it into the acrylic surface. This approach is ideal when you want the durability of acrylic with pattern detail.
Mistake to Avoid: Using the same pressure as on natural nails, which will warp the acrylic or split the image.
23. Quick Fixes for Common Stamping Problems
Style/Vibe: Troubleshooting practical
Best For: All nail lengths and skill levels
Skill: Beginner
If your stamp smudges, check three things: base dryness, stamper tack, and polish viscosity. A lightly tacky stamper often transfers better than an overly sticky one. Clean plates with 90 percent isopropyl alcohol or an acetone wipe, but wipe in one direction to avoid streaks. Press for about 2 seconds and roll once. I was shown this workflow by a tech who works at a salon downtown and it fixed my worst smudges.
Mistake to Avoid: Repeatedly stacking thick top coats to hide smudges, which only leads to more drag and chipping.
Your Nail Kit
Honestly the best $14 I have spent, clear silicone stamper medium ($12-16). It helps with alignment and works across short and medium nails.$6-12). The thinner edge pulls polish cleanly.
For scraping, flexible metal scraper set, 2 pieces (
A reliable polish for stamps, black-stamping-polish-cream-finish ($8-15). Dense pigment matters more than brand for crisp lines.$7-10). Great for adding tiny freehand details after stamping.
Small dotting-tool-set-5-piece (
Assorted-stamping-plate-set-of-10 ($12-25). Mix of florals and geometrics covers most looks.$8-14). Use a thin final layer to avoid drag.
Fast-dry-top-coat-15ml (
No-lint-micropore-wipes-pack-50 ($6-9). For plate cleaning and prep.$12-20). For embedding studs and foil.
Clear-gel-top-coat-15ml (
Mirror-chrome-powder-mini-set ($7-15). For chrome backgrounds before stamping.$9-18). For reverse stamping and touch-ups.
Precision-nail-art-brush-set-8-piece (
Gold-stud-mix-100pcs ($5-9). Small hardware that anchors accents.$4-8). For plate cleaning and decomposing sticky residues.
Top-quality-acetone-8oz (
Practice-nail-tip-wheel-50pcs (~$6-12). Test press times and pressure before working on real nails.
Nail Tips That Save a Mani
Thin coats beat one thick coat every time. Three thin base layers dry more evenly and hold stamped details better than one gloopy coat, try quick-dry base for faster work.
Keep a small roll of painter’s tape handy. Use strips to mask negative spaces, then stamp metallic fills in the exposed area for crisp edges. I use blue-painter-tape-1-inch for consistent spacing.
If your stamper is too bouncy, freeze it for five minutes and try again. A slightly firmer head picks up thin-line etches better. Silicone-stamper-cover-medium is a cheap fix.
Curing tip: when using gel, partially cure to a tacky state before stamping, then fully cure after placement. It embeds the motif and reduces lifting. I learned this workflow after trying these steps across three gel sets.
Clean plates with a cotton pad and high-purity alcohol in one direction to avoid smear marks. Isopropyl-alcohol-99percent-16oz is indispensable.
If a top coat drags your stamp, wait an extra 60 seconds then apply a thinner layer. Try a brush-on-fast-dry-topcoat-7ml that lays down smoothly without pulling.
