
I kept picking designs that looked sharp on my phone and blurred within a year. After a few touch-ups and one angry sunburn, I learned that a tiny tattoo is not a shrunken full-sleeve. Line weight, placement and how often you sunbathe matter more than the image. I stopped chasing detail and started thinking about scale and motion, and everything healed cleaner.
These ideas aim for quiet, wearable looks that heal well and read clearly at a glance. Most of these cost under $200 for a single session. They work for coverable placements and for wrists, ankles, behind the ear, and fingers. Across five shops I have visited, artists recommended simpler lines for longevity. If you need something work-friendly, focus on placements you can hide with sleeves or jewelry.
1. Tiny Single-Needle Line
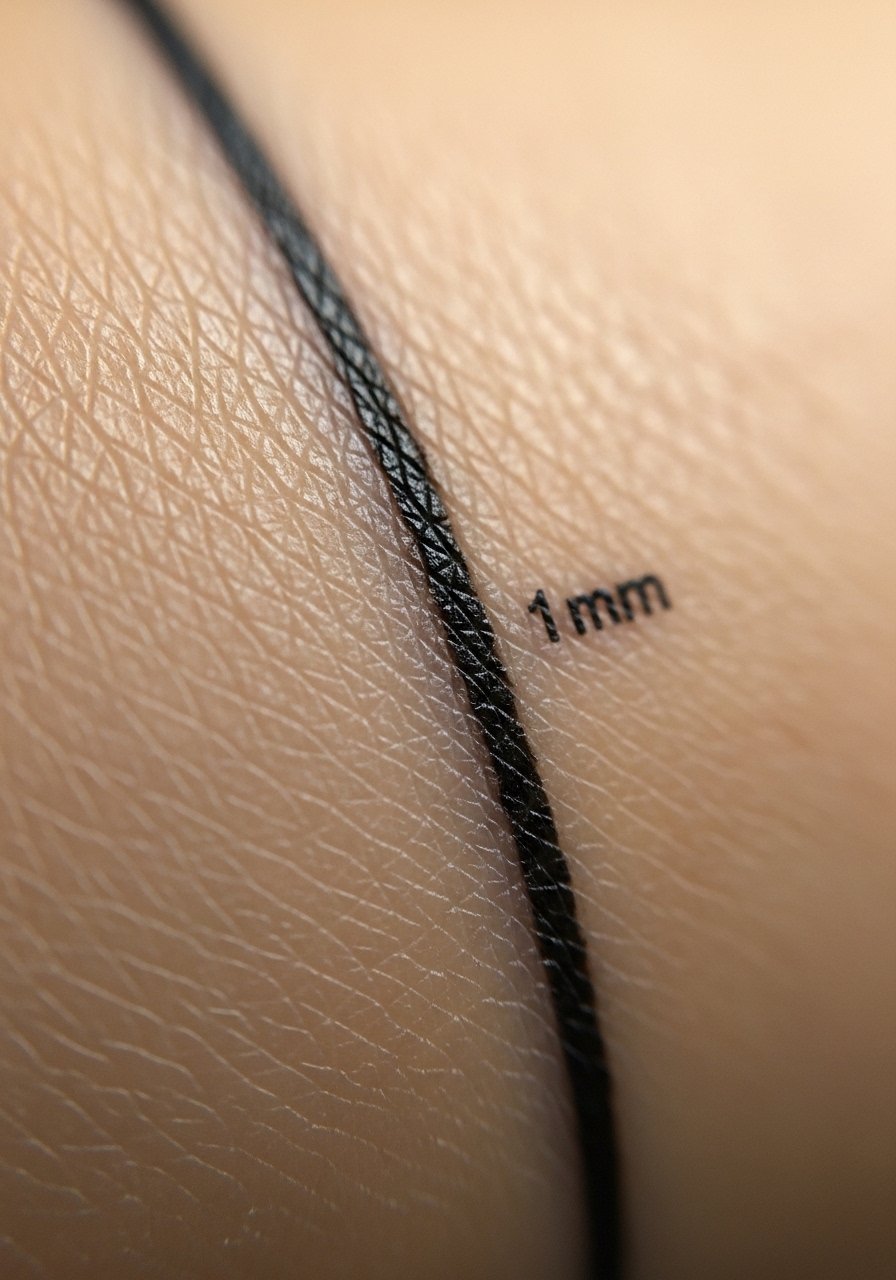
Style/Technique: Single-needle line
Pain Level: 3/10
Session Time: 15 to 30 minutes
Best For: Wrist, inner arm, anyone new to tattoos
A true single-needle line reads like handwriting and ages quietly because it uses a 0.25 to 0.35 mm needle grouping, not a tight multi-liner. Visually it looks like a deliberate mark rather than a sticker. Best for someone who wants something subtle that still reads at arm's length. Bring a reference image scaled to 1:1 so the artist can judge line weight. If you want an at-home care option, try tattoo-aftercare-ointment to keep the scab layer supple.
Mistake to Avoid: Asking for "as thin as possible" without a size reference, which makes lines break up as skin heals.
2. Micro Dot Cluster
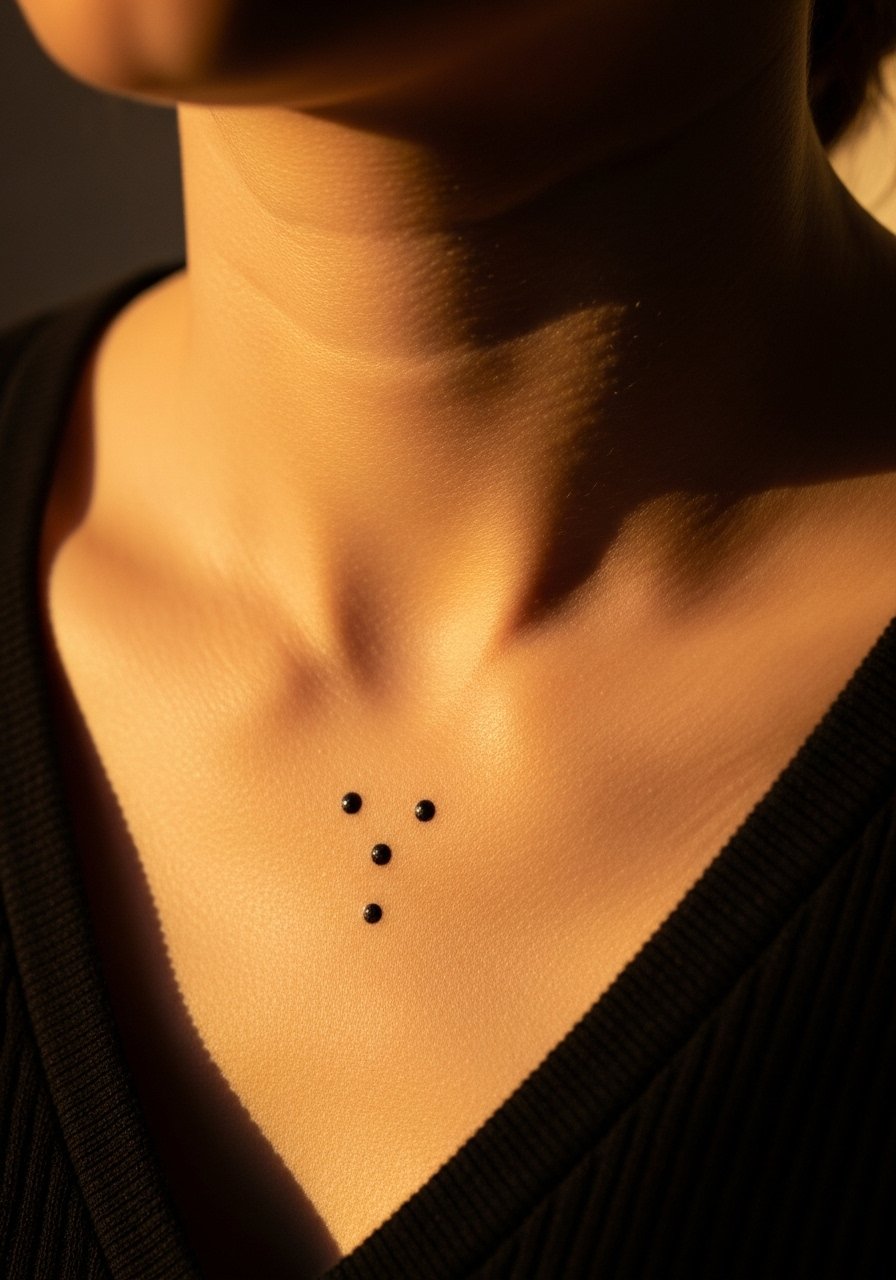
Style/Technique: Single-dot stipple
Pain Level: 2/10
Session Time: 10 to 20 minutes
Best For: Collarbone, behind ear, ankle
A cluster of 2 to 5 dots spaced about 2 mm apart reads as a symbol at a distance and as texture up close. The trick is keeping each dot under 1.5 mm so they do not merge over time. This works for minimalists who want something abstract and coverable. Artists often use a single 3RL needle for crisp round dots. For a gentle wash of moisture during healing, pick up unscented-fragrance-free-healing-cream.
Mistake to Avoid: Placing dots too close, which causes them to blur into a blob as the ink spreads.
3. Tiny Script Word
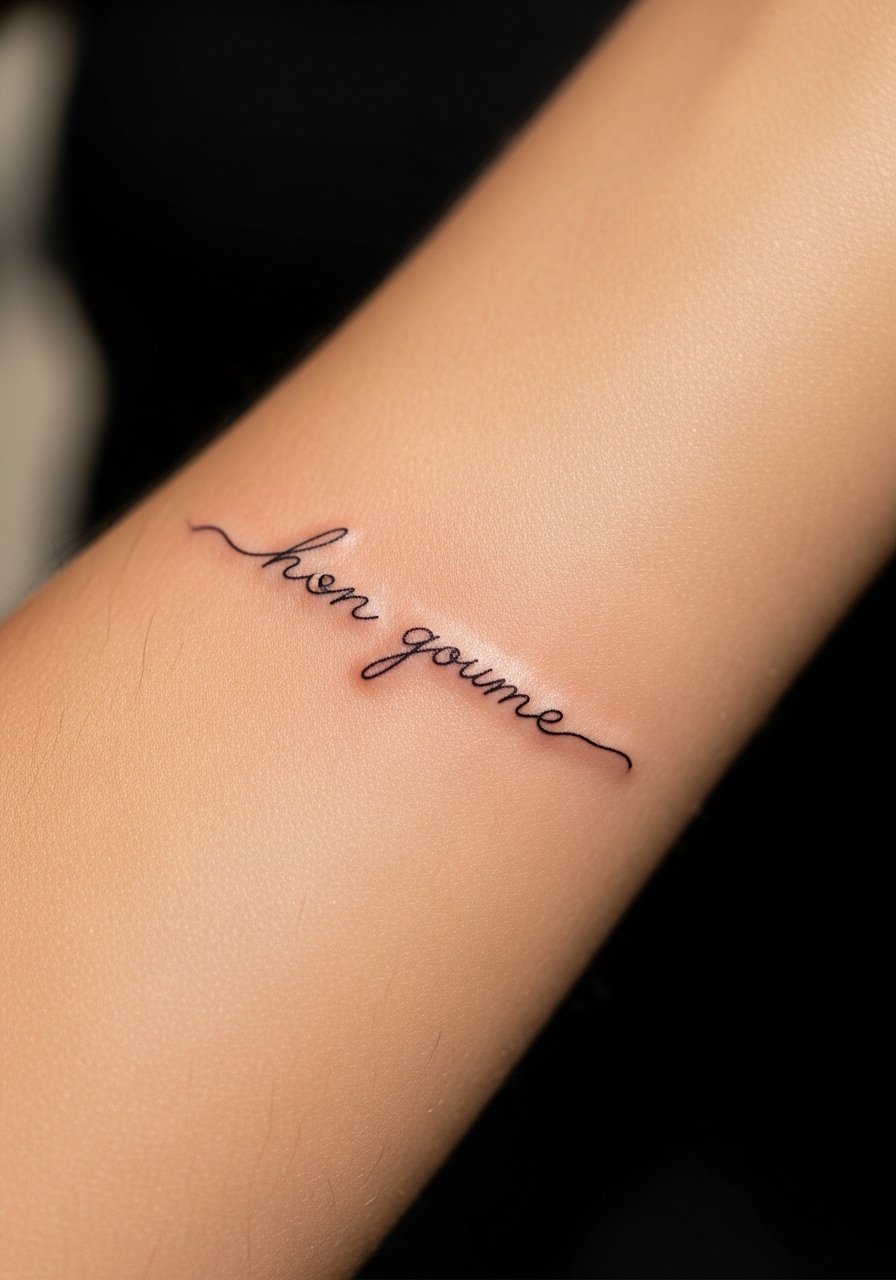
Style/Technique: Fine-script lettering
Pain Level: 4/10
Session Time: 20 to 40 minutes
Best For: Inner wrist, rib, behind ear, anyone wanting a daily reminder
Handwritten script in 1.5 to 2 mm stroke width reads like a whisper. Ask the artist to hand-draw the word at the final size, then photograph it in natural light so you can see spacing on your skin. This fits someone who wants something personal but discreet. If you plan to hide it at work, choose the inner forearm or rib. I recommend a small bottle of tattoo-sunblock-stick for long-term protection.
Mistake to Avoid: Scaling lettering straight from a screenshot, which often becomes illegible when reduced to 1 inch.
4. Minimal Crescent Moon

Style/Technique: Simple silhouette
Pain Level: 3/10
Session Time: 10 to 20 minutes
Best For: Finger, behind ear, visible but small placements
A solid crescent about 6 to 10 mm wide gives a clear silhouette and survives friction if ink depth is correct. The visual works for someone who wants symbolic imagery without detail. Fingers fade faster, so expect touch-ups at 1 to 3 years. For aftercare during the first week, consider breathable-liquid-film-spray to reduce rubbing.
Mistake to Avoid: Requesting heavy fill on a tiny finger design, which heals patchy and tends to blur.
5. Micro Geometric Triangle
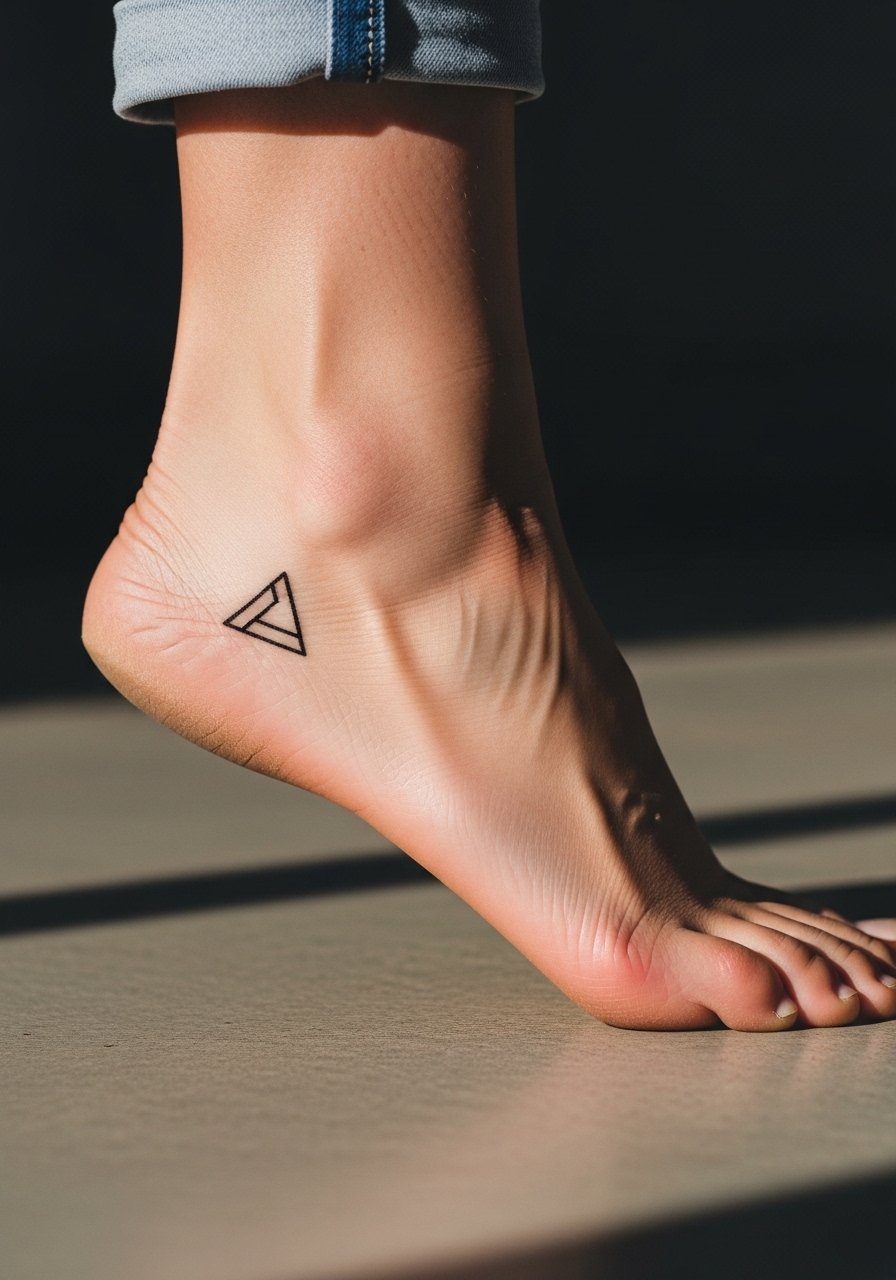
Style/Technique: Precision outline
Pain Level: 2/10
Session Time: 15 to 25 minutes
Best For: Ankle, nape, behind ear
A 10 to 12 mm equilateral triangle with 0.8 to 1 mm line weight reads cleanly and is forgiving as skin moves. Geometric minimalism suits someone who likes structure and symmetry. Ask for the stencil scaled exactly to your ankle so the artist can judge how it bends when you walk. For stencil prep or to soothe the area, bring fragrance-free-cold-compress-pack.
Mistake to Avoid: Choosing a triangle with lines too thin for the skin texture of the placement, which can gap on healing.
6. Tiny Botanical Stem
Style/Technique: Fine-line botanical
Pain Level: 4/10
Session Time: 30 minutes to 1 hour
Best For: Calf, forearm, anyone wanting nature-inspired minimalism
A single-stem sprig works when the main stem is 1 to 1.2 mm thick and leaves are simplified to 2 to 4 mm shapes. It reads feminine without being fussy and moves with muscle tone. Artists often recommend black or muted green ink for subtlety. Bring a loose reference rather than a photo so the artist can adapt scale. During healing, avoid tight socks for the calf placement. I used gentle-antibacterial-salve during the first three days.
Mistake to Avoid: Insisting on tiny detailed leaves, which turn into indistinct shading after a year.
7. Mini Arrow With Motion
Style/Technique: Clean directional line
Pain Level: 3/10
Session Time: 15 to 30 minutes
Best For: Hand, forearm, anyone who likes directional designs
An arrow with a 1 mm shaft and 3 to 4 mm arrowhead reads as intent even when small. The visual motion suits people who want something that feels active. For hand placements, expect faster fading because of frequent washing. Carry a small tube of fast-absorbing-healing-cream for the first week.
Mistake to Avoid: Placing the arrow on an area that stretches like the thumb web, which distorts the line.
8. Minimal Constellation

Style/Technique: Dot-and-line constellation
Pain Level: 3/10
Session Time: 20 to 40 minutes
Best For: Upper arm, shoulder, anyone wanting a personal map
A small constellation that spans 2 to 3 inches uses dots sized 1 to 2 mm with fine connector lines under 1 mm. It reads both like a pattern and a symbol of place or date. Good for people who want a story without obvious imagery. For a long plane flight after getting inked, pack sterile-adhesive-bandages-small for protection.
Mistake to Avoid: Asking for tiny stars with internal detail, which becomes muddy as they settle.
9. Tiny Barcode Line
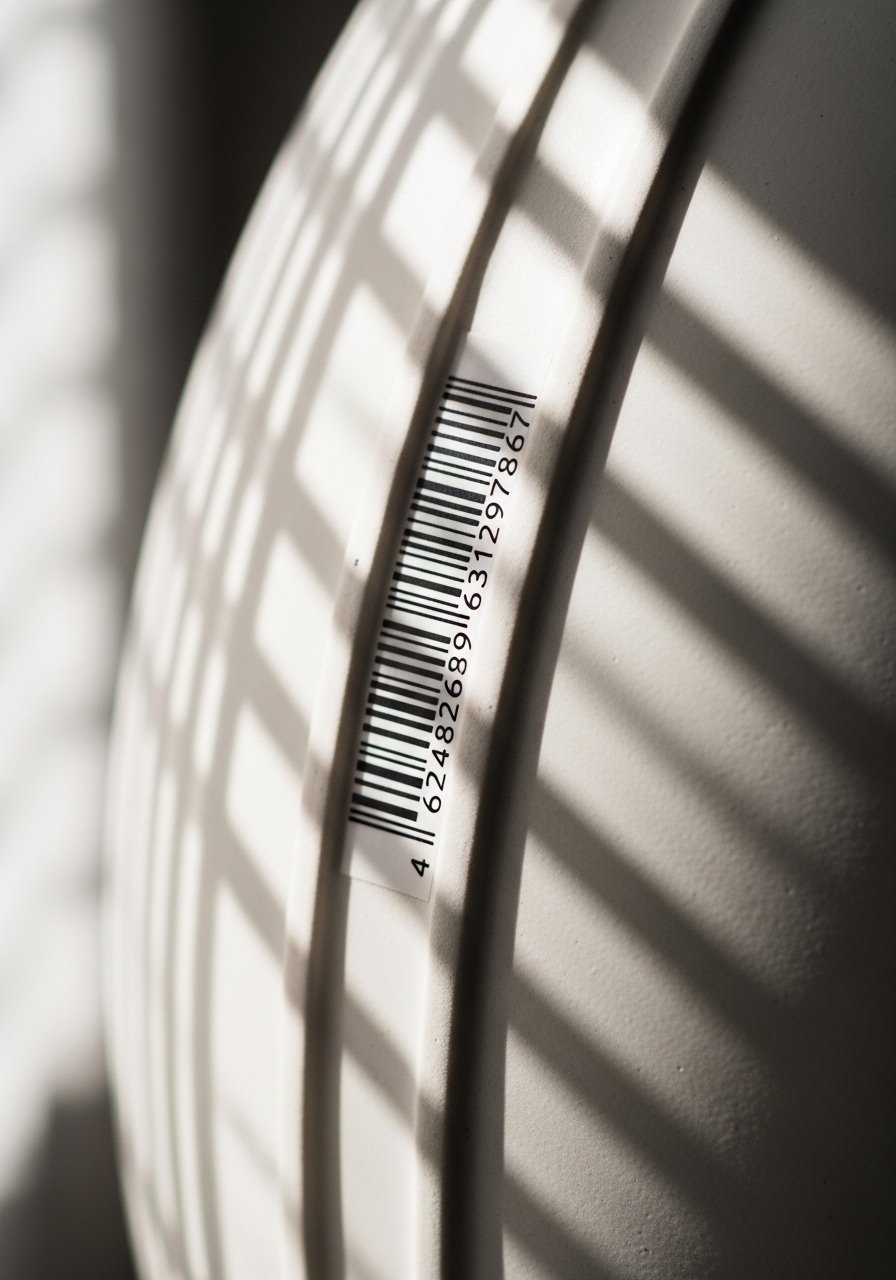
Style/Technique: Linear barcode
Pain Level: 5/10
Session Time: 30 minutes
Best For: Rib, side torso, anyone who wants a modern symbol
A barcode-style strip of 12 to 18 thin lines works when line spacing is consistent at about 0.8 mm. It creates a modern look and reads abstract from a distance. Because ribs move a lot, expect slightly longer healing and potential touch-up. For rib sessions, wear loose tops and use high-waist-comfy-undergarments afterward to avoid rubbing.
Mistake to Avoid: Asking for micro-line barcodes on high-movement skin, which causes uneven healing.
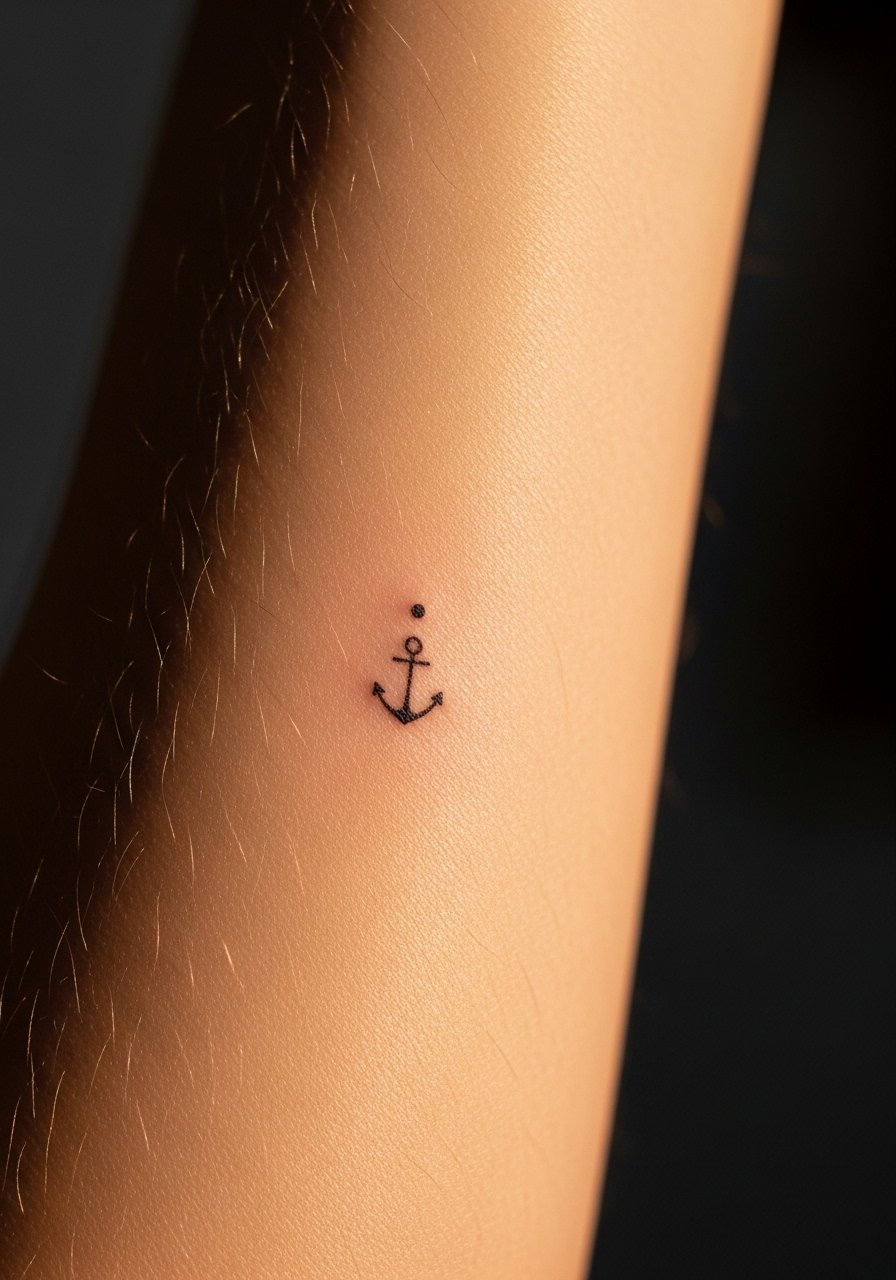
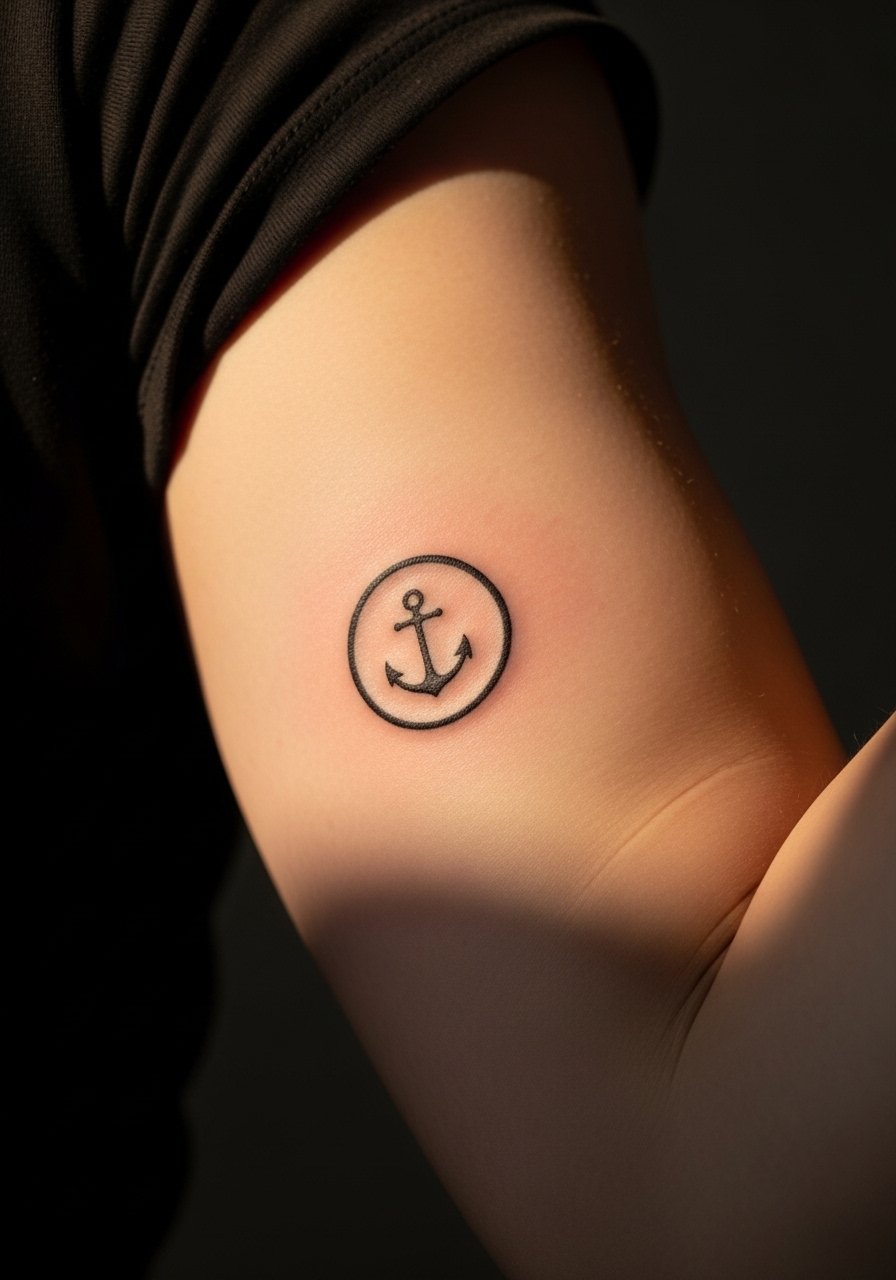
10. Micro Anchor Symbol

Style/Technique: Small silhouette
Pain Level: 3/10
Session Time: 15 to 30 minutes
Best For: Ankle, foot, someone who wants nautical nods
A 8 to 12 mm anchor silhouette with minimal interior detail reads clearly at a glance. It suits people who want symbolism without obvious complexity. Feet and ankles need special post-session care because of shoes. Pack a pair of slide-on-sandals-for-healing for the first week.
Mistake to Avoid: Asking for tiny intricate rope details that do not hold at small scale.
11. Small Red Dot Accent
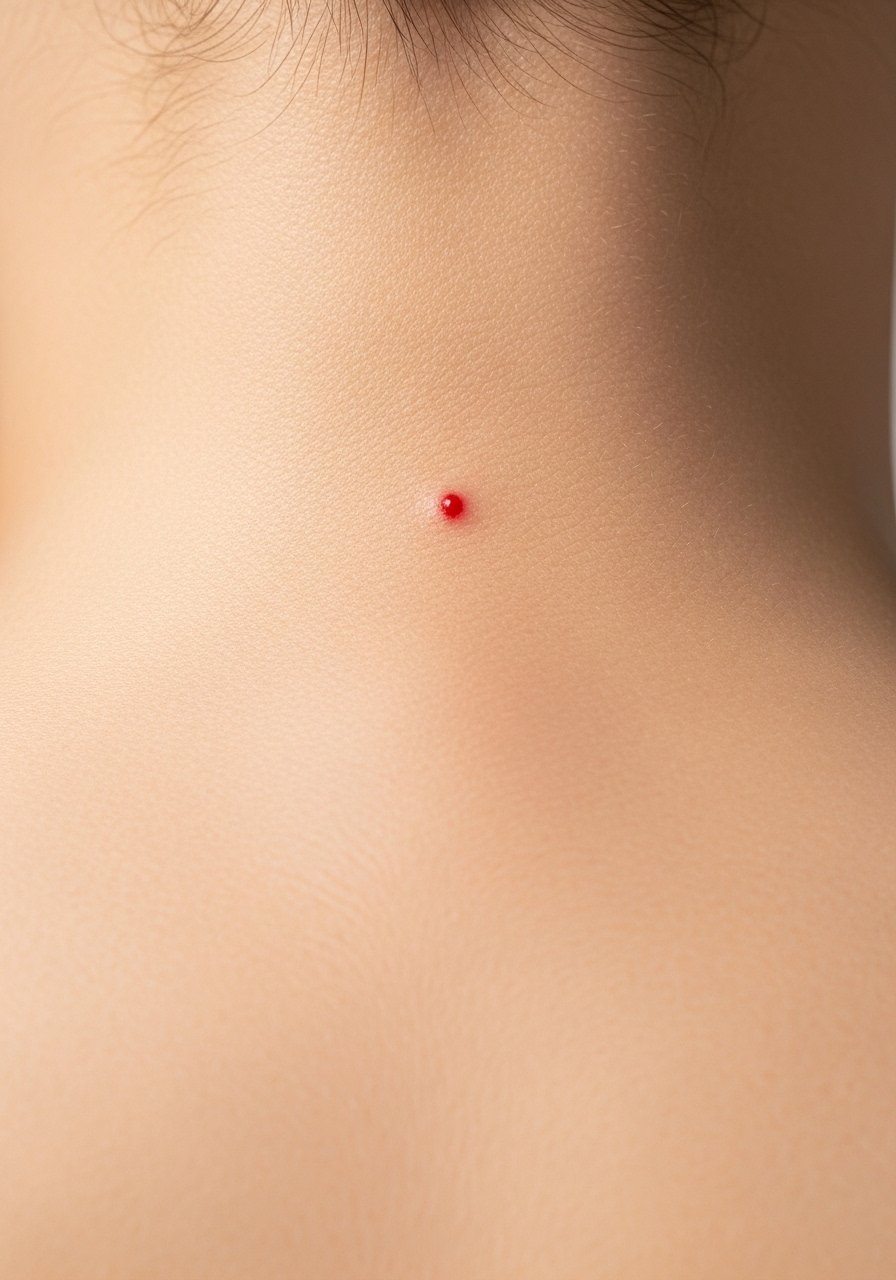
Style/Technique: Single-color accent
Pain Level: 2/10
Session Time: 10 minutes
Best For: Behind ear, nape, anyone wanting a pop of color
A single red dot 2 to 4 mm wide acts like a signature. Color tattoos require stable pigments and slightly shallower placement to avoid blowout. This fits someone who wants a discreet color that is easy to cover with hair or clothing. For color longevity, ask about pigment brand and pick up gentle-color-safe-sunscreen-stick for daily use.
Mistake to Avoid: Picking neon reds that fade quickly instead of muted carmine or scarlet pigments.
12. Tiny Mountain Outline
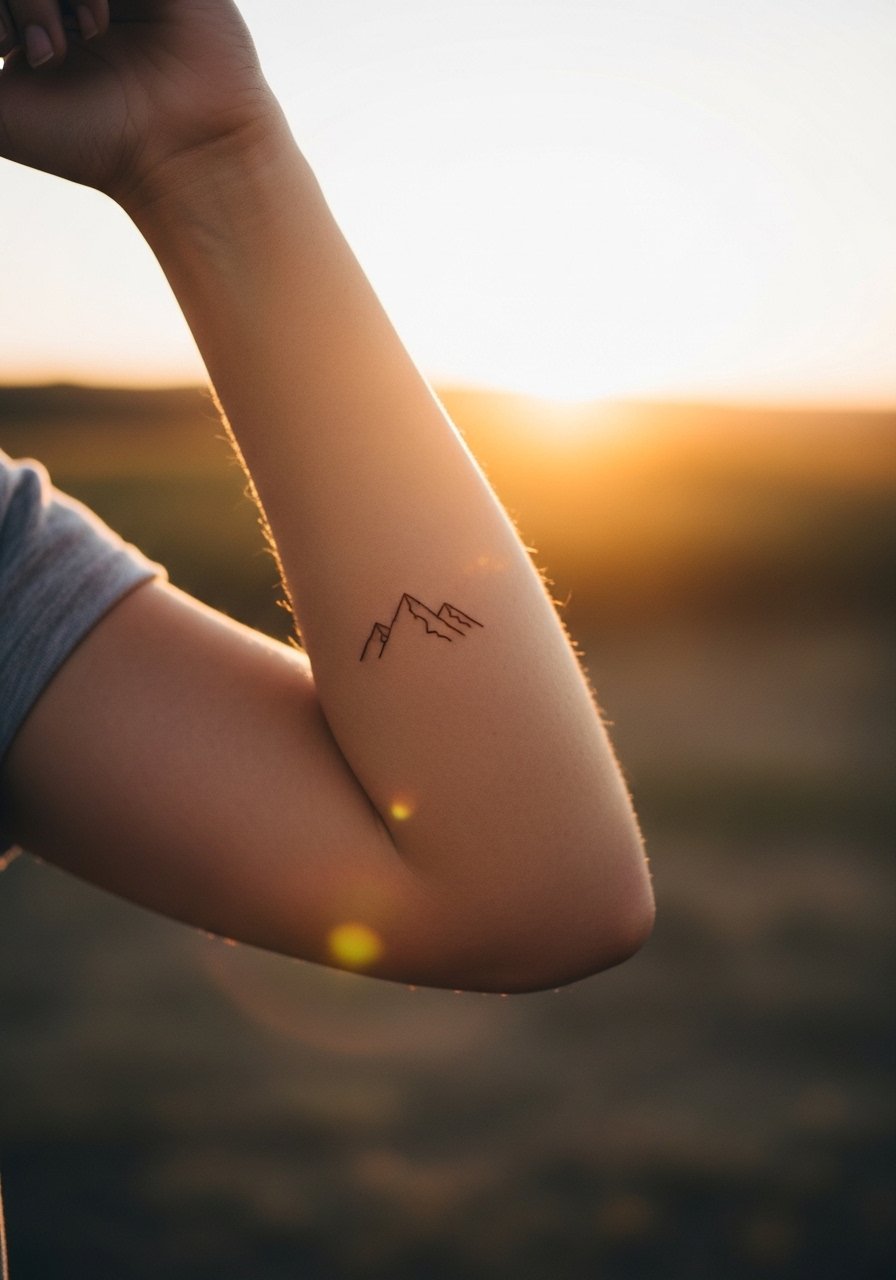
Style/Technique: Lightweight outline
Pain Level: 4/10
Session Time: 20 to 35 minutes
Best For: Forearm, shoulder, outdoorsy people
A simplified three-peak outline, 15 to 20 mm across with 1 mm stroke, conveys landscape without detail. It works well when the peaks are balanced and the negative space is intentional. If you plan to layer other marks later, leave a 10 mm gap for breathing room. I paired mine with a tiny compass from idea 19. For sessions outdoors, bring sun-protective-reef-shirt to avoid sunburn.
Mistake to Avoid: Crowding additional small tattoos within 5 mm, which makes both pieces age poorly.
13. Minimal Wave Line
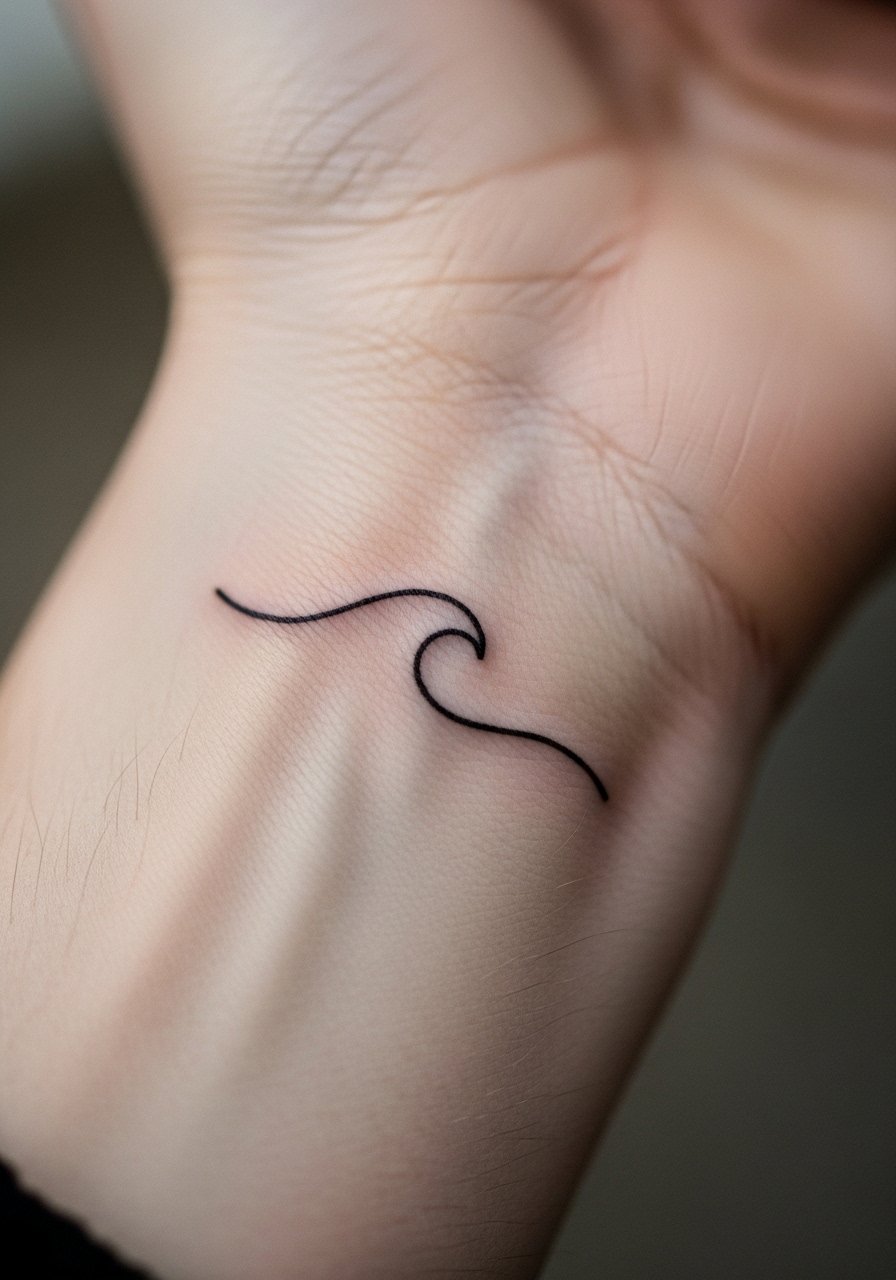
Style/Technique: Continuous fluid line
Pain Level: 2/10
Session Time: 10 to 20 minutes
Best For: Wrist, ankle, beach lovers
A single wavy line 8 to 12 mm long with gentle curves looks like movement without detail. The width should sit around 0.8 to 1 mm to survive hand washing and friction. I like this on people who want a low-commitment nod to water. Use breathable-bandage-strips for the first two days if the area rubs.
Mistake to Avoid: Requesting micro texture within the wave, which disappears as it heals.
14. Tiny Crescent With Dot
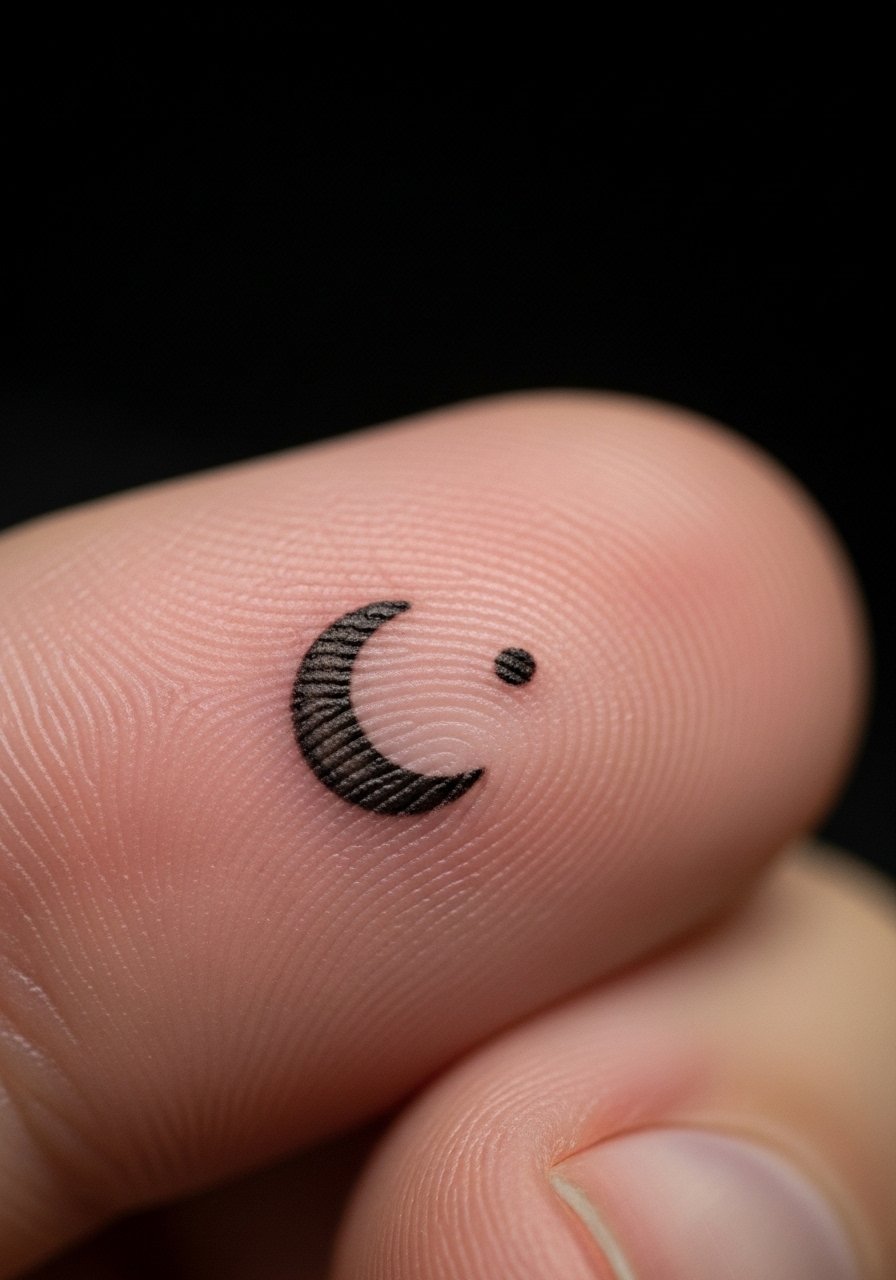
Style/Technique: Symbol pairing
Pain Level: 3/10
Session Time: 10 to 20 minutes
Best For: Finger, behind ear, subtle placements
Pairing a 6 mm crescent with a 2 mm dot creates a compact glyph that reads personal. The spacing between moon and dot should be 2 to 3 mm for clarity. This is good for people who want a tiny emblem that feels deliberate. For finger placements, expect yearly touch-ups. Keep non-abrasive-hand-sanitizer on hand while healing.
Mistake to Avoid: Putting the dot too close, so the two elements merge.
15. Micro Portrait Outline
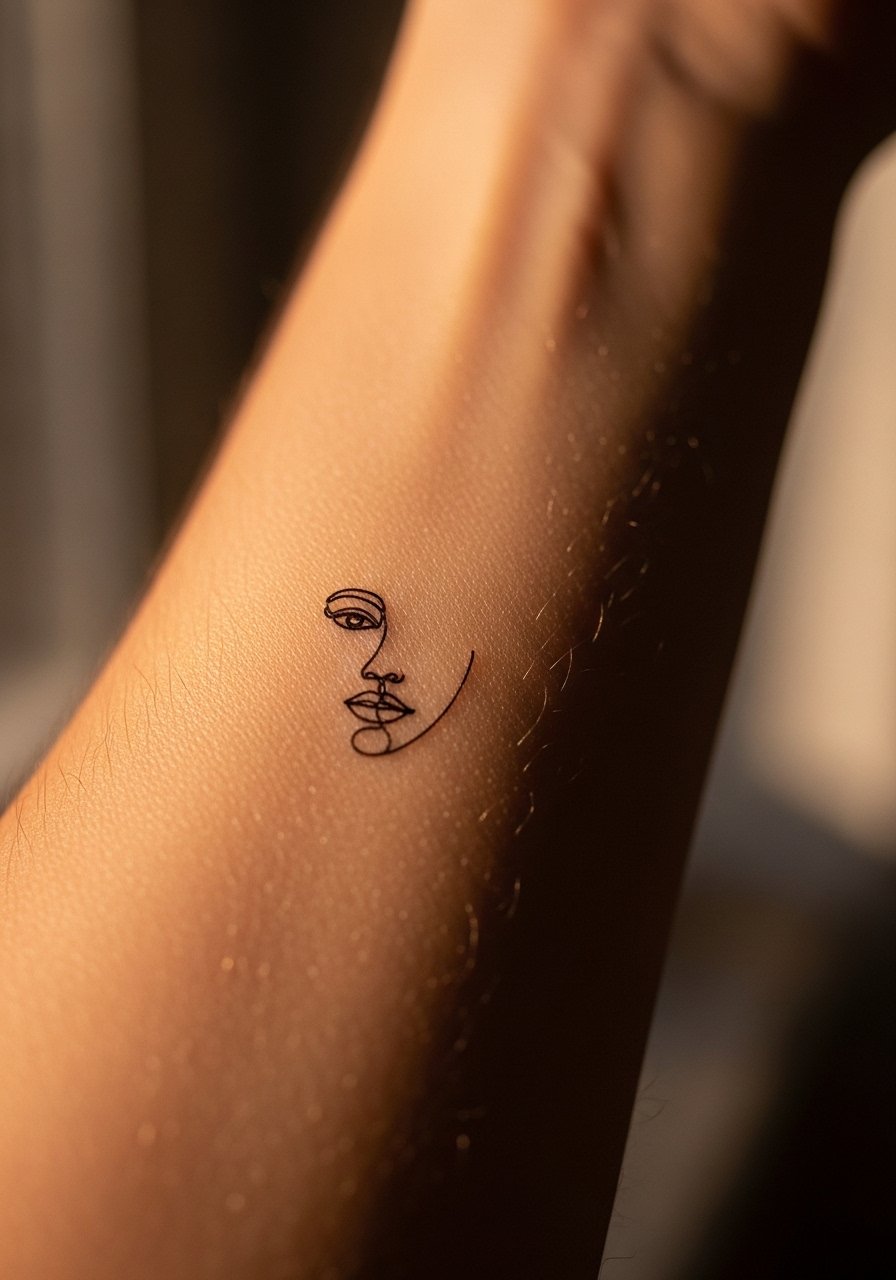
Style/Technique: Continuous single-line portrait
Pain Level: 4/10
Session Time: 30 to 45 minutes
Best For: Inner arm, chest, anyone into artful minimalism
A continuous single-line face about 20 to 30 mm across reads abstract and artistic because the eye fills in missing pieces. Keep internal lines minimal and avoid tiny facial details. This suits someone who values art references over literal portraits. For sessions with lots of linework, bring compressible-cushion-pillow to stay comfortable.
Mistake to Avoid: Requesting tiny eyes or lips that become indistinct and clutter the design.
16. Tiny Roman Numerals
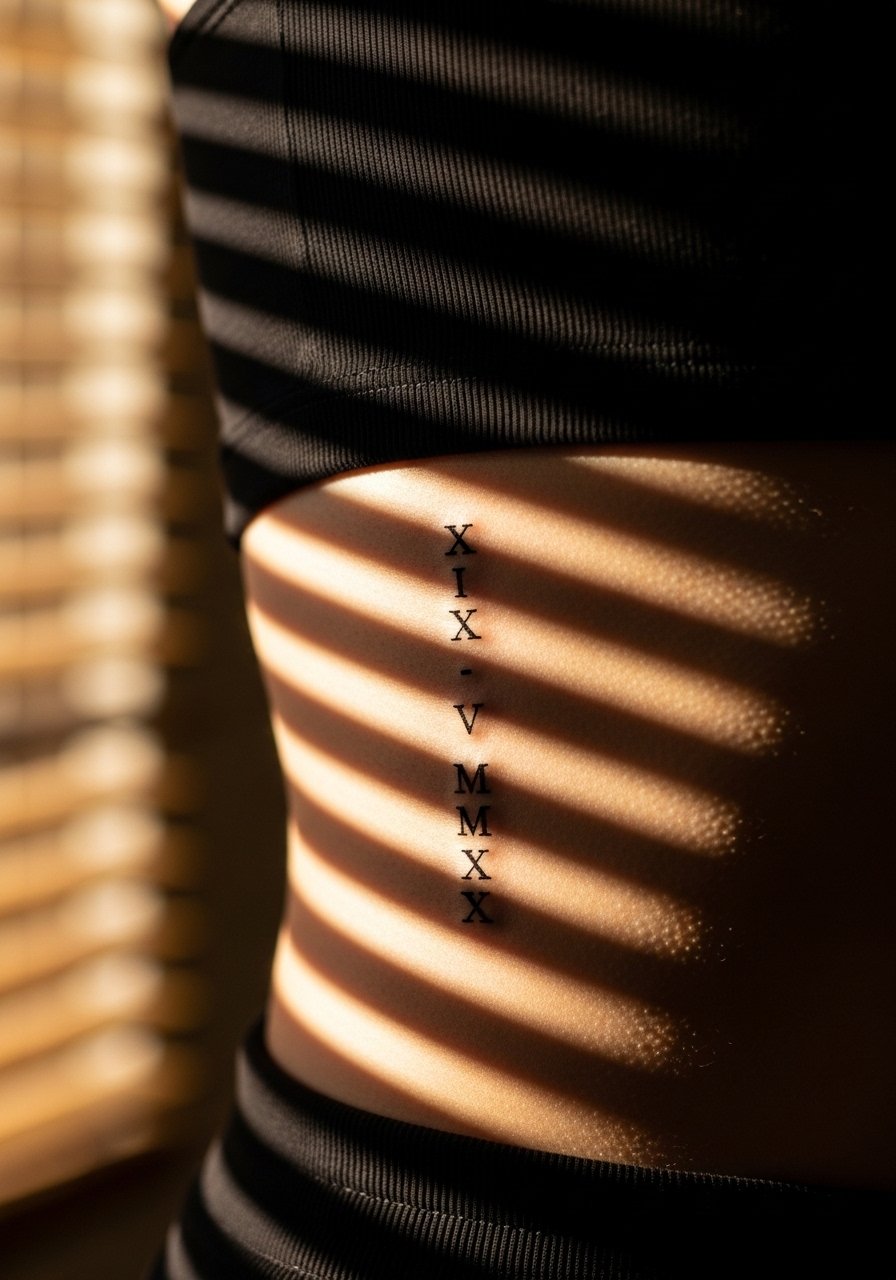
Style/Technique: Fine numerals
Pain Level: 5/10
Session Time: 20 to 40 minutes
Best For: Rib, collarbone, anyone marking a date
Roman numerals in 1.5 to 2 mm strokes make dates discreet and elegant. Ask the artist to space numerals at 2 to 3 mm to avoid crowding. This works for anniversaries or meaningful numbers and is easy to conceal. During sessions on the rib, plan for breathing breaks. I used fragrance-free-healing-lotion afterward to soothe.
Mistake to Avoid: Using tight, ornate fonts at small sizes, which become a blur over time.
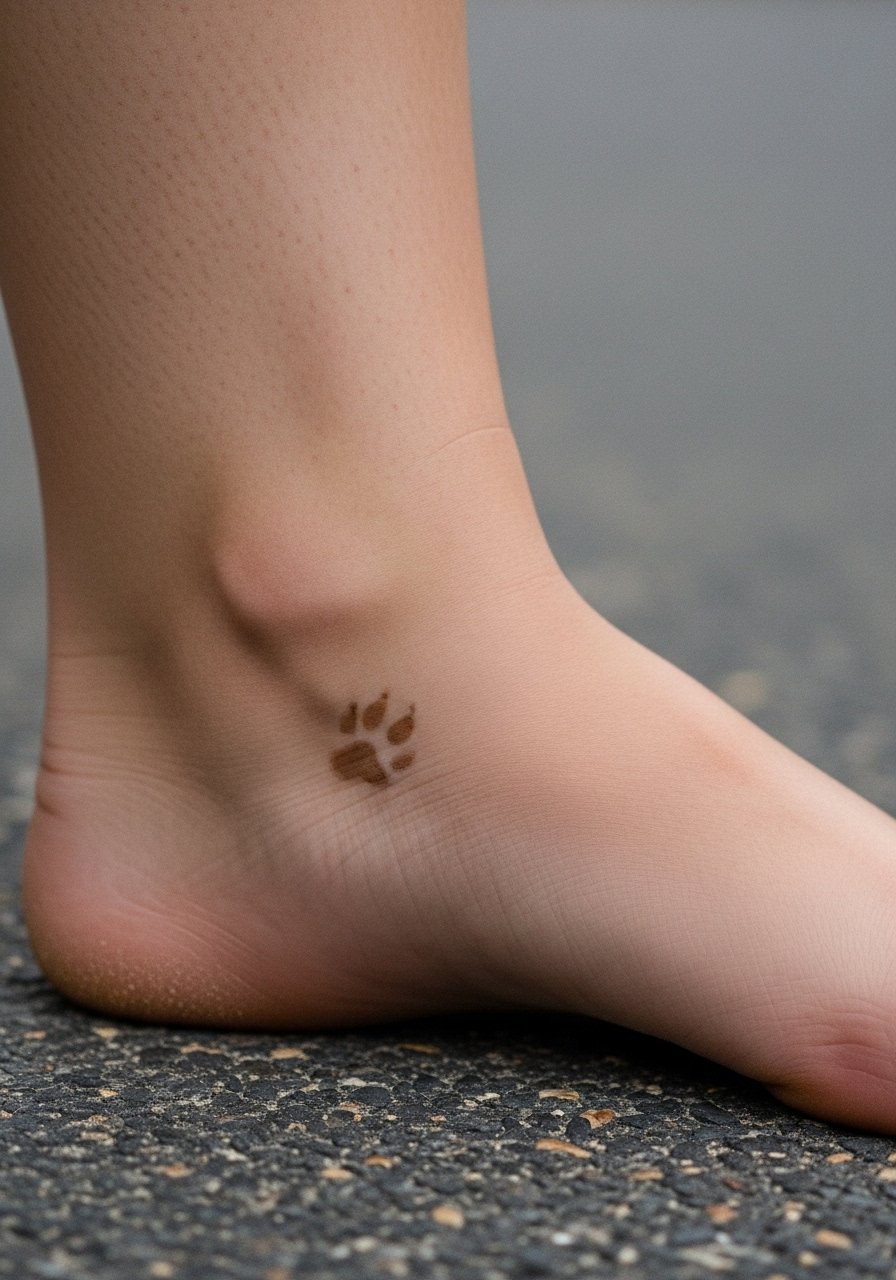
17. Minimal Paw Print
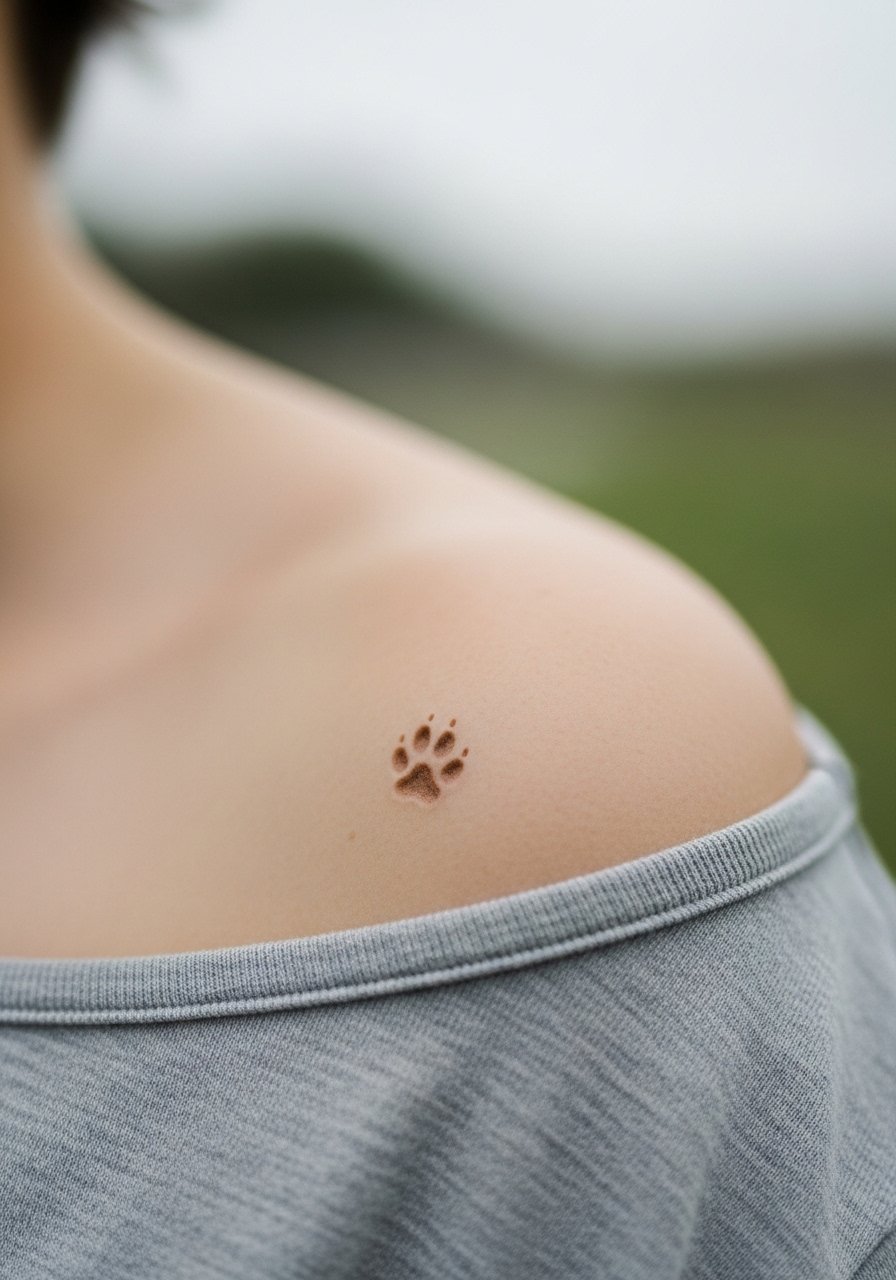
Style/Technique: Small silhouette
Pain Level: 3/10
Session Time: 15 to 25 minutes
Best For: Shoulder, ankle, pet memorial tattoos
A paw print simplified to three toe dots and a pad silhouette of about 8 to 12 mm reads cleanly. Good for people who want a pet nod without a full portrait. Keep the toe dots 1.5 to 2 mm so they hold. For memorial placements, pick a spot you can see easily. I recommend gentle-fragrance-free-healing-cream for initial care.
Mistake to Avoid: Trying to include fur texture at small scale, which looks messy later.
18. Tiny Key Silhouette

Style/Technique: Mini silhouette
Pain Level: 3/10
Session Time: 20 minutes
Best For: Wrist, finger side, anyone who likes symbolism
A key silhouette of 10 to 15 mm with simplified teeth reads as a symbol rather than a tool. It fits people who want symbolic imagery that can be hidden under bracelets. If you want future layering, leave surrounding skin clear. A small tin of sterile-gauze-pads helps during the scab stage.
Mistake to Avoid: Demanding ornate key handles that cannot hold in small scale.
19. Tiny Compass Needle

Style/Technique: Micro directional symbol
Pain Level: 3/10
Session Time: 15 minutes
Best For: Thumb, wrist, travelers
A compass needle made of two opposing lines 8 to 12 mm long suggests direction without a full compass rose. Keep the central pivot point under 2 mm for balance. It suits people who travel often or want a discreet reminder. For thumb placements, expect regular fading and plan for touch-ups. Use liquid-bandage-spray for protection while active.
Mistake to Avoid: Asking for a full compass with tiny letters, which turns into a smudge.
20. Mini Paper Plane
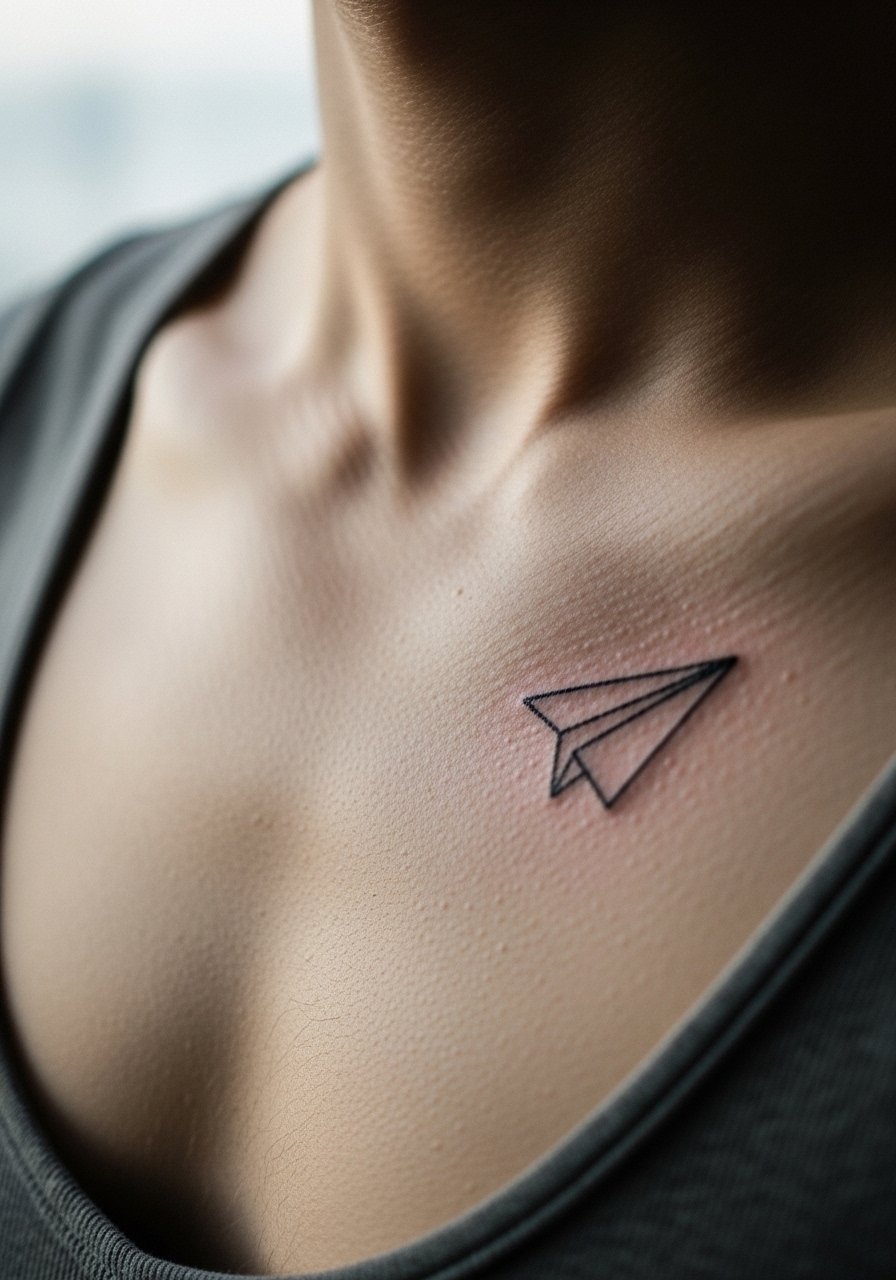
Style/Technique: Simple outline icon
Pain Level: 4/10
Session Time: 20 to 30 minutes
Best For: Chest, collarbone, anyone who likes travel motifs
A paper plane with 1 mm line weight at 12 to 18 mm fits minimalist wardrobes and covers easily. It feels playful and moves with the body when placed near the collarbone. For chest placements, wear a loose shirt post-session. I keep a small tube of healing-ointment-travel-size in my bag for the first week.
Mistake to Avoid: Adding tiny motion lines that clutter the simple silhouette.
21. Micro Infinity Loop
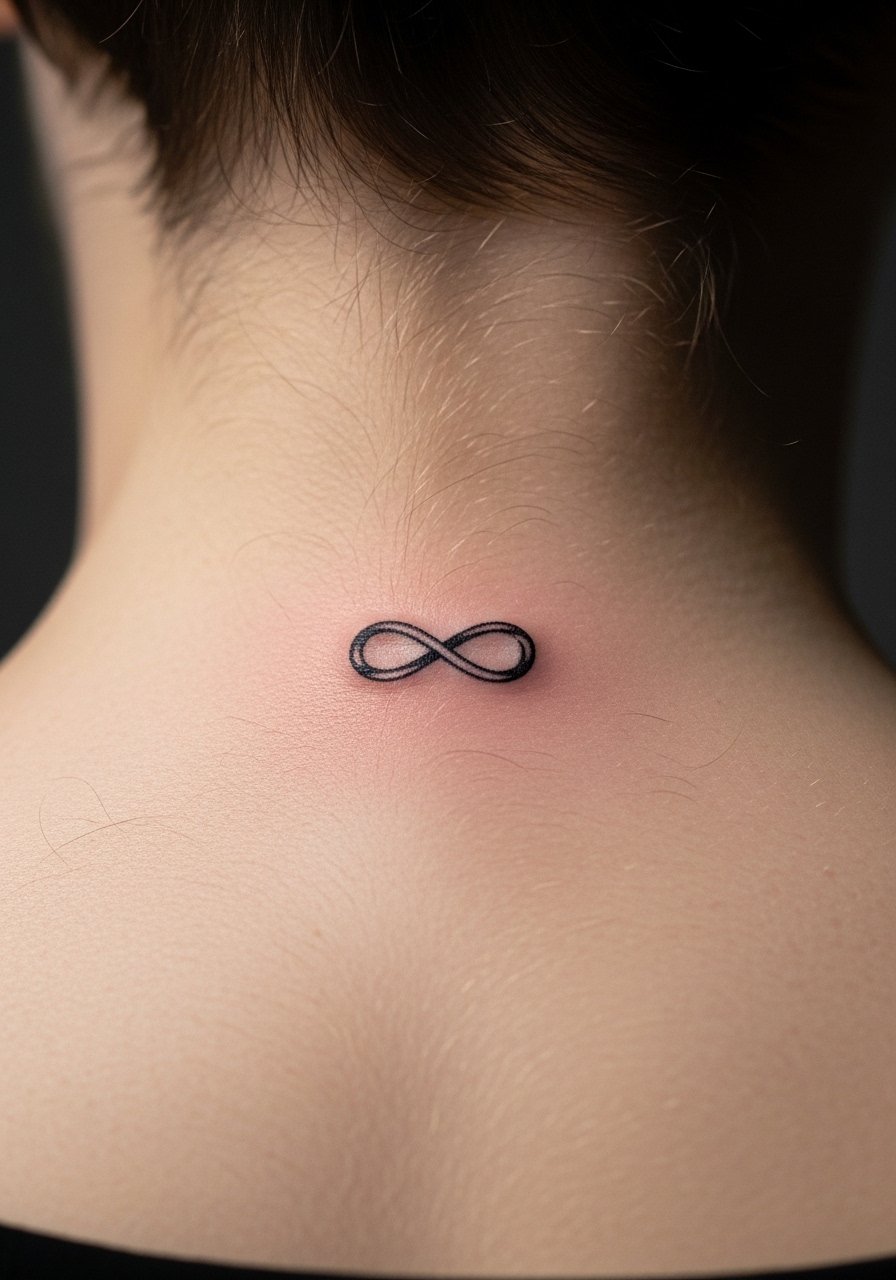
Style/Technique: Continuous loop
Pain Level: 3/10
Session Time: 15 minutes
Best For: Nape, wrist, anyone wanting a simple symbol
An infinity loop 12 to 14 mm across with a 1 mm stroke reads as a quiet signature. It ages well because the continuous line is forgiving if ink spreads slightly. This is great for someone who wants a versatile, coverable symbol. Keep hair covering in mind for visibility. Apply fragrance-free-sunblock-stick once healed for outdoor days.
Mistake to Avoid: Requesting the loop at 4 to 5 mm, which loses definition quickly.
22. Tiny Anchor Dot Row
Style/Technique: Repeated tiny motif
Pain Level: 3/10
Session Time: 20 minutes
Best For: Forearm, wrist, repetitive small elements
A vertical trio of small anchor-like dots spaced 4 to 6 mm apart gives rhythm and reads like a personal code. Repetition in small motifs helps them feel intentional. This suits people who want a series they can extend later. For consistent spacing, ask your artist for a scaled stencil. I keep sterile-aquaclean-gauze on hand during re-bandaging.
Mistake to Avoid: Crowding repeated motifs too tightly and losing separation as skin settles.
23. Tiny Morse Code Line
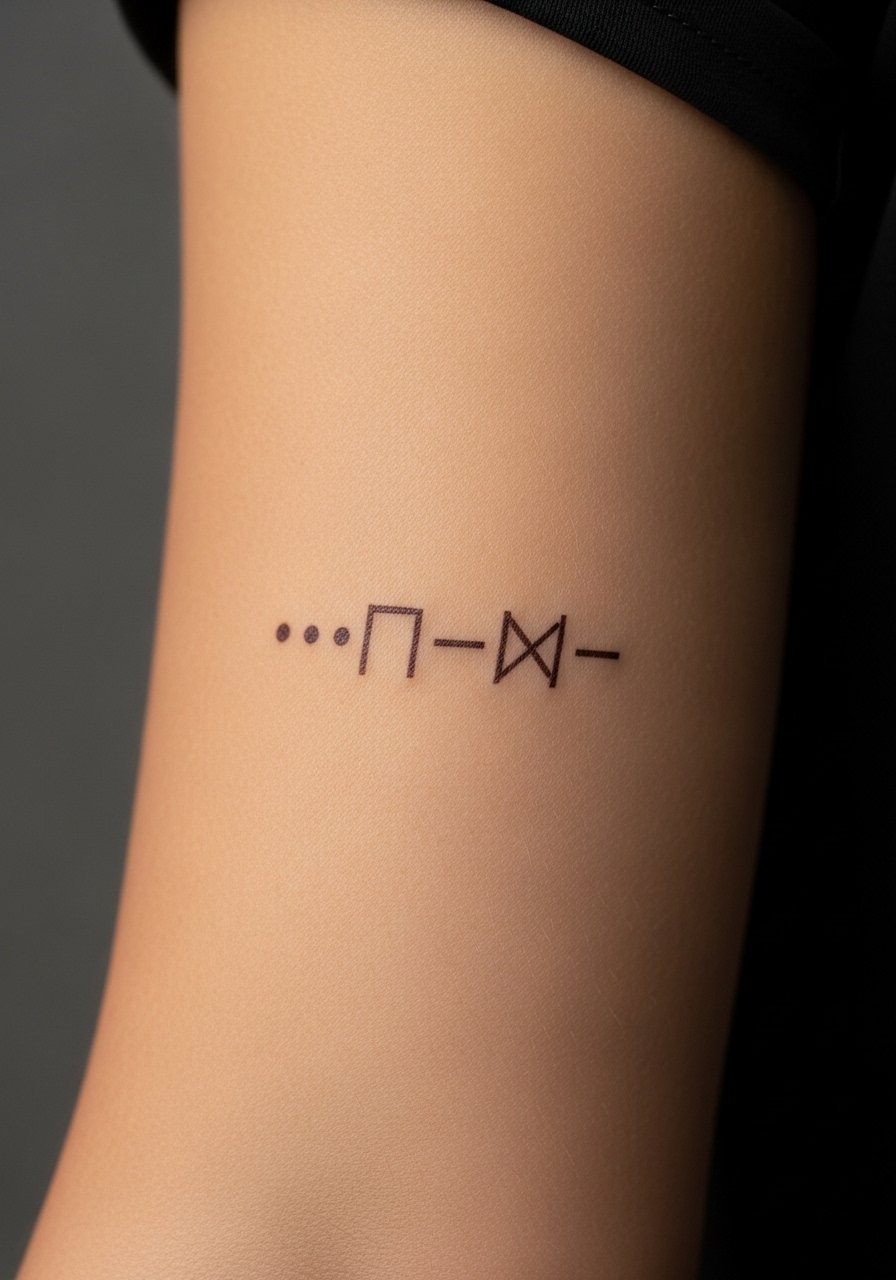
Style/Technique: Dot-dash script
Pain Level: 3/10
Session Time: 15 to 30 minutes
Best For: Forearm, ankle, secret message lovers
Morse code uses dots 1 to 2 mm and dashes about 4 to 6 mm with 2 to 3 mm spacing. It creates a private message that reads as pattern to others. Perfect for someone who wants meaning without literal text. Bring your intended message and the artist will scale it to fit. Keep non-stick-gauze-roll for comfortable bandaging.
Mistake to Avoid: Requesting tiny dots and dashes without clear spacing, which makes the code unreadable.
24. Micro Laurel Branch
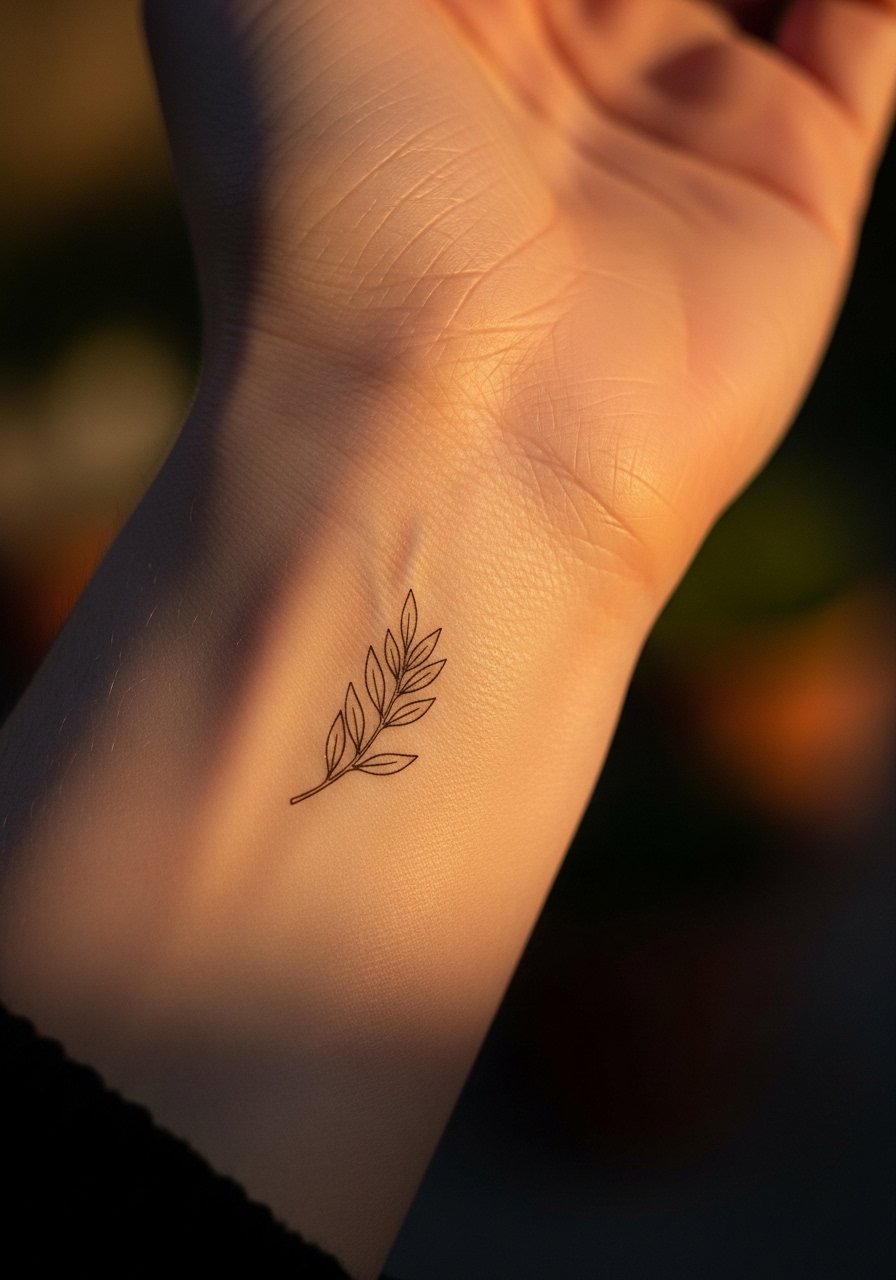
Style/Technique: Mini botanical wreath
Pain Level: 3/10
Session Time: 20 to 35 minutes
Best For: Wrist, ankle, people wanting classic symbols
A laurel branch with tiny leaves 1.5 to 2 mm wide creates a classic nod that is still minimalist. Keep the curve gentle and leaves simple. It suits someone who wants a refined symbol that does not scream. For the first week, avoid bracelets that could rub the leaves. I like soft-cotton-wrist-warmers while healing.
Mistake to Avoid: Trying to add veins or tiny shading, which smudges as the ink settles.
25. Tiny Semicolon
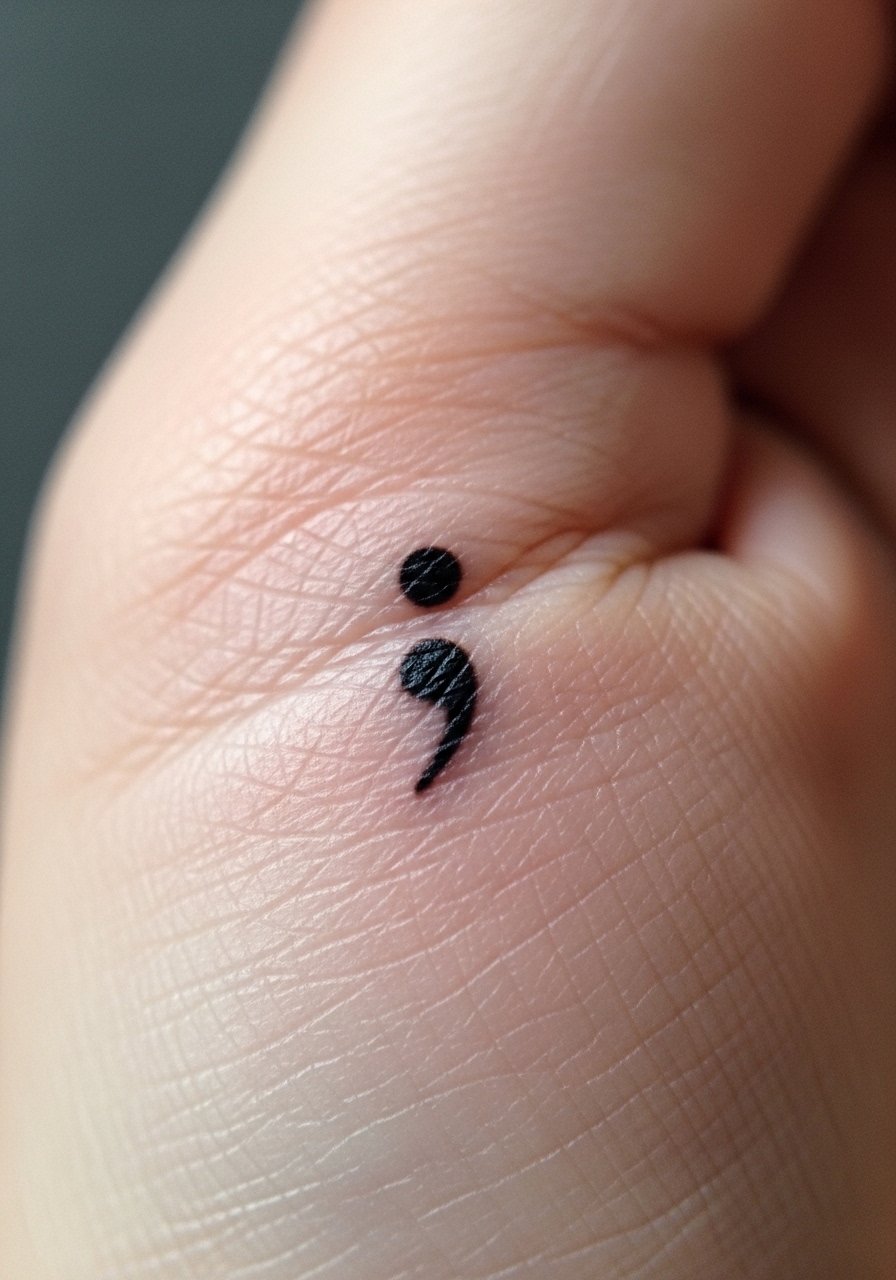
Style/Technique: Symbolic punctuation
Pain Level: 2/10
Session Time: 10 minutes
Best For: Finger, behind ear, anyone who values the symbolism
A semicolon at 2 to 4 mm is a discreet but meaningful mark. Keep the dot portion round and the comma shape shallow so it holds. This is ideal for people who want a small symbol with personal meaning. Because fingers fade, expect touch-ups. Carry mini-healing-ointment in your wallet.
Mistake to Avoid: Adding decorative flourishes that defeat the simplicity of the mark.
26. Micro Anchor With Negative Space
Style/Technique: Negative-space icon
Pain Level: 4/10
Session Time: 30 to 45 minutes
Best For: Inner arm, anyone wanting contrast
Using negative space means the artist inks a surrounding shape so your skin forms the icon. At small scales, keep the negative region at least 3 to 4 mm across so the shape does not fill in. It feels modern and intentional for people who like graphic design. Ask your artist about pigment saturation to avoid heavy ink pooling. For longer sessions, bring reusable-water-bottle-stainless-steel.
Mistake to Avoid: Requesting tiny negative-space details that collapse as scabs form.
27. Tiny Paw Print Line Art
Style/Technique: Outline minimalism
Pain Level: 3/10
Session Time: 20 minutes
Best For: Ankle, wrist, pet lovers
An outline paw with simplified pad shapes of 1.5 to 2 mm width keeps the image readable and delicate. It works for people who prefer outlines to solid fills. For ankle placements, avoid tight shoes while healing. Use healing-spray-antibacterial if it rubs.
Mistake to Avoid: Trying to recreate a full paw portrait at a tiny scale, which loses detail.
28. Micro Arrow Cluster
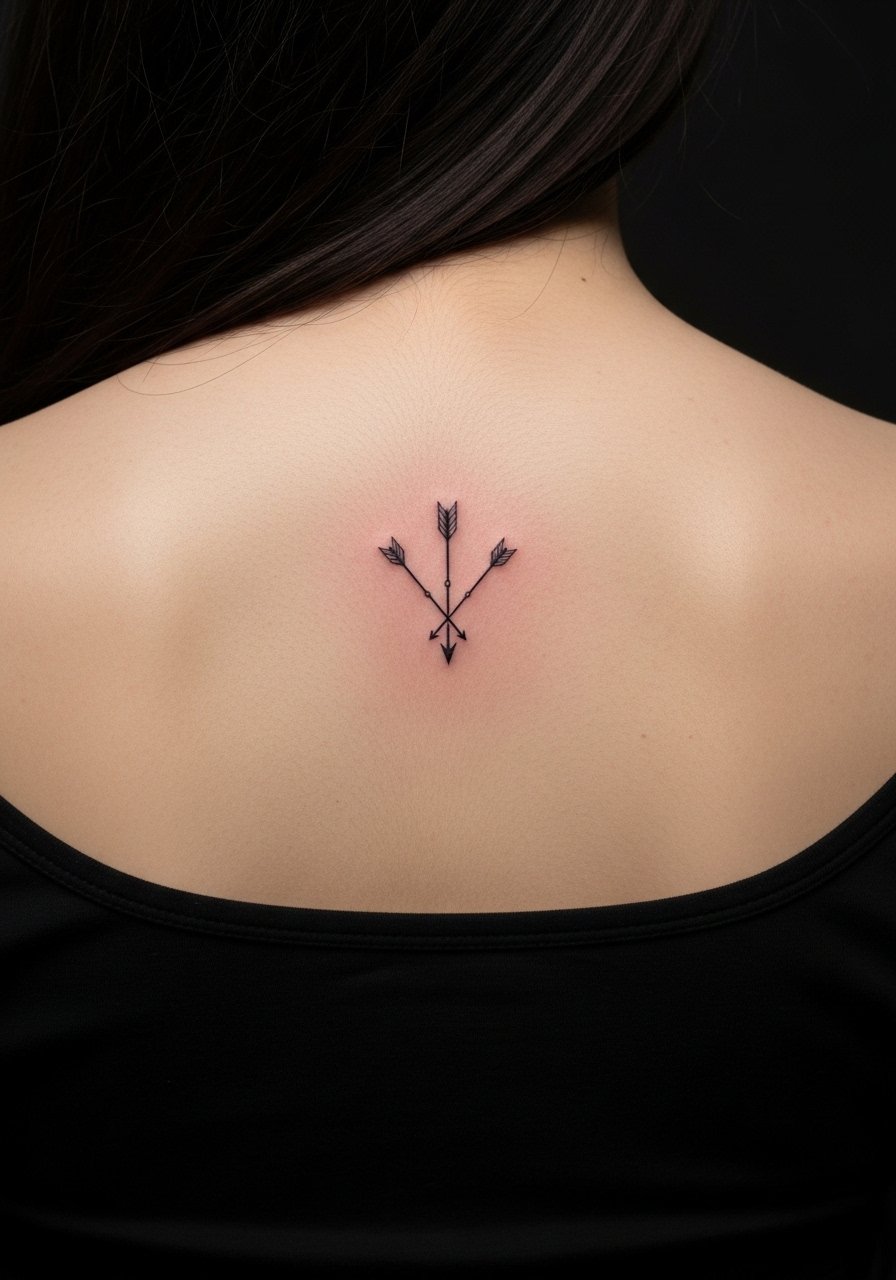
Style/Technique: Clustered tiny arrows
Pain Level: 4/10
Session Time: 20 to 35 minutes
Best For: Upper back, shoulder, people who like layered symbols
Three tiny arrows, each 8 to 12 mm, fanned slightly, create a punctuation mark rather than a literal weapon. This works for people who want a motif that can be extended later. Ensure arrows are spaced 4 to 6 mm for clarity. For upper back sessions, bring a loose tank top. Aftercare with unscented-healing-balm helped my pieces settle evenly.
Mistake to Avoid: Packing arrows too tightly, which makes a single blob instead of three marks.
29. Tiny Coordinate Dots
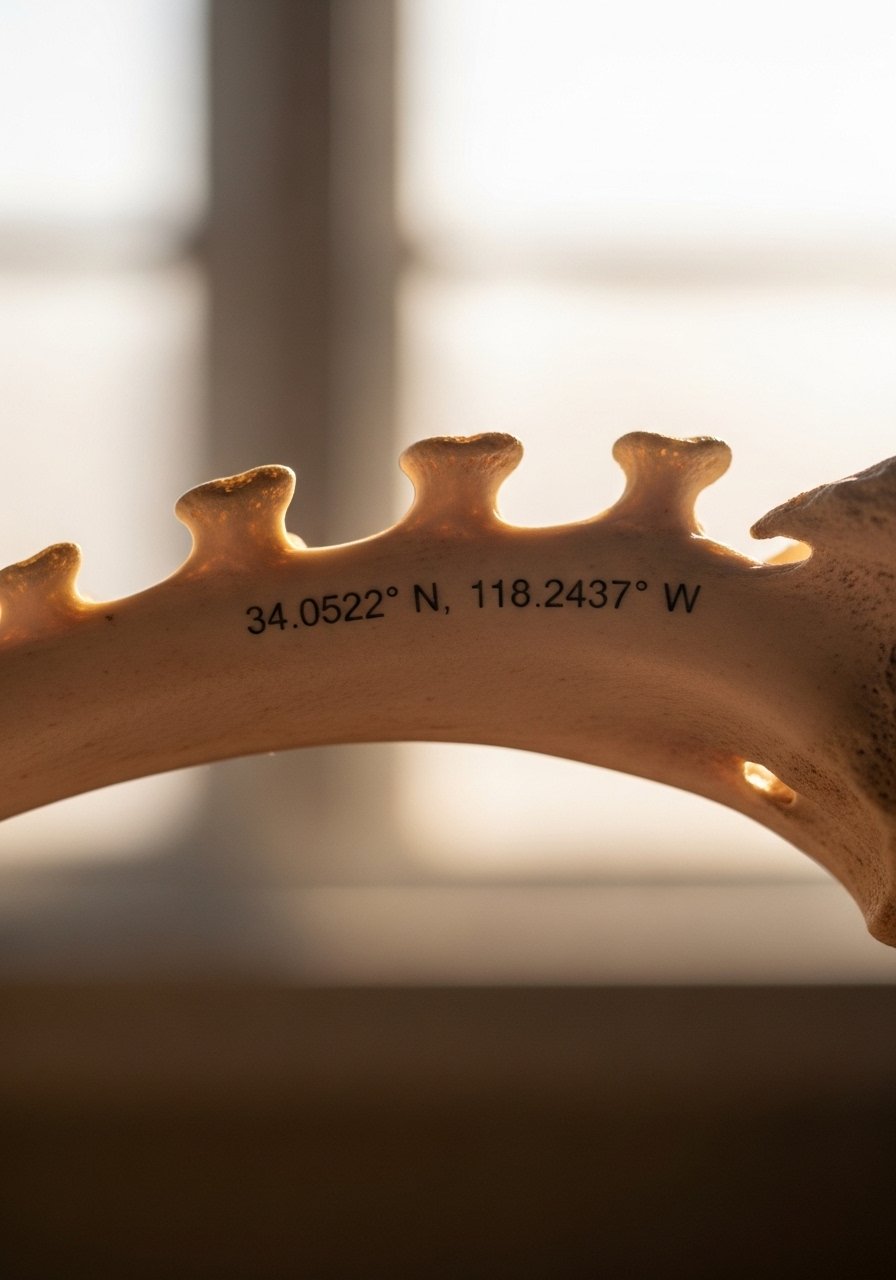
Style/Technique: Tiny numeric coordinates
Pain Level: 5/10
Session Time: 20 to 40 minutes
Best For: Rib, inner arm, anyone marking a place
Coordinates in small numbers work as a private label of location. Keep numerals spaced at 2 to 3 mm and use a simple sans serif style for legibility at small sizes. This suits someone who wants a place-based reminder that can be kept personal. For rib placements, schedule a session when you can rest afterward. I found loose-comfy-shirts-cotton helpful in the first two days.
Mistake to Avoid: Choosing an ornate font that becomes unreadable when reduced to a fingertip size.
Your Aftercare Kit
Skin Prep / Protection
- Honestly the best small investment after a session. Tattoo-aftercare-ointment (~$8-15). Light, fragrance-free, and easy to apply.
- Breathable-liquid-film-spray (~$10-18). Keeps the area from sticking to clothing without suffocating the skin.
Bandaging / Comfort
- Sterile-gauze-pads (~$6-12) for initial blotting. Use thin layers not thick ones.
- Non-stick-gauze-roll (~$6-10) for areas that need wrapping.
Sun Protection
- Fragrance-free-sunblock-stick (~$8-14). Use daily once healed.
- Gentle-color-safe-sunscreen-stick (~$9-16). Keeps pigments stable.
Comfort Items
- Slide-on-sandals-for-healing (~$12-25) for foot and ankle tattoos.
- Compressible-cushion-pillow (~$12-20). Makes longer sessions easier.
- Reusable-water-bottle-stainless-steel (~$15-25). Hydration helps healing.
Extras
- Liquid-bandage-spray (~$10-15) for active areas.
- Mini-healing-ointment (~$5-9). Good for your wallet or purse.
Most people spend somewhere between $500 and $800 when they finally commit to refreshing a room.
Aftercare Tips From Real Healing
Let your artist set the seal window. A short cover time of 2 to 4 hours is common. If your artist recommends longer, follow that. Use sterile-gauze-pads not fabric that leaves fibers.
Carry a tiny tube of healing balm and reapply in thin layers. Tattoo-aftercare-ointment about the size of a pea twice daily keeps scabs soft and reduces itching.
Avoid soaking for two weeks. Baths and long swims accelerate fading. If you must be in water, use a waterproof bandage like liquid-bandage-spray for short exposures.
Thin coats beat thick ones during application and touch-ups. Artists should use light passes so the ink sits in the dermis, not lodged too deep. Ask about the needle grouping if you are worried about blowout.
Sun protection matters early and late. Once healed, use fragrance-free-sunblock-stick whenever a tattoo is exposed. UV is the fastest way color and crisp lines degrade.
If a piece is on a high-friction zone like fingers or ribs, plan for touch-ups. Budgeting ahead saves surprise costs and keeps lines crisp. Keep a note of the artist and session date for easy follow-up.
Keep clothing loose over new ink. Cotton shirts and slide sandals like slide-on-sandals-for-healing avoid rubbing and let air circulate.
When in doubt about scabbing, call your artist. Avoid over-washing or peeling scabs. A photo taken daily helps both you and the artist judge progress and prevents unnecessary clinic visits.
