
I kept booking artists who loved tiny wrist pieces and then asking them to suddenly design something that wrapped perfectly over my shoulder cap, and every time the curve read wrong on my arm in photos. The moment I started bringing photos of the tilt of my deltoid, plus a traced outline from my shirt, appointments stopped being a guessing game and started being design time.
These ideas are for anyone who wants a shoulder-cap-friendly tattoo that actually sits with clothing and movement, whether you are hiding tattoos at work or planning an eventual sleeve. I pulled these after sitting across five shops I have visited and testing small placement tweaks in three sessions. Expect a range of budgets, from single-hour fine-line pieces to multi-hour neo-traditional panels, and notes on which options are more coverable, which need color touch-ups over time, and which designs age best with natural shoulder motion.
1. Fine-Line Floral Crescent
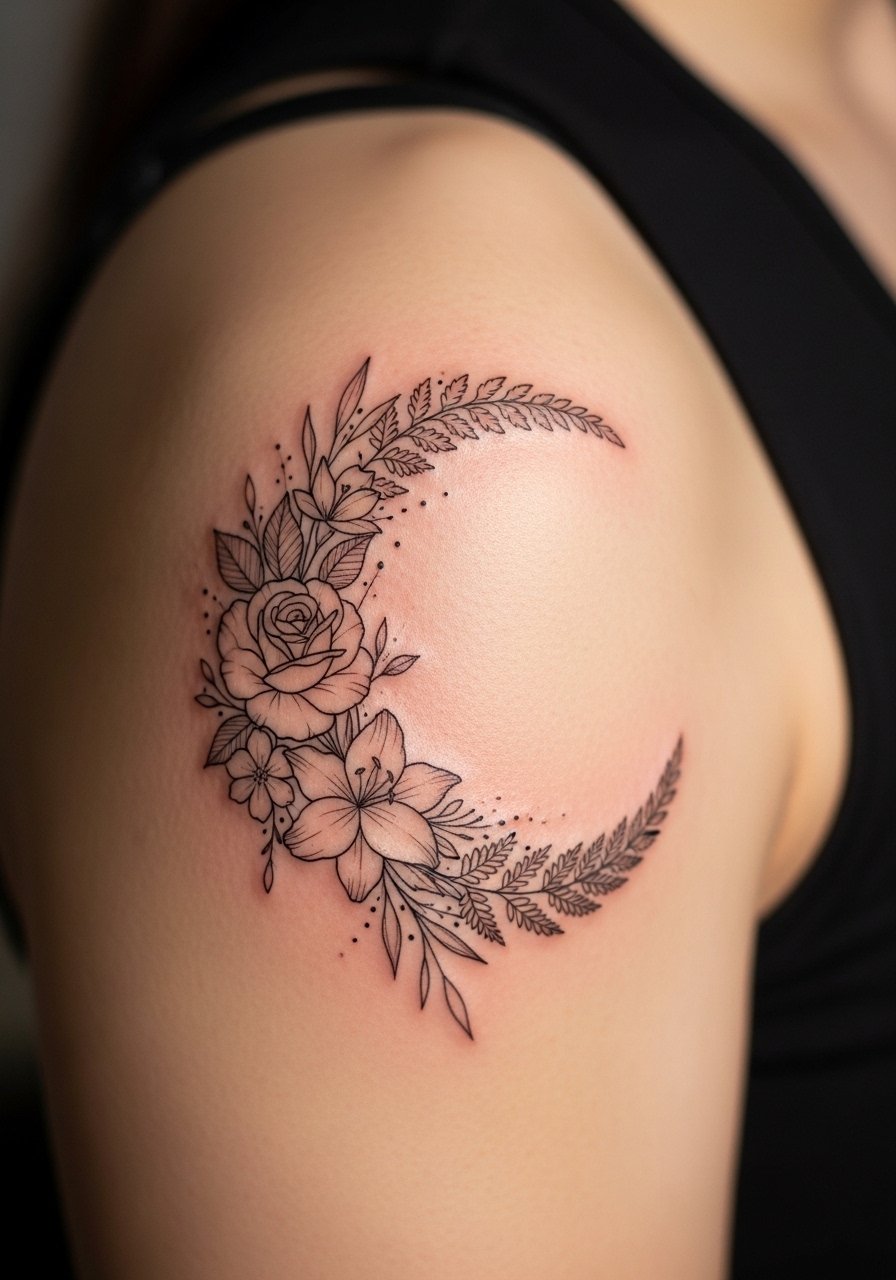
Style/Technique: Fine-Line Floral
Pain Level: 4/10
Session Time: 1 to 2 hours
Best For: Subtle visible art / those who want coverable pieces
A narrow crescent of tiny roses and leaves follows the natural curve of the deltoid and reads like an accessory under sleeveless tops. What makes it work is the mix of 0.25 to 0.35 mm hairlines and 10 to 15 percent negative space so the piece breathes when the arm moves. It feels quiet and intentional, best for people who want visible art without a bold commitment. Low budget, one short session, and simple aftercare. Bring a shirt tracing so your artist knows exactly where the crescent sits under real clothing. I usually carry a small fragrance-free tattoo balm for daily moisturizing after the first week.
Mistake to Avoid: Asking for thicker outlines to “make it pop” which flattens the crescent across the shoulder curve.
2. Geometric Band That Wraps the Cap
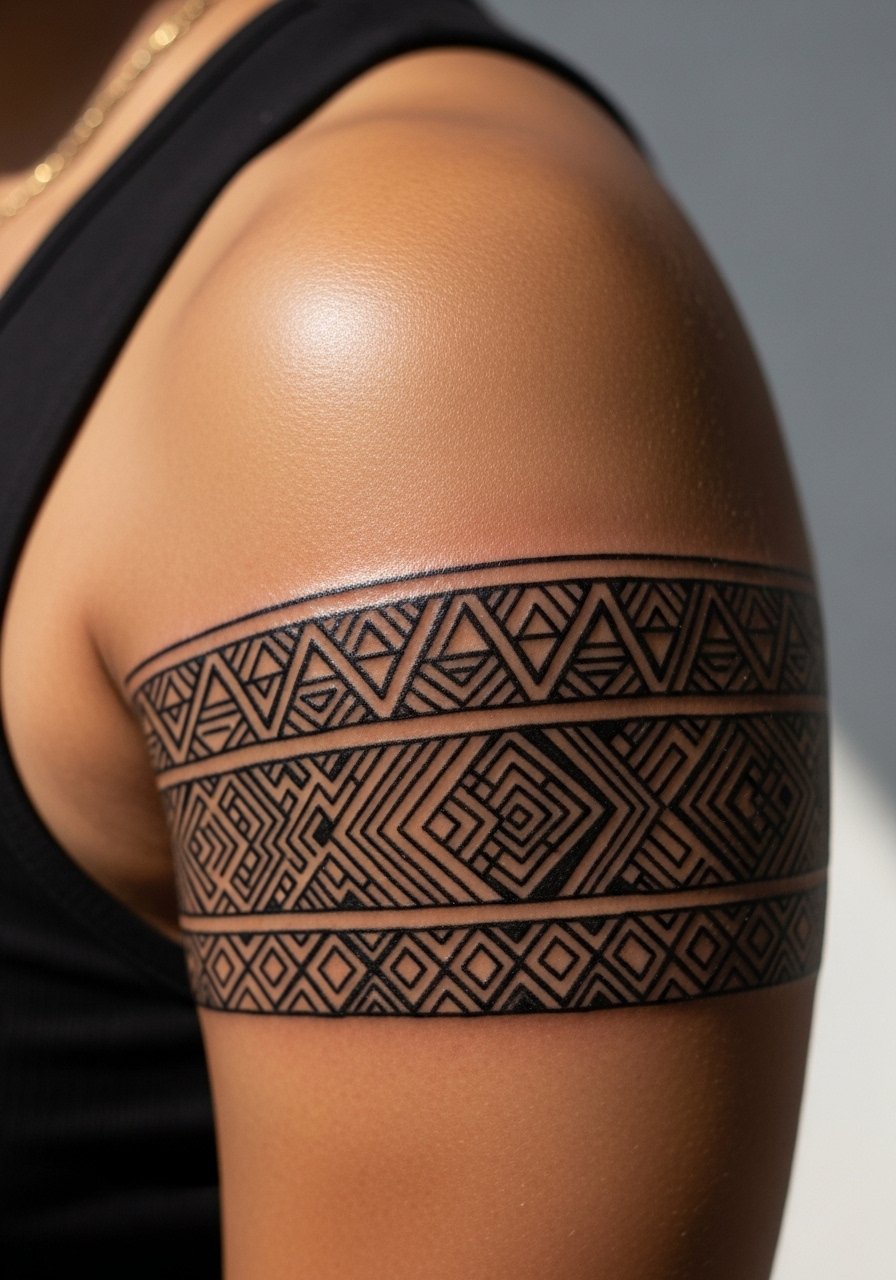
Style/Technique: Minimal Geometric Band
Pain Level: 3/10
Session Time: 1 hour
Best For: Clean modern looks / people with straight edges in their wardrobe
A narrow geometric band that starts on the shoulder cap and continues as a patterned strip onto the arm uses repeat spacing of roughly 6 mm between elements to keep the rhythm readable from every angle. The result is architectural and modern, a subtle cuff that reads like jewelry. It suits anyone who wears sleeveless tees or tailored blazers. Skill level is low for the stencil work but precise execution matters. I bring a single-use stencil transfer paper to appointments now to show distances and angles. Budget friendly and quick to heal.
Mistake to Avoid: Centering the band on the highest point of the shoulder bone which causes distortion when the arm hangs.
3. Watercolor Splash Across the Cap
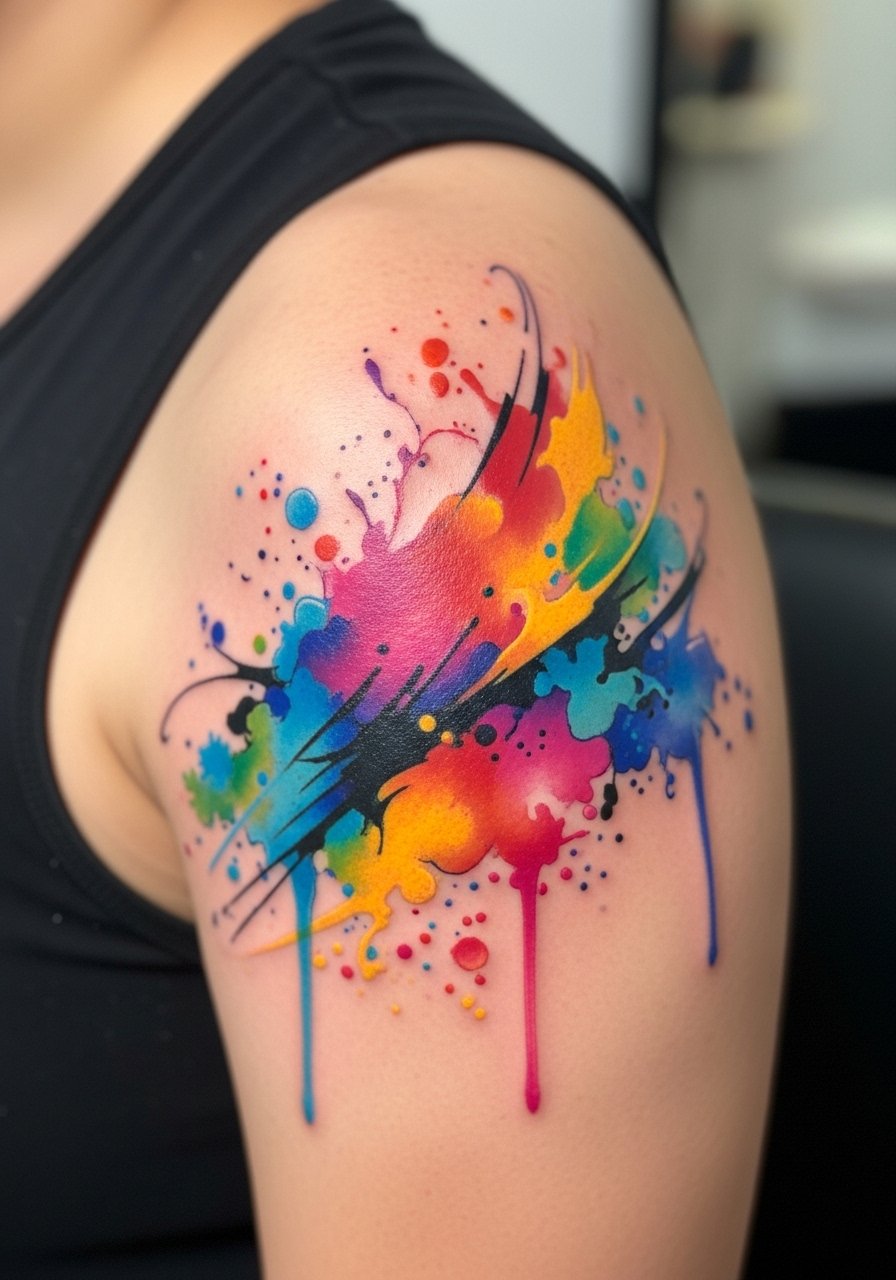
Style/Technique: Watercolor Blend
Pain Level: 5/10
Session Time: 2 to 3 hours
Best For: Color lovers who want painterly feels
A watercolor approach uses diluted color patches that sit beneath a light line frame, so the pigments melt into skin rather than sitting as hard blocks. The trick for the shoulder cap is keeping color saturation at 40 to 60 percent in high-motion zones so touch-ups are predictable instead of constant. This creates a soft, wearable art piece that feels like a permanent brushstroke when you move. Expect mid-range pricing and honest conversation about future touch-ups. Bring a reference palette and consider a healed-skin photo from the artist in similar lighting. A small tube of SPF block for tattoos is worth buying for long-term color care.
Mistake to Avoid: Requesting saturated color right at the edge of the cap where the pigment rubs against clothing during healing.
4. Botanical Vine That Grows Down the Arm
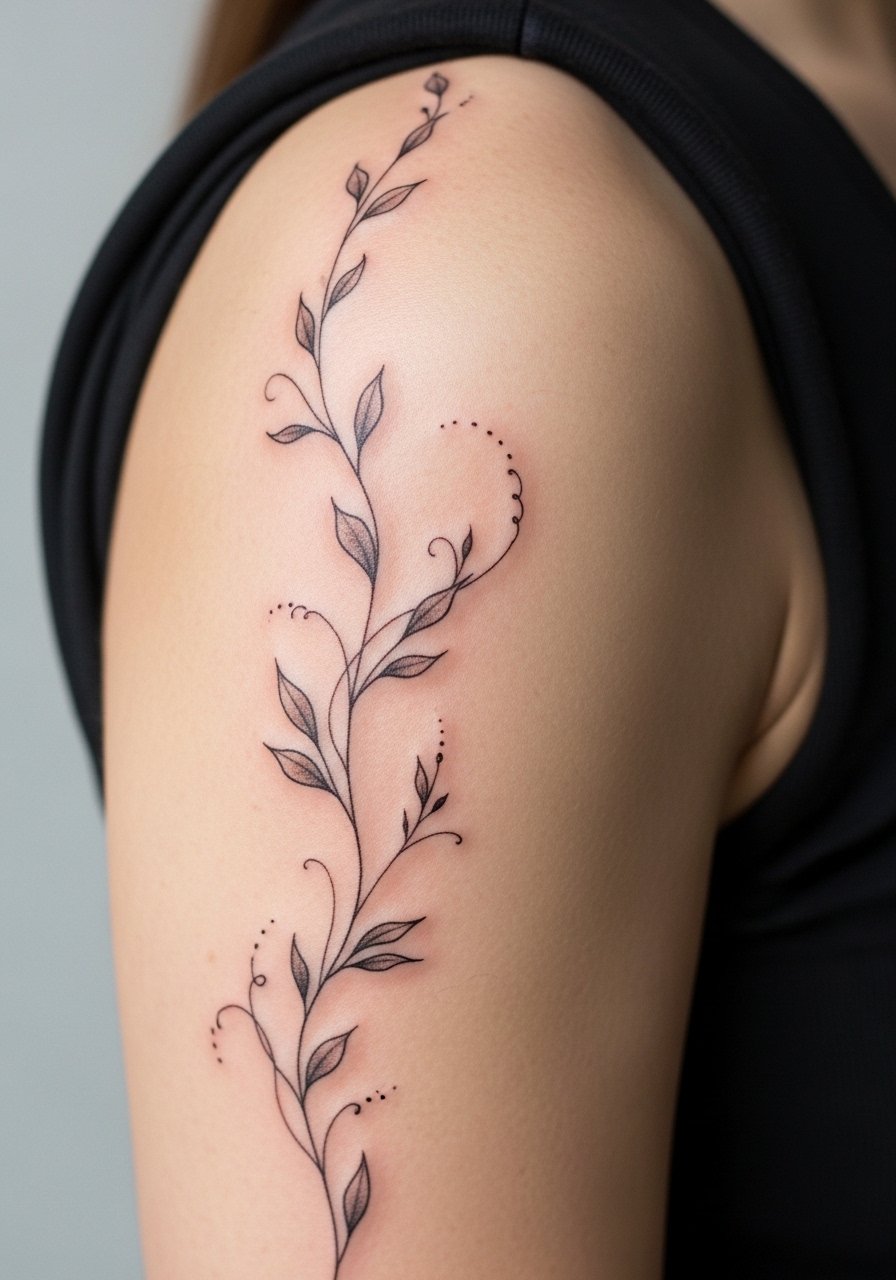
Style/Technique: Botanical Linework
Pain Level: 4/10
Session Time: 1.5 to 2.5 hours
Best For: Those who want a flowing piece that can extend later
A vine that starts at the cap then descends the arm reads as a natural extension of posture. The visual win is planning leaf placement at a 3:1 scale so larger leaves sit near the cap and smaller ones trail down, which prevents a top-heavy look. It feels organic, feminine or neutral depending on leaf shapes, and is easy to add onto later. Mid-budget and beginner friendly. I keep a small aftercare spray in my kit for the first week to reduce scabbing when lines are fine.
Mistake to Avoid: Crowding leaves too close together which makes the vine read as a blotch on curved skin.
5. Minimal Script Arched to the Cap
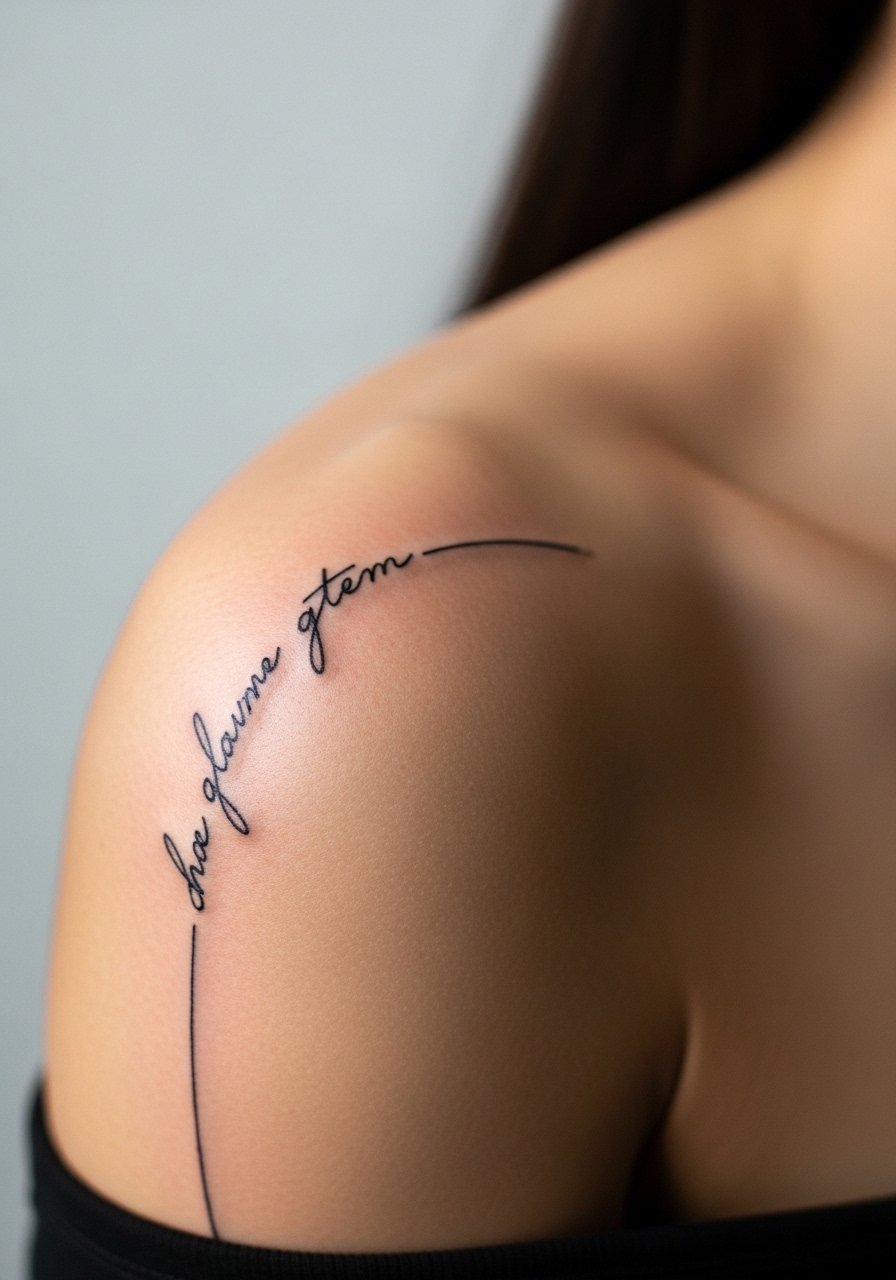
Style/Technique: Minimal Script
Pain Level: 3/10
Session Time: 0.5 to 1 hour
Best For: Name or message pieces that need to stay subtle
A single-word script arched gently along the cap is all about spacing and angle. Keep letter height between 6 and 9 mm so the text remains legible on the curve, and ask for letter spacing increased by about 8 percent compared with flat-skin layouts. The feel is intimate and personal, perfect for someone who wants meaning without bold visibility. Very budget friendly, usually a quick session. For stencil confidence I bring a printed line of my chosen font. A fine-tip tattoo aftercare ointment helps preserve the thin strokes during healing.
Mistake to Avoid: Letting the artist reduce letter spacing to cram the word into a shorter arc which makes letters blur together over time.
6. Neo-Traditional Portrait Fragment
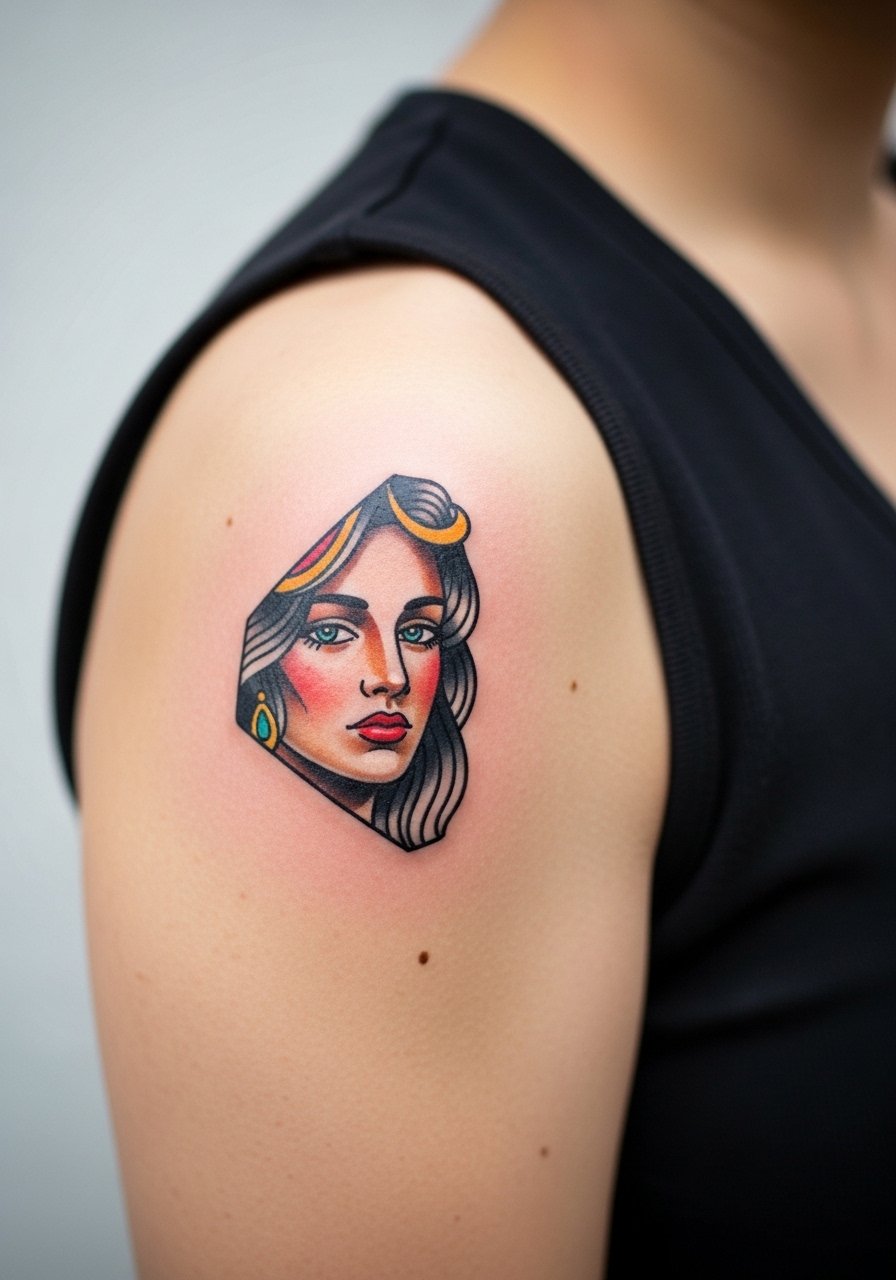
Style/Technique: Neo-Traditional Portrait
Pain Level: 6/10
Session Time: 2 to 4 hours
Best For: People who want bold color and vintage tattoo vibes
A portrait fragment uses bold color blocks and soft shading that hug the shoulder shape, usually in a 2:1 balance of shadow to highlight so the face reads at arm distance. This creates a statement area that still reads as part of a larger composition if you add more later. It feels confident and cinematic. Budget is higher because of color saturation and blending. Bring high-res reference photos and expect careful placement so faces do not "tilt" with your posture. I pick a reliable fragrance-free healing salve for the first fortnight.
Mistake to Avoid: Placing a portrait too close to the shoulder crease where motion distorts facial features during healing.
7. Tiny Constellation Cluster
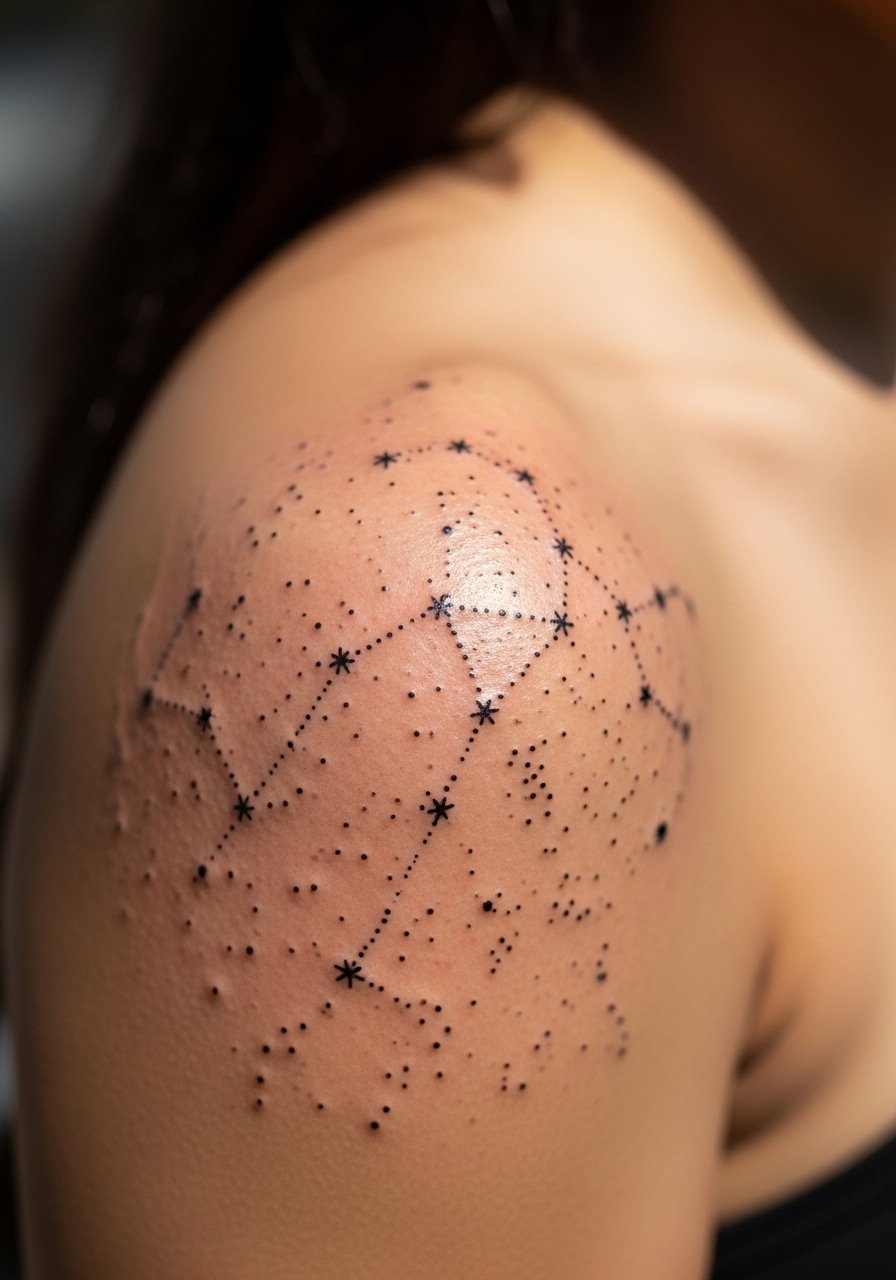
Style/Technique: Micro Dotwork Constellation
Pain Level: 2/10
Session Time: 0.5 to 1 hour
Best For: Subtle, scattered pieces that mimic freckles
Delicate dots and tiny star outlines across the cap read like a permanent sprinkle of jewelry. The visual success is in alternating dot sizes in a 2:1 ratio and keeping the densest cluster under 6 cm for balance. It creates a playful, light feeling and works well for those who want several small additions later. Very low cost and quick to heal. I sometimes ask for healed-stage mockups from the artist so I know how it photographs. A small pack of antibacterial soap is a practical aftercare buy.
Mistake to Avoid: Asking for too many dense dots which can merge into a muddy area after healing.
If any of these ideas have you ready to put together a reference kit, here are the products I actually use every appointment.
Artist-Ready Tattoo Kit Picks For Shoulder Caps
Stenciling & Prep:
- stencil transfer paper (~$8-15). Hand-trace your clothing lines onto this so placement is exact.
- single-use gloves (~$12-20). Small comfort win during short sessions.
Aftercare & Protection:
- fragrance-free tattoo balm (~$10-18). No scent helps avoid irritation.
- tattoo sunscreen stick (~$8-15). Daily SPF where clothing doesn’t cover.
Comfort & Practical:
- lightweight compression sleeve (~$12-20). Wear for travel home after a long session.
- small travel mirror (~$6-12). Check placement and healing photos at home.
Shoulder Cap Care Habits I Use
Keep the initial washes gentle. Use a mild unscented soap in lukewarm water and pat dry, not rub. I recommend a small bar or liquid with no dyes and a mild antibacterial soap for the first 48 hours.
Grab fragrance-free tattoo balm for daily hydration after the first three days. Thin layers twice a day prevent clogging pores around hair follicles on the shoulder.
If your piece is in a high-rub area, wear a loose cotton tee over it for the first week. A pack of soft cotton t-shirts that won’t stick makes sleeping and commuting less annoying.
When the design uses color, protect it with a stick tattoo sunscreen once healed. Sun exposure at the cap fades pigment faster than on the inner arm.
If you plan to extend the piece later, photograph the healed tattoo in diffuse daylight and bring those images. A reliable small travel mirror helps check angles when you are planning additions.
