
I kept asking for longer tips at the salon and then snapped one the next day, blaming my job, my bag, whatever I could think of. After a few too many chip-and-repair weekends I learned short acrylics can look cleaner and last longer if you stop trying to make them look like magazine photos. The trick was picking shapes and finishes that work for short nails, not against them.
These nine looks are low fuss, wallet-friendly, and geared to someone who wants a polished mani without daily maintenance. I tested versions with a tech who works at a salon downtown, and most of these take 30 minutes to install and five to ten minutes to maintain at home. Expect basic tools, an LED lamp, and one or two reliable polishes. If you like short lengths because they fit work and busy hands, these are the ones that actually hold up.
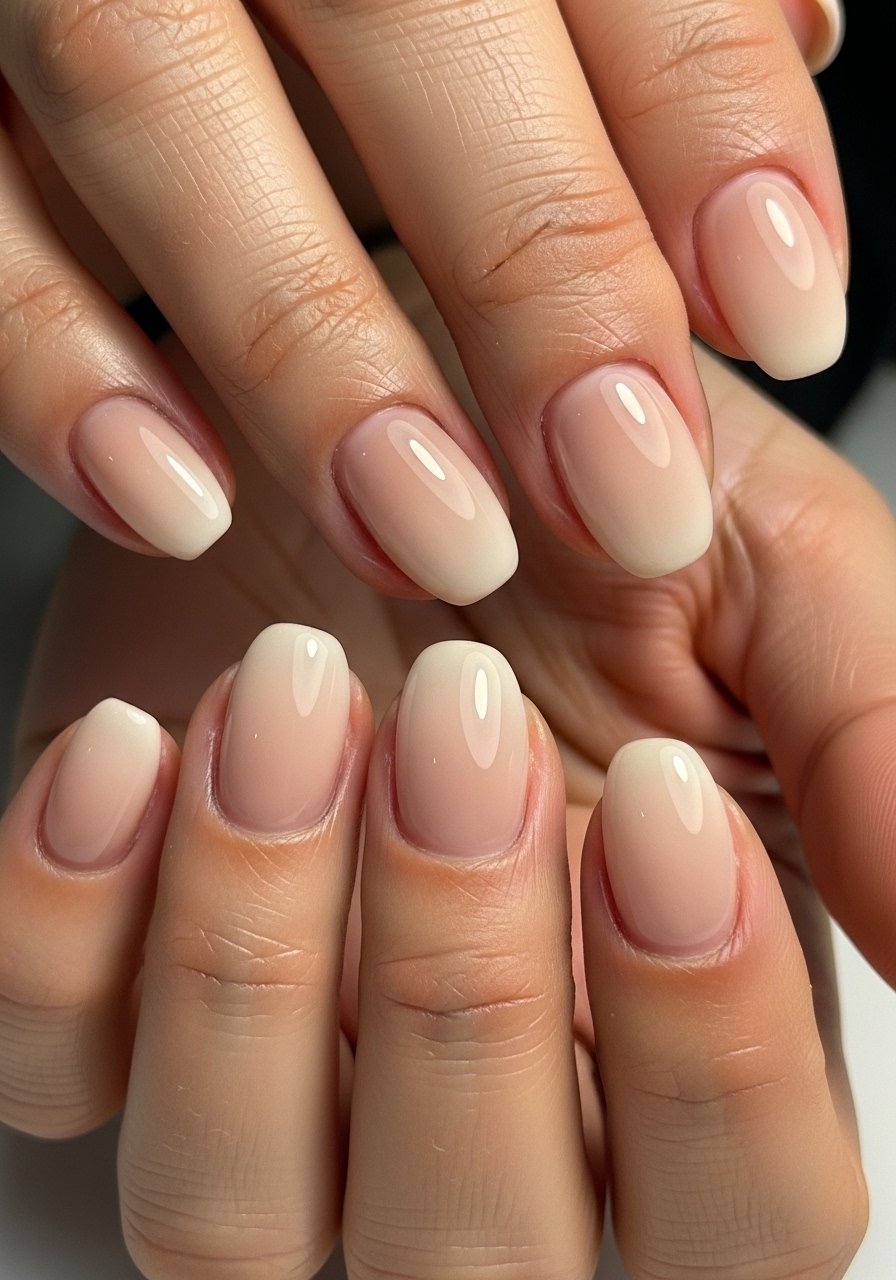
1. Clean Squoval in Soft Nude

Short squoval is the workhorse shape. It keeps corners from catching and reads polished without needing length. For acrylics ask your tech for a 1 mm free edge and a soft file at a 45 degree angle to avoid thinning natural nail. I usually ask for a thin acrylic overlay, two thin coats of builder gel color, and a glossy top coat. Try a neutral builder gel like builder-gel-clear and finish with quick-dry-top-coat. This is beginner friendly and fits office, errands, and short-party looks.
Mistake to Avoid: Asking for thick tips to compensate for short length, which creates bulk and chips faster.
2. Minimal French with Soft Smile Line
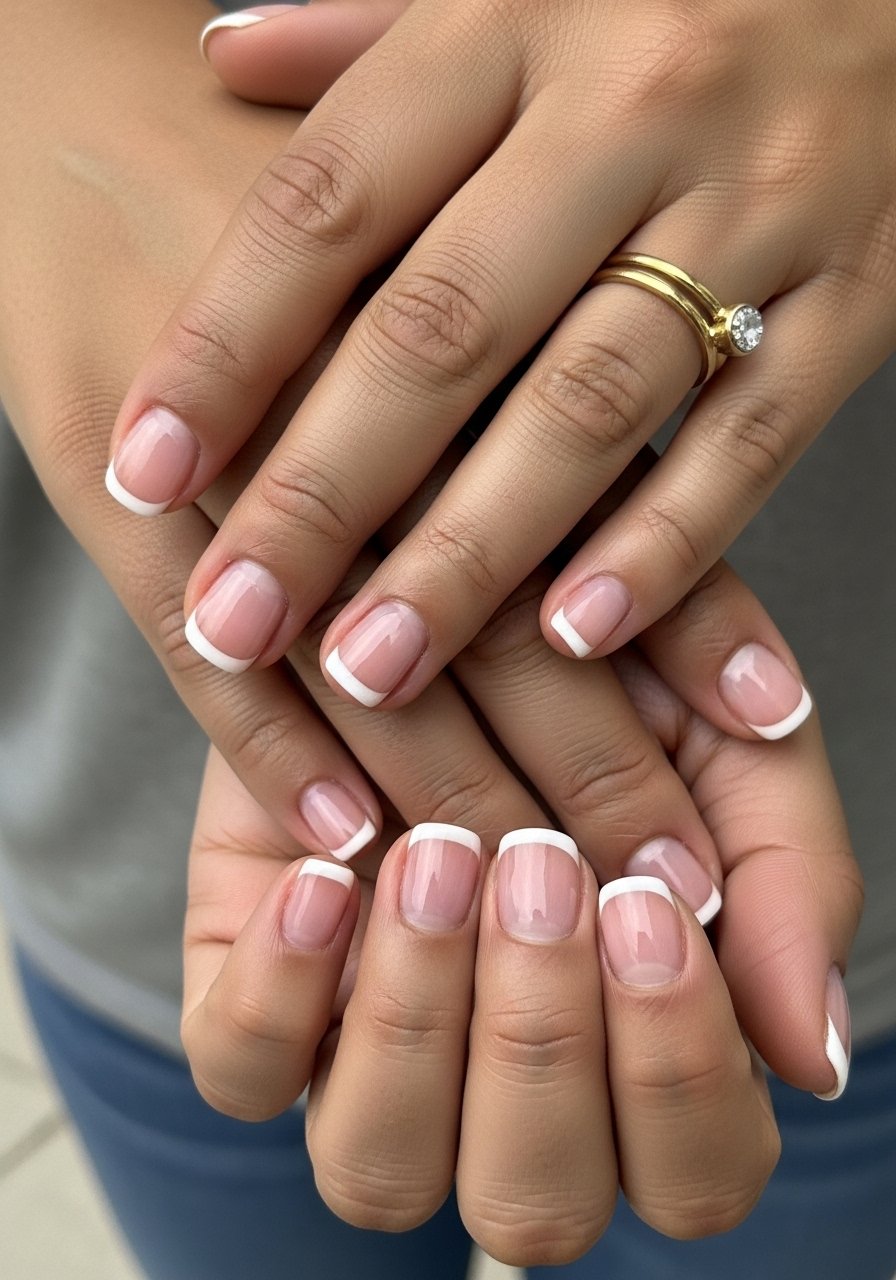
A slim smile line reads tidy on short nails, unlike high-contrast classic tips that shrink the nail visually. Have your tech paint the white line about 1.5 mm from the edge rather than at the very tip, then blend the base with a sheer pink overlay. Use a 3:1 thin-to-medium ratio on your base coats, meaning three thin layers of sheer base and one slightly thicker sealing layer. I love pairing a crisp white like nail-art-white with a sheer pink builder gel. This look is low-skill for upkeep and lasts through typing and dishes.
Mistake to Avoid: Painting the white too thick, which flakes and looks heavy on short lengths.
3. Matte Neutral With Micro Gold Dot
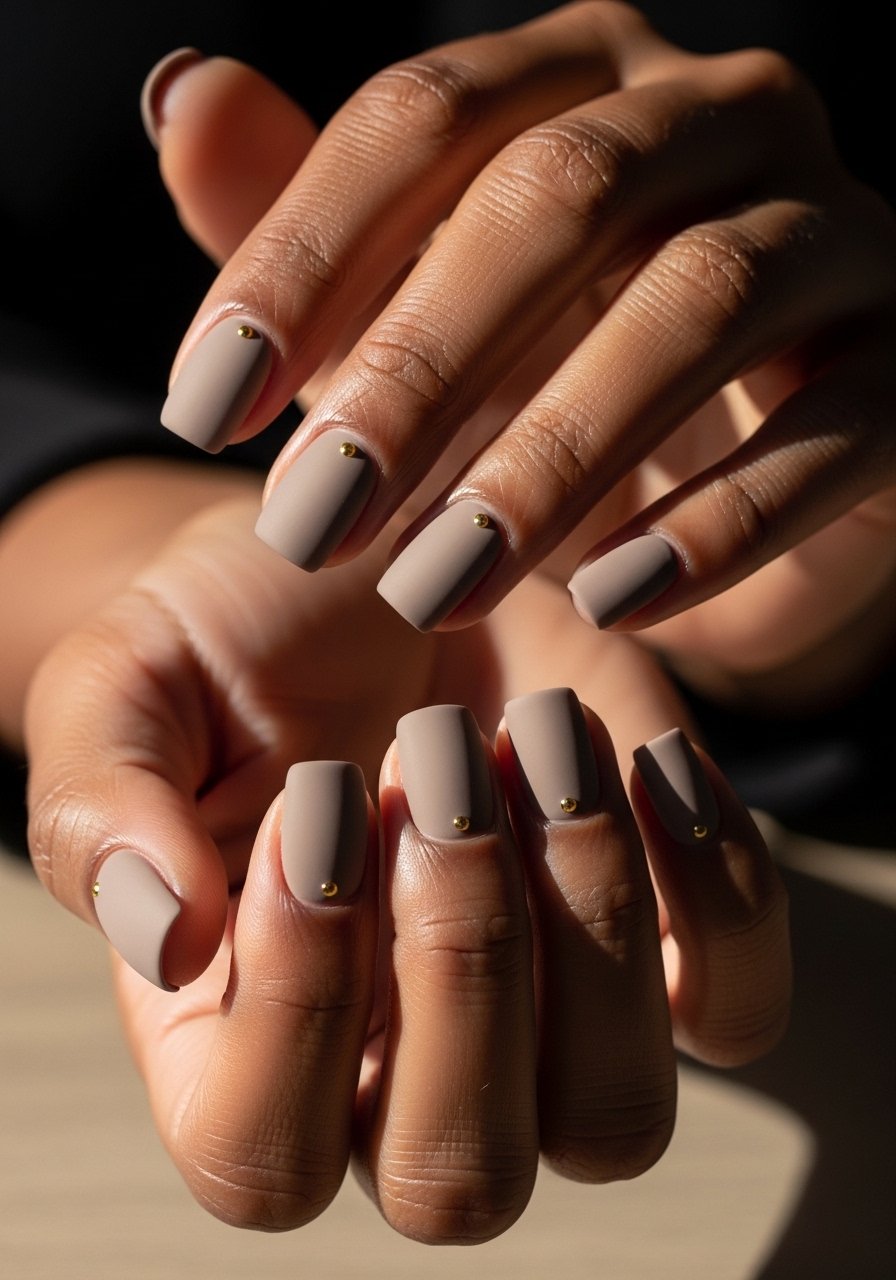
Matte finishes visually shorten glare and make nails look refined and modern. For short acrylics I ask for a matte top coat applied after two thin color layers, then I add a 1 mm gold dot placed off-center near the cuticle for interest. The dot is glued with a tiny amount of gel and cured 30 seconds. Try a durable matte like matte-top-coat and tiny metallic studs from micro-nail-studs. This style feels grown-up and is a nice budget pick because one bottle covers many manicures.
Mistake to Avoid: Rubbing matte top coat too soon, which can streak the finish.
4. Sheer Jelly Pink With Wispy Glitter
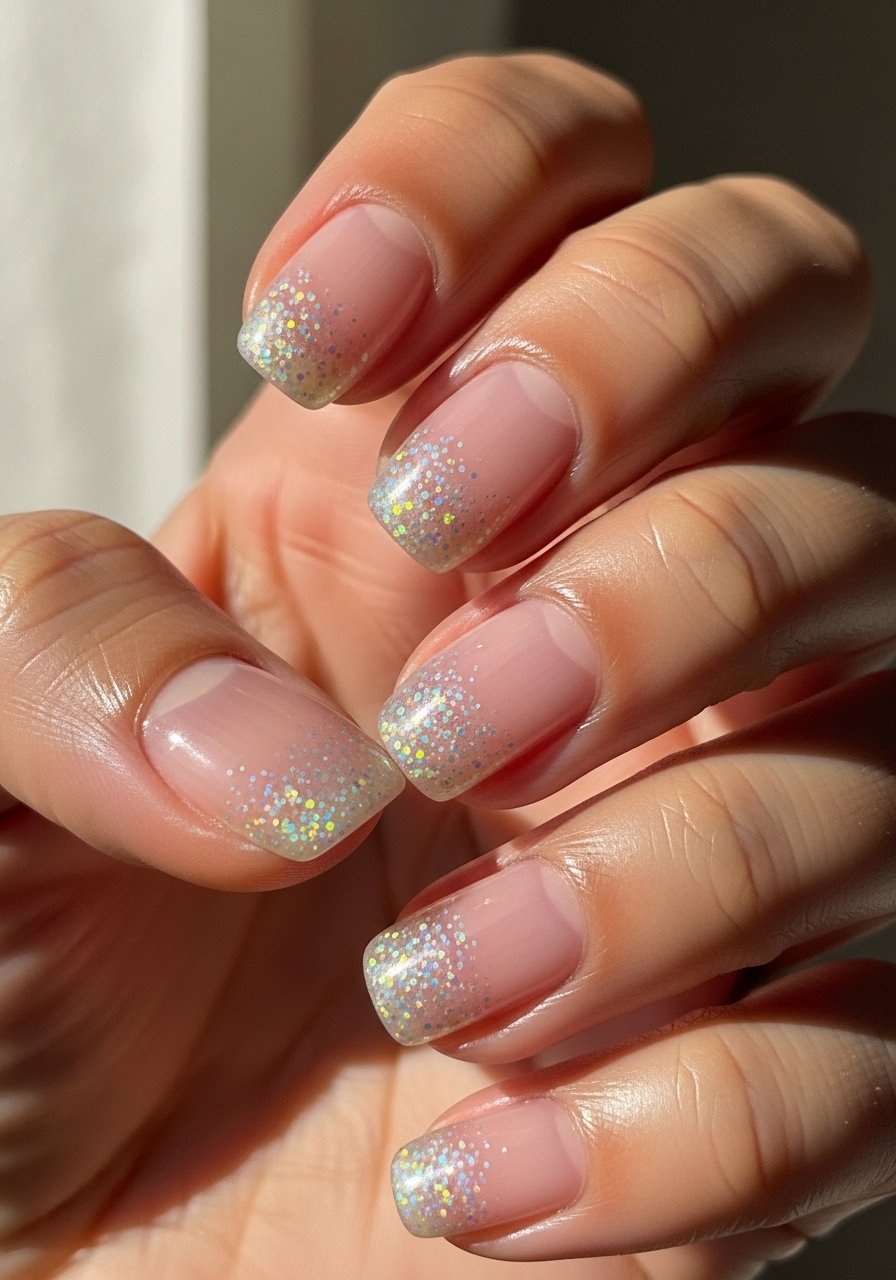
The jelly look brings depth without length. Ask for three thin jelly layers, each cured 30 to 60 seconds depending on the lamp. Add glitter with a light tap pattern, concentrating toward the free edge so the glitter does not add bulk near the cuticle. I mix a glitter topper like light-holo-topper sparingly with builder gel for control. This gives a playful sheen while keeping nails practical for keyboard and kitchen work. Low commitment and easy to refresh with one thin overlay between fills.
Mistake to Avoid: Dipping the brush into glitter and slapping it on, which makes lumps that lift.
5. Tiny Abstract Lines on Short Squared Tips
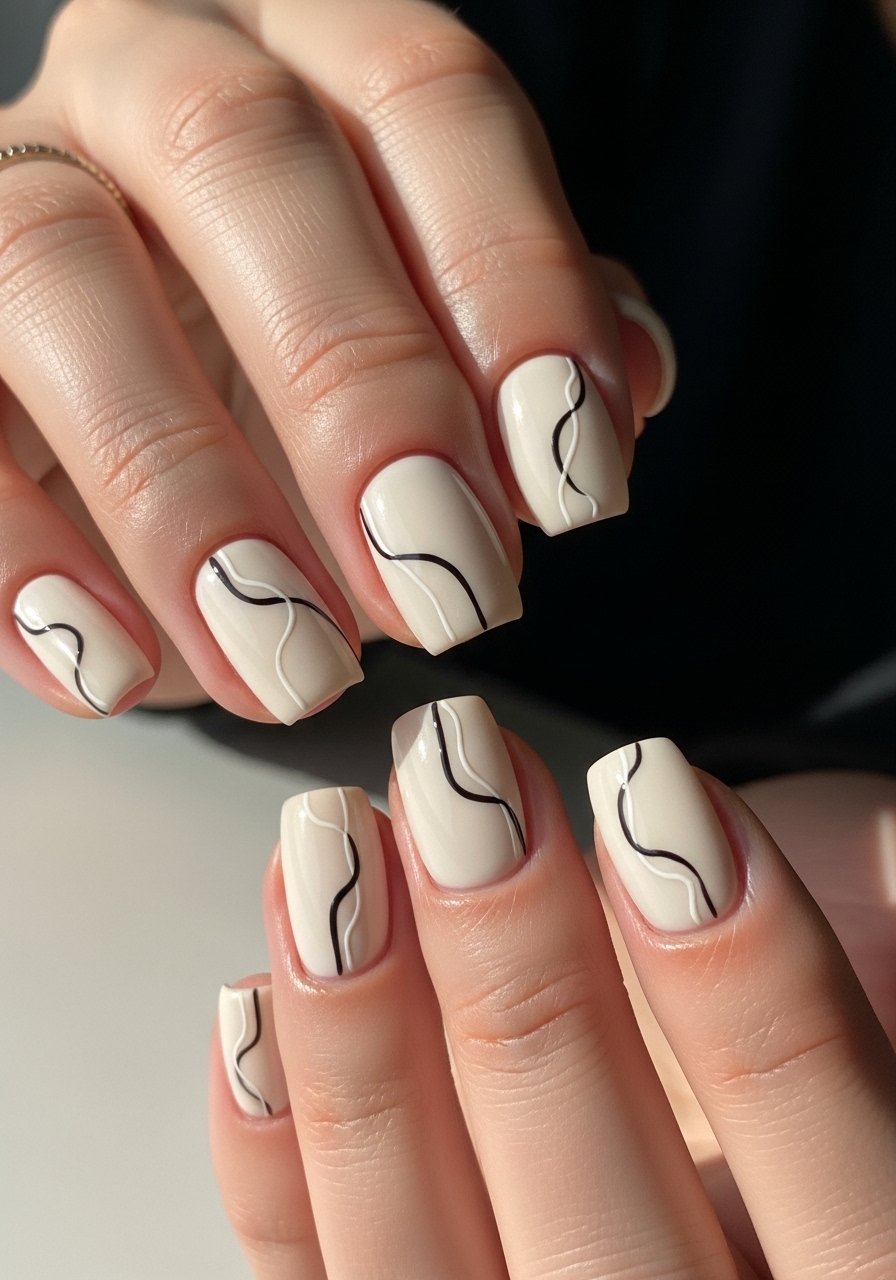
A few thin, deliberate lines go a long way on a short canvas. Use a negative-space cream base and add one to two ink-thin strokes with a striping brush. Keep the lines at 0.5 to 1 mm width so they read crisp at arm's length. I prefer doing the artwork on alternate nails to keep the look simple and easy to redo at home with a fine-striping-brush and a fast-drying black polish. This is great for someone who likes a modern, artful vibe without complex maintenance.
Mistake to Avoid: Overloading every nail with lines, which makes the design feel cluttered.
6. Soft Chrome Accent on One Nail

A single chrome accent updates a simple mani instantly. Keep the rest of the nails a soft neutral and go chrome on the ring finger only. After curing a base layer, buff the chrome pigment lightly into a thin layer of no-wipe top coat and cure 60 seconds. Use a compact kit like chrome-powder-kit and a no-wipe top coat no-wipe-top-coat. This approach reads modern and classy, and because chrome is dense you need only a tiny amount to get the effect.
Mistake to Avoid: Rubbing chrome repeatedly, which creates streaks instead of smooth reflectivity.
7. Low-Maintenance Matte French Edge

Instead of a high contrast French tip, opt for a matte-tonal edge that gently frames the nail. Have the tech paint the edge 1 mm narrower than a classic tip and finish with matte top coat. The small margin gives a clean silhouette and hides minor regrowth. I use a thin angled brush and a steady hand or ask for a gel pen outline then matte seal. Try angled-nail-brush for at-home touch ups. This is a great office-friendly option that looks fresh even three weeks in.
Mistake to Avoid: Making the edge too thick, which becomes obviously regrown quickly.
If any of these have you ready to shop, here are the essentials I actually reach for.
Short Acrylic Nail Kit
Tools
- 180-grit-file (~$5-10), for shaping the free edge gently.
- fine-striping-brush (~$6-12), for minimal abstract lines and French edges.
- angled-nail-brush (~$7-14), for crisp small edges.
Products
- no-wipe-top-coat-nail (~$9-16), for chrome and glossy seals.
- matte-top-coat (~$8-14), for all-matte finishes.
- builder-gel-clear (~$12-25), for thin overlays that protect the natural nail.
Extras
- micro-nail-studs (~$6-10), for tiny accents.
- light-holo-topper (~$7-15), for subtle glitter effects.
8. Neutral Ombre With Short Fade
A compact ombre gives the sense of length without actual extension. For short acrylics request a baby-botomy fade technique, where colors blend in two to three passes, each pass about 30 percent coverage, building to full opacity. Use a small sponge or a soft brush and cure between passes for cleaner blends. I often use a cream beige and soft pink combination and seal with a glossy or matte top coat. Products like ombre-sponge-tool and a sheer builder gel make this attainable at home if you are patient. This is feminine, subtle, and great for casual events.
Mistake to Avoid: Rushing the blend in one pass, which shows harsh lines and looks messy.
9. Tiny Negative Space Heart Accent

Negative space art reads delicate on short nails. Paint a pale neutral base, then use a fine brush to outline a 2 mm heart and remove the center with a dot of remover or by filling with base color before sealing. Keep the heart small so it does not overwhelm the nail. For tools grab fine-dotting-tools and a reliable neutral polish. This is playful, low-fuss, and holds up well because the heart is tiny and less likely to chip visibly.
Mistake to Avoid: Scaling the heart too large so it eats the nail surface and looks crowded.
Short Acrylic Mani Habits
Thin coats beat one thick coat every time. Three thin layers of color cured individually, followed by a top coat like no-wipe-top-coat-nail, are smoother and last longer than one heavy swipe.
Keep cuticles moisturized nightly with a balm. Grab cuticle-repair-balm and massage for thirty seconds to prevent lifting and hangnails.
File gently along the edge rather than back and forth. A 180-grit-file maintained in the kit prevents cracking and extends fills.
When you need a quick fix, press a tiny drop of clear builder gel onto a chipped edge and cure for thirty seconds. builder-gel-clear costs little and saves a salon trip.
Always store small nail jewelry in a small container. micro-nail-studs kept organized make touch ups painless.
