
I kept ruining perfectly good gel polishes by rushing the base, which meant my dots smeared or lifted inside two days. After one mani that bubbled like tiny craters, I learned to slow down and change one small habit. That one change made polka dots look deliberate instead of accidental, and finally I started enjoying playful nails that survived my keyboard-heavy workdays.
If you want pretty nails that last, these ideas are for people who like polish that behaves, not showy salon-level engineering. Most are beginner friendly, many can be done at home in under 45 minutes, and I include budget tools plus a few splurge pieces for when you want a cleaner finish. Most people getting their nails done these days are asking for gel, not acrylic.
1. Classic White Dots on Sheer Pink
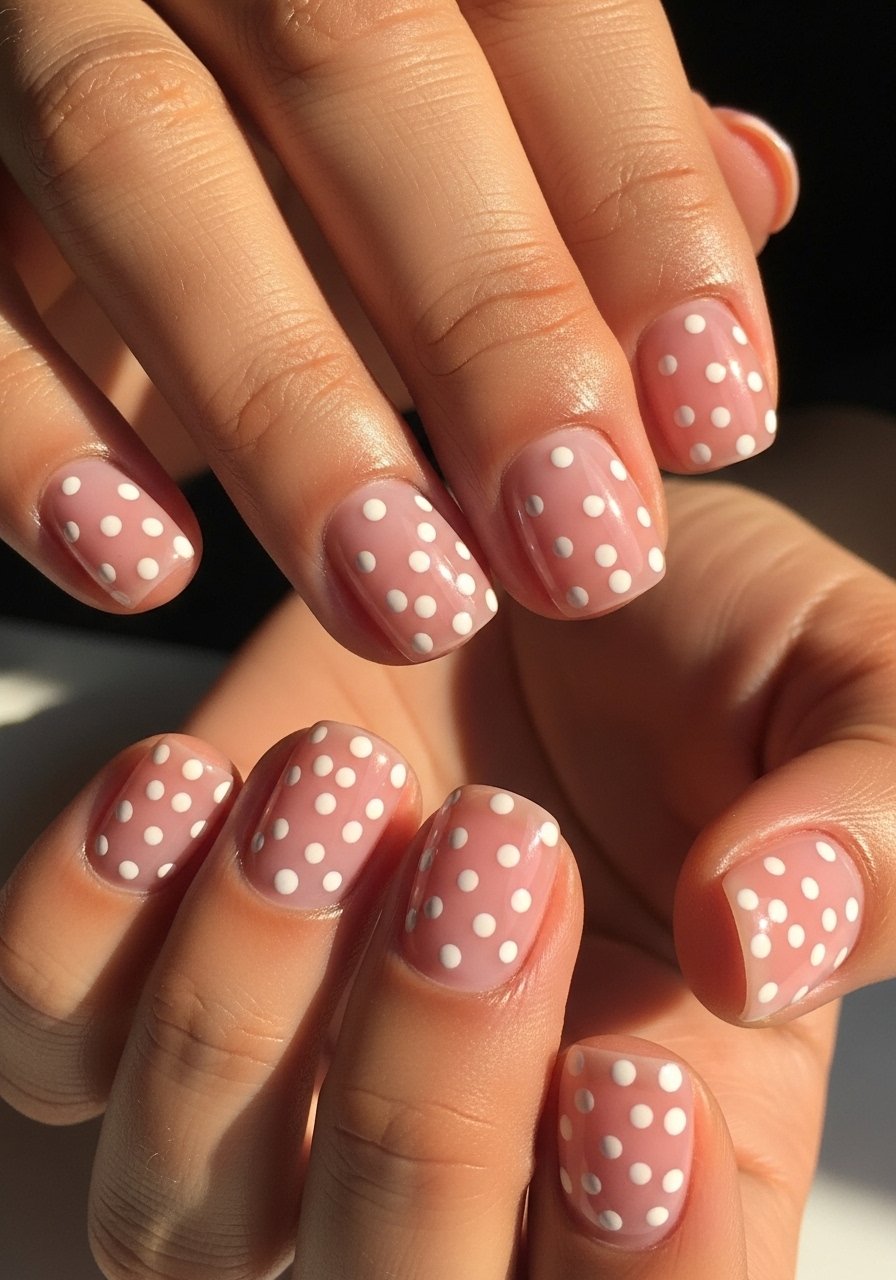
Style/Vibe: Soft Classic
Best For: Short nails, everyday wear
Skill: Beginner
I learned that white dots need an opaque base layer beneath them to stop the dots from looking ghosted in photos. Paint two thin sheer-pink gel coats, cure each for 30 seconds, then use a 1 mm dotting tool and a pure white gel, curing 30 to 45 seconds per dot. The result reads clean and wearable, like a tidy vintage manicure. Use a peel-off base on delicate nails, or a tack-free top if you want glossy shine. Pair with a quick-dry top coat if you are impatient.
Mistake to Avoid: Pressing too hard with the dotting tool and dragging the polish into an irregular blob.
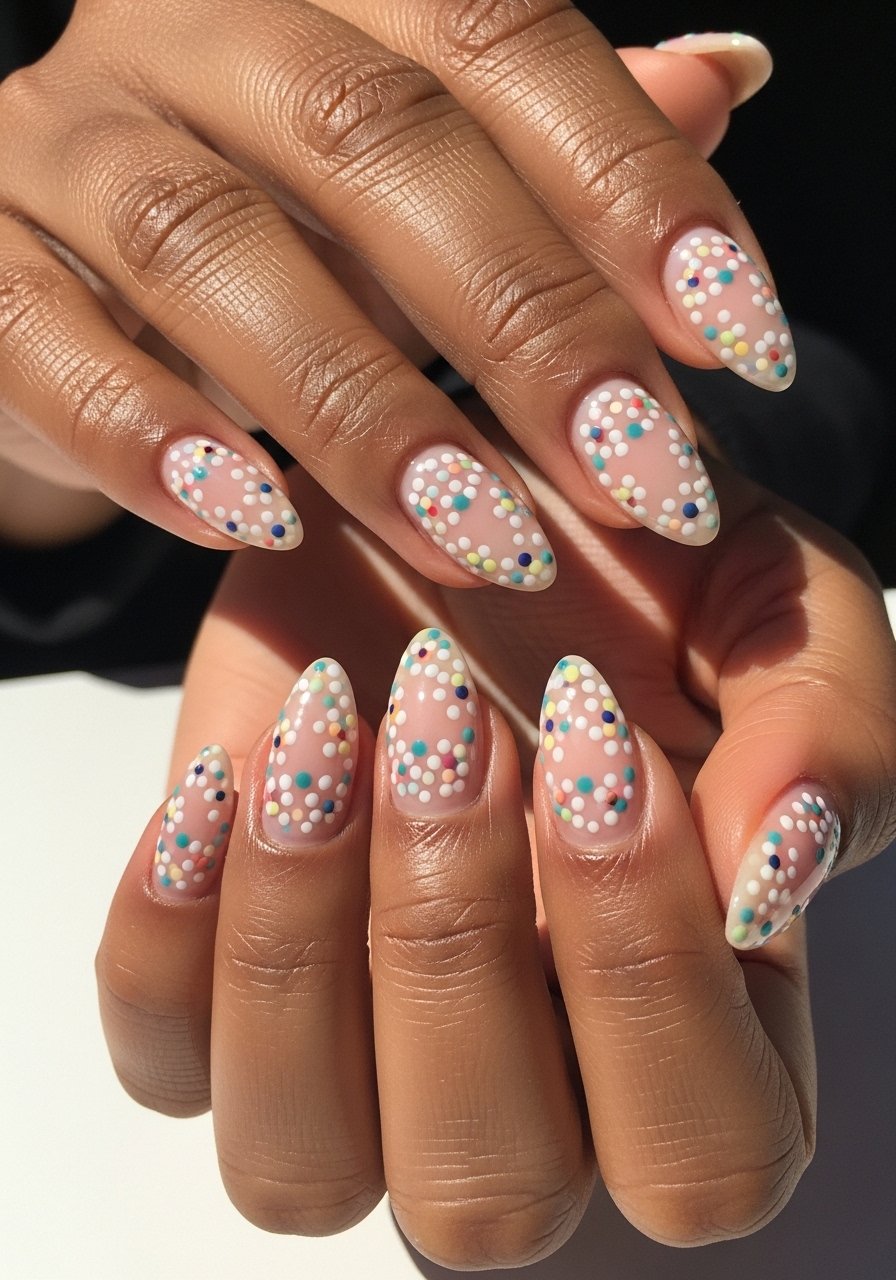
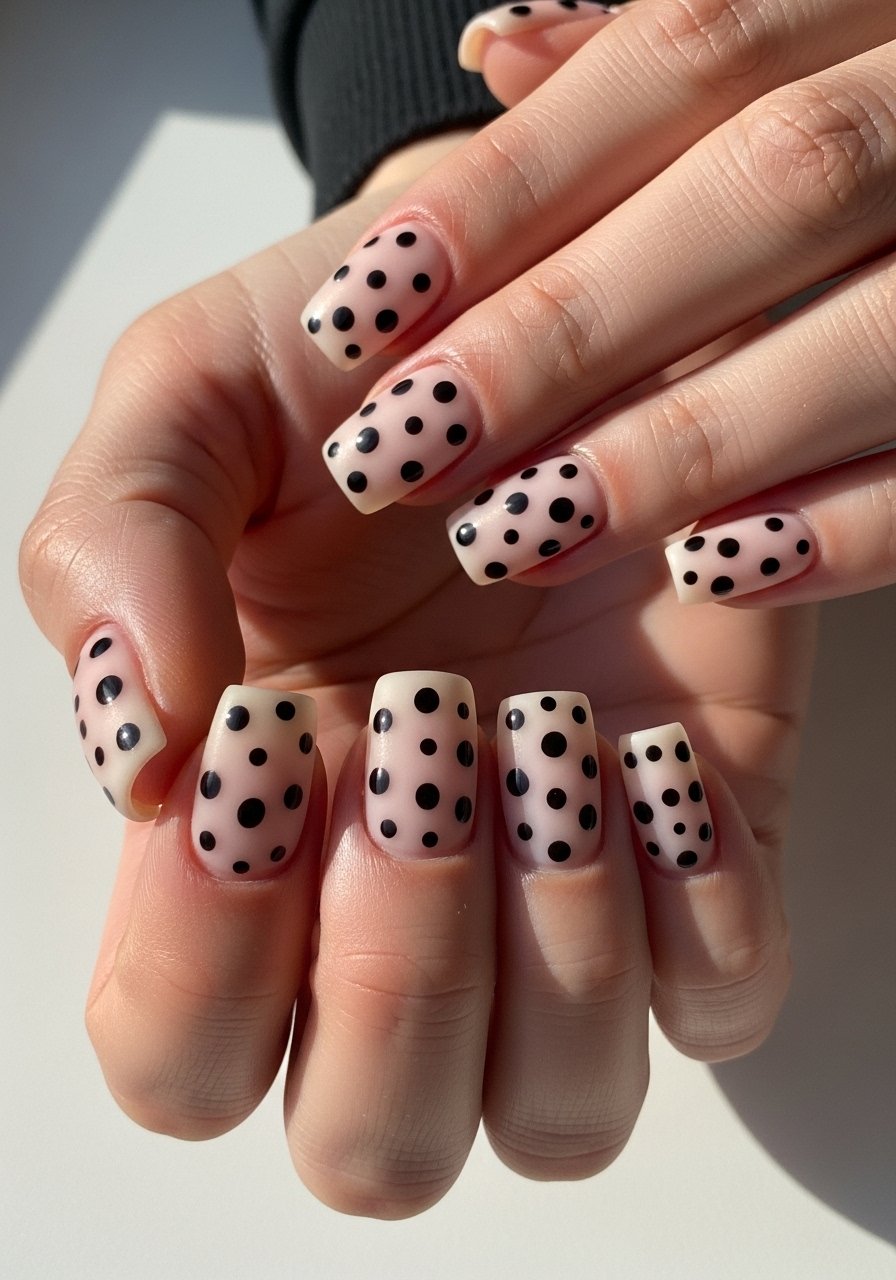
2. Tiny Confetti Dots on Matte Black
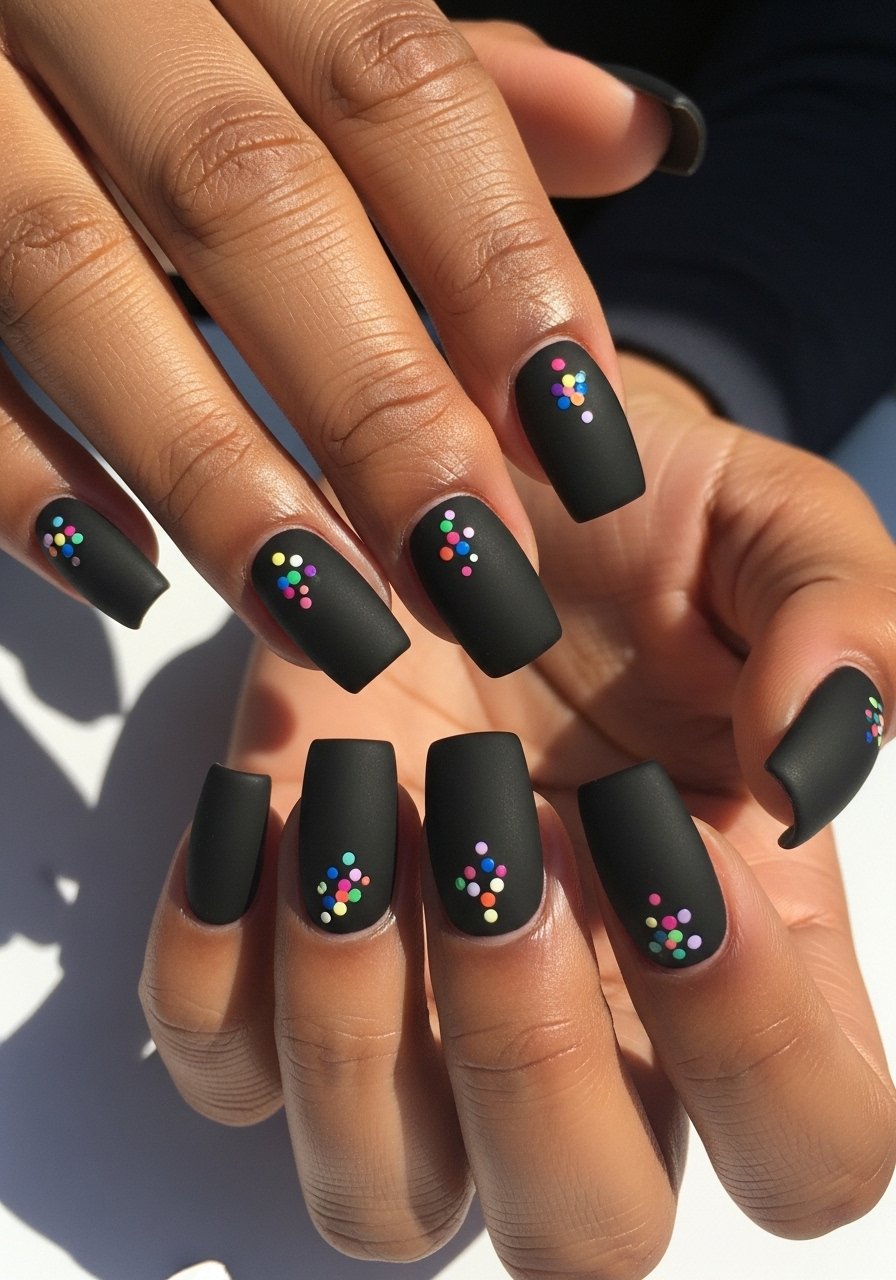
Style/Vibe: Modern Playful
Best For: Medium nails, night out
Skill: Intermediate
Tiny dots look like confetti when they are consistently sized and spaced. Work with a 0.5 mm pin or the tip of a very fine brush, and load only a speck of polish so each dot maintains a crisp edge. After curing the matte top coat for 60 seconds, use a glossy gel top coat on one accent nail to create contrast. This technique takes a little patience but the effect reads high-end. I use a gel color that cures tacky then seal with a no-wipe matte top coat for an on-trend finish.
Mistake to Avoid: Overloading your tool so dots merge into messy clusters.
3. Negative Space Polka Rows
Style/Vibe: Minimal Chic
Best For: Long nails, editorial looks
Skill: Intermediate
Negative space gives dots room to breathe and looks current without feeling busy. Use a clear builder gel as your base and map out rows 2 mm apart with a light pencil before adding dots. Alternate single and double dots every third nail for rhythm. This is low-paint, so cure for 30 seconds per layer and finish with a thin layer of glossy top coat. Works well if you want a salon look without a full-coverage color.
Mistake to Avoid: Skipping a thin clear base layer, which makes later layers lift around the cuticle.
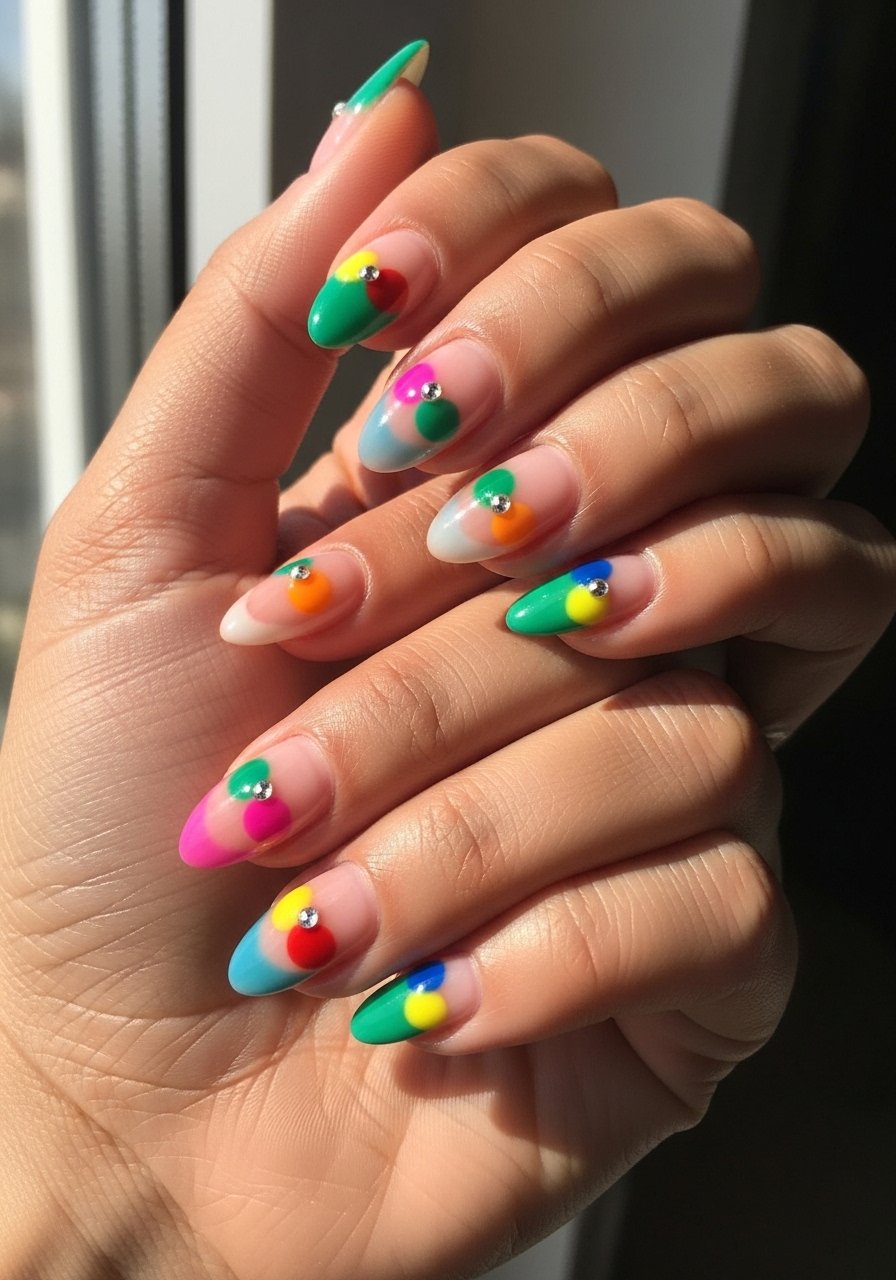
4. Oversized Contrast Dots on Pastel Base
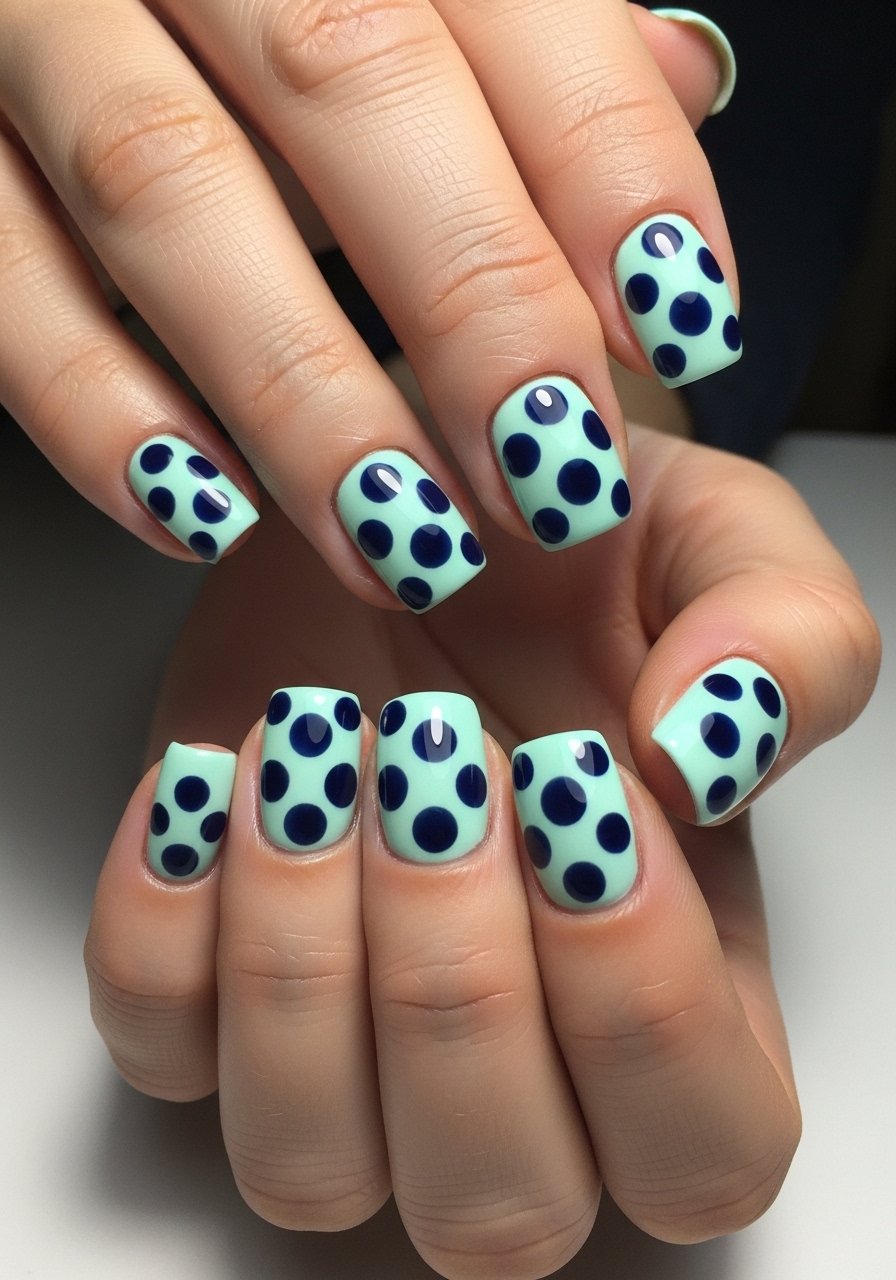
Style/Vibe: Bold Soft
Best For: Short nails, statement mani
Skill: Beginner
The trick for large, graphic dots is controlling dot pressure. Use a 3 mm dotting tool and dip it briefly, then stamp the dot straight down without rocking. Larger dots read playful and survive hands-on days because they hide small chips. Pastel bases with a dark contrasting dot read fresh for spring and work on most skin tones. Two thin base coats are better than one thick one, and cure fully to avoid dents when you press the dotting tool.
Mistake to Avoid: Using one thick base coat so the surface dents when you place a large dot.
5. Glitter Core Polka Dots
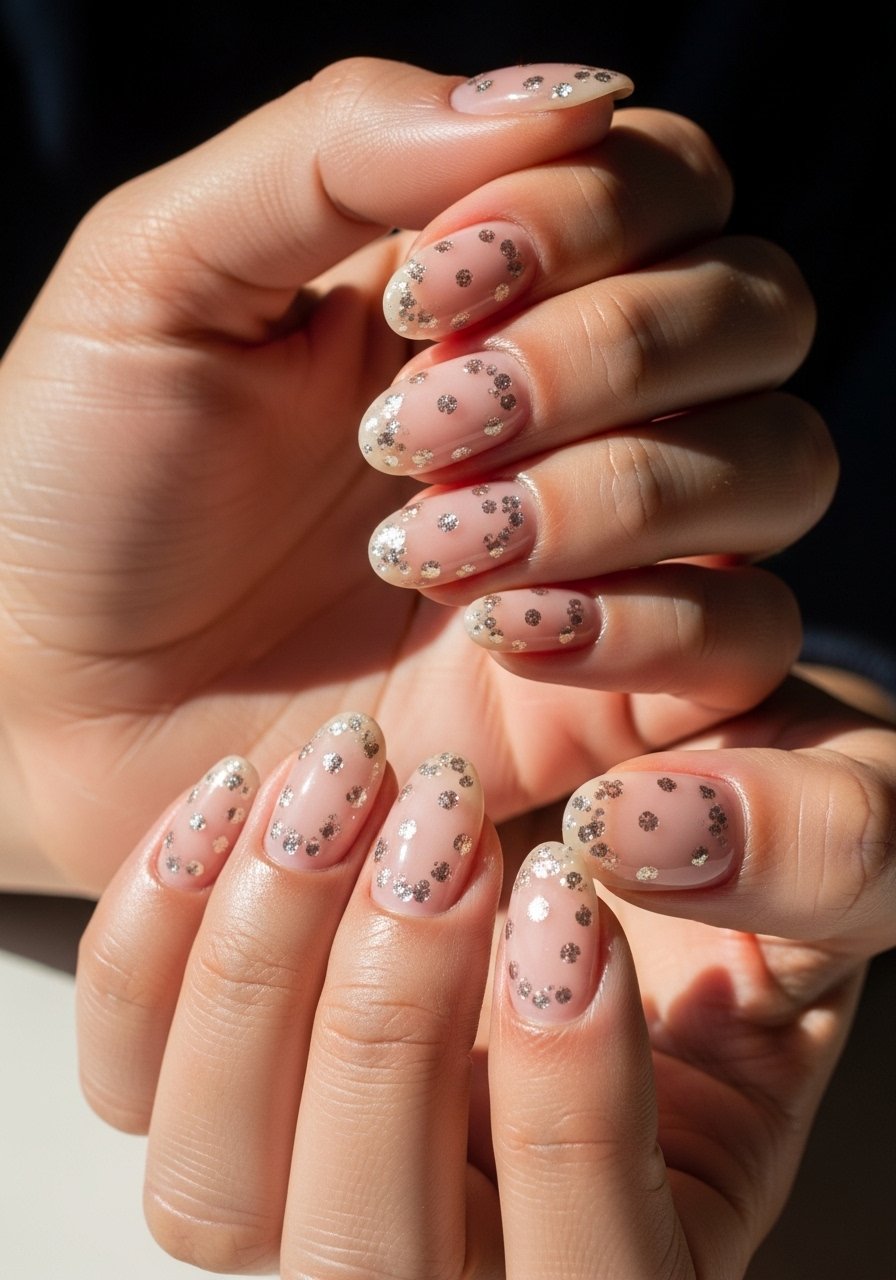
Style/Vibe: Subtle Sparkle
Best For: Medium nails, special events
Skill: Intermediate
Fill the dot center with a tiny dab of clear gel and sprinkle micro-glitter before curing, or use a glitter gel and press it into the dot while tacky. The key is to keep dots small, about 1.5 mm, so the glitter reads intentional. Cure for 60 seconds if using a dense glitter gel to avoid uncured resin. This looks luxe without being over the top and saves you from an all-over glitter mani that feels loud.
Mistake to Avoid: Applying glitter to an uncured surface, which drags the glitter into streaks.
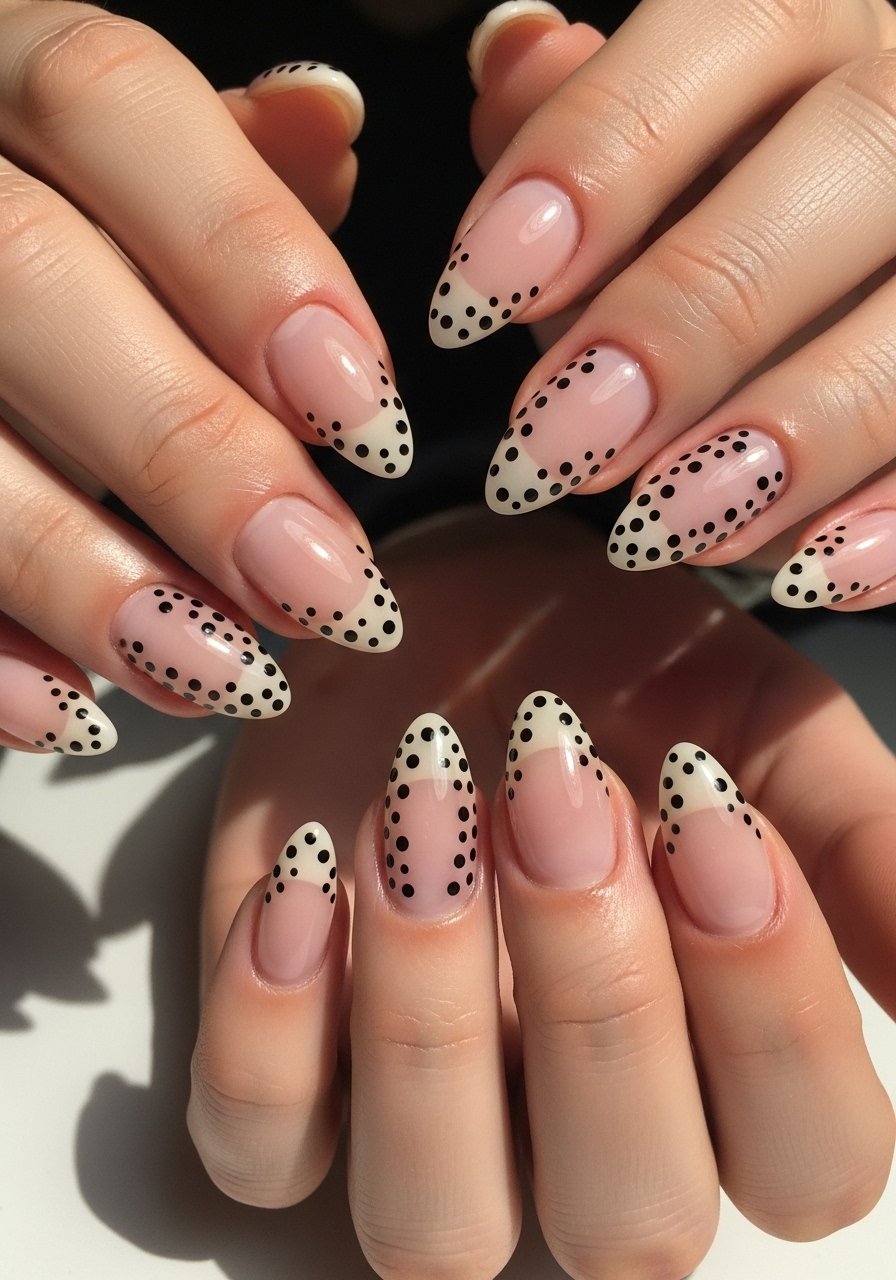
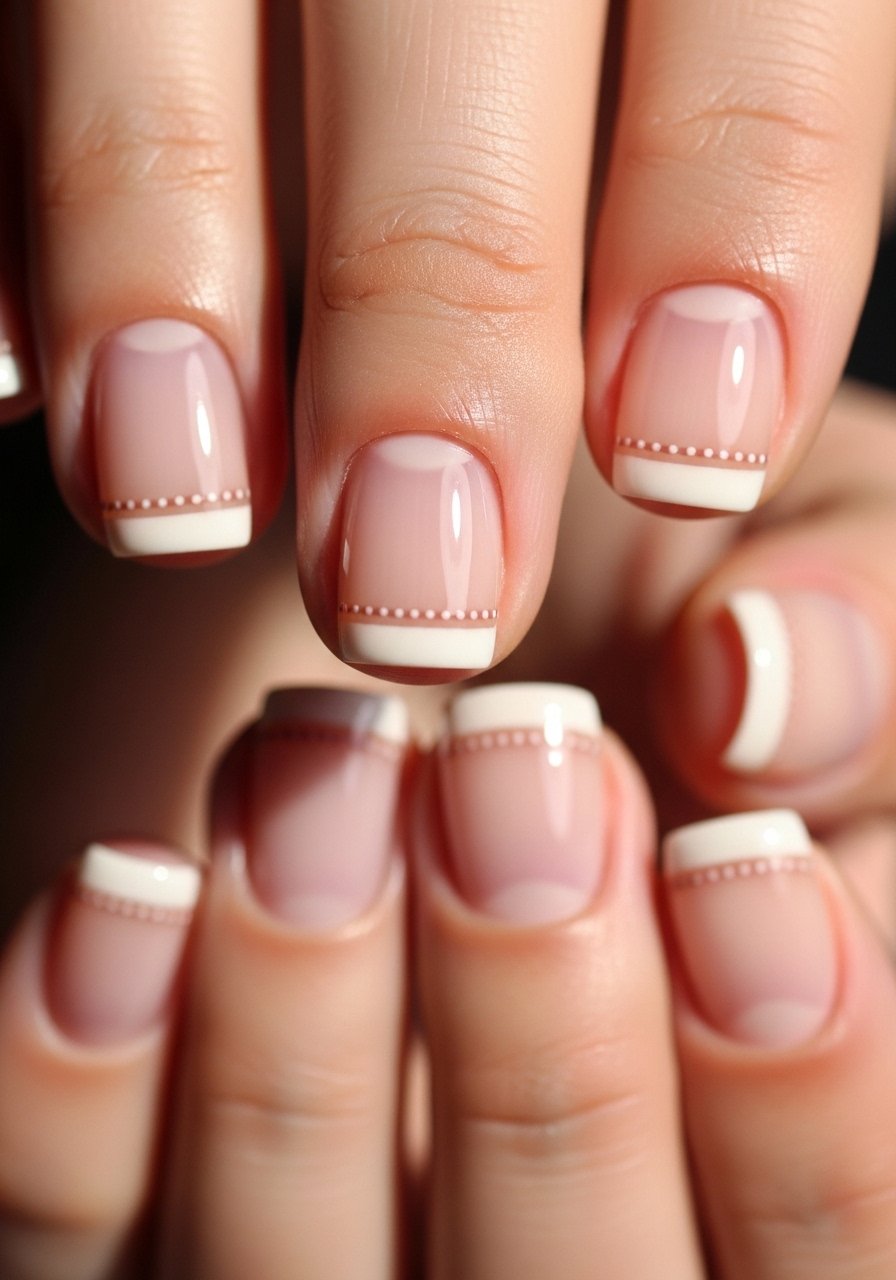
6. Two-Tone French Polka Tip
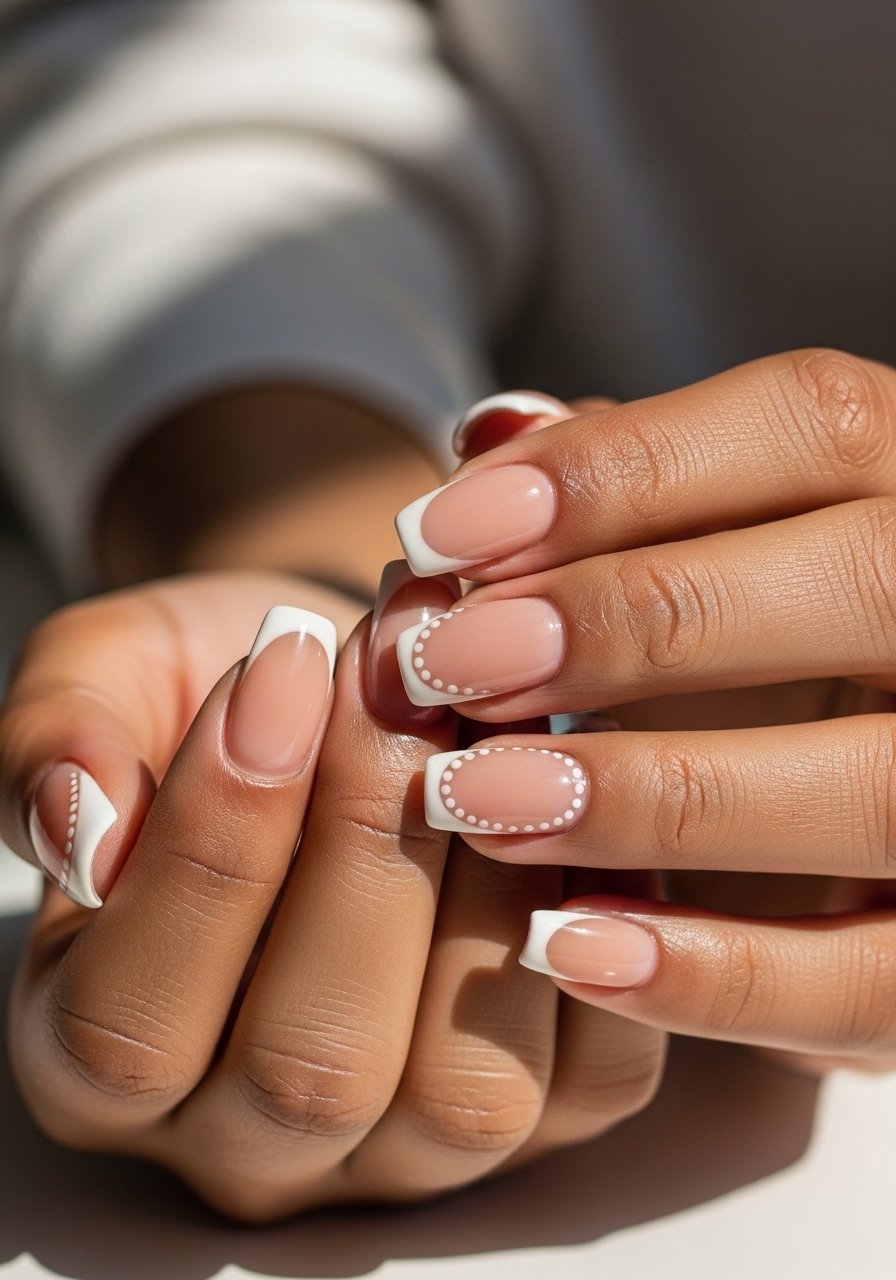
Style/Vibe: Retro-Updated
Best For: Medium to long nails, office-friendly flair
Skill: Intermediate
Start with a neutral base, paint a colored French tip about 1.5 to 2 mm wide, cure, then add a neat row of 1 mm dots along the junction. Use color contrast, for example soft taupe tip with white dots on top. This is a smart swap for classic French when you want personality without flashy color. Steady hands help, but painter’s tape or tip guides make it beginner friendly. Cure each layer to maintain crisp edges.
Mistake to Avoid: Trying to place dots on an uncured tip, which pulls the tip paint inward.
7. Ombre Base With Graduated Dots

Style/Vibe: Soft Gradient
Best For: Long nails, romantic occasions
Skill: Advanced
A blended ombre base gives dotted patterns a soft backdrop. Sponge two gel colors together thinly, cure, then place dots in a gradient, largest at the tip shrinking toward the cuticle. Use three dot sizes, about 3 mm, 1.5 mm, and 0.5 mm, and space them 2 to 3 mm apart for balance. This technique is a little time-consuming but photographs beautifully. Cure each dot layer for 30 seconds and finish with a glossy top coat.
Mistake to Avoid: Blending thick layers so the ombre looks heavy and obscures the dot gradient.
If any of these tools or polishes look useful, here are the picks I come back to most.
Essentials for Polka Dot Gel Manis
Application Tools:
- a fine dotting tool (~$6-12), useful for 0.5 mm to 3 mm dots depending on the tip size
- a set of gel brushes (~$10-20), helpful for negative space and tiny touch ups
Base & Top:
- peel-off base coat (~$8-15), handy if you change designs weekly
- no-wipe gel top coat (~$10-18)
Color & Effects:
- sheer nude gel polish (~$8-20)
- opaque white gel polish (~$8-15)
- micro-glitter gel (~$12-22)
Hardware:
- mini LED nail lamp (~$15-30), for quick 30 to 60 second cures
- lint-free wipes (~$6-10)
Extras:
- painter’s tape nail guides (~$5-9) for clean tips and rows
8. Sheer Chrome Dots on Clear Gel
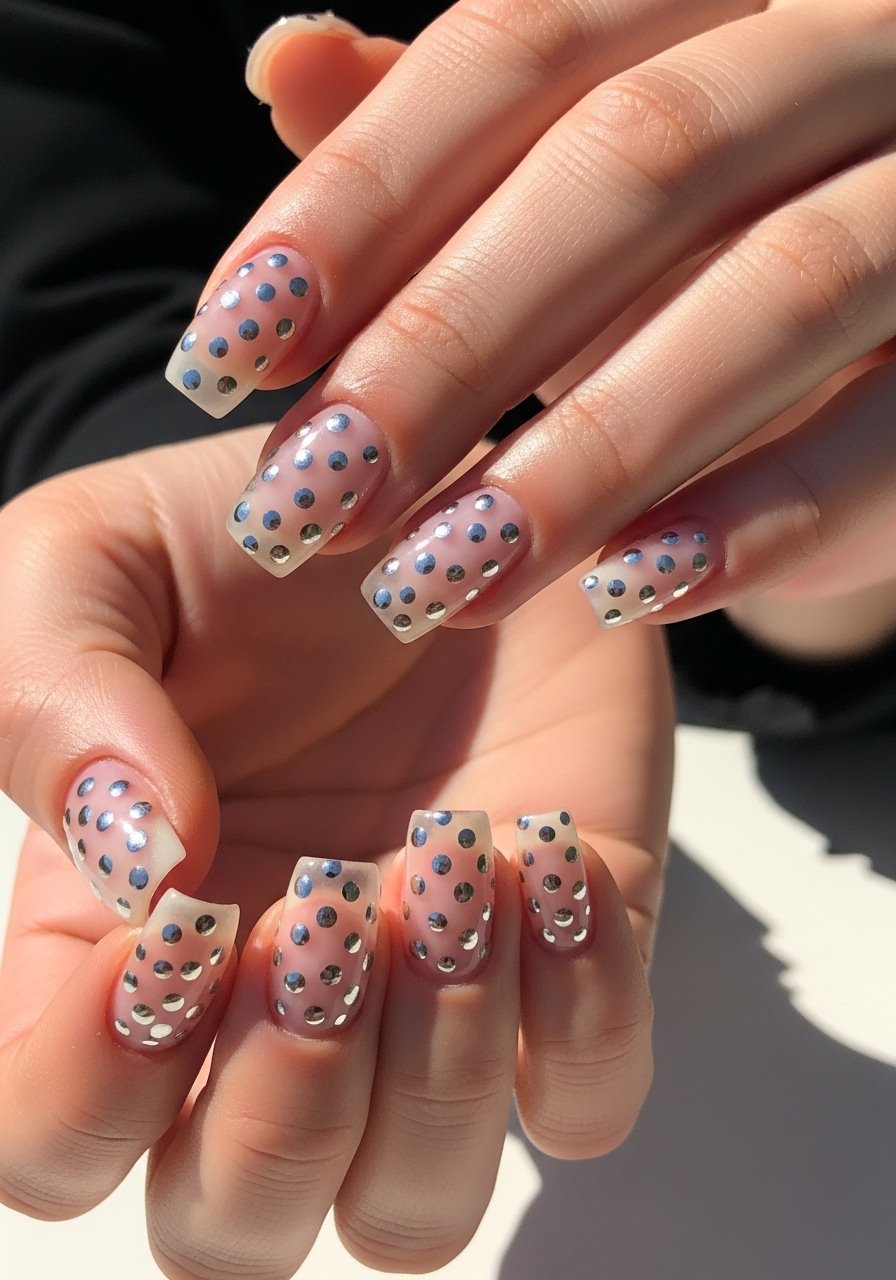
Style/Vibe: Futuristic Minimal
Best For: Medium nails, evening looks
Skill: Intermediate
Chrome powders inside dots add a metallic surprise without committing to full chrome nails. After curing a clear layer, place dots with a gel that cures tacky, press chrome powder into the dot with a silicone tool, then seal with a no-wipe top coat. Chrome shows up best in small, dense dots of about 2 mm. The texture contrast between clear gel and mirrored dots creates a focused, chic detail.
Mistake to Avoid: Rubbing chrome powder across wet areas, which smears the dot edges.
9. Tonal Dots for Neutral Workwear

Style/Vibe: Polished Neutrals
Best For: Short nails, office friendly
Skill: Beginner
Tonal dots read refined because they add texture without high contrast. Pick a base and a dot color one to two shades darker. Keep dots small at 1 mm and distributed in a balanced scatter. This is a quick at-home option that lasts if you cure carefully and use thin layers. Pair with a durable top coat if your hands type all day.
Mistake to Avoid: Choosing colors too close to your skin tone, which makes dots disappear in photos.
10. Gel Polish Flower Polka Combo
Style/Vibe: Playful Floral
Best For: Medium nails, spring events
Skill: Intermediate
Turn dots into tiny flowers by placing five small dots in a circle and adding a contrasting center dot. Use a 0.5 mm tool for petals and a 1 mm for centers. This multiplies the visual interest without adding complexity. Cure each layer for 30 seconds and keep petal spacing regular. It is fun for brunch or a casual wedding guest look.
Mistake to Avoid: Crowding flower clusters so they read as blobs, not blossoms.
11. Glossy Over Matte Dots
Style/Vibe: Tactile Contrast
Best For: Medium nails, weekend looks
Skill: Beginner
Matte bases with glossy dots catch the eye because of the finish contrast. Apply a full matte top coat and cure, then spot-paint glossy gel dots and cure again. The glossy dots will pop against a flat backdrop. This is an easy way to add polish depth without extra color work. Allow extra cure time for the glossy spots if you used a thick pigment.
Mistake to Avoid: Applying matte coat after glossy dots, which removes shine.
12. Micro-Dot French Line
Style/Vibe: Subtle Detail
Best For: Short nails, low-key styling
Skill: Beginner
A micro-dot French replaces the solid line with a dotted one. Use a 0.5 mm tool to place dots 1 mm apart along the smile line. This reads delicate and modern on short nails and takes five to ten minutes per hand. Seal with a fast-curing top coat to avoid smudging. It is subtle enough for meetings but with a clever twist.
Mistake to Avoid: Making dots unevenly spaced, which looks accidental instead of intentional.
13. Jewel-Accented Dots
Style/Vibe: Glam Mini
Best For: Long nails, party nights
Skill: Advanced
Place a 2 mm glitter or metallic dot, cure, then secure a tiny rhinestone in the center with a dab of gel adhesive and cure again. The layered approach prevents gems from popping off. Use a top coat around the gem but avoid coating the gem itself if you want extra sparkle. This pairs well with neutral bases so the accessory reads deliberate.
Mistake to Avoid: Gluing stones to an uncured surface, which traps air and lifts later.
14. Pastel Gradient Dots

Style/Vibe: Soft Color Fade
Best For: Medium nails, daytime looks
Skill: Intermediate
Fade a pastel rainbow across nails as a base, cure, then add a single white dot centered near the cuticle or tip for a graphic look. The contrast of a single dot against a soft gradient reads intentional and feminine. Use two thin passes for the gradient to keep it sheer and ethereal. This is time-consuming but low in technical difficulty.
Mistake to Avoid: Using thick gradient layers that obscure the dot placement.
15. Textured Gel Dots Over Sculpted Tips
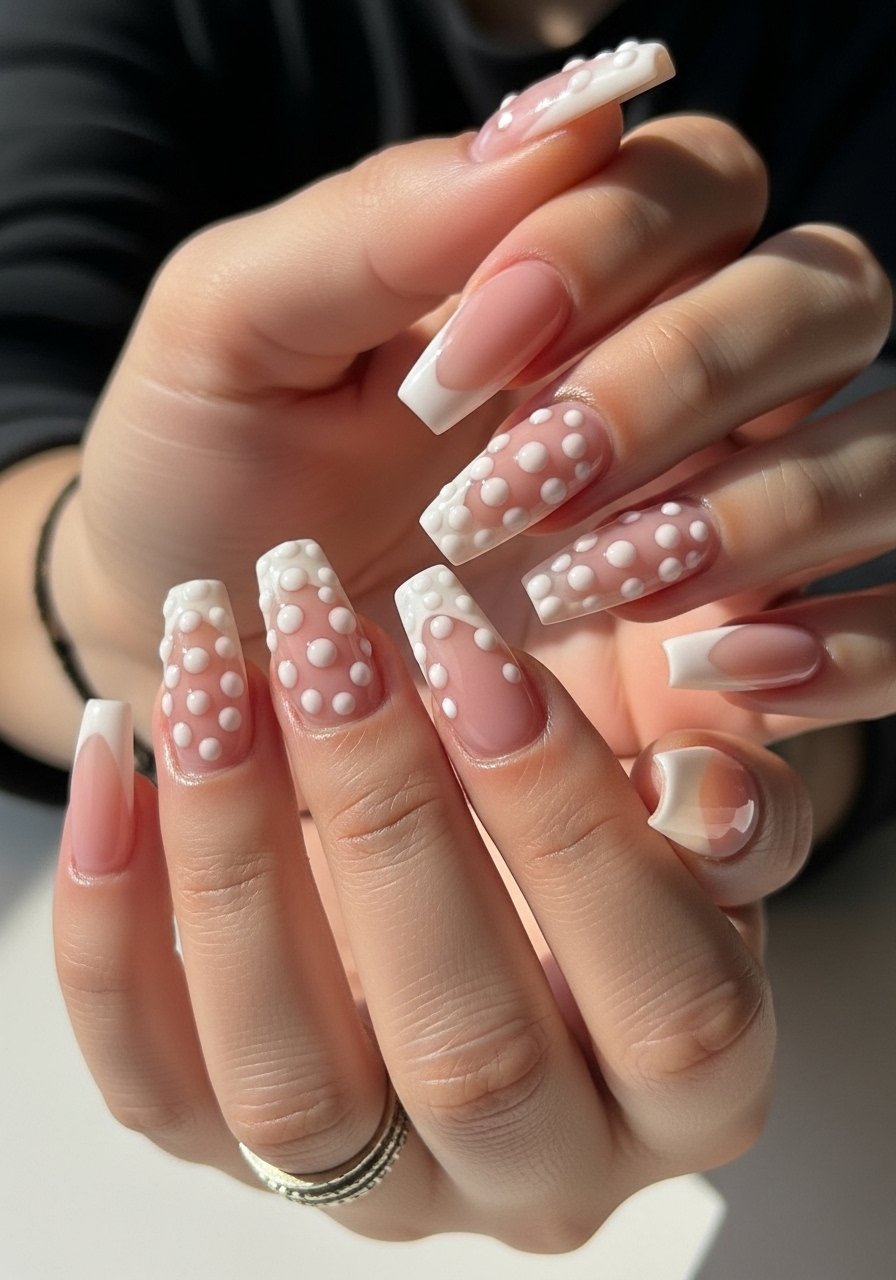
Style/Vibe: Sculptural Edge
Best For: Long nails, creative clients
Skill: Advanced
Build a sculpted tip with builder gel, cure, then create raised textured dots by piling small beads of gel and curing each bead for 15 to 20 seconds to hold shape. This creates a tactile, almost 3D polka effect that survives wear if you seal the edges properly. Ideal for clients who want artful, long-lasting nails. Allow extra lamp time for dense raised beads.
Mistake to Avoid: Trying to freehand large raised beads without curing increments, which causes collapse.
Polka Dot Mani Habits
Thin coats beat one thick coat every time. Three thin layers of a no-wipe top coat look smoother and last longer than one gloopy layer.
Grab a mini LED lamp for about $20. Curing each thin layer properly cuts chip risk and speeds up your actual hands-on time.
People often forget cuticle prep. Use a gentle cuticle remover and push back cuticles before any polish for adhesion that lasts.
Keep a small pot of top coat for touch-ups. If a dot chips, touching the spot and curing it takes less time than redo the whole nail. Use a brush-on gel top-up for quick saves.
If you plan to pack polka dot looks into rotation, store dotting tools and gel bottles upright. A tiny bottle organizer keeps colors accessible and avoids spills.
