
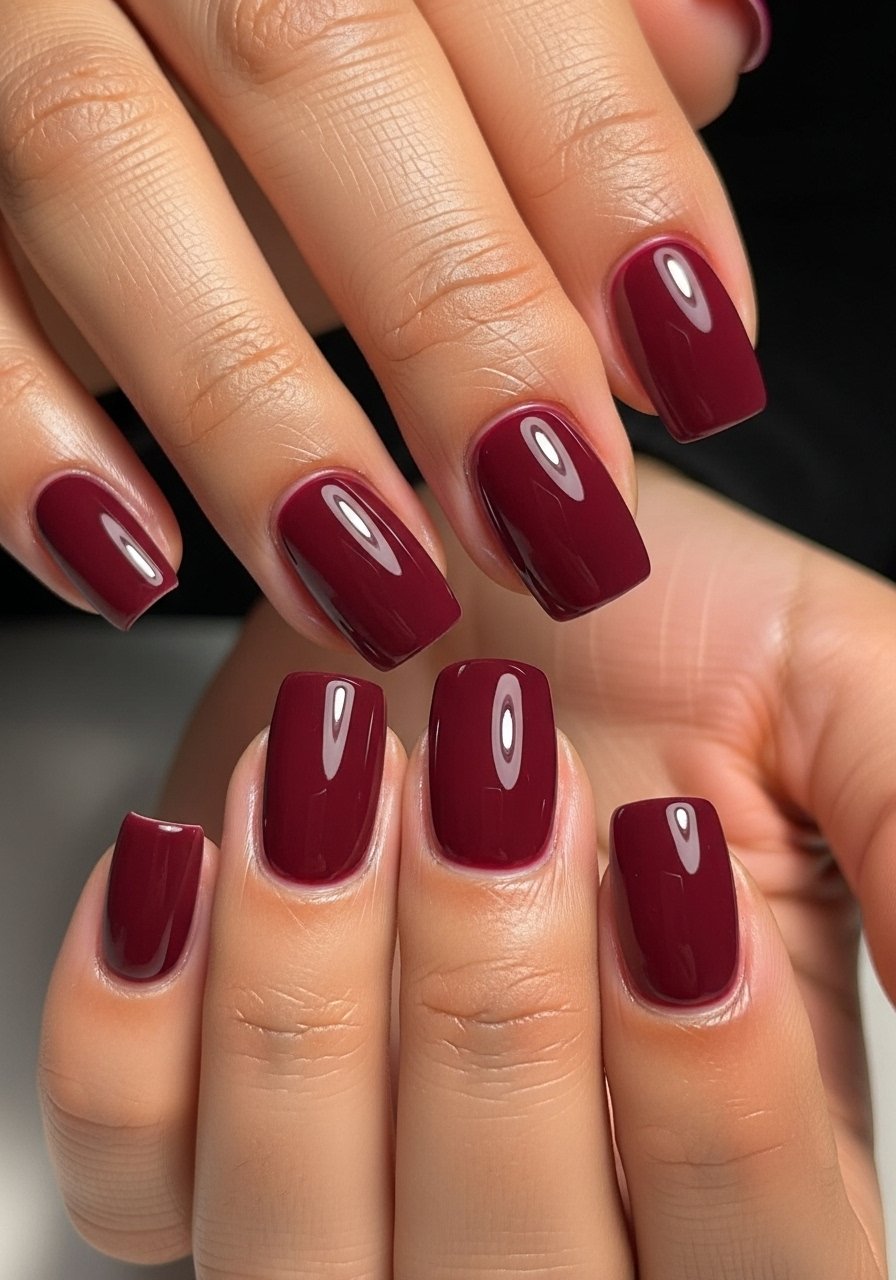
I kept slapping chunky glitter on my tips for New Year and wondering why photos looked great and my actual nails looked like confetti that lost its way. The year I switched to controlled placement and thinner coats everything photographed better and the wear was cleaner. That tiny change made the whole mani feel intentional instead of rushed, and now I plan the look before I open the polish.
These ideas are for people who want a polished party mani without spending all night at the salon. Most are beginner friendly with a few intermediate techniques, and budget options appear every few ideas. If you want something quick for a last-minute party, skip to the press-on and fast-dry entries. If you like to linger over detail, save the hand-painted fireworks and crystal clusters for your afternoon mani session.
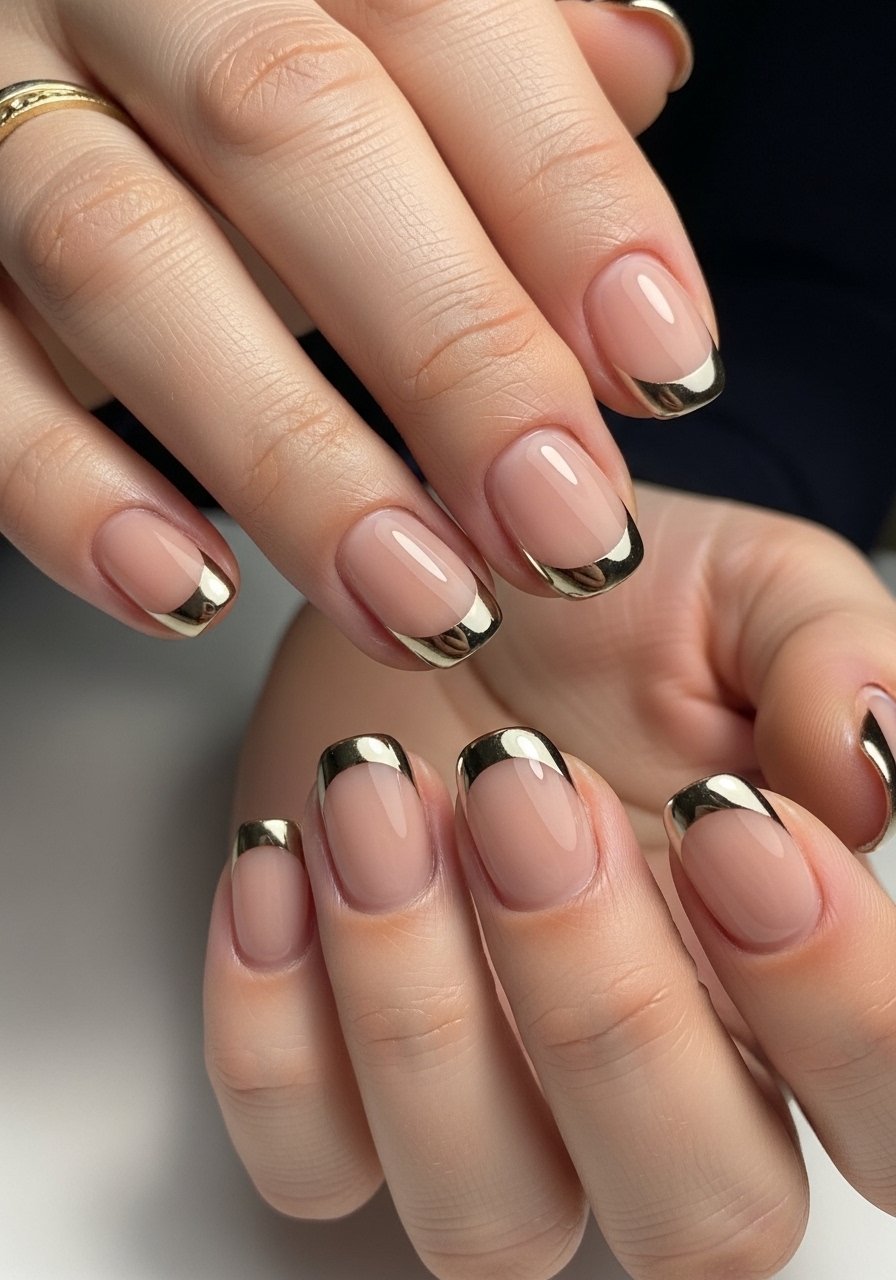
1. Champagne Metallic French With Negative Space
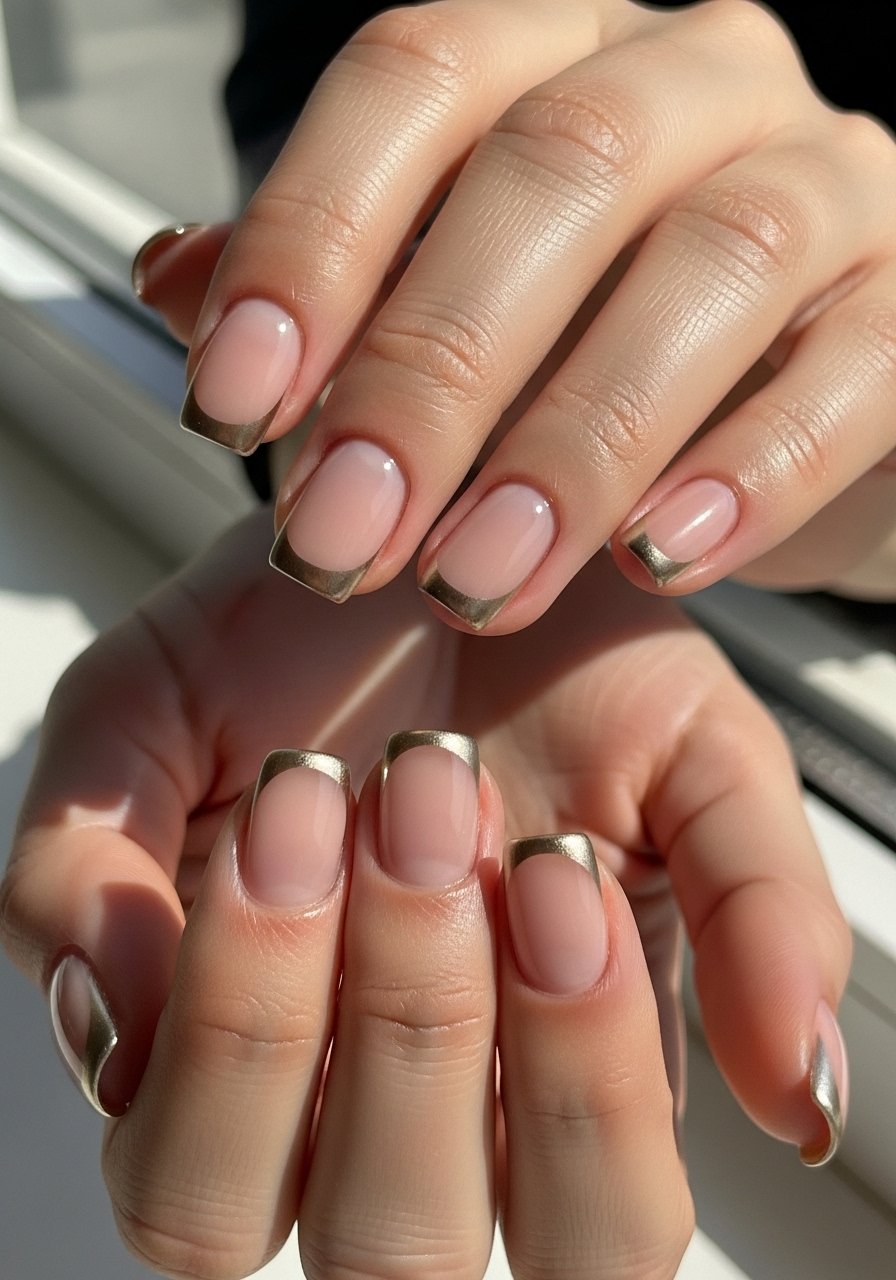
Style/Vibe: Modern party French
Best For: Short nails / NYE dinners
Skill: Beginner
A thin metallic line at the free edge reads festive without shouting. Start with one sheer nude base coat, then paint the metallic in one thin pass using a narrow brush, leaving a 1.5 to 2 mm gap of bare nail as negative space. That gap keeps the look wearable for work the next day. I like pairing a peel-off base coat so cleanup after the party is painless. Two thin coats and 60 seconds of dry time per coat stops bubbling and keeps the shine smooth.
Mistake to Avoid: Pressing too hard with the metallic brush, which makes an uneven, lumpy line.
2. Subtle Glitter Fade Over Nude
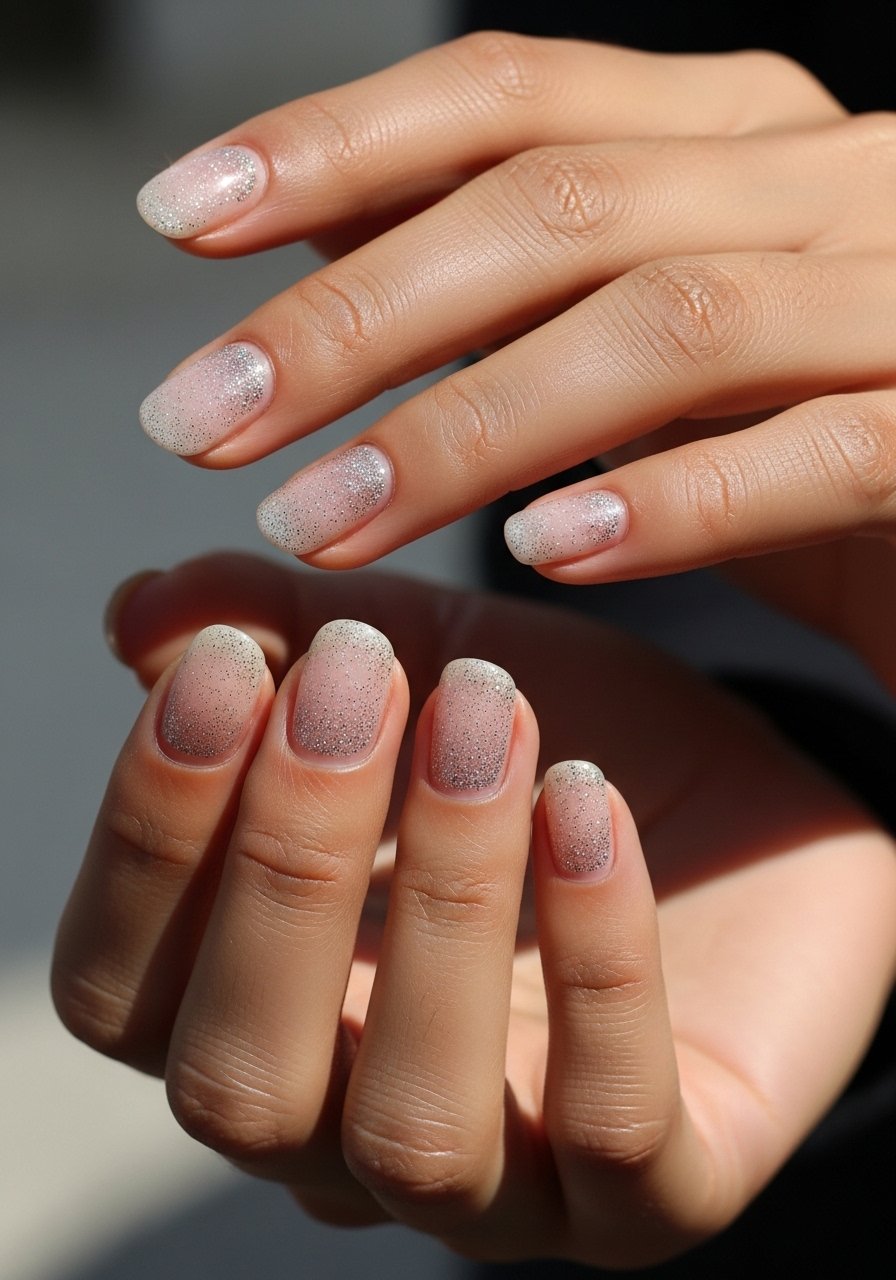
Style/Vibe: Soft sparkle
Best For: Medium nails / cocktail parties
Skill: Beginner
A glitter fade looks luxe without the scratchy feel of full-coverage glitter. Apply one thin coat of a nude sheer, then dab a dense fine glitter at the cuticle and lightly drag toward the middle with a flat brush for a 60 to 40 fade. Use a fine glitter mix so you get coverage in two small taps, not ten. Seal with a gel-like top coat applied in thin layers to avoid clumping.
Mistake to Avoid: Piling glitter on in one spot, which creates a raised patch that chips fast.
3. Matte Midnight With Metallic Tips
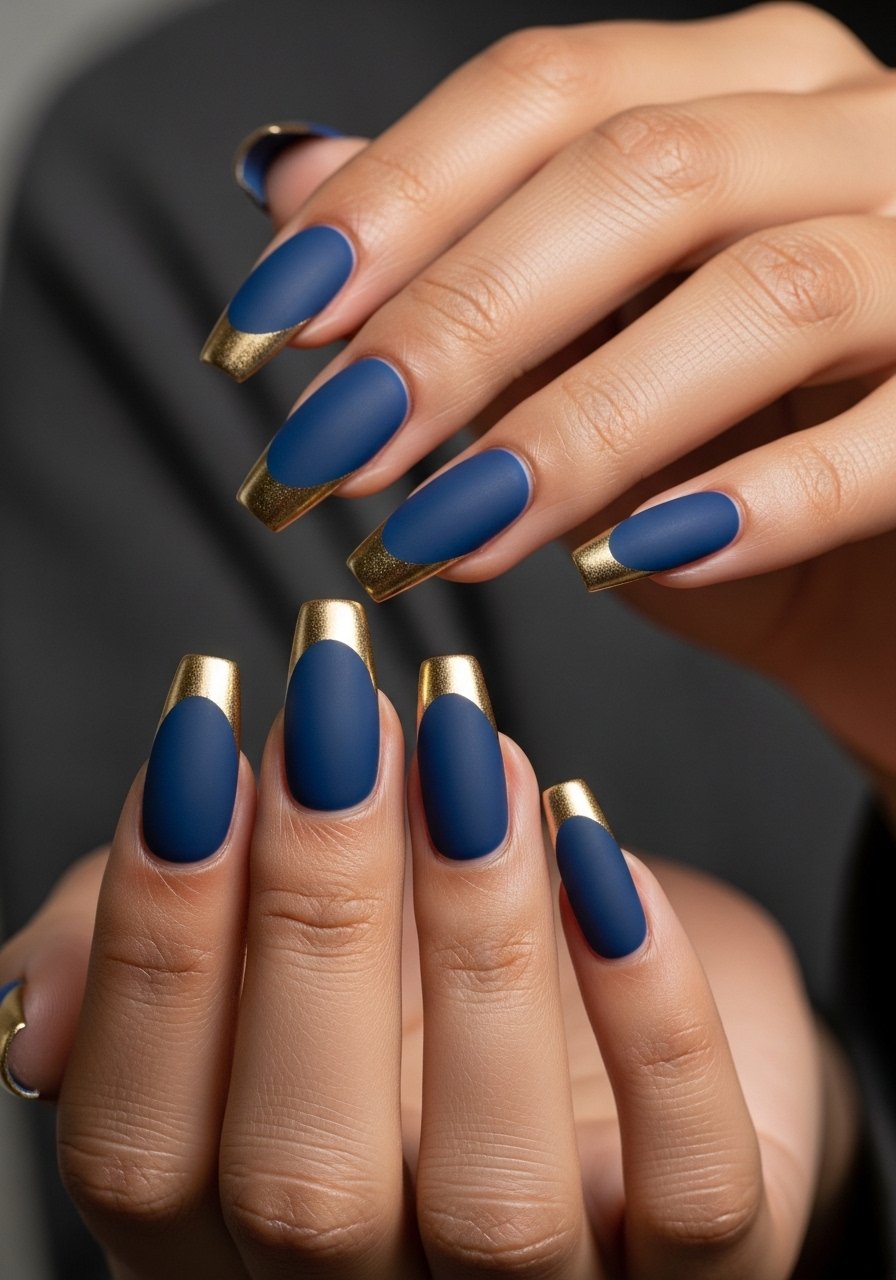
Style/Vibe: Moody glam
Best For: Long nails / evening events
Skill: Intermediate
Matte navy gives a modern, moody backdrop and tiny gold tips read festive without being juvenile. Apply two thin coats of a pigmented midnight blue, cure or dry fully, then buff the tip edge lightly with a 240-grit pad before painting a hairline gold stripe. Finish the sides with a mattifying spray or a matte top coat. For a cleaner edge use a striping brush and one pass. A small fast-dry matte top coat preserves the flat finish.
Mistake to Avoid: Overbuffing the free edge so the tip loses shape and the metallic skips.
4. Press-On Countdown Numerals
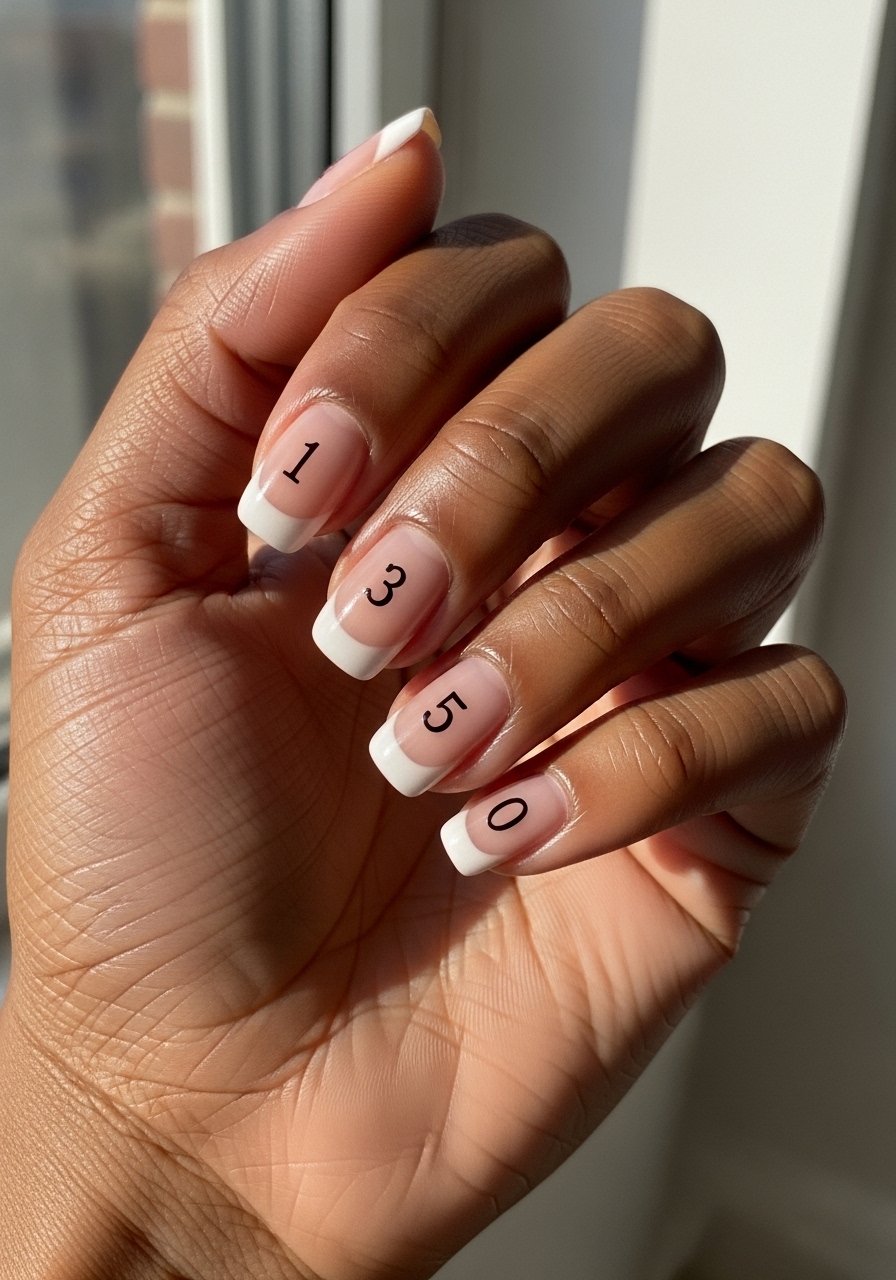
Style/Vibe: Playful literal
Best For: Short nails / last-minute plans
Skill: Beginner
Press-ons are a smart way to wear an intricate look without salon time. Pick a pre-shaped set and add tiny numerals with a fine-tip pen or decals. Keep digits small, centered near the cuticle, so they read at arm's length. I tested this across three different press-on brands and found thinner bases flex with natural nail movement better. Try a press-on nail set that matches your length, and glue only the center to allow tiny flex without popping.
Mistake to Avoid: Gluing the entire press-on down hard, which lifts quickly when nails flex.
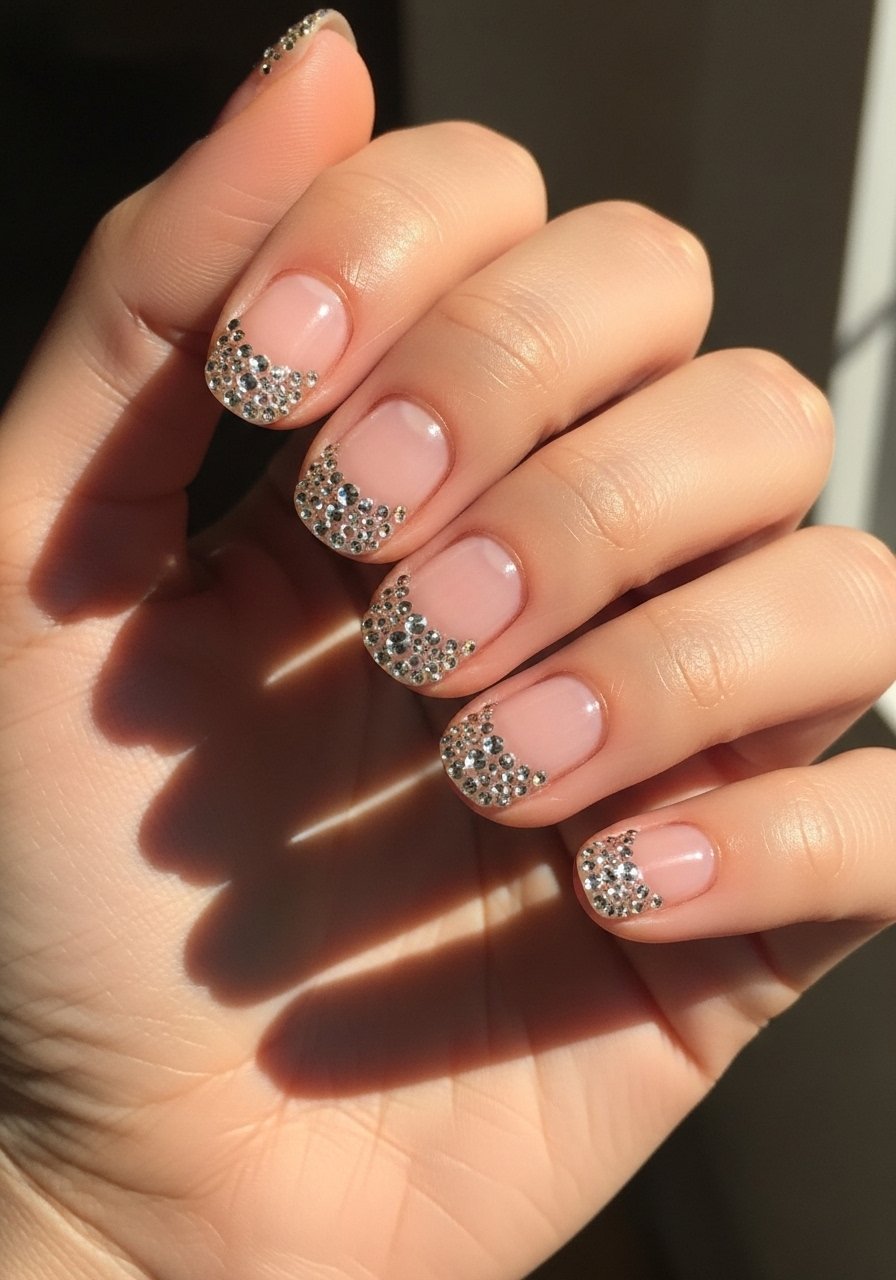
5. Champagne Almond With Micro Rhinestone Accent
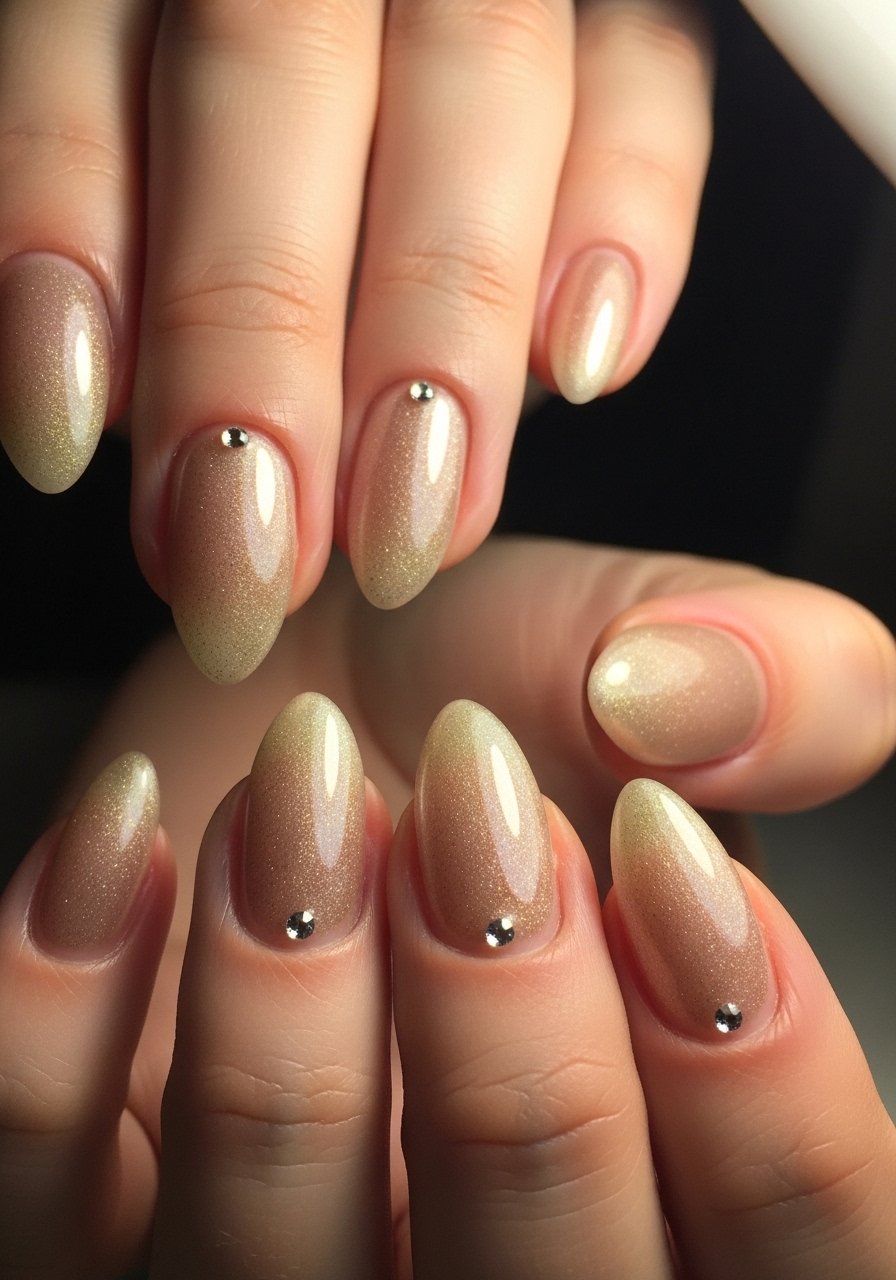
Style/Vibe: Subtle luxe
Best For: Wedding-attending NYE guests / medium nails
Skill: Beginner
One tiny crystal at the cuticle reads formal without being over the top. Use a sticky gel top coat or nail glue dabbed with a toothpick for precise placement. I like a 1.5 mm rhinestone for balance on medium nails. Apply two thin coats of a champagne shimmer, then seal the rhinestone with a small dot of top coat. A nail rhinestone set gives multiple sizes for mixing.
Mistake to Avoid: Using a giant stone that tears at the free edge and catches on sleeves.
6. Midnight Fireworks Hand-Painted Accent
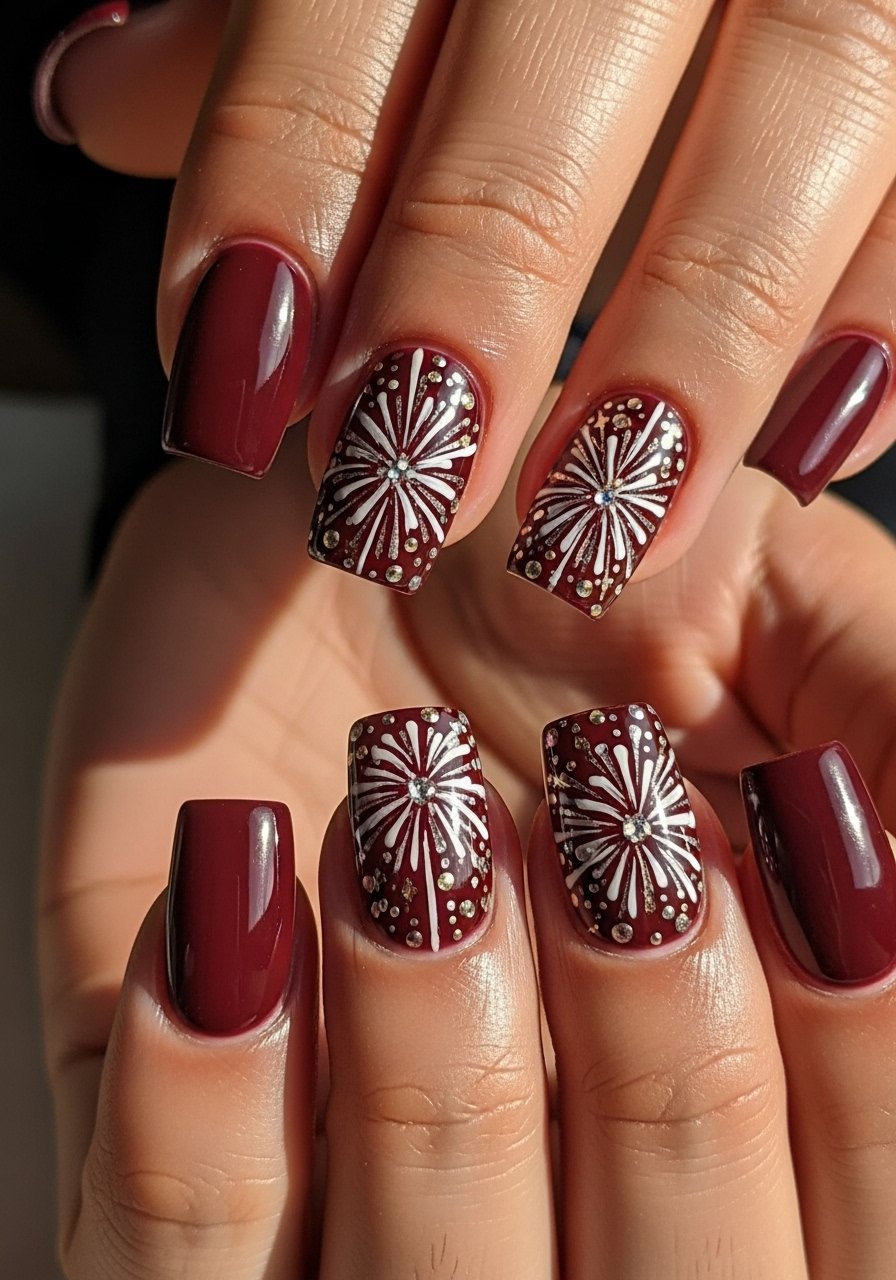
Style/Vibe: Painterly party
Best For: One accent nail / evening shows
Skill: Advanced
A single hand-painted fireworks nail is worth the time and the attention it draws. Thin your acrylic paint or polish with one drop of brush cleaner for crisp, fluttering lines. Start with a glossy dark base then layer small bursts using a toothpick or liner brush. Work from center out in 3 to 6 short strokes per burst for a realistic look. Pair with a glossy top coat for depth. If you want to skip painting, use a firework nail decal sheet.
Mistake to Avoid: Overworking the lines so the burst reads muddy instead of crisp.
7. Chrome Reverse French With Cuticle Shine
Style/Vibe: Futuristic classic
Best For: Short nails / photos that pop
Skill: Intermediate
Chrome near the cuticle flips the classic French to feel modern. Apply a sticky tack-free base lightly at the lunula, then rub chrome powder with a soft applicator for a mirror finish. Seal with two thin layers of a non-yellowing top coat. For a softer effect buff the chrome edges by 0.5 mm to blend into the base. A small jar of chrome pigment powder goes a long way.
Mistake to Avoid: Applying chrome over a wet top coat, which ruins the mirror effect.
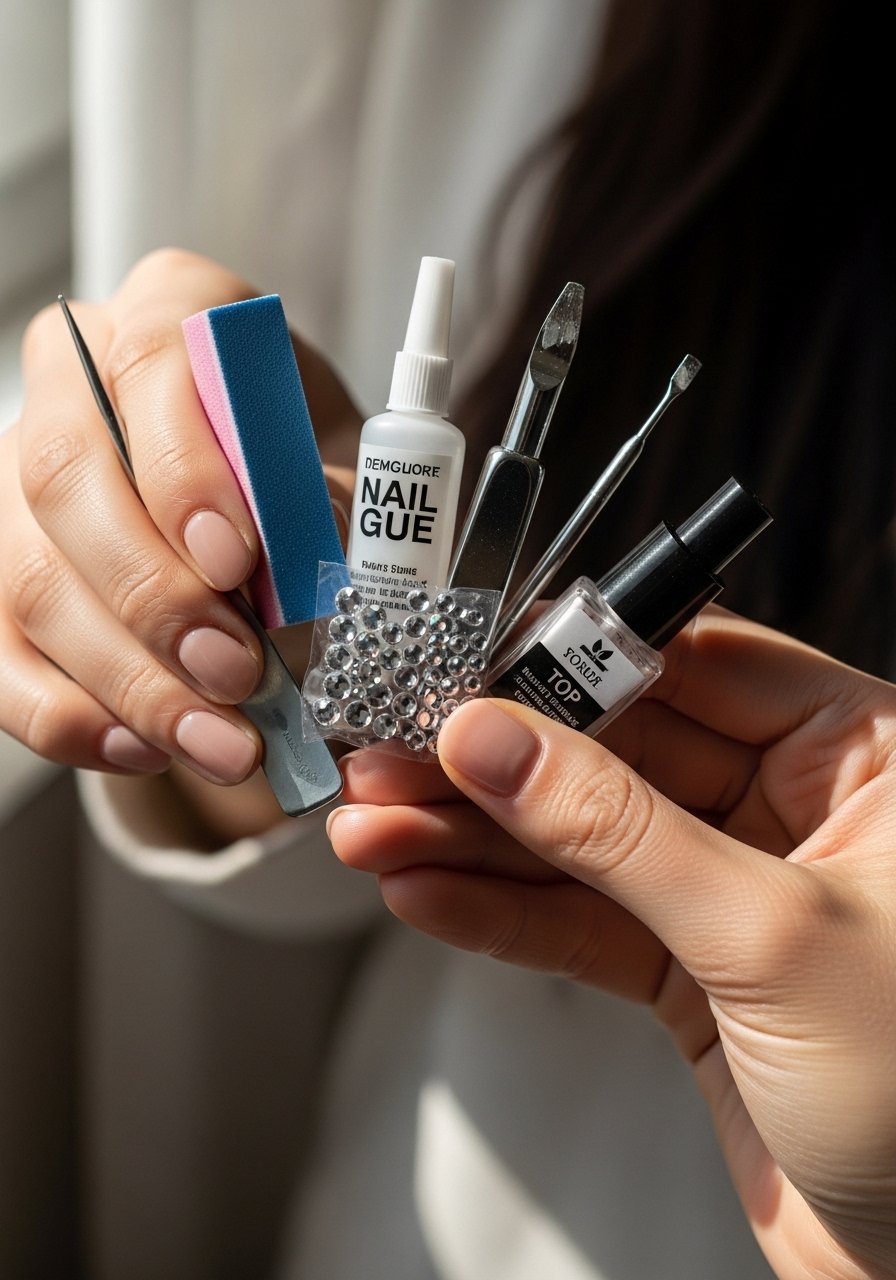
If any of these ideas have you ready to actually try something, here are the products doing most of the work.
Ring-In Mani Essentials
Tools & Prep:
- Peel-off base coat (~$8-12). Makes party cleanups way easier.
- Cuticle oil pen (~$6-10). Quick hydration before polish.
Color & Effects:
- Fine glitter mix (~$6-12). For fades and accents.
- Chrome pigment powder (~$7-15). Mirror finish for small areas.
- Nail rhinestones (~$5-10). Micro sizes for cuticle accents.
Tools for Detail:
- Striping brushes set (~$8-14). Thin lines without fuss.
- Press-on nail kit (~$12-20). Backup plan for last-minute plans.
Seal & Finish:
- Fast-dry glossy top coat (~$6-12). Layer thin for shine and longevity.
8. Holographic Flake Accent Panels
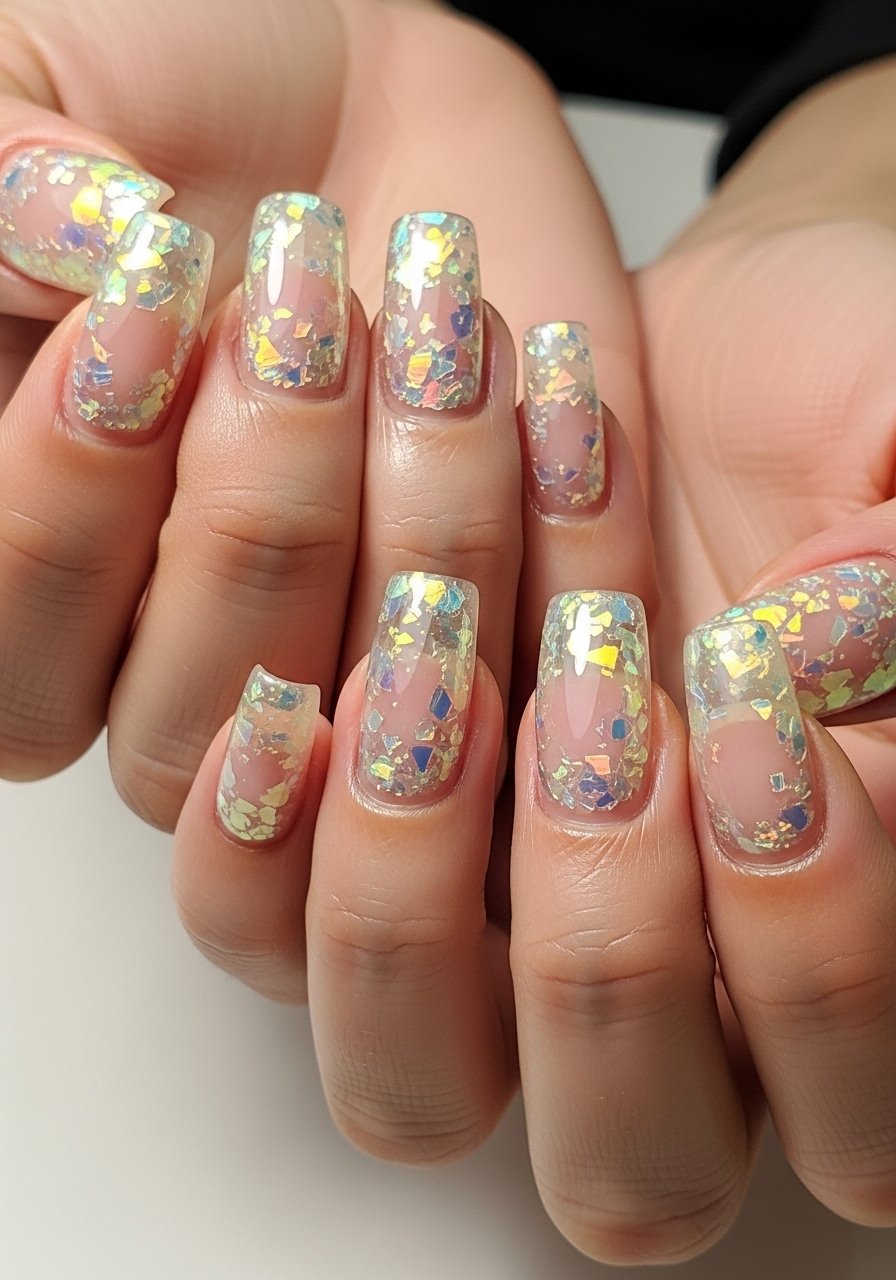
Style/Vibe: Space-glitter panels
Best For: Medium nails / photos and club lighting
Skill: Intermediate
Holographic flakes trapped under a clear panel create depth without rough texture. Paint a clear window with two thin layers of builder gel or sticky base, sprinkle flakes sparingly to avoid bulk, then level with a 1 mm layer of clear gel. Cure between layers if using gel. I learned this from a tech who works at a salon downtown and the small flake-to-window ratio is the trick. Use a holographic flake jar for variety.
Mistake to Avoid: Overfilling the panel, which causes lifting and a bumpy feel.
9. Satin Velvet Finish in Deep Jewel
Style/Vibe: Tactile luxe
Best For: Long nails / low-glare events
Skill: Intermediate
Satin finishes read luxe in photos without the high shine. Apply a pigmented color, let it dry, then layer a satin top coat in two thin passes. For a softer touch use a micro buff in one direction before the finish to remove tiny high spots. Satin is forgiving of small chips but do thin coats so the texture stays consistent. Pair with a satin top coat.
Mistake to Avoid: Rubbing the satin finish while it is still curing, which leaves glossy fingerprints.
10. Micro Star Scatter on Accent Nail

Style/Vibe: Tiny constellation
Best For: Short nails / daytime parties
Skill: Beginner
A single accent nail with micro stars reads celebratory without being overdone. Use a thin clear base, place stars with a tweezer, then lock them with a thin top coat. Keep star sizes under 1.5 mm so they lay flat. Use an assorted micro star pack so you can mix colors subtly.
Mistake to Avoid: Using large stars that snag on fabric and lift at the edges.
11. Glitter Bar Ombre With Vertical Shine
Style/Vibe: Modern bar ombre
Best For: Medium to long nails / stage lighting
Skill: Intermediate
A vertical glitter bar visually lengthens the nail. Paint a narrow strip down the center with one thin coat of clear adhesive, dab glitter densely, then feather the edges slightly toward the sides for a soft transition. Finish with two thin layers of a gel-like top coat. For a clean result use a thin adhesive gel and cure fully between layers.
Mistake to Avoid: Making the bar too wide, which shortens the nail visually.
12. Tiny Crystal Cluster at Free Edge
Style/Vibe: Delicate edge bling
Best For: Medium nails / close-up photos
Skill: Intermediate
A crystal cluster at the free edge reads like jewelry on your nails. Arrange three to five micro crystals in a crescent, glue with a dab of clear builder gel, then seal the base only to keep the cluster from looking trapped. This placement reduces catching while you use your hands. I experimented across acrylic and natural nails; natural nails prefer smaller clusters. A mini crystal assortment gives options.
Mistake to Avoid: Placing the cluster too far onto the nail bed, which makes it uncomfortable.
13. Skinny Metallic Stripe Centerpiece
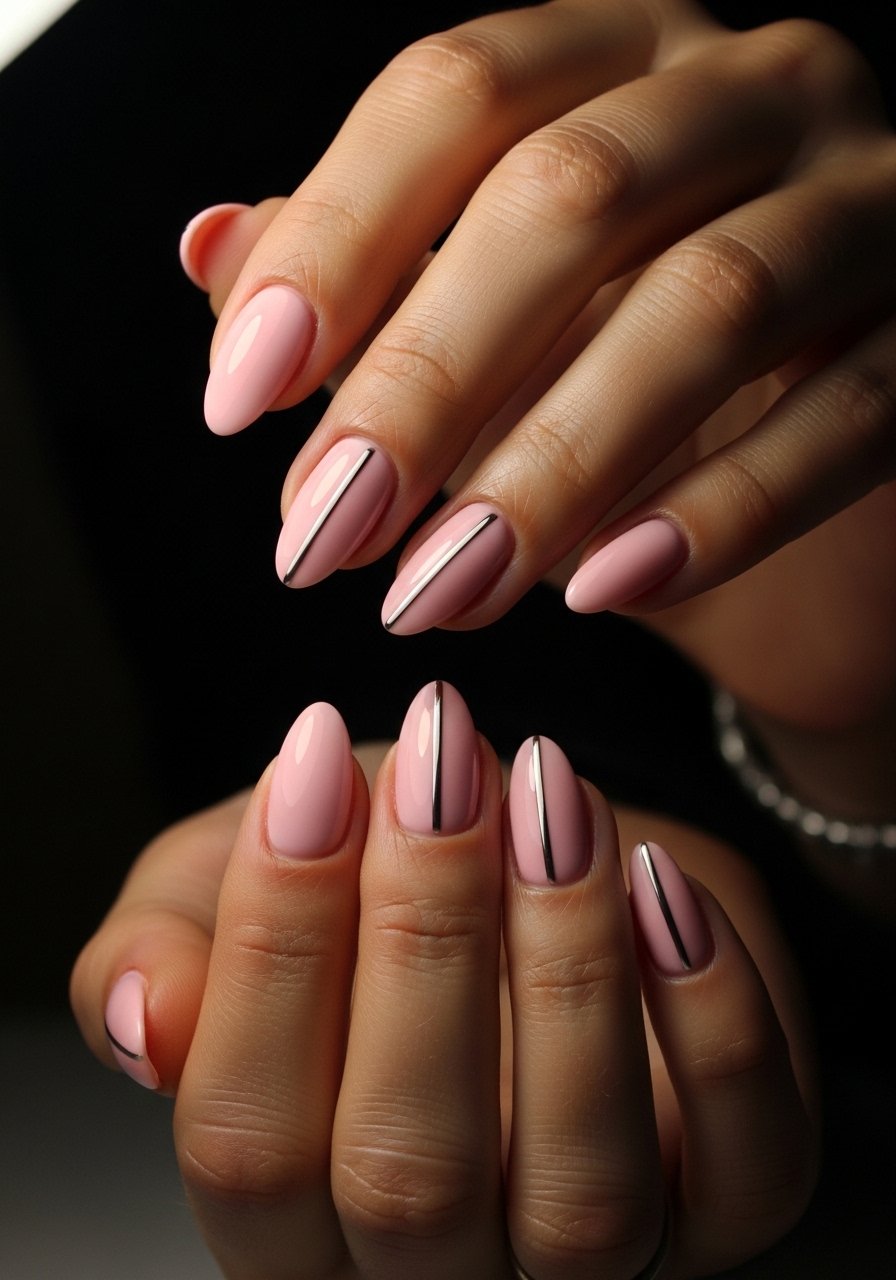
Style/Vibe: Minimal linear glam
Best For: Medium nails / office-to-party
Skill: Beginner
A single skinny metallic stripe is graphic and simple. Use a striping brush and one steady pass from cuticle to tip, keeping the stripe about 1 mm wide. If you waver, use a striping tape guide and remove while the paint is tacky. Finish with a glossy top coat to seal. A small tube of metallic nail polish works well for the stripe.
Mistake to Avoid: Painting a stripe over ridges without smoothing first, which makes the line look broken.
14. Gel-To-Go Quick Set Mani
Style/Vibe: Fast and sturdy
Best For: Short nails / people who need durability
Skill: Beginner
If longevity matters, a gel-to-go kit that cures in a 60-second lamp is a lifesaver. Prep with a 240-grit file, wipe with alcohol, then apply two thin color coats and a fast-cure top coat, curing each for the lamp's recommended time. A 60-second gel polish starter kit gives you the lamp and a durable finish. Thin layers prevent heat spikes and lifting.
Mistake to Avoid: Applying thick gel layers that trap uncured product and peel.
15. After-Party Repair & Refresh Kit
Style/Vibe: Practical recovery
Best For: All nail lengths / post-party fixes
Skill: Beginner
A tiny kit saved in your bag is the best party trick. Include a mini glue tube, a 180/240 buffer, a small top coat, and a couple of replacement rhinestones or press-ons. For split nails, a thin layer of clear glue under the split sealed with top coat holds until you can do a proper repair. I keep a mini nail glue and mini top coat in my clutch.
Mistake to Avoid: Using ordinary craft glue for repairs, which can discolor and fail.
Mani Night Habits That Actually Work
Thin coats beat one thick coat every time. Three thin layers dry smoother and last longer than one thick gloopy layer. Try a fast-dry top coat to lock layers in.
Start with a clean nail surface. Wipe with rubbing alcohol and push cuticles back gently, not forcefully. A cuticle pusher tool costs about $5 and saves ruined lines.
Curate one statement nail, not five. Pair a hand-painted accent with neutral companions to avoid visual overload. A small striping brush helps keep details tight.
Pack a repair kit. Carrying a mini glue and one press-on prevents panic at midnight. A tiny press-on backup set takes up almost no space and saves the night.
