
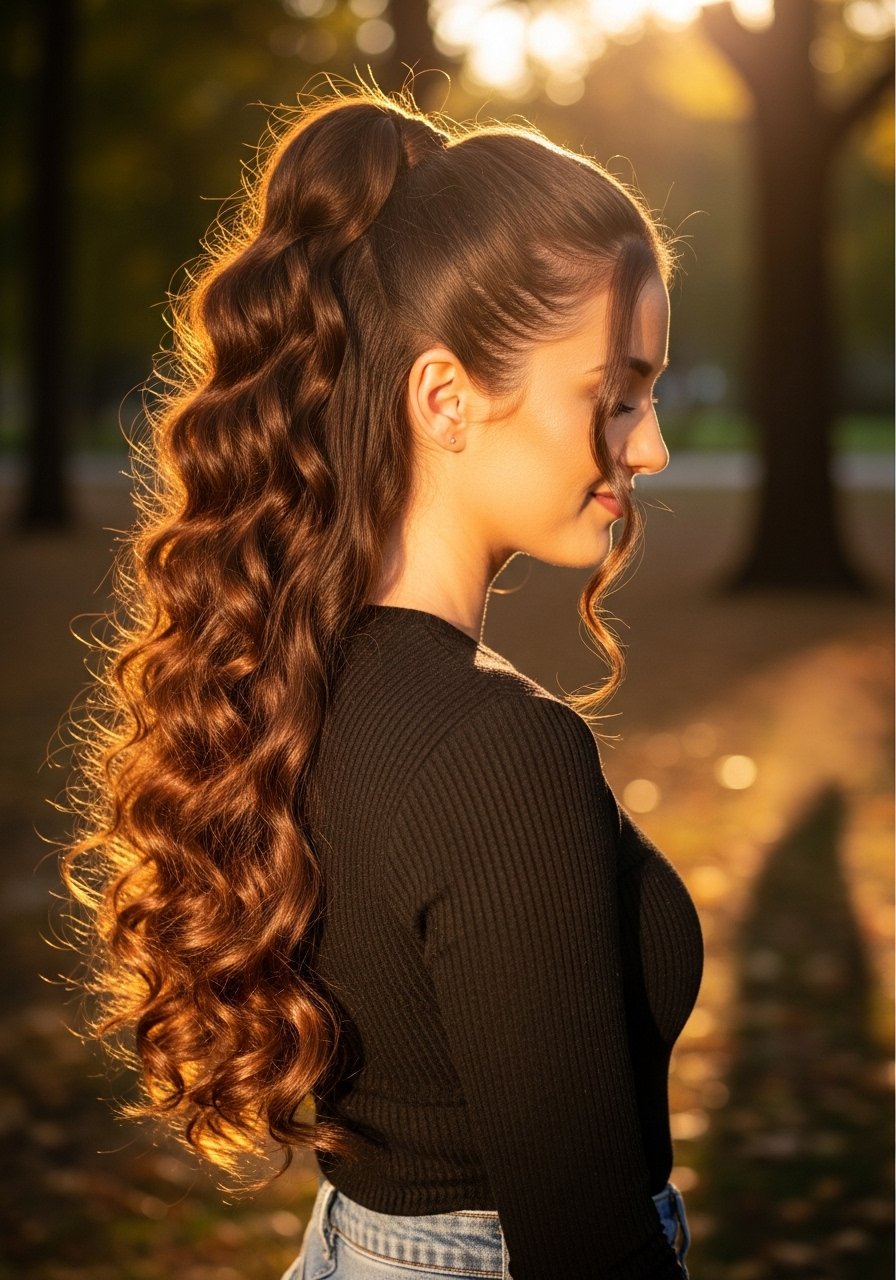
I kept remaking the same braid and wondering why it unraveled by lunchtime, until I realized I was starting too loosely at the crown and using one giant elastic at the end. The fix was small, mechanical, and boring. Once I began sectioning an extra half inch at the part and swapping to three micro elastics spaced 2 inches apart, my braids survived gym class, commute traffic, and toddler hands.
These picks are practical, not runway. They work for straight, wavy, curly, and coily hair, and across four hair textures I have styled the same technique with small tweaks. Most styles here are doable at home in 10 to 30 minutes, and I note when something needs a little practice or a heat tool. Budget wise I include drugstore and splurge picks so you can try one braid without a big spend.
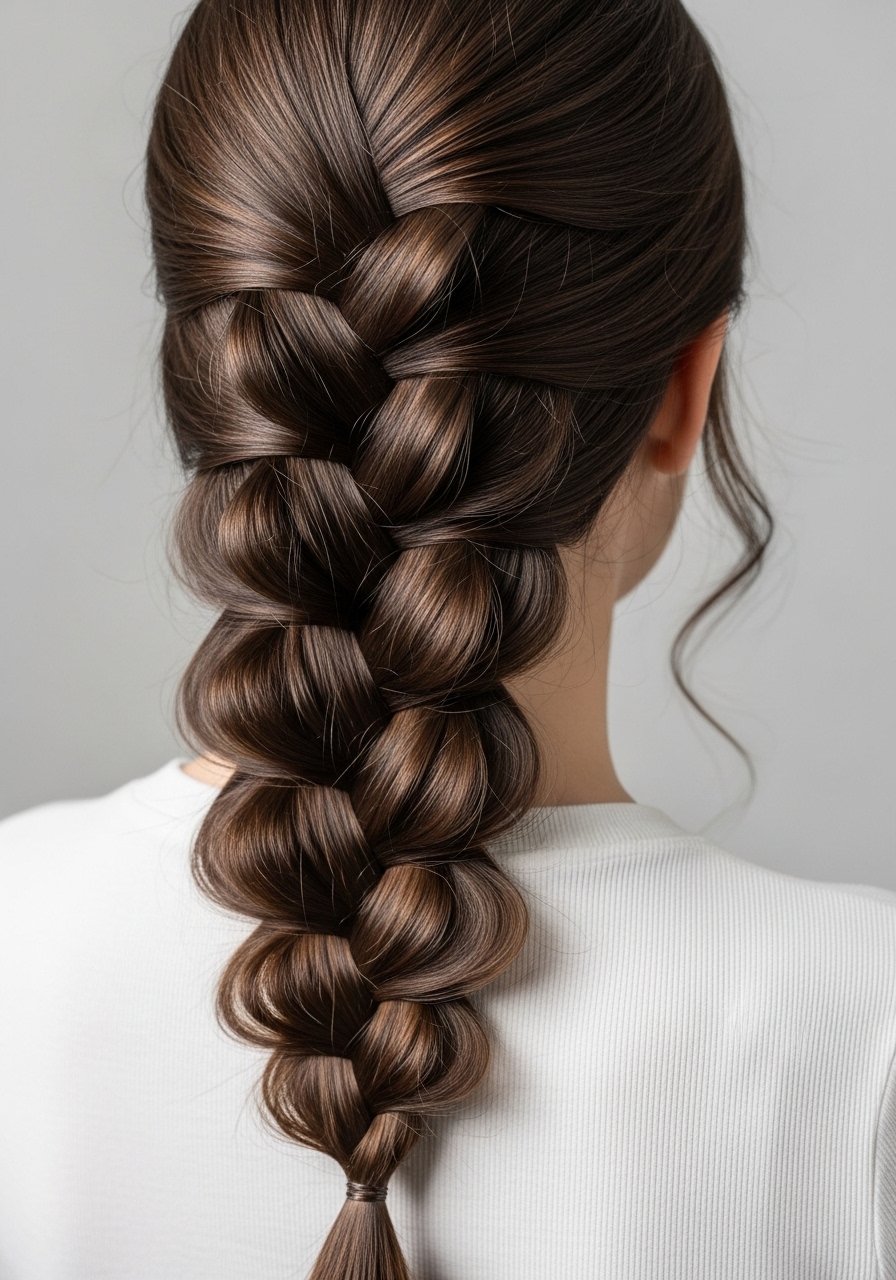
1. Classic French Braid With Clean Part
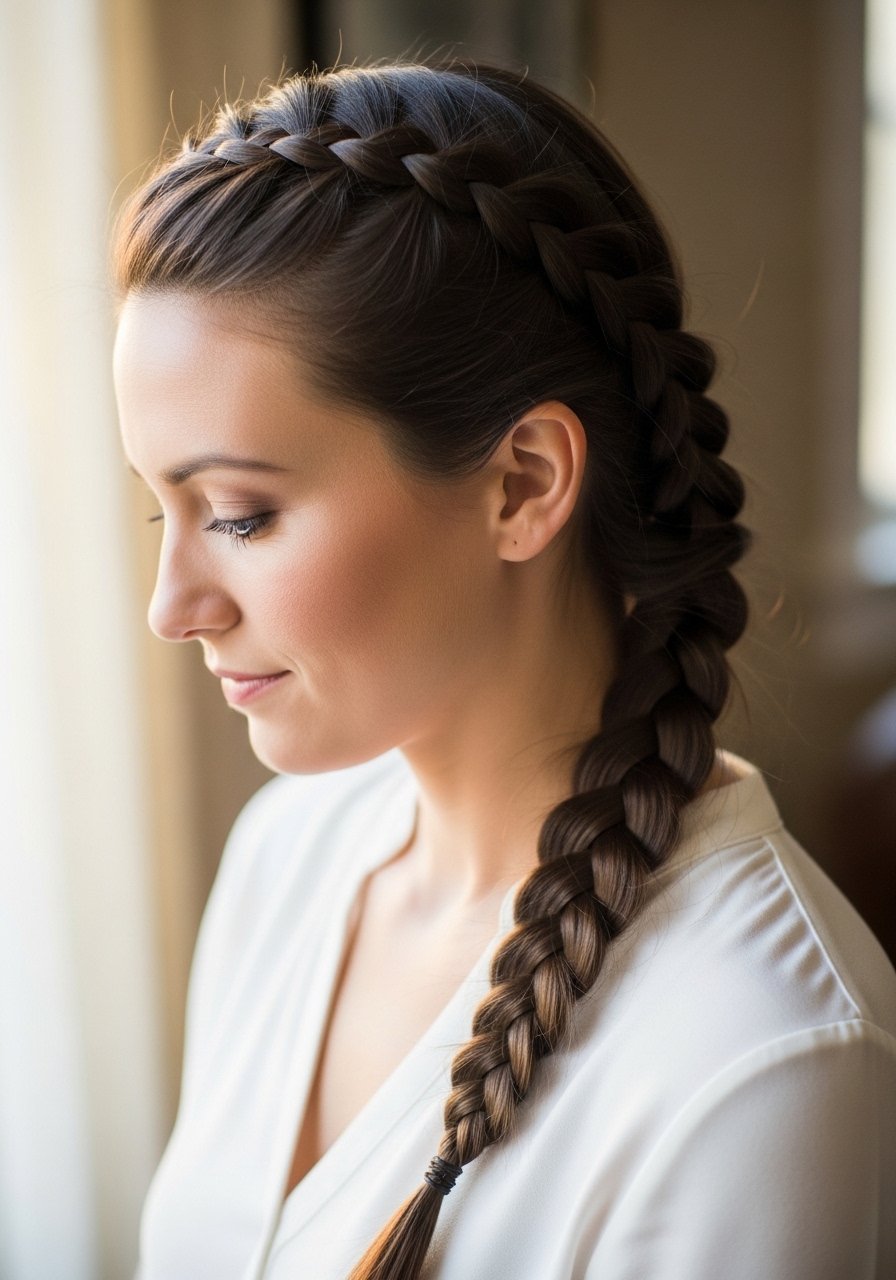
Start by creating a 1-inch centered part and pick up 1-inch sections as you cross over, so the braid stays neat even on finer hair. It reads tidy and pulled-together, which makes it a good everyday office or school style. Works for beginners with a little practice and for all hair types if you smooth each new section with a pea-size amount of styling cream, about a 1:3 cream-to-water spritz mix to avoid buildup. I use a small paddle brush and silicone hair elastics to finish.
Mistake to Avoid: Starting with sections that vary more than a half inch, which makes the braid look uneven.
2. Dutch Braid That Pops
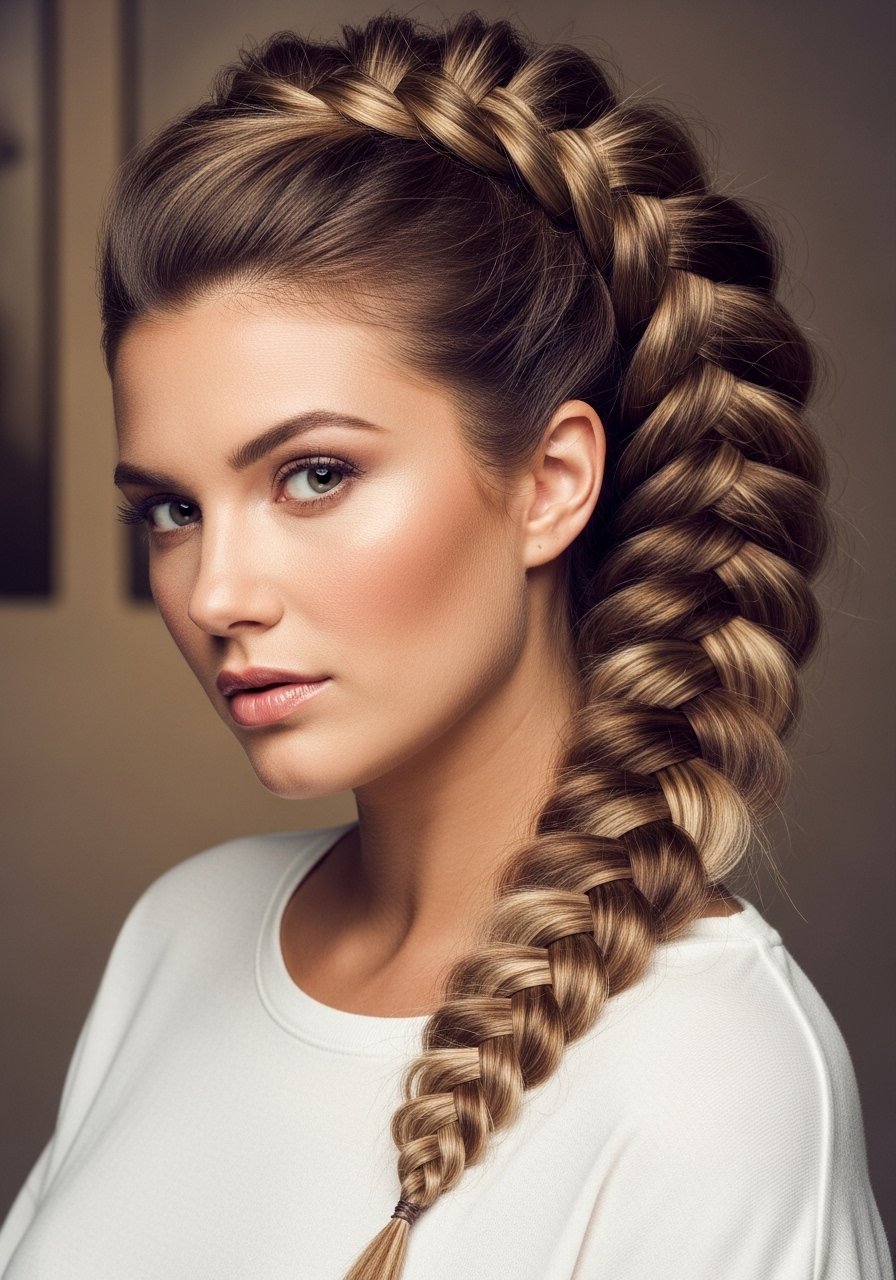
For that raised look, weave under rather than over and keep your tension firmer than a French braid. I pull each stitch gently every 6 stitches to pancake the braid, which gives the chunky, textured result seen on feeds without needing filling pieces. It reads bold and youthful, great for active days or festivals. Short on time, rough-texturize with a palmful of salt spray in a 2:1 water-to-product dilution for better grip.
Mistake to Avoid: Braiding with dry, slippery hair, which causes the braid to flatten and slip by midday.
3. Fishtail Braid, Soft and Messy

The fishtail looks intricate but is basically two sections and tiny crossovers. For a lived-in finish, start with a 1-inch loose three-strand at the top for structure, then switch to fishtail. It creates a romantic, undone vibe that suits date nights and weekend errands. If your hair is silky, mist a touch of texturizer at the roots and work it in so the 20 to 30 small passes hold. I like a wide-tooth comb and texturizing powder for extra volume.
Mistake to Avoid: Pulling out too many strands when pancaking, which makes the braid look sparse.
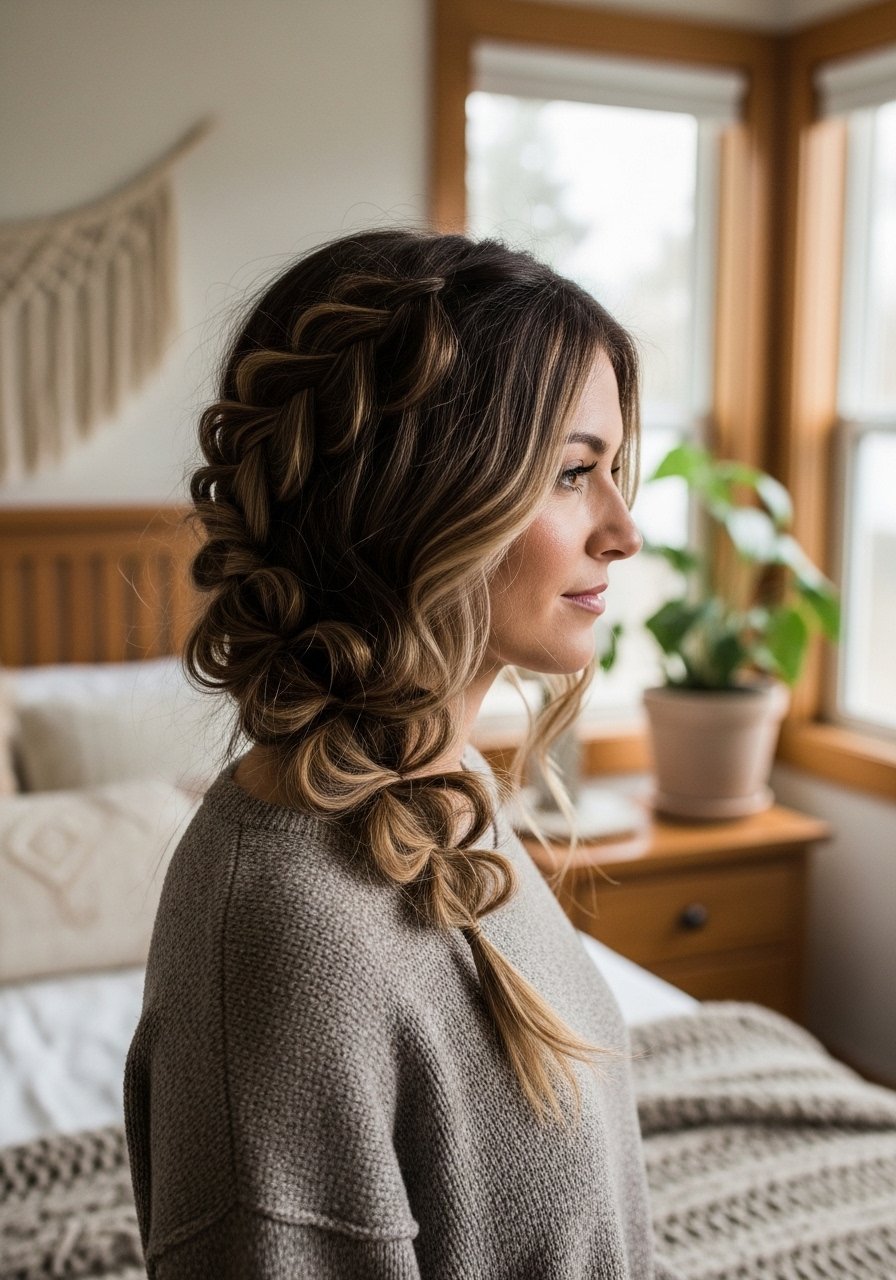
4. Rope Braid for Sleek Finish

This is simple once you master the twist. Twist two sections clockwise, then wrap them counterclockwise around each other so the twist locks. The result is clean and modern, ideal for work or a minimalist outfit. For longevity, secure with two small elastics spaced 1.5 inches apart rather than one, which prevents the rope from unspooling. Finish with a dab of smoothing serum and a fine mist of light-hold hairspray.
Mistake to Avoid: Using a single elastic at the end, which can let the twist rotate and loosen.
5. Waterfall Braid That Frames the Face
The waterfall braid is a pleasing face-framing option that looks complicated but reads soft and approachable. Take sections no wider than 3/4 inch so the dropped strand slips neatly through. It is great for fine to medium hair and pairs well with a lightweight leave-in so the cascading strands do not frizz. For hold without stiffness, set the finished braid with a spray that has flexible hold and touch up pieces with a mini metal clip hidden beneath layers.
Mistake to Avoid: Picking up too-large strands, which makes the waterfall look chunky instead of delicate.
6. Milkmaid Braids for Weekend Charm
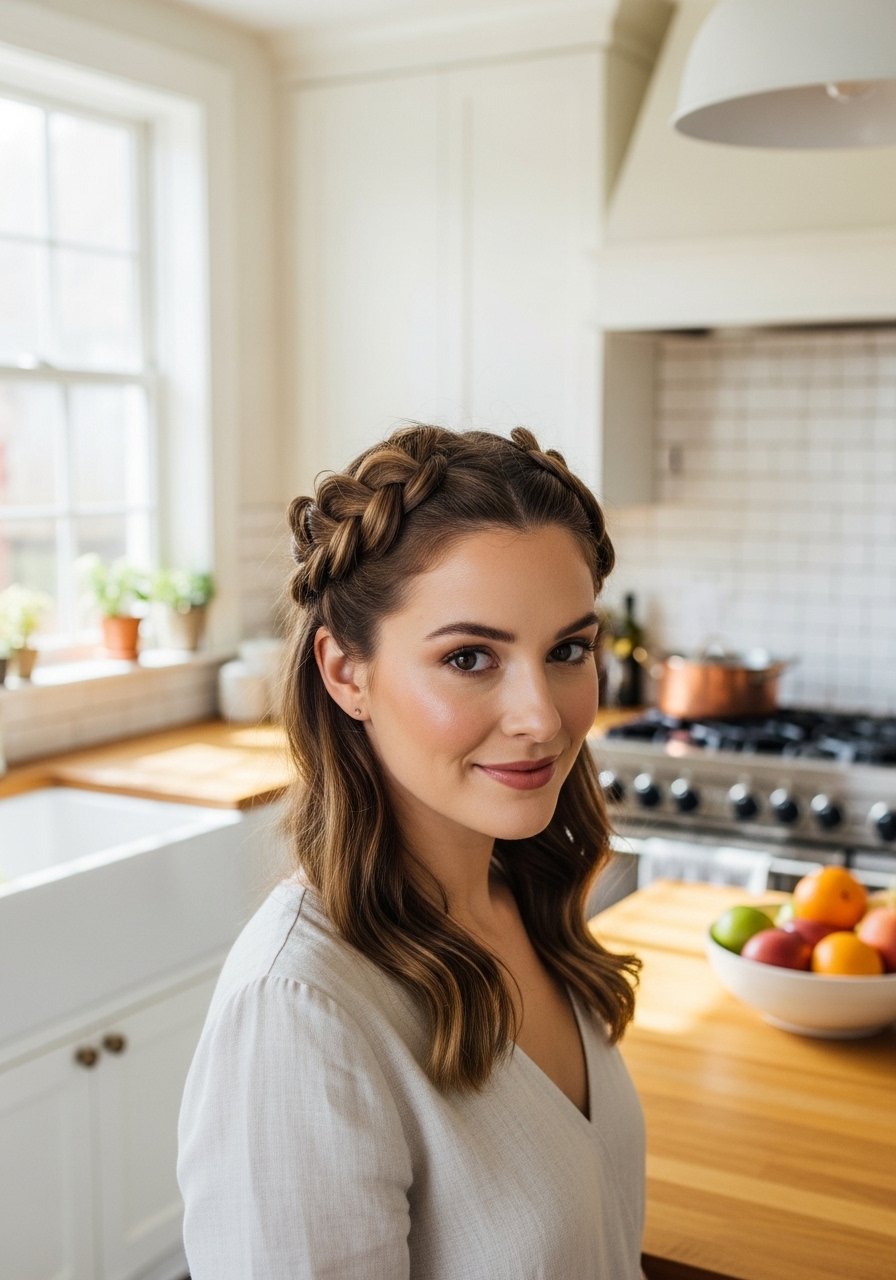
Cross two braids over the crown and pin them flat for a vintage-meets-modern feel. I like to slightly loosen each braid by pulling every fourth stitch for softness. This style reads intentional and cozy, and it is forgiving if your parts are imperfect. It works as a zero-heat styling choice when started on second-day hair. Use snag-free elastics and secure with U-pins, then mist with a light-hold spray like flexible hairspray.
Mistake to Avoid: Pinning too few points, which allows the braids to pop up at the crown after a few hours.
7. Halo Braid That Covers Roots

If you want a polished look that also hides a grown-out part, the halo braid is your friend. Start 1 inch behind the hairline and feed in sections evenly to maintain thickness. It creates a regal, put-together finish without heat when done on natural texture. For finer hair, tease the crown by 1 inch at the base before braiding to add lift. I often use a small amount of volumizing mousse worked from roots to mid-lengths.
Mistake to Avoid: Beginning the braid too close to the hairline, which makes the halo sit flat and look small.
If any of these styles have you ready to actually try something, here is everything worth picking up.
Essential Braid Kit Picks
Tools:
- Silicone hair elastics (~$6-12), they hold without creasing and stretch back.
- U-shaped bobby pins (~$5-10), necessary for pinning crown and halo styles.
- Mini metal clips (~$4-8), handy for holding waterfall strands while you work.
Styling Products:
- Sea salt spray (~$8-18) for grip on slippery hair.
- Texturizing powder (~$10-20) to add instant volume at the roots.
- Light-hold hairspray (~$6-15) so braids stay touchable.
Finishing & Care:
- Smoothing serum (~$10-25) to tame flyaways.
- Wide-tooth comb (~$5-12) for gentle detangling before braiding.
8. Pull-Through Braid for Big Volume
This braid mimics a chunky braid without the bulk of multiple strands by creating faux sections with small elastics. I space elastics roughly 2 inches apart and butterfly each segment to enlarge it. The result is dramatic and modern, perfect for events and photos. Works best on medium to long lengths and on hair with some texture. Use a detangling spray and clear small elastics to keep the segments hidden.
Mistake to Avoid: Skipping the butterflying step, which makes the braid look flat and stringy.
9. Boxer Braids That Actually Stay
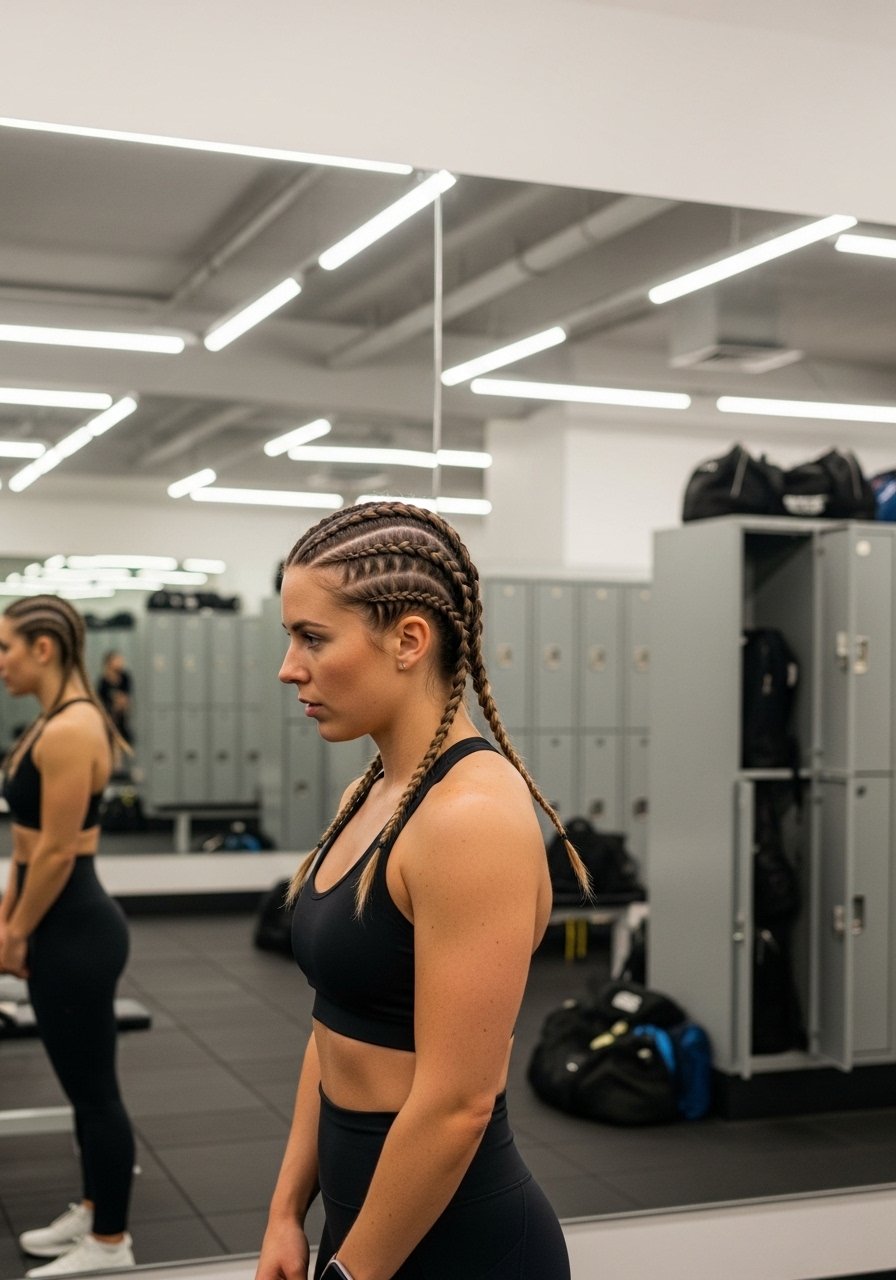
Boxer braids hold through workouts because they are braided tightly with firm tension. Section hair into two even halves and use a rat-tail comb to make an exact part. For longevity, tie down the ends with two elastics and tuck them back under the start of the braid. This style is low-fuss for active days and easy to sleep in. I smooth each new section with a pea-size of styling gel and finish with sport-hold hairspray.
Mistake to Avoid: Starting with uneven halves, which throws off the symmetry and causes one braid to loosen faster.
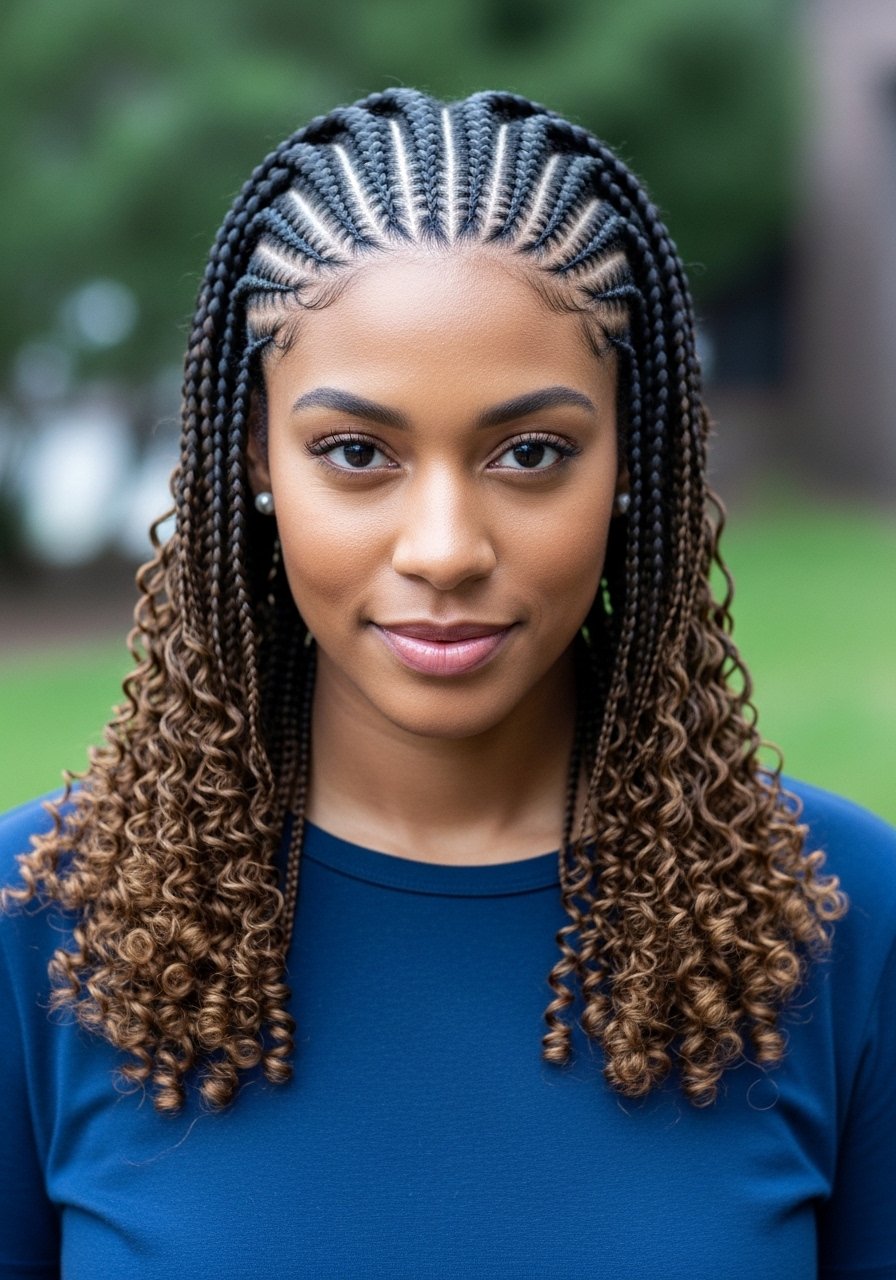
10. Lace Braid Along the Hairline
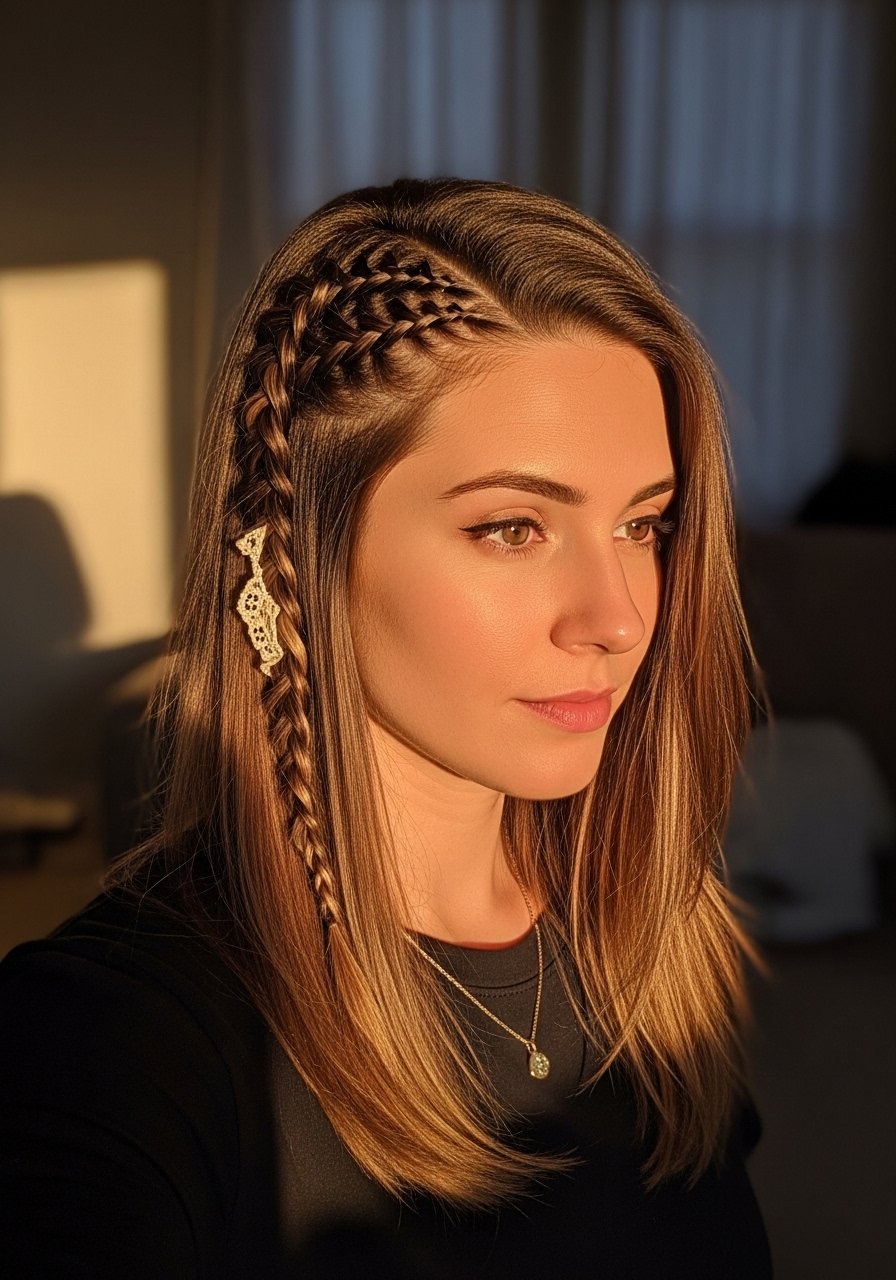
A lace braid picks up hair only from the top side, so it sits flatter and frames the face. Use 3/4-inch sections to keep the braid narrow and elegant. It looks polished for interviews and meetings and pairs well with tucked-back hair behind the opposite ear. On curly textures, smooth each added section with a small amount of leave-in to maintain definition. I often secure loose ends with an invisible clear elastic band.
Mistake to Avoid: Adding hair from both sides by accident, which turns the lace into a regular French braid.
11. Side-Swept Boho Braid with Face Flakes
This one is about imperfection. Pull a deep side part, start a low braid, and stop three inches before the end so the tail fans out into waves. Gently tug the braid every third stitch to create volume and let two thin pieces fall near the face. It reads relaxed and youthful, great for weekends. For a lived finish, spritz the braid with light texturizer and roll the ends under with your fingers.
Mistake to Avoid: Over-tightening the braid, which removes the soft boho effect and makes it look severe.
12. Bubble Braid for Playful Volume
Bubble braids are easy and eye-catching. Secure small elastics every 2.5 inches down the ponytail, then gently pull each segment until it puffs into an even bubble. This creates a polished yet playful vibe that is good for kids, festivals, or casual dates. On finer hair add a touch of texturizing powder to each segment before pulling to help it hold. I use clear small elastics for a neat look.
Mistake to Avoid: Spacing elastics inconsistently, which makes the bubbles uneven and messy.
13. Protective Cornrows for Overnight Styling
Cornrows are both a style and a protective method. When doing them for protection, braid with even 1/2-inch parts and keep tension firm but not painful. They reduce manipulation and make morning routines easier. For overnight protection, sleep on a silk pillowcase and lightly oil the scalp in a 2:1 carrier oil to essential oil mix to prevent dryness. I secure the ends with satin scarf ties when I will be sleeping in them.
Mistake to Avoid: Braiding too tightly, which can cause breakage and sore edges.
14. Braided Bun That Converts
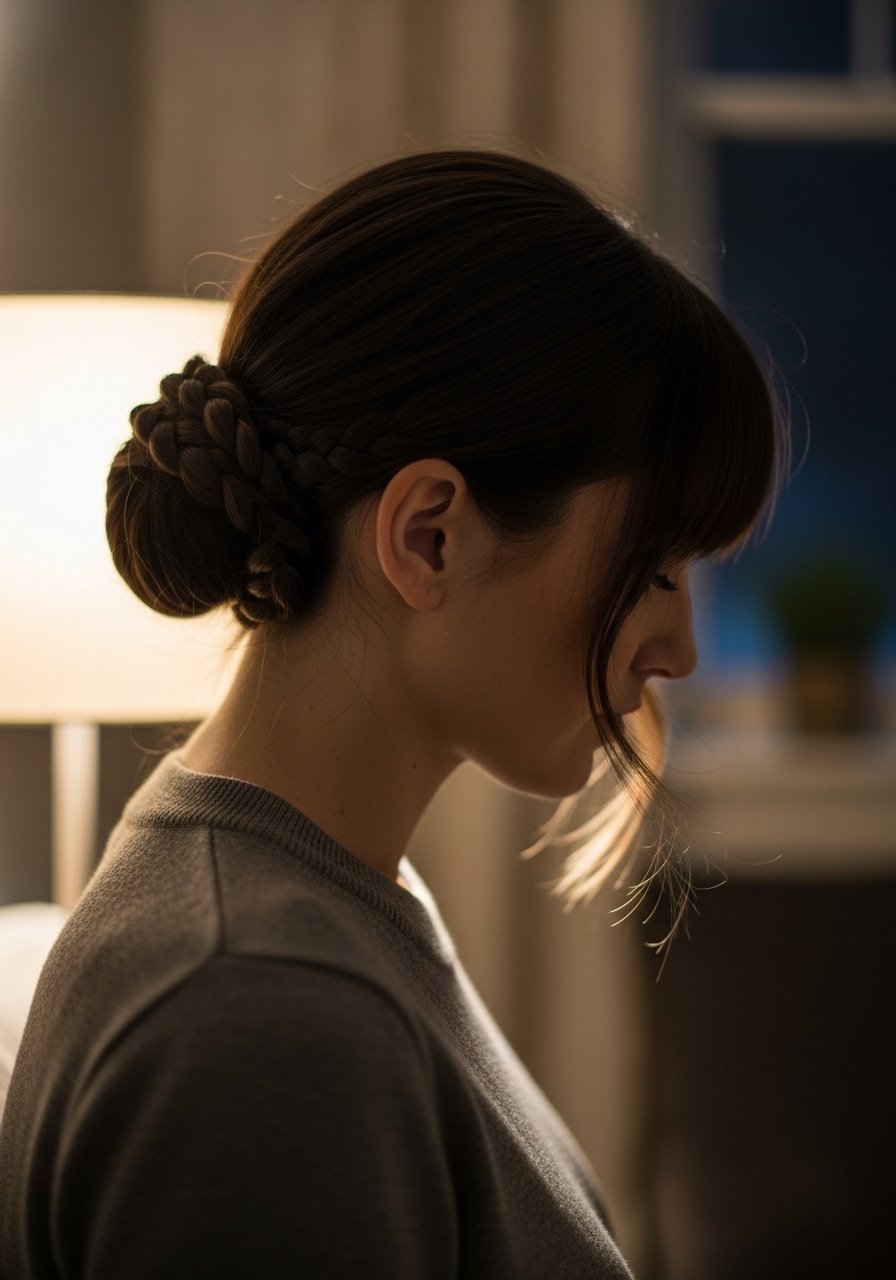
Combine a simple three-strand or rope braid with a low bun for an elevated, office-friendly style. Start with a braid down the middle, wrap it into a bun, and anchor with U-pins. I like to leave three 1-inch face-framing pieces out for softness. It reads refined and intentional, yet it is heat-free if you start on second-day hair. Add a drop of smoothing serum and a hidden bobby pin set to secure.
Mistake to Avoid: Skipping pins under the bun base, which allows the bun to slip at the nape.
15. Accent Ribbon Braid for Seasonal Flair

Weaving a ribbon or narrow scarf through one braid makes a simple look feel intentional and seasonally tuned. Use a 1/4-inch ribbon and anchor it at the start with a small elastic so it feeds smoothly. It creates a playful, styled finish for festivals, springtime weekends, or dressy casual outfits. For delicate ribbons, secure the end with a tiny dab of clear styling glue or a small elastic so it does not slip out.
Mistake to Avoid: Using a ribbon that is too wide, which overwhelms the braid and looks costume-like.
Nighttime Braid Habits
Sleep on a silk pillowcase. It reduces friction and keeps braids smoother. I prefer a silk pillowcase for fewer morning tangles and less frizz.
Grab a satin bonnet if you move a lot at night. It holds braids in place better than a pillowcase alone and keeps edges neat.
Curly and coily hair benefits from a light oil pre-sleep. A 2:1 mix of jojoba and a few drops of essential oil keeps the scalp from drying out, and I use a small glass dropper bottle to distribute evenly.
Most people over-tighten when aiming for sleekness. Try braiding with slightly looser tension, then pin and shape the braid for a sleeker look without stress. My go-to is a small set of U-shaped pins to anchor shape without tugging.
