
I used to buy a bunch of parsley, tuck it in the crisper, and forget about it until it was a sad pile of brown edges. The turning point came when I had a jar of basil that lasted two weeks on the counter and a parsley bunch that wilted in three days. Once I stopped treating all herbs the same, they lasted far longer and I stopped wasting money and meals.
These tips are kitchen-honest and low budget. Most methods need only jars, freezer trays, or a cheap herb keeper. I tested several of these three times to get the timing right, and they work for people who cook two to five times a week. Expect 5 to 20 minutes of prep, and techniques that fit weeknight cooking without special tools.
1. Trim Stems and Store Like Flowers for Tender Herbs
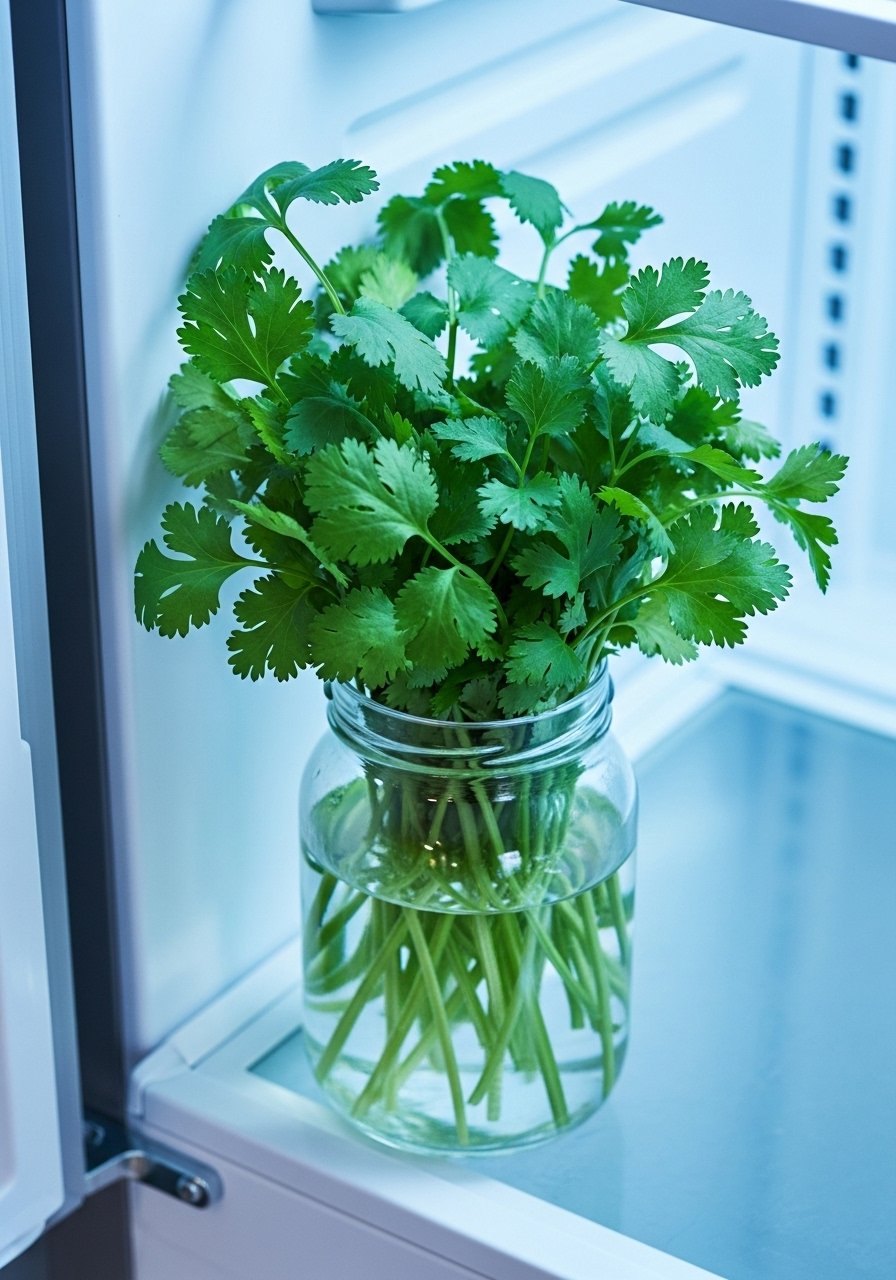
The easiest reset for cilantro, parsley, and chives is to trim the stems and stand the bunch upright in an inch of cold water, change the water every other day, and cover loosely with a plastic bag. The result is a bowl of herbs that looks and behaves like a cut bouquet. This works for fair-to-medium fridge temps, and it keeps herbs crisp for up to two weeks when done properly. I like a set of small glass jam jars for the job because the narrow neck supports stems. The key detail that saved me was trimming one quarter inch off stems under running water, not in air.
Mistake to Avoid: Leaving stems untrimmed before storing so they cannot take up water and go limp.
2. Damp Paper Towel Wrap for Leafy Herbs
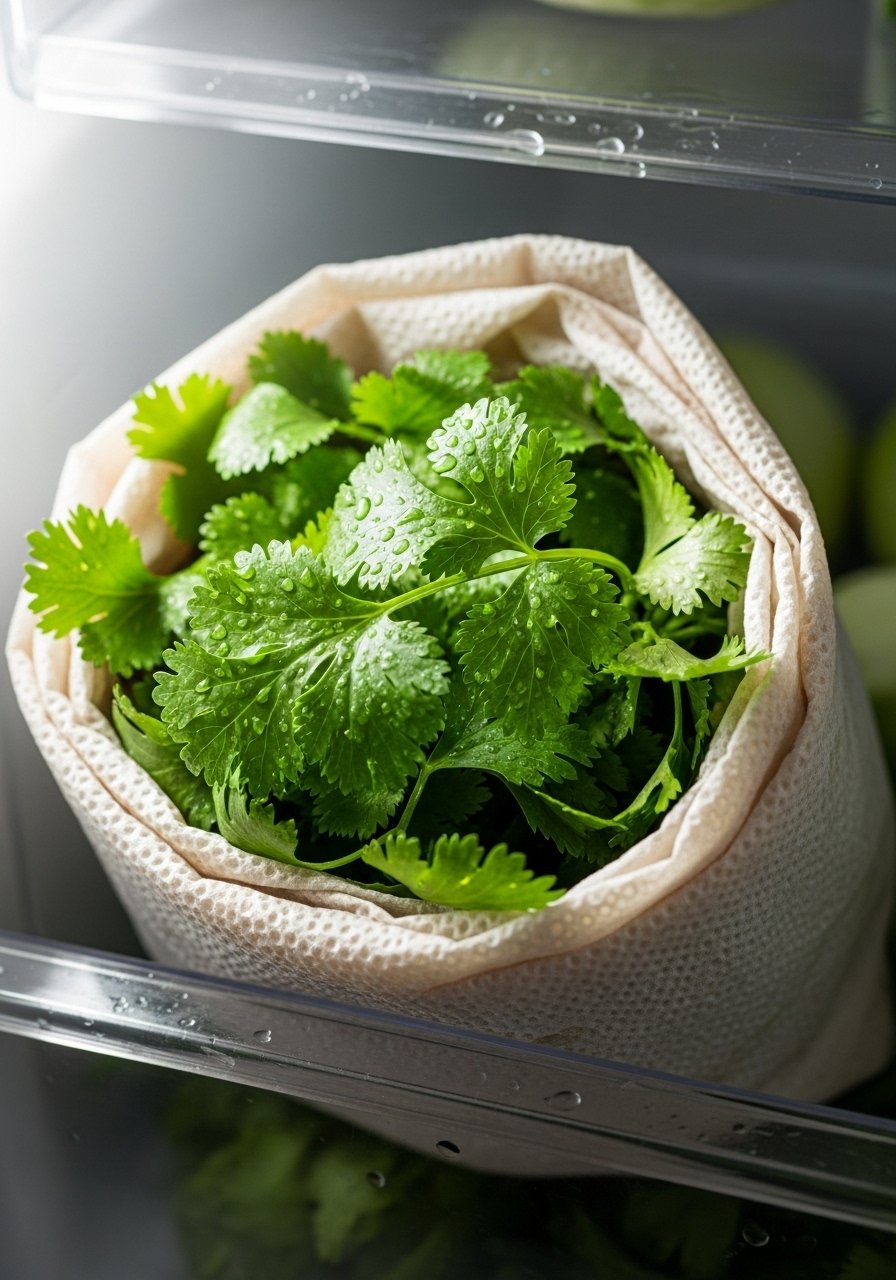
For basil, mint, and flat-leaf parsley, wrap leaves loosely in a barely damp unbleached paper towel, then slide into a perforated produce bag or a breathable container. The damp towel keeps humidity steady without puddling, which prevents sliminess. I set the towel to be moist, not dripping, and that ratio kept herbs fresh for 8 to 10 days. On a tight budget, use reusable cotton kitchen towels. For an everyday upgrade, try a set of breathable produce bags to avoid plastic wrap. This approach solves the fridge-burn and soggy-mess frustrations other guides ignore.
Mistake to Avoid: Wrapping herbs in a soaking wet towel so they rot instead of staying crisp.
3. Herb Keeper Container for Staggered Use
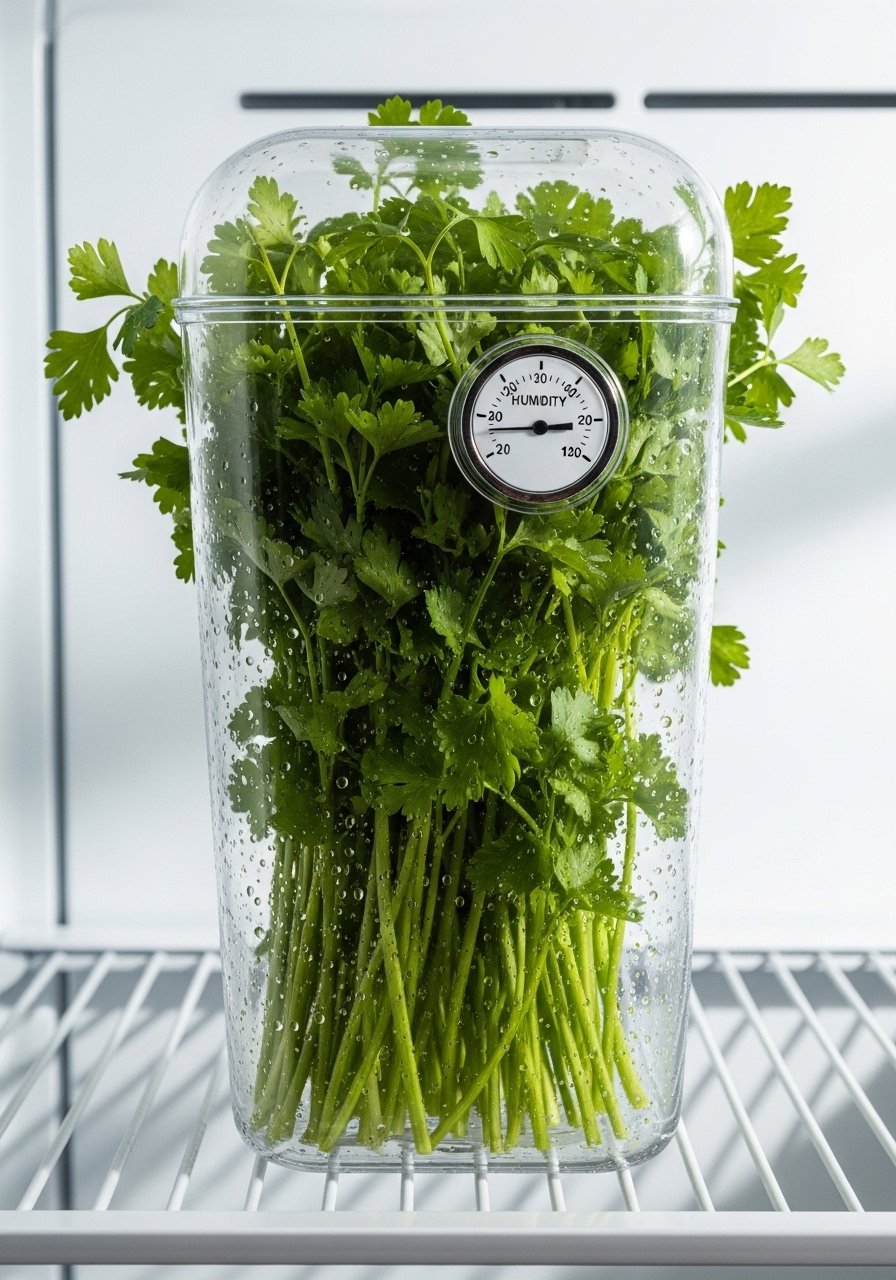
If you buy herbs weekly, a dedicated herb keeper with an adjustable vent is worth it. The vent controls airflow so denser herbs like rosemary stay dry while tender herbs retain moisture. Pack stems upright in about one inch of water and set vent to half-open when storing in the fridge. I tested the vent settings three times and found half-open works for mixed purchases. For an inexpensive option, try a clear herb keeper with vent. This fixes the common frustration of herbs that either dehydrate or get soggy because it balances humidity.
Mistake to Avoid: Cramming mixed herbs into one sealed container with no airflow so they mildew.
4. Flash-Freezing in Oil for Cooking-Ready Cubes
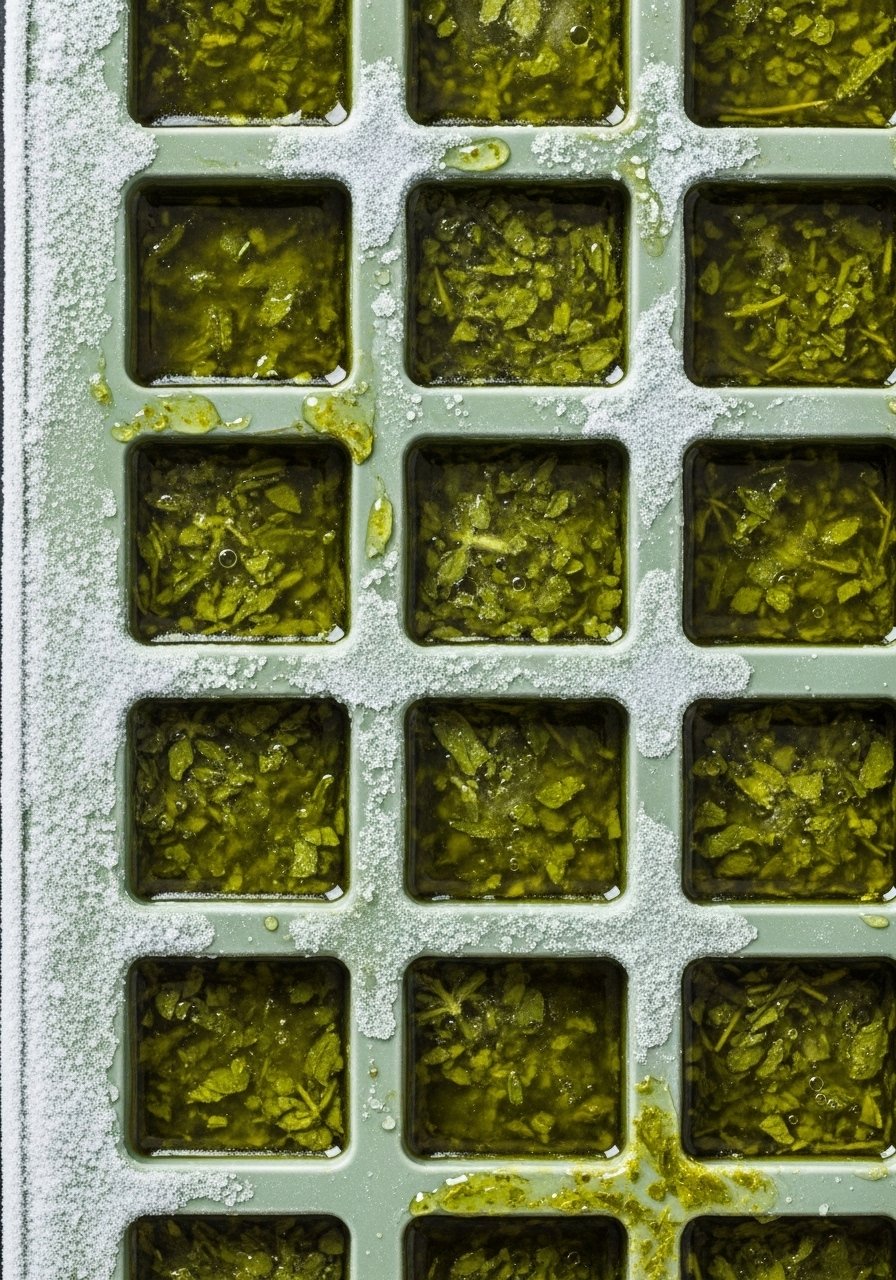
Chop basil, chives, dill, or tarragon, pack one tablespoon per compartment and top with olive oil or melted butter. Freeze until solid, then pop into a freezer bag. Each cube is ready for sautés or soups and keeps flavor far better than loose frozen herbs. The ratio I use is one packed tablespoon herb to one tablespoon oil per cube. A soft silicone ice cube tray pops cubes easily. This method addresses the freezer-clump problem that ruins portioning and prevents waste during busy weeks.
Mistake to Avoid: Freezing loose chopped herbs in a bag so they clump into a single solid block.
5. Oven or Dehydrator Low-Temp Drying for Shelf-Stable Herbs
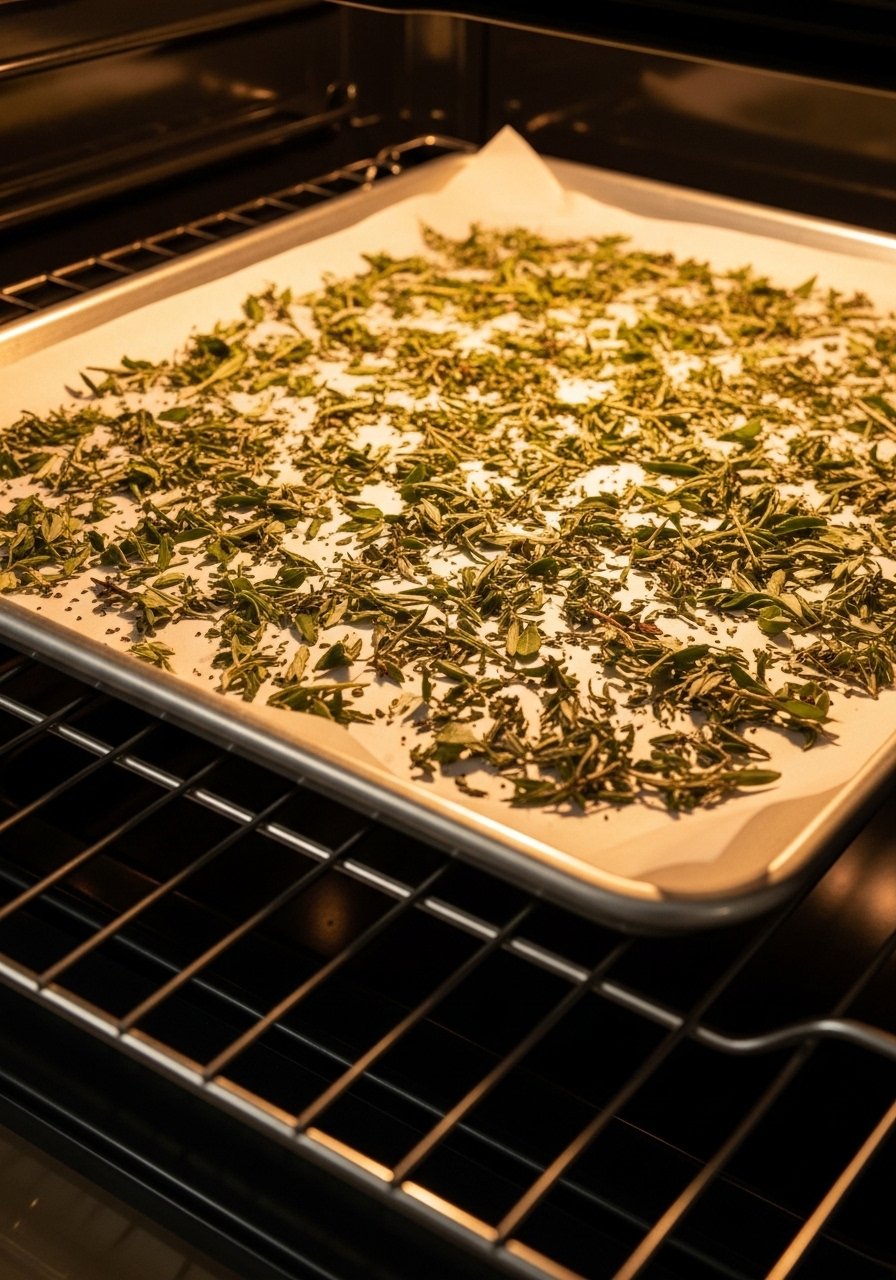
When you need dried herbs, use the oven at its lowest setting or a dehydrator at 95 to 110 degrees Fahrenheit and keep leaves in a single layer. Turn every 15 minutes so drying is even. I tested drying three times to nail a 90 to 120 minute window for thicker leaves. The result is aromatic, slightly chewy leaves that crush easily. For frequent drying, a small countertop dehydrator is a better investment than overcooking herbs in a hot oven. This covers the gap many articles miss about uneven drying and bitter off-flavors from overheat.
Mistake to Avoid: Turning the oven too high so herbs brown and taste bitter instead of crisp.
6. Store Basil at Room Temperature for Green Flavor
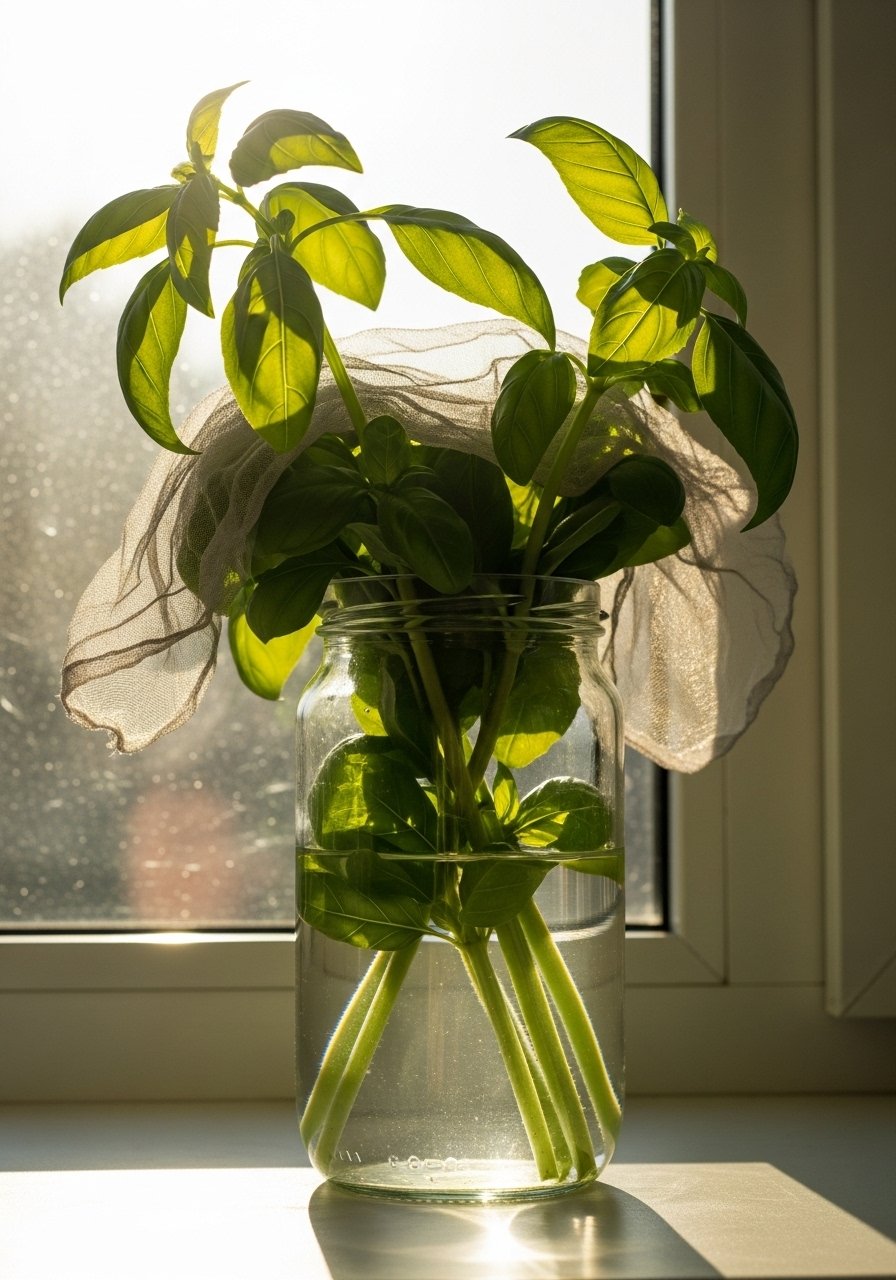
Basil dislikes cold. Treat it like a flower by trimming stems and placing them in a jar of water on the counter away from direct heat. Change water every two days and use within two weeks. For pesto-ready basil, this preserves both texture and that fresh green flavor that refrigeration dulls. A regular mason jar works fine. This fixes the all-too-common mistake of stashing basil in the back of the fridge where it blackens overnight.
Mistake to Avoid: Refrigerating basil so leaves blacken and lose that bright flavor.
7. Flat-Freezing Leaves for Quick Garnish
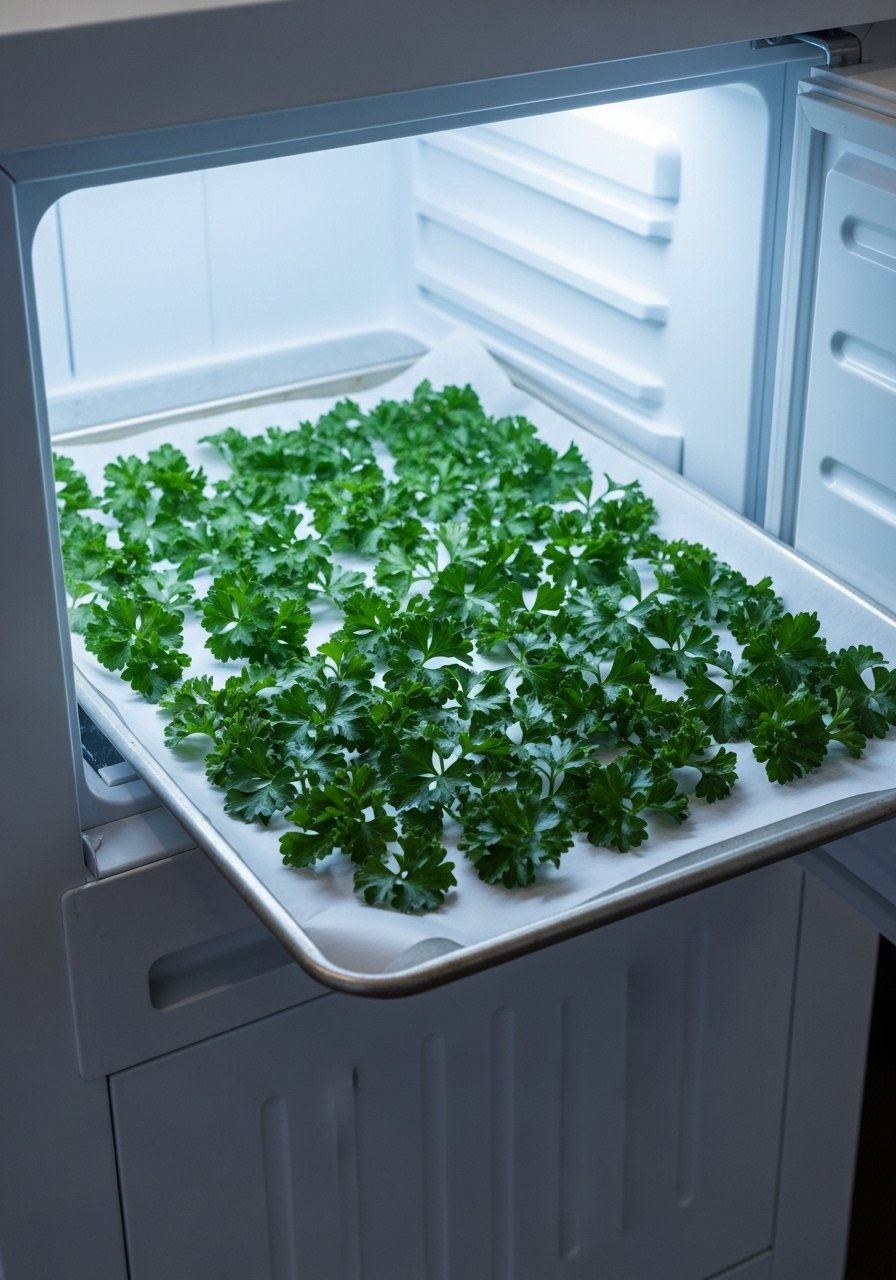
Lay whole leaves single layer on parchment, flash-freeze for 45 minutes, then transfer to labeled freezer bags. The leaves stay separate so you can grab a handful for garnish. For delicate leaves use a small sheet pan so they do not overlap. Flash-freezing first prevents clumping and preserves texture better than bulk bagging. A thin parchment roll does the trick. This solves the frustration of brittle, stuck-together leaves that are hard to use straight from the freezer.
Mistake to Avoid: Dumping whole leaves into a bag and letting them freeze into one unusable mass.
8. Make Herb Compound Butter or Pesto and Freeze Logs
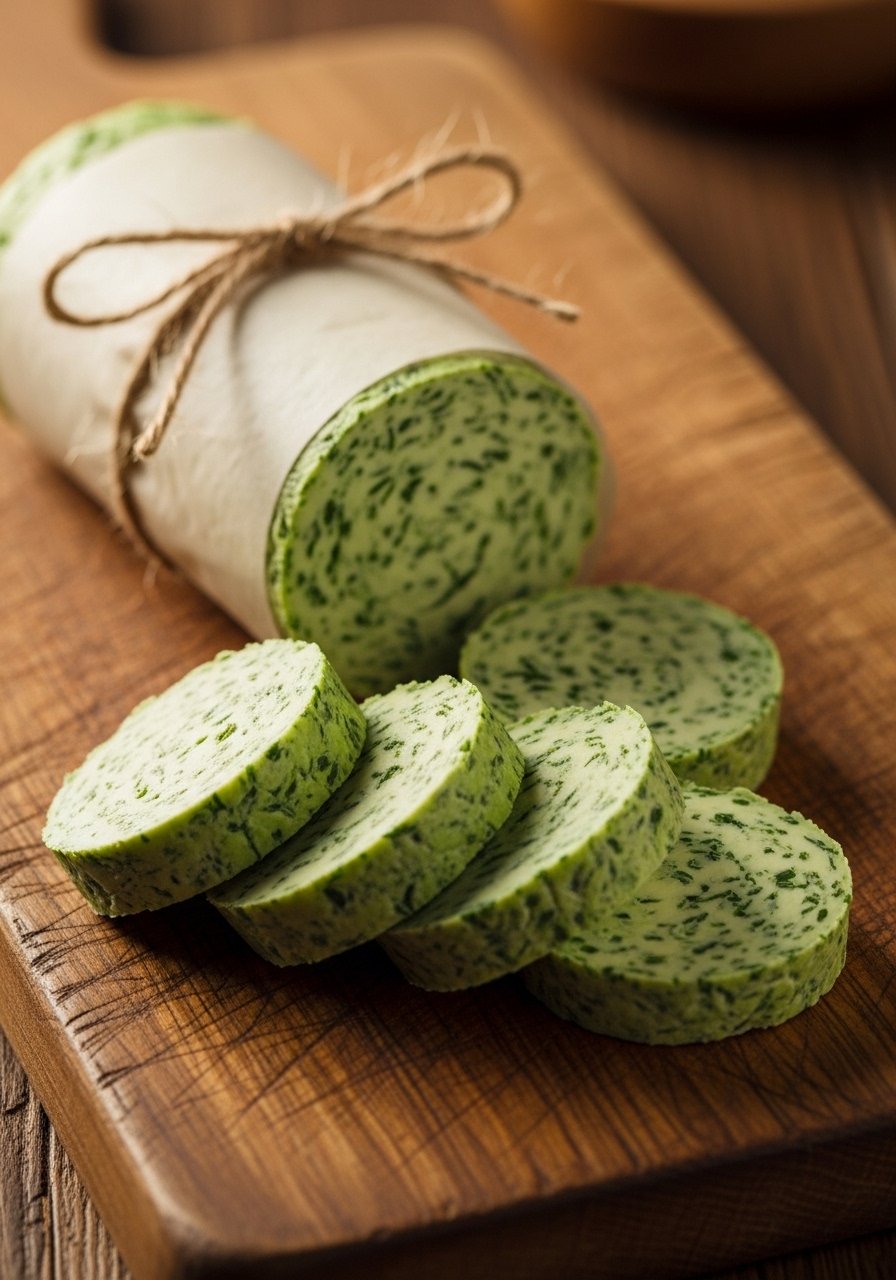
For quick pan finishes, chop 1 cup packed herbs to 8 ounces softened butter, mix, roll in parchment, and freeze. For pesto, measured cups are one cup herbs to one third cup nuts and olive oil to taste. Slice off rounds for steaks, vegetables, or bread. I keep a set of silicone baking mats to roll and freeze easily. This covers the competitor gap around preserving fresh flavor in ready-to-use forms and cuts waste for people who hate wasting half a bunch.
Mistake to Avoid: Freezing mixed herb sauces in large tubs so you can never take just what you need.
9. Store Woody Herbs Dry and Ventilated
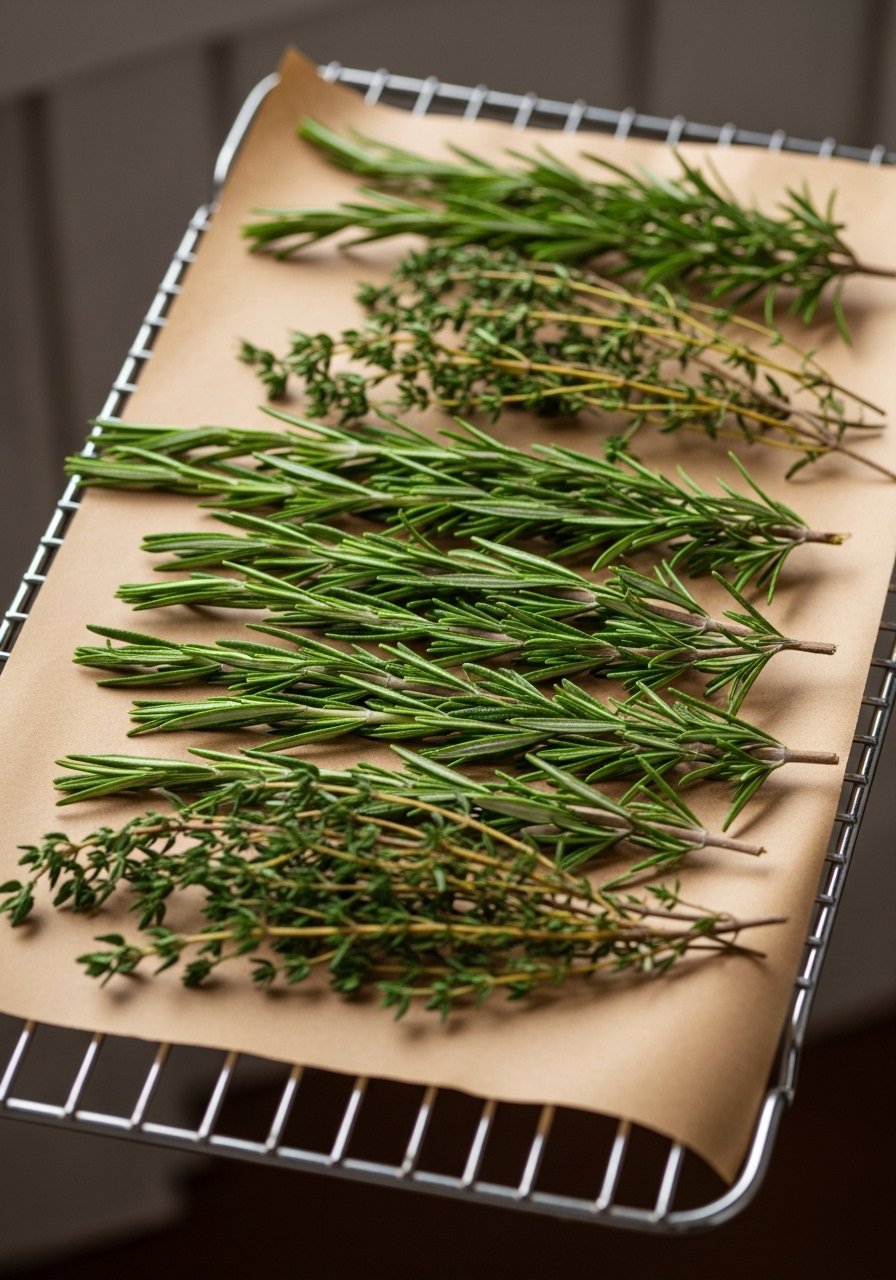
Rosemary, thyme, and oregano prefer dry air. Lay sprigs on a paper-lined rack in the fridge or hang them in a cool dark spot. For longer storage, strip leaves and place in a paper bag with holes to allow airflow. Keeping woody herbs bone-dry preserves oils and prevents mildew. A simple wire cooling rack works in the fridge or pantry. This method answers the common complaint that rosemary goes woody and flavorless when left damp.
Mistake to Avoid: Tossing woody herbs into a sealed plastic bag where trapped moisture makes them mold.
10. Label and Date Everything, Even Small Batches
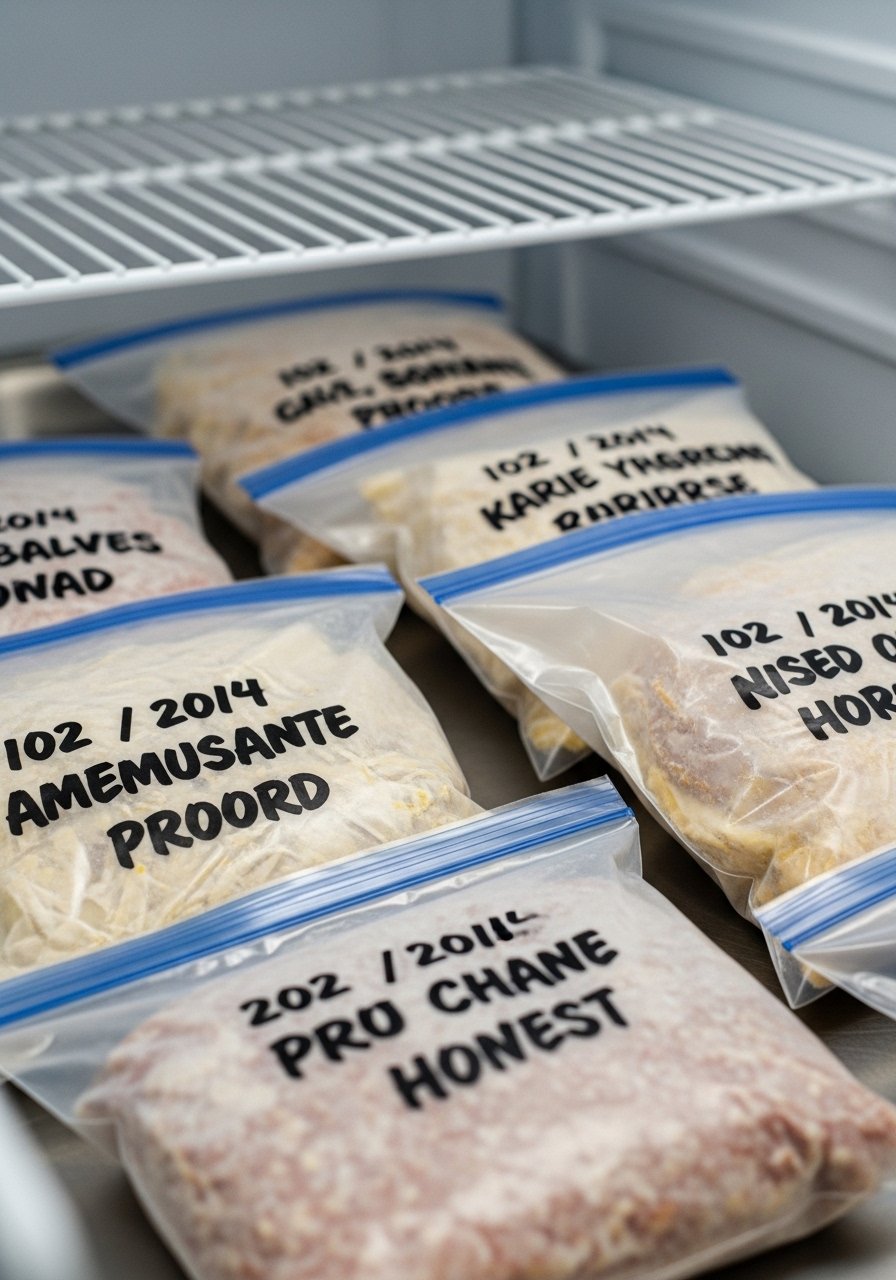
A tiny step that pays off is labeling herb bags, cubes, and jars with the date and variety. I once had two identical bags and lost last season's oregano to mystery. Knowing age prevents flavor surprises and saves money because you use the oldest stash first. Use a fine-tip permanent marker set and run a calendar check every three months. This helps with meal planning and prevents the fridge purge frustration most home cooks face.
Mistake to Avoid: Skipping labels so you toss usable herbs because you do not remember when you froze them.
11. Revive Limp Herbs with a Quick Stem Rescue
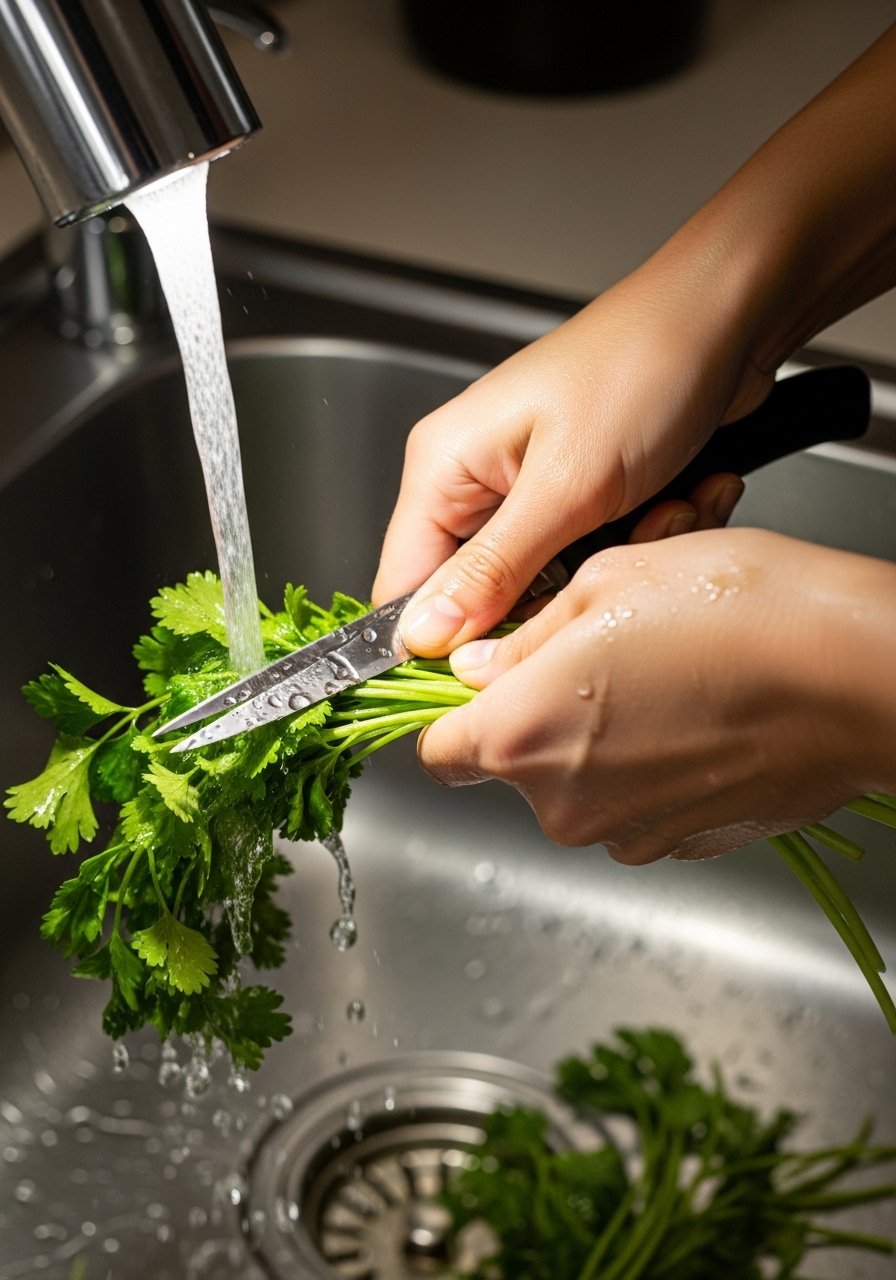
If herbs arrive limp, re-cut stems under cold running water, then submerge stems in an ice bath for 10 minutes and stand them upright in fresh water in the fridge. For basil, use room-temperature water instead of cold. This trick pulls out trapped gases and rehydrates cells so herbs perk up for several days. It is the rescue I use when the grocery bunch looks past its prime. Keep a small kitchen shear nearby for clean cuts.
Mistake to Avoid: Snipping limp herbs without rehydrating first so they never recover.
Your Pantry and Equipment
- Honestly the best $12 I have spent, small glass jam jars set (~$10-15). Narrow necks hold stems upright and stack well.
- For freezing oil cubes, a flexible silicone ice cube tray (~$8-12) pops cubes cleanly.
- For drying often, a countertop food dehydrator (~$40-70) keeps temps steady and leaves aromatic results.
- Keep a parchment paper roll (~$6-10) on hand for flash freezing and rolling butter.
- A set of mesh produce bags (~$9-14) replaces single-use plastic for wrapped herbs.
- Fine-tip permanent markers (~$6-9) for clear labels.
- Silicone baking mats (~$12-20) make freezing and rolling compound butters simple.
Cooking Tips Worth Stealing
Thin layers preserve more flavor. When chopping herbs for freezing, spread no more than a single leaf thickness on parchment so freeze time is fast and individual pieces stay separate. Grab a parchment roll while you are at it.
Grab a compact dehydrator tray set for under $30. If you like dried herbs in jars, this prevents that smoky, overcooked taste you get from high oven heat.
Labeling cuts decision fatigue. A small label maker or fine-tip marker saves time when you freeze many herb forms.
Most people spend somewhere between $500 and $800 when they finally commit to refreshing a room, so start small. Invest first in jars, a tray, and a marker. The rest you can add as you see which methods you use most.
Keep strong-flavored herbs separate. Freezing rosemary or thyme near parsley will dull parsley because aroma transfers in the freezer. Use separate bags or compartments and a pack of freezer bags with slider for easy portioning.
