
I kept saying I wanted a tiny tattoo, then booked something that covered my bracelet and felt like a commitment I had not meant to make. After a few months of regret I learned to ask for one pinpoint line, a small placement, and a clear aftercare plan. That one change made every future piece fit my daily life.
These are not sleeves or heavy blackwork, they are small single-session pieces meant to be easy to hide and quick to heal. Expect modest pricing and 30 to 90 minute sessions for most designs. If you need coverability for work, look for placements that tuck under a watch or sit on the rib. Across five shops I have visited artists all recommended single-needle lines for fine details and a fragrance-free balm for the first week.
1. Tiny Script On The Inner Wrist

Style/Technique: Fine single-needle script
Pain Level: 3/10
Session Time: 30 to 45 minutes
Best For: Inner wrist, people who want discreet text
A single-word script in 1 to 3 lowercase letters reads delicate in photos, and in real life it sits flat against the skin instead of sitting like a sticker. Ask your artist for a 1RL or 3RL needle for consistent 0.5 mm lines, and bring a reference in your own handwriting if you want it to feel personal. This fits anyone who wears long sleeves to work and likes low-maintenance pieces. For aftercare I used a fragrance-free healing balm for the first five days, applying a rice-grain amount twice daily.
Mistake to Avoid: Requesting a heavy script that looks good in a photo but blurs when scaled down.
2. Single-Needle Star Behind The Ear

Style/Technique: Single-needle micro symbol
Pain Level: 2/10
Session Time: 15 to 30 minutes
Best For: Behind the ear, people preferring coverable accents
Tiny symbols behind the ear keep things playful and almost jewelry-like. A single 0.5 mm star done with a 1RL needle heals flat and rarely needs touch-ups if placed off the bone. This placement is quick and budget-friendly, often one short appointment. It reads subtle in photos and holds up well once the peeling phase finishes. If you want a matching stud vibe, pair the tattoo with a small hoop on the same side. Bring a neutral cleanser like a gentle fragrance-free face wash to pat the area clean during healing.
Mistake to Avoid: Placing tiny work too close to the hairline where scabbing gets hair trapped in it.
3. Mini Botanical Ankle Sprig
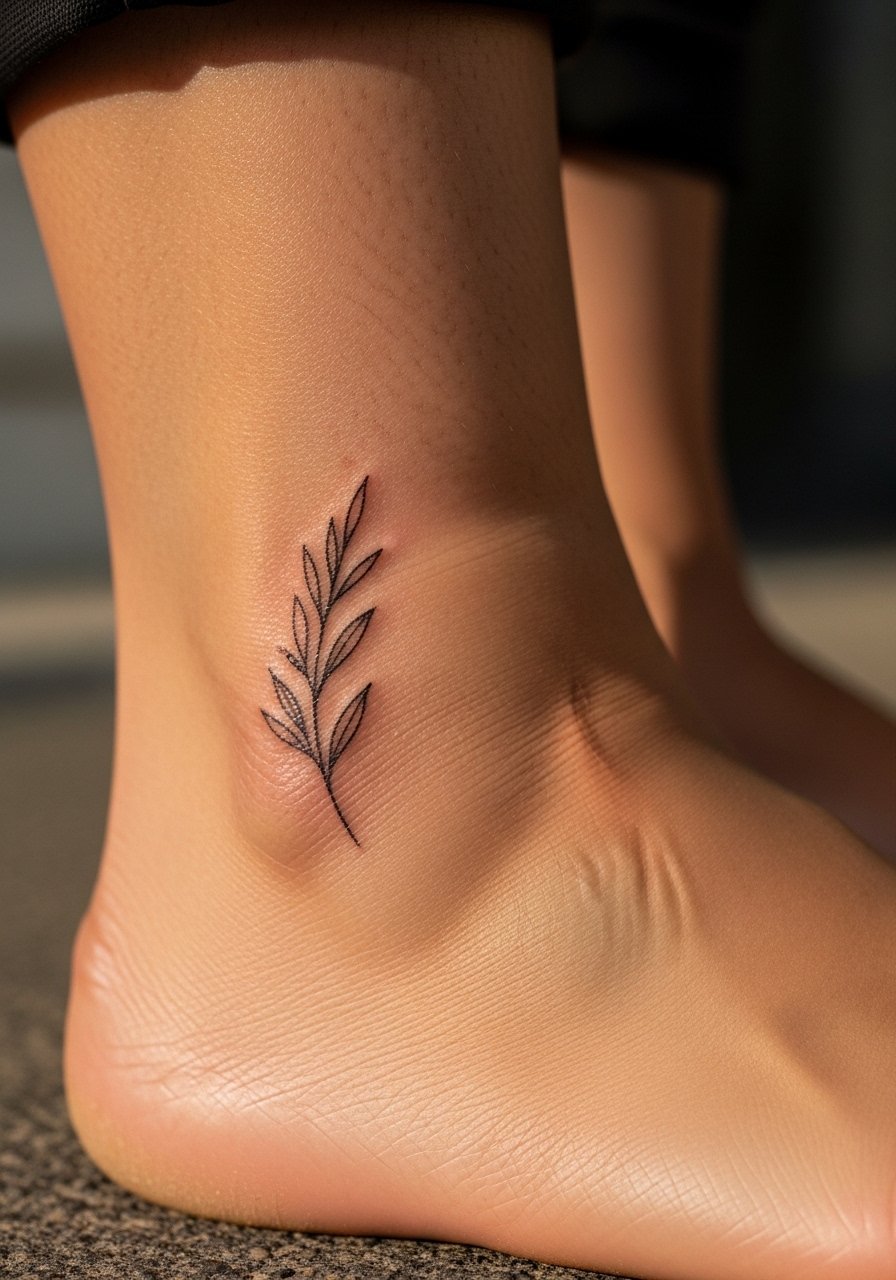
Style/Technique: Fine-line botanical
Pain Level: 4/10
Session Time: 30 to 60 minutes
Best For: Outer ankle, people who wear low shoes or sandals
A thin sprig with 3 to 5 leaves uses micro linework to read like a whisper on skin. The visual works because the negative space between leaves creates contrast, not heavy shading. Choose an artist who uses single needles for leaf veins, ask for 0.5 mm line weight, and plan footwear that avoids rubbing the area for two weeks. This style ages gracefully if you avoid midday sun and use a tattoo-specific mineral sunscreen after the month-long healing. I kept a small tube of tattoo sunscreen in my bag.
Mistake to Avoid: Picking a design with dense shading that migrates and looks muddy at a small scale.
4. Micro Geometric Dot Row

Style/Technique: Minimal geometric dotwork
Pain Level: 2/10
Session Time: 20 to 40 minutes
Best For: Forearm or outer ankle, people who want modular pieces
A row of 4 to 6 evenly spaced dots with one connecting line reads intentional and modern. Ask for equal spacing of about 4 to 6 mm between dots to keep the rhythm visible from arm distance. This is a gap competitors miss, since many lists ignore tiny negative-space geometry as a design system. It pairs well with rings or bracelets that mirror the dot spacing. Keep sessions short and budget-friendly, and use a thin-layer aftercare ointment like the fragrance-free healing balm after showering.
Mistake to Avoid: Requesting dots too close together, which can turn into a solid blur when healed.
5. Tiny Constellation On The Side Finger
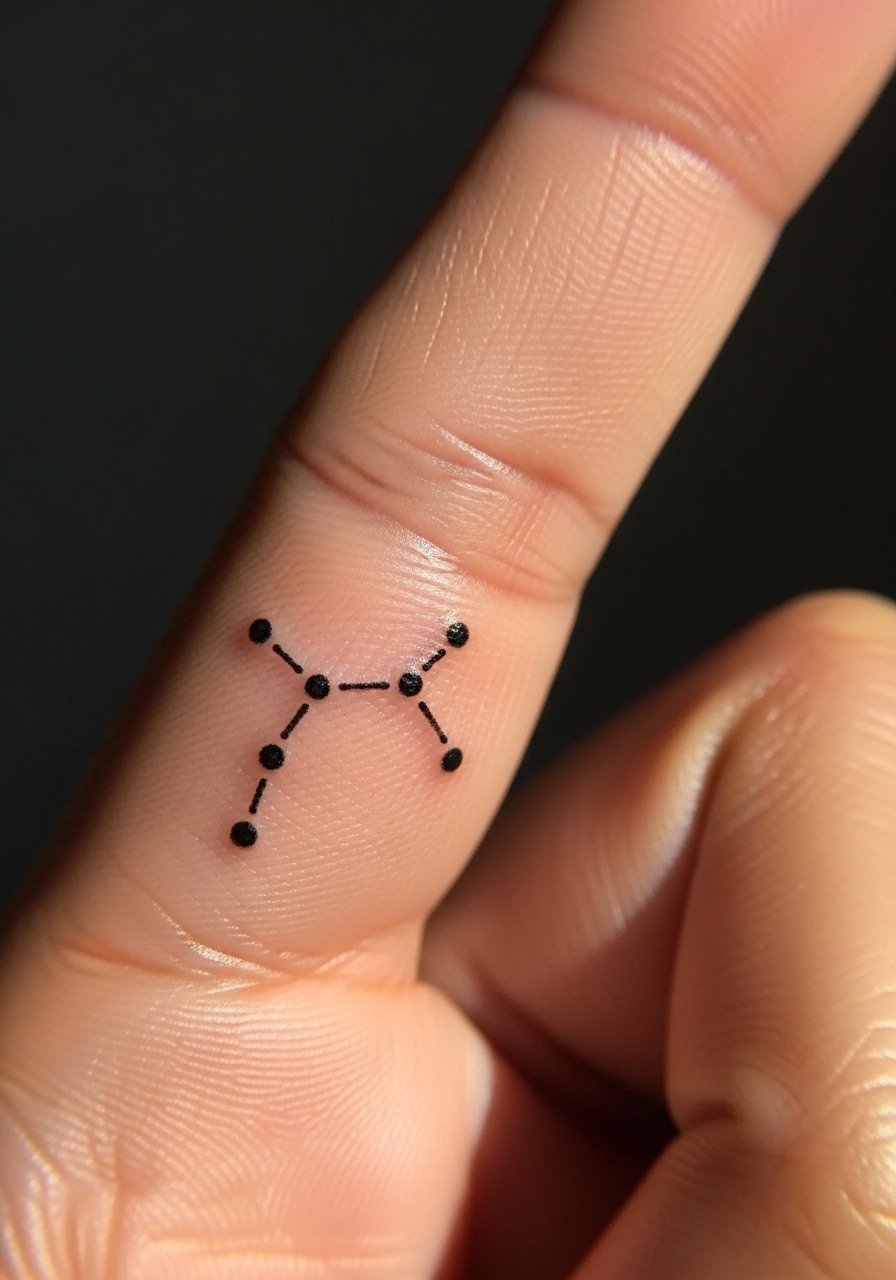
Style/Technique: Micro constellations, dot and line mix
Pain Level: 5/10
Session Time: 30 to 45 minutes
Best For: Side finger, people who want peek-a-boo art
Fingers fade faster than other locations, but a 3 to 4 star cluster along the side of a finger looks like delicate jewelry while it lasts. Use a sparse pattern and single-needle dots placed 3 to 5 mm apart. Expect faster fade and a potential touch-up after 12 to 18 months. If you want longevity, choose the outer finger instead of the pad-facing side. Keep the area dry during early healing and apply a tiny amount of a skin barrier balm to prevent soap from stripping ink.
Mistake to Avoid: Insisting on dense shading on a finger, which fades unevenly and needs frequent fixes.
6. Minimal Portrait Silhouette On The Rib

Style/Technique: Single-line silhouette
Pain Level: 6/10
Session Time: 45 minutes to 1.5 hours
Best For: Rib or side torso, people wanting intimate, coverable art
A tiny silhouette portrait drawn in one continuous fine line feels modern and personal without being literal. On the rib the pain is higher, but the placement allows you to hide it under clothing. Specify that the artist keeps the line weight under 1 mm and avoids heavy fills that change the mood of the piece. For healing, lie on your back for short naps initially to keep friction low. I learned after three sessions at one local shop that ribs need looser clothing for two weeks. Keep a breathable bandage on hand and a gentle antibacterial soap for first washes.
Mistake to Avoid: Choosing a face portrait with too much detail, which loses identity when shrunk to a few centimeters.
7. Tiny Dots Aligned With Jewelry
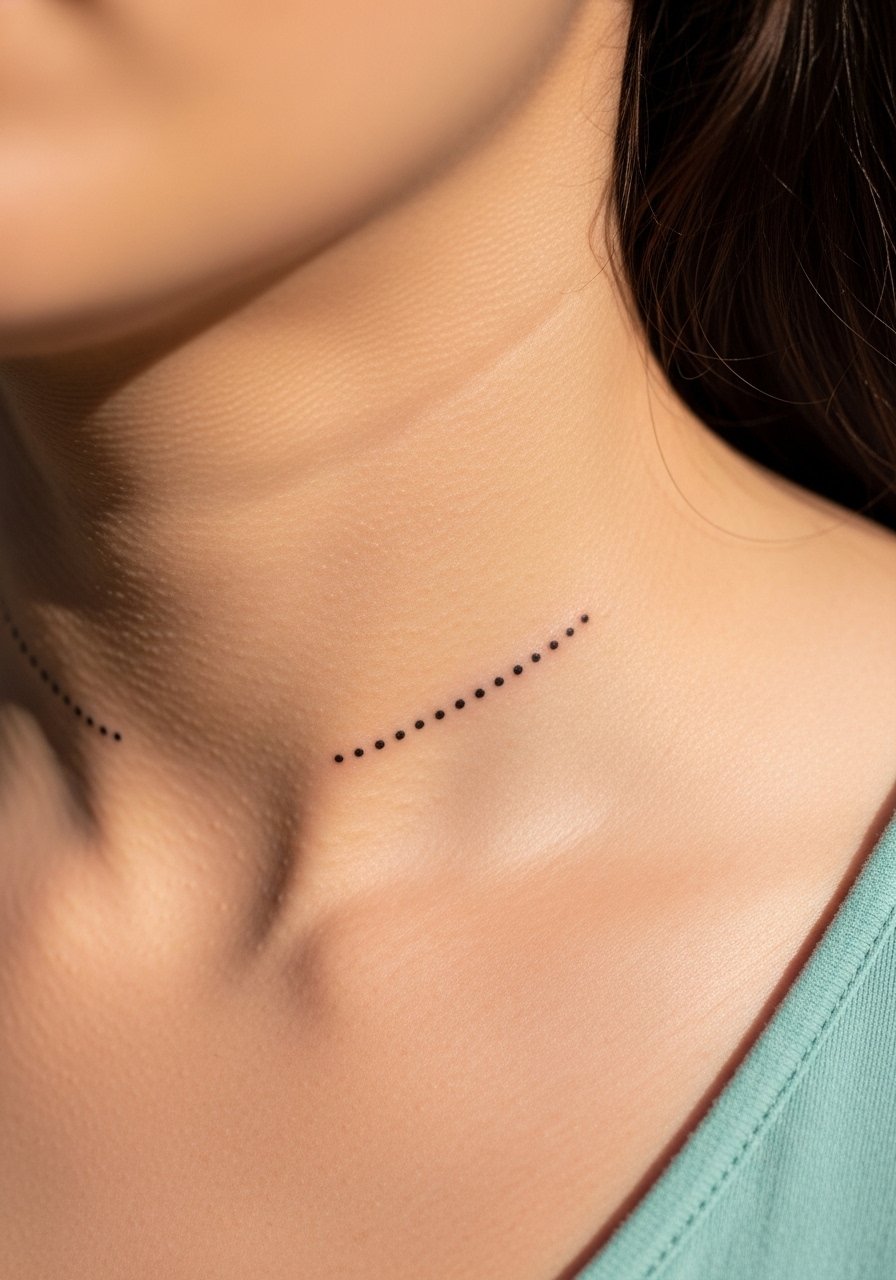
Style/Technique: Micro dot alignment
Pain Level: 2/10
Session Time: 20 to 30 minutes
Best For: Collarbone, wrist, people who wear consistent jewelry
This is a simple design trick I wish I had known earlier. Ask your artist to map dots so they sit where your necklace ends or where a ring sits on your finger. That alignment makes the ink feel like part of your daily styling rather than a separate object. Use a spacing of 6 to 8 mm so the dots read as rhythm from a distance. It is renter-friendly and easy to hide with clothing if needed. For aftercare I kept a travel-size fragrance-free healing balm in my jewelry box.
Mistake to Avoid: Asking an artist to freehand alignment without trying the exact jewelry on during the stencil stage.
If any of the tools or balms here sound useful, these are the items I actually reach for when getting or caring for tiny tattoos.
Minimal Tattoo Care Kit
Aftercare Essentials:
- Fragrance-free healing balm (~$8-18), gentle and seals without clogging pores.
- Antibacterial foam cleanser (~$6-15), for the first two washes.
Tools & Protection:
- Transparent adhesive bandages (~$6-12), cut to size for small placements.
- Tattoo mineral sunscreen (~$10-20), wear after the first month to protect tiny lines.
Extras:
- Portable cold pack (~$5-12), helps swelling for sensitive placements.
- Transfer paper for artist references (~$7-15), handy if you like precise placement copies.
Tiny Tattoo Healing Habits
Keep it light on ointment. A very thin layer of fragrance-free healing balm twice a day prevents scabbing from getting too thick and reduces color pull when the scab comes off.
Give small pieces space from tight clothing. Wearing a soft cotton tee instead of a high-neck sweater for two weeks stops irritation and speeds up even healing. I rotated to loose tops after my ankle and wrist pieces.
Start sun protection early. Once the peel finishes around week three, use a mineral sunscreen daily to keep thin lines from fading.
Avoid heavy exfoliation near tiny tattoos. Gentle washing with a mild cleanser is enough. A short, careful clean twice daily keeps the area tidy without stripping ink.
