
I kept asking for thinner lines and leaving the artist to guess what that meant, which is how I ended up with a fuzzy carnation on my wrist. The moment a shop owner in town said, "Tell them you want single-needle 1RL for the ruffled edges," my next appointment actually looked like the photo I brought. That is how I learned to speak fine-line tattoo language and stop guessing.
These ideas are for people who want delicate botanical ink that reads like a sketch, not a billboard. Most are one-session friendly and fit budgets from an apprentice booking to a seasoned artist rate. I tested variations across five shops I have visited, so you get placement notes, realistic session times, and which styles hide wear better over years.
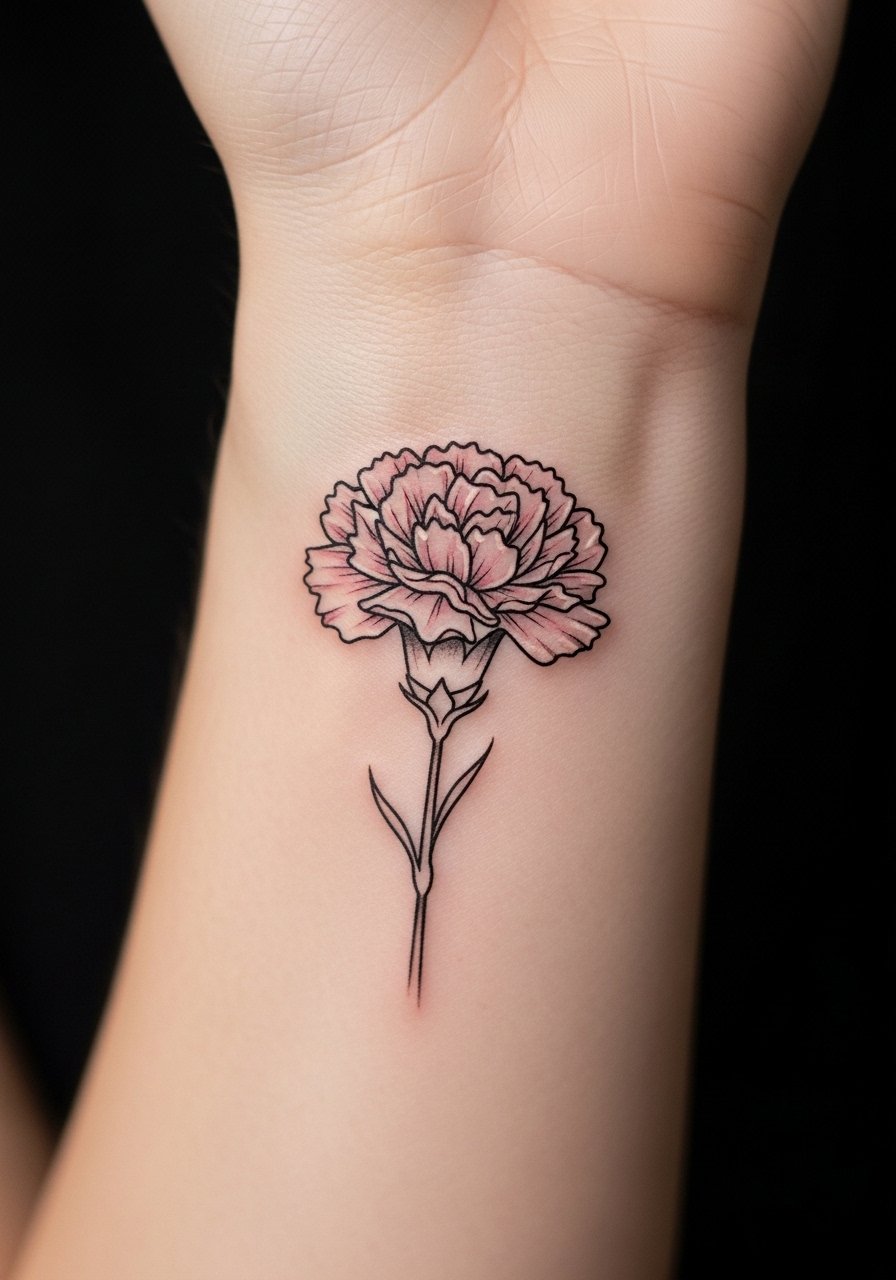
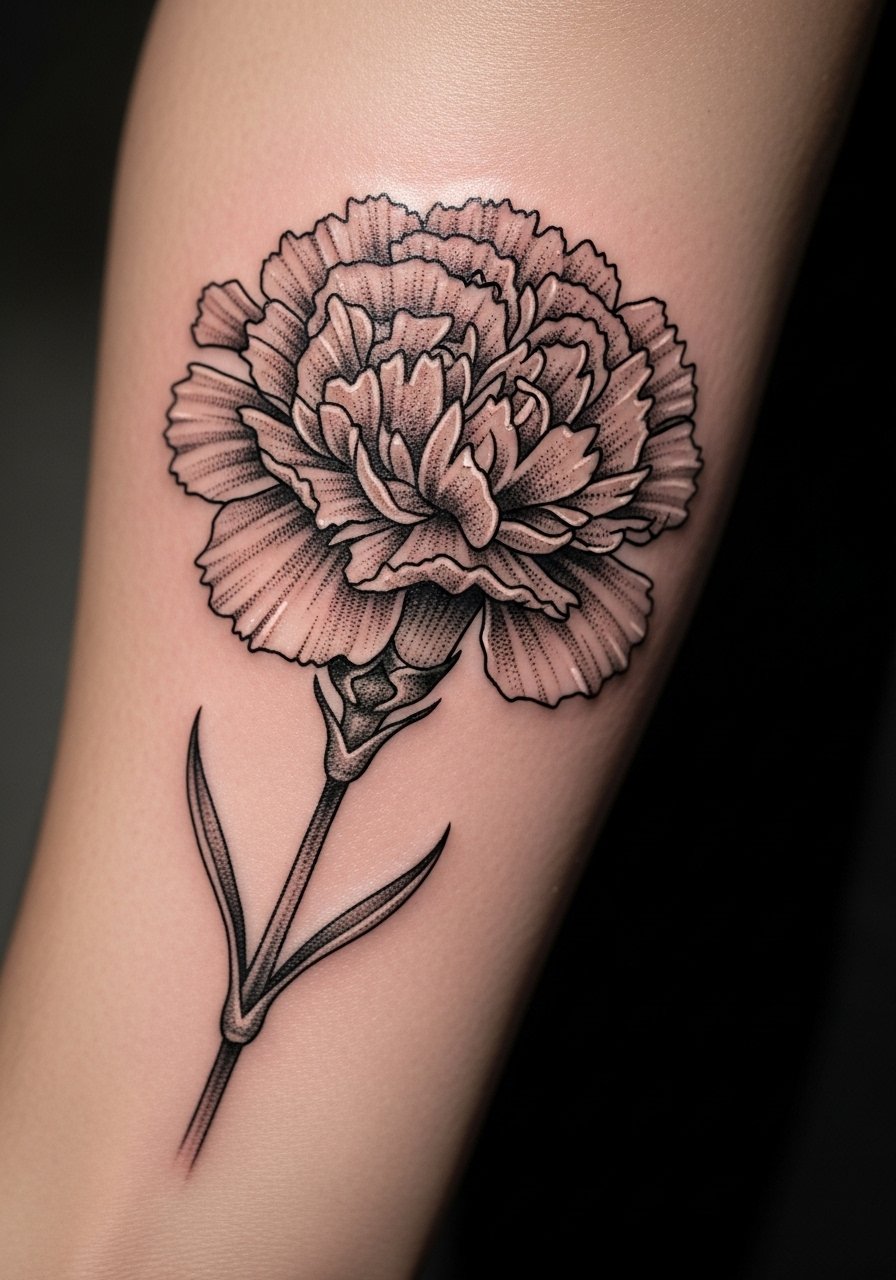
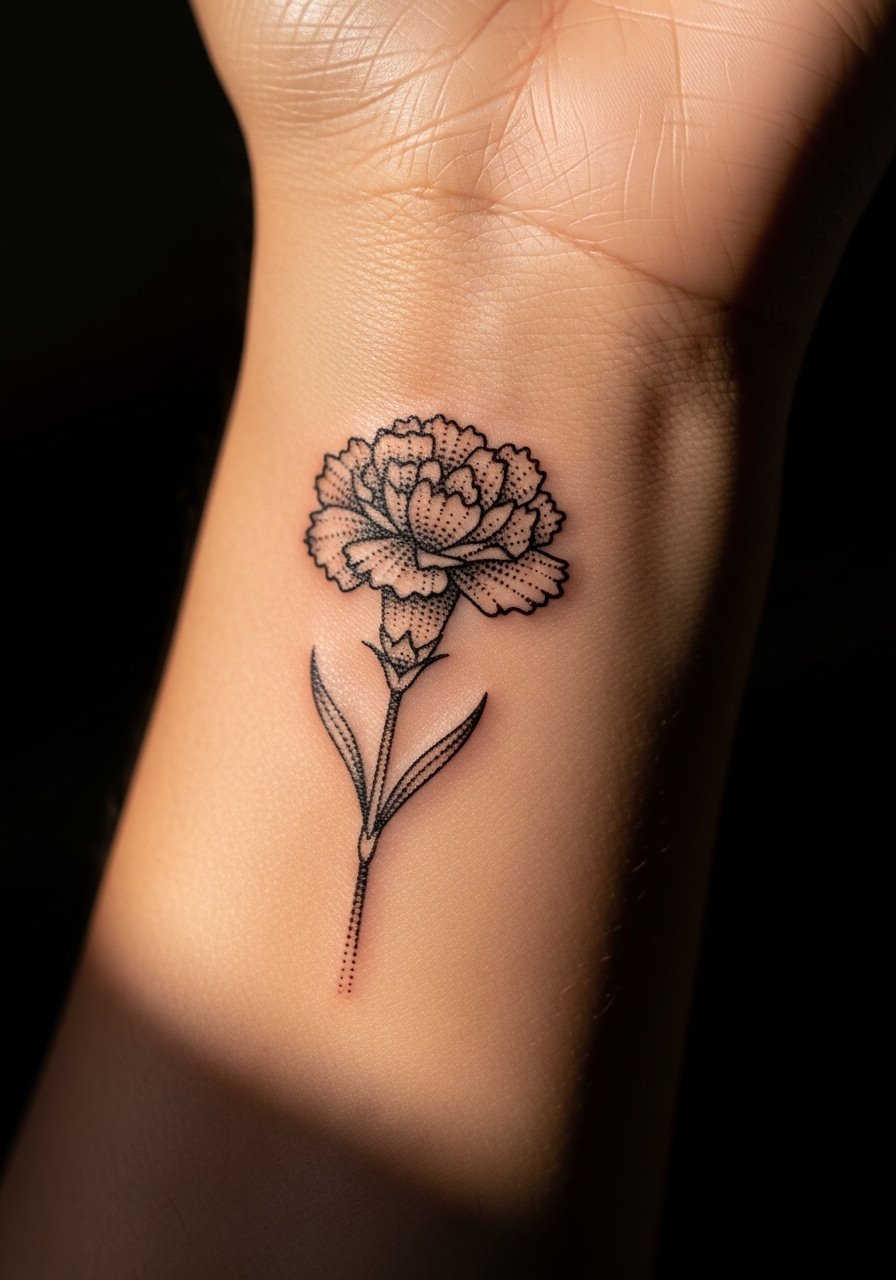
1. Single-Needle Outline Carnation
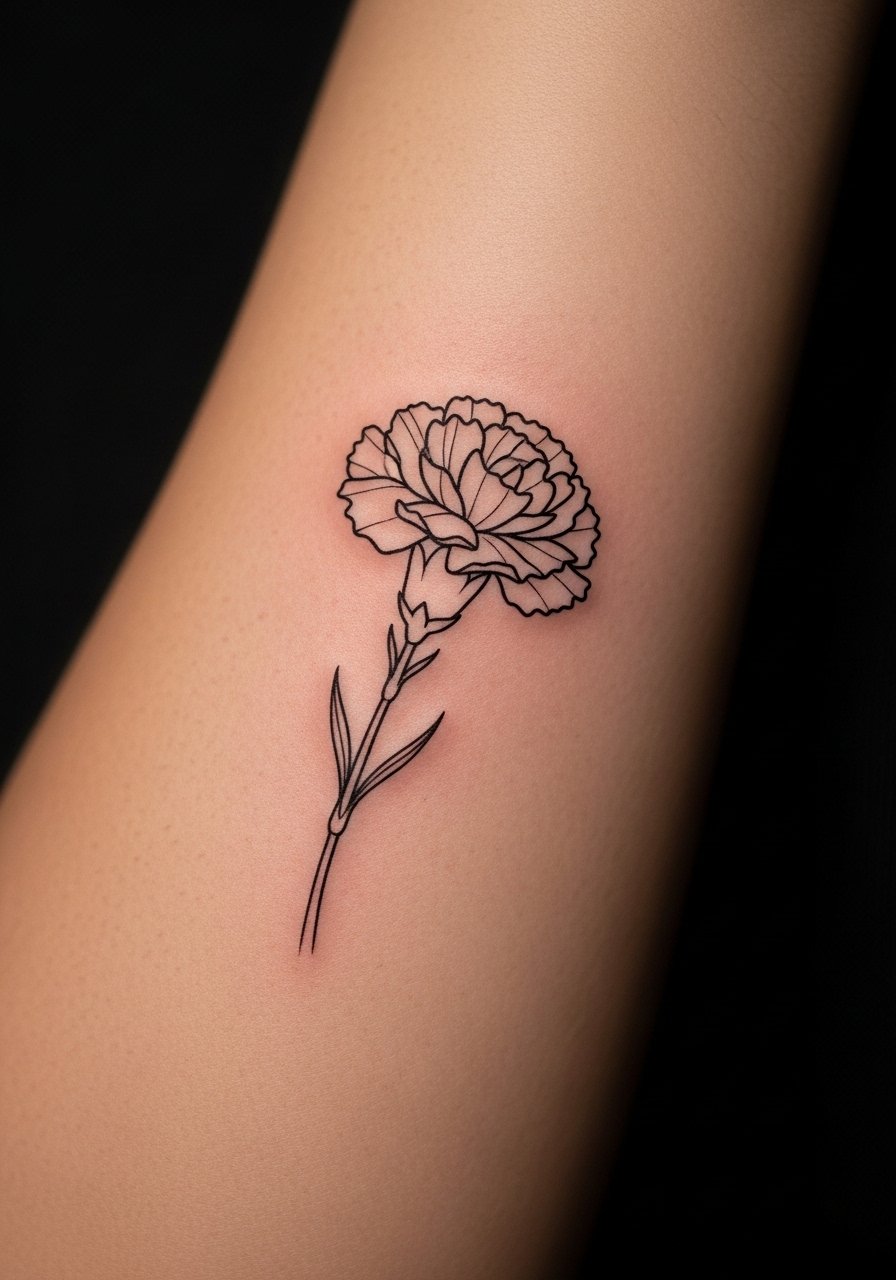
Style/Technique: Single-needle outline
Pain Level: 3/10
Session Time: 30 to 60 minutes
Best For: Forearm, wrist, anyone wanting subtle visibility
A single-needle outline keeps petals airy, so the carnation looks like a botanical sketch. It works because the line weight matches hair-thin petal edges, giving a quiet, wearable result. This is low cost and short time, ideal for first fine-line tattoos. Ask for 1RL for the crispiest edges and 3RL only for the main stem detail, which stops the design from disappearing on oily skin. Pair with a simple aftercare balm like gentle tattoo salve to protect lines while healing.
Mistake to Avoid: Asking for "thin lines" without specifying single-needle or an RL size.
2. Micro-Bouquet on the Ankle
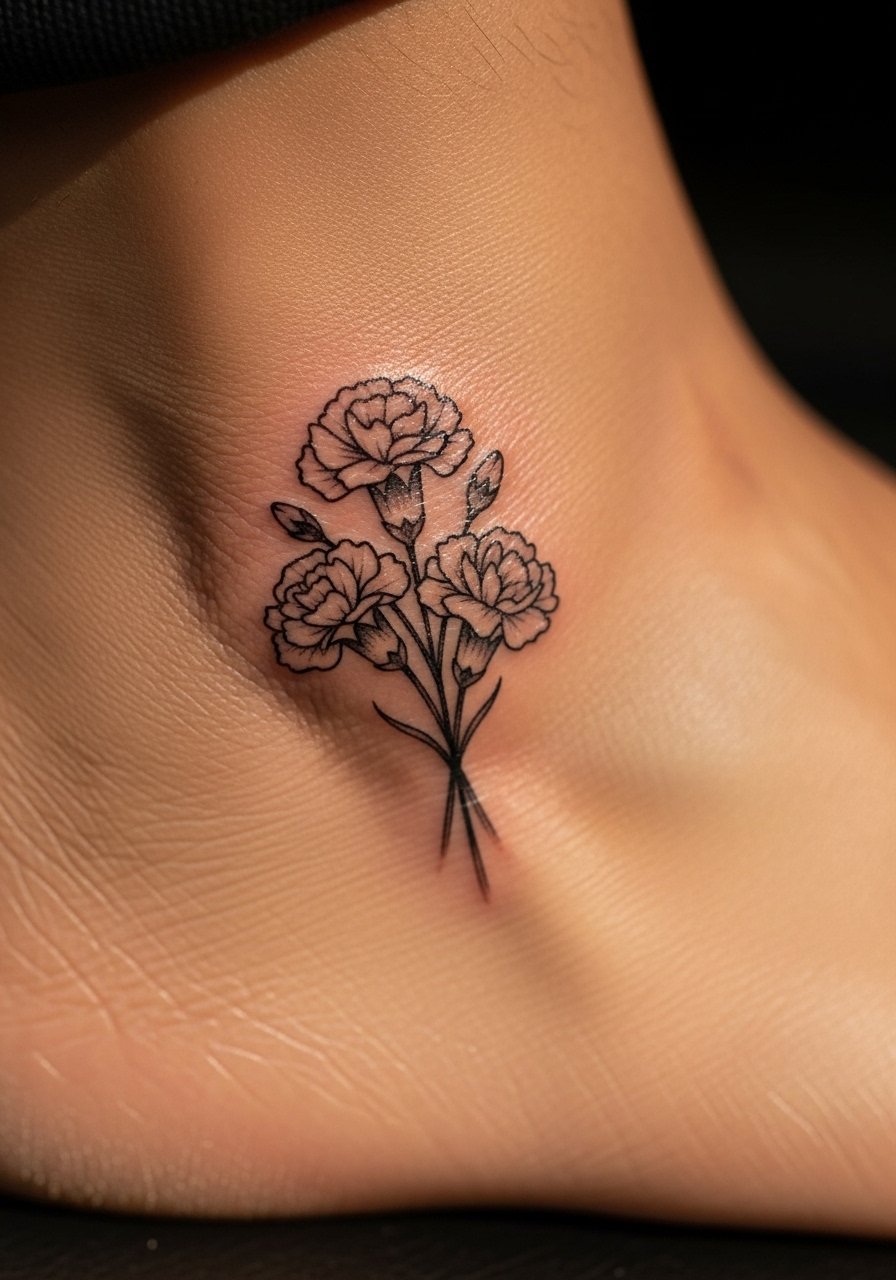
Style/Technique: Tiny bouquet cluster
Pain Level: 2/10
Session Time: 30 to 45 minutes
Best For: Ankle, behind the ear, coverable spots
A micro bouquet stacks two to three tiny carnations with stems crossing, which reads floral without being a single focal point. Visually it creates movement on small canvases like the ankle. I recommend line spacing of about 3 to 4 millimeters between blooms, so the petals age without merging. This is beginner-friendly and affordable. For travel healing, pack a small tube of unscented healing ointment to avoid over-moisturizing overnight.
Mistake to Avoid: Crowding flowers so they blur into a single dark patch after healing.
3. Layered Greywash Shading
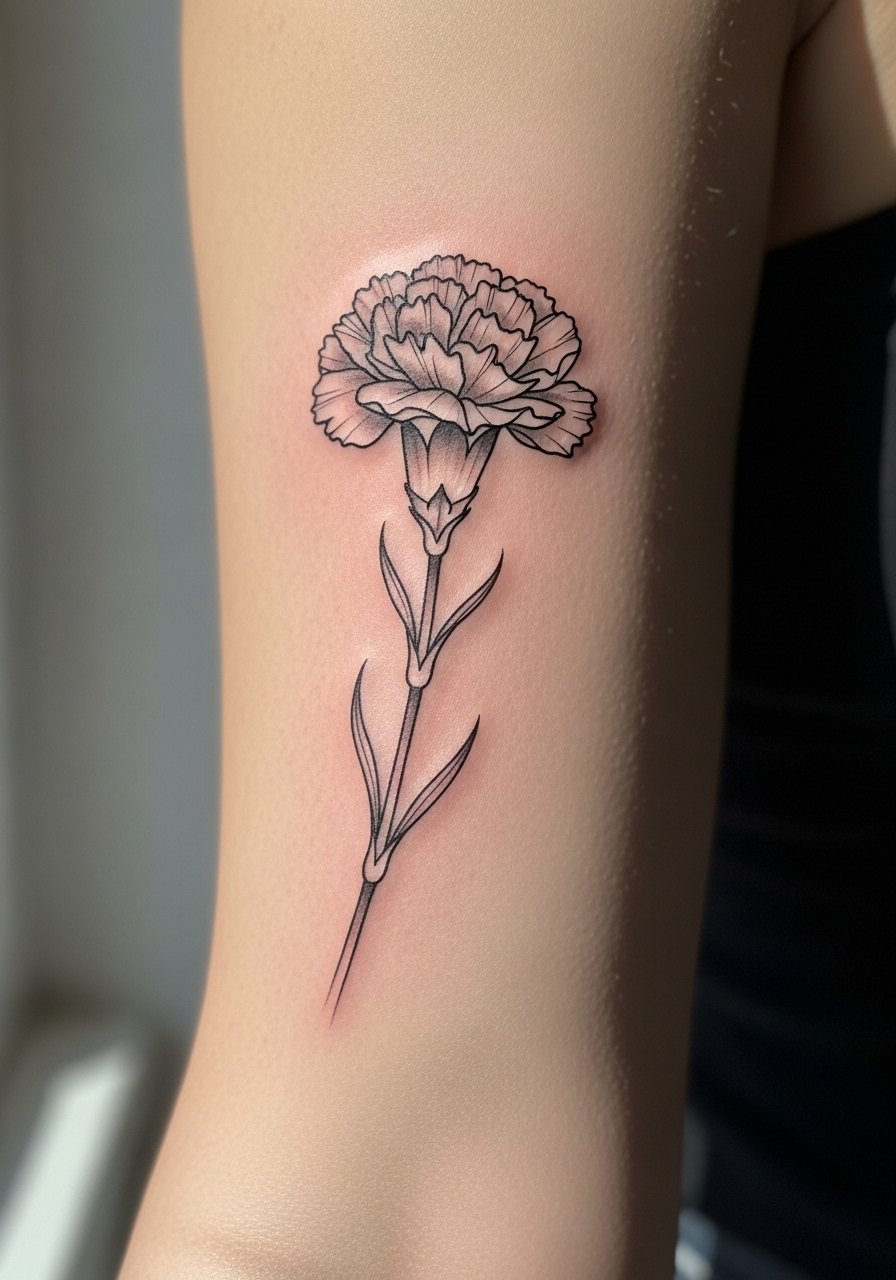
Style/Technique: Greywash layering
Pain Level: 4/10
Session Time: 1 to 1.5 hours
Best For: Upper arm, calf, people who want more depth
Soft greywash gives a pencil-shaded look while keeping edges crisp. The trick is multiple light passes with a 3RL or 5RL, building tonal gradients instead of packing once. Visually it makes the carnation feel dimensional without color, which suits work-visible placements. Budget it as a slightly longer session since shading takes time. Bring a reference photo of the exact petal density you want so the artist knows how many wash layers to plan.
Mistake to Avoid: Asking for "solid grey" which becomes flat and heavy on fine-line work.
4. Stem-Only Minimal Carnation
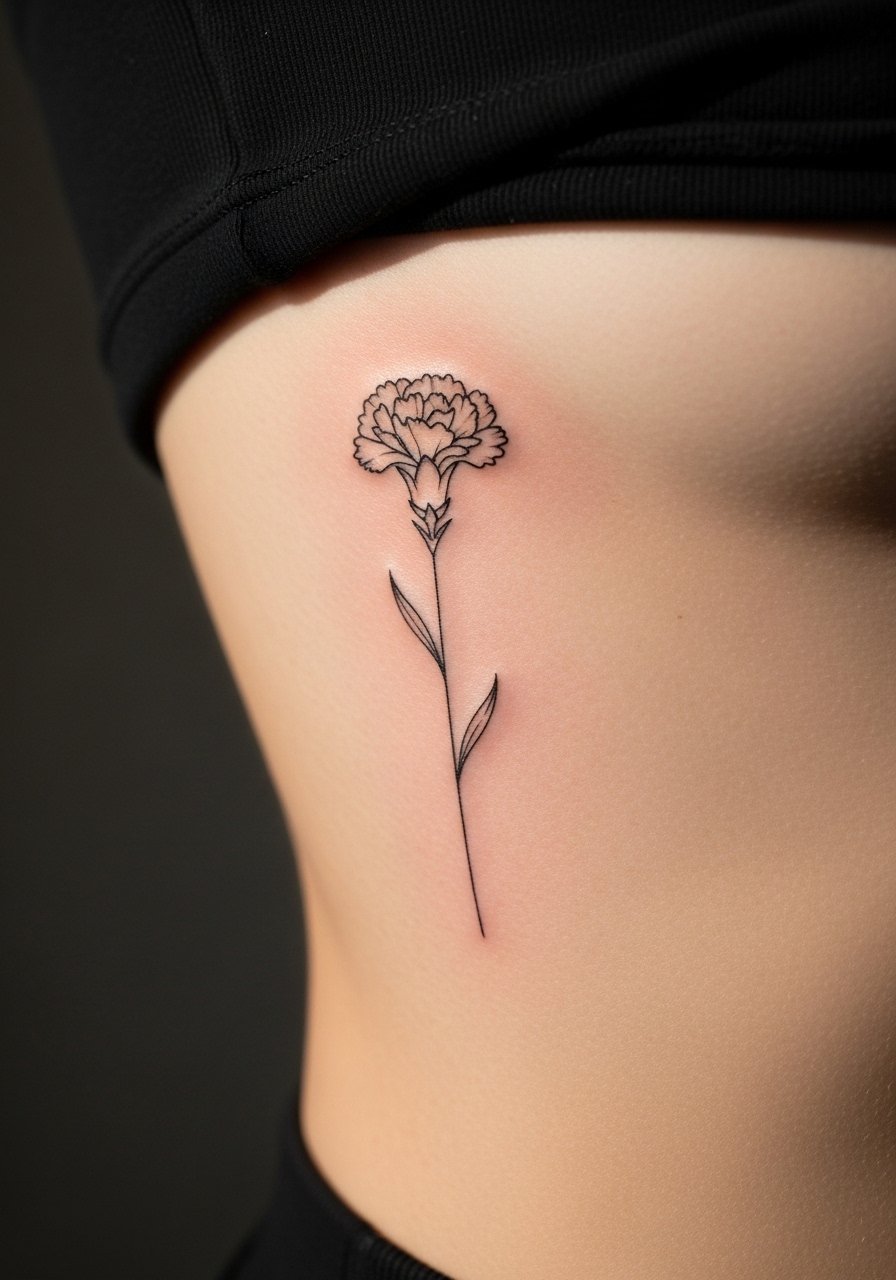
Style/Technique: Minimal stem line
Pain Level: 5/10
Session Time: 20 to 40 minutes
Best For: Rib, side, anyone who wants subtle coverage
Stripping the carnation to stem and a few petal hints reads elegant and stays coverable for work. It works because negative space sells the floral shape, and it is quick to tattoo. Ask for slightly bolder stem lines, 3RL, so the thin stem ages steadier, while petals stay with 1RL. This is a great budget option for those who do not want full-flower detail but still want botanical form.
Mistake to Avoid: Using identical thinness for stem and petals, which makes the stem vanish over time.
5. Tiny Color Accent Carnation
Style/Technique: Fine-line with color accent
Pain Level: 4/10
Session Time: 45 to 75 minutes
Best For: Wrist, collarbone, anyone wanting discreet color
A whisper of color on petal tips keeps the design delicate while adding personality. Pick diluted pigment applied in thin layers so the color reads like watercolor, not a block. For longevity, use muted shades that age into a soft halo. Budget rises slightly because color requires careful layering and follow-up touch checks. Bring a photo of the exact color fade you prefer so the artist can mix appropriately.
Mistake to Avoid: Requesting bright saturated color that will overpower fine-line strokes.
6. Single-Flower Collarbone Placement
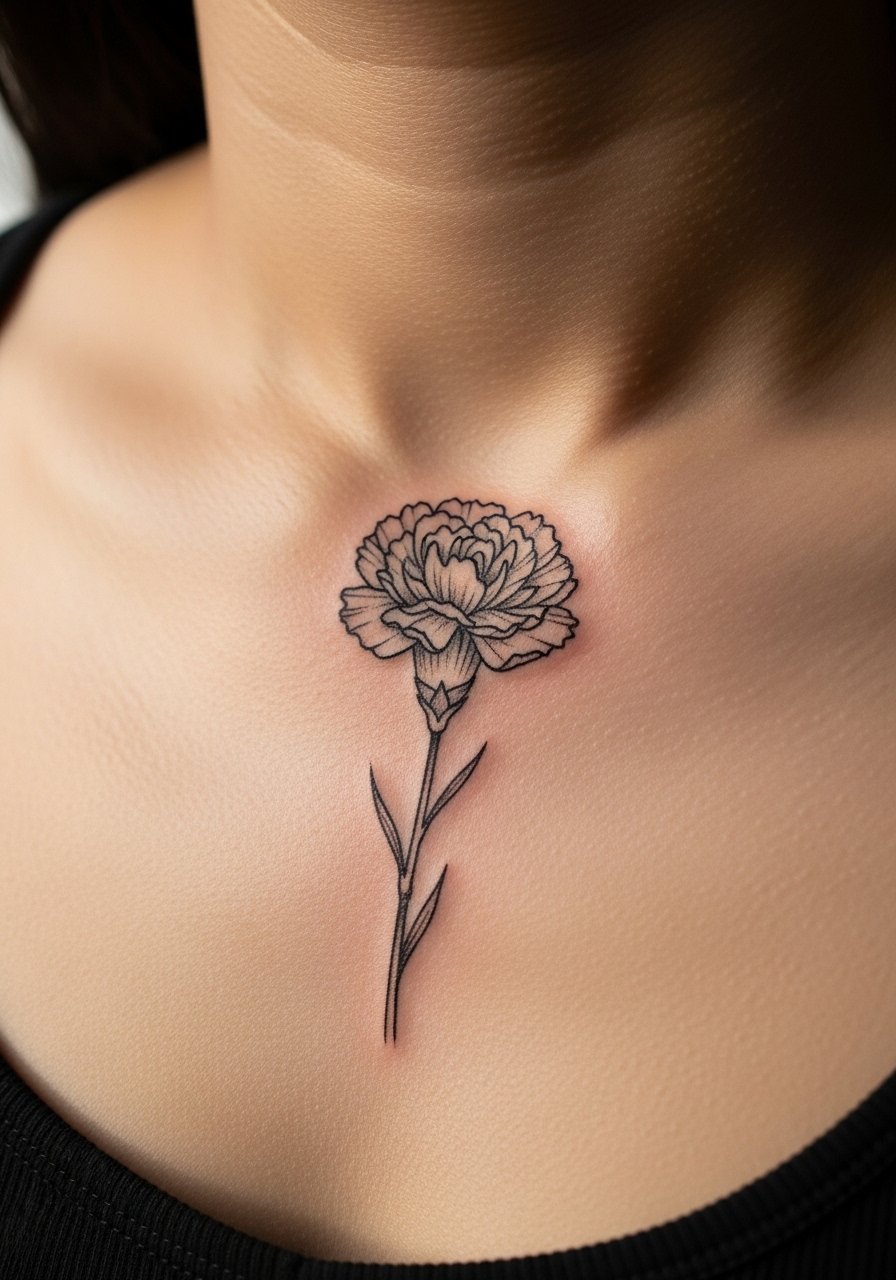
Style/Technique: Centered collarbone flower
Pain Level: 3/10
Session Time: 30 to 60 minutes
Best For: Collarbone, chest, visible but elegant placement
A single carnation at the collarbone sits where movement flatters the petal curve, making the tattoo feel intentional yet visible. The artist should plan a small negative space buffer so the design breathes on thin skin. This placement suits those who like jewelry-adjacent ink and prefer a one-session result. Expect a short healing window but be ready for light touch-ups as the area moves a lot.
Mistake to Avoid: Placing the bloom too close to the clavicle bone edge, which distorts with body movement.
7. Fine-Line Memorial Carnation with Initial
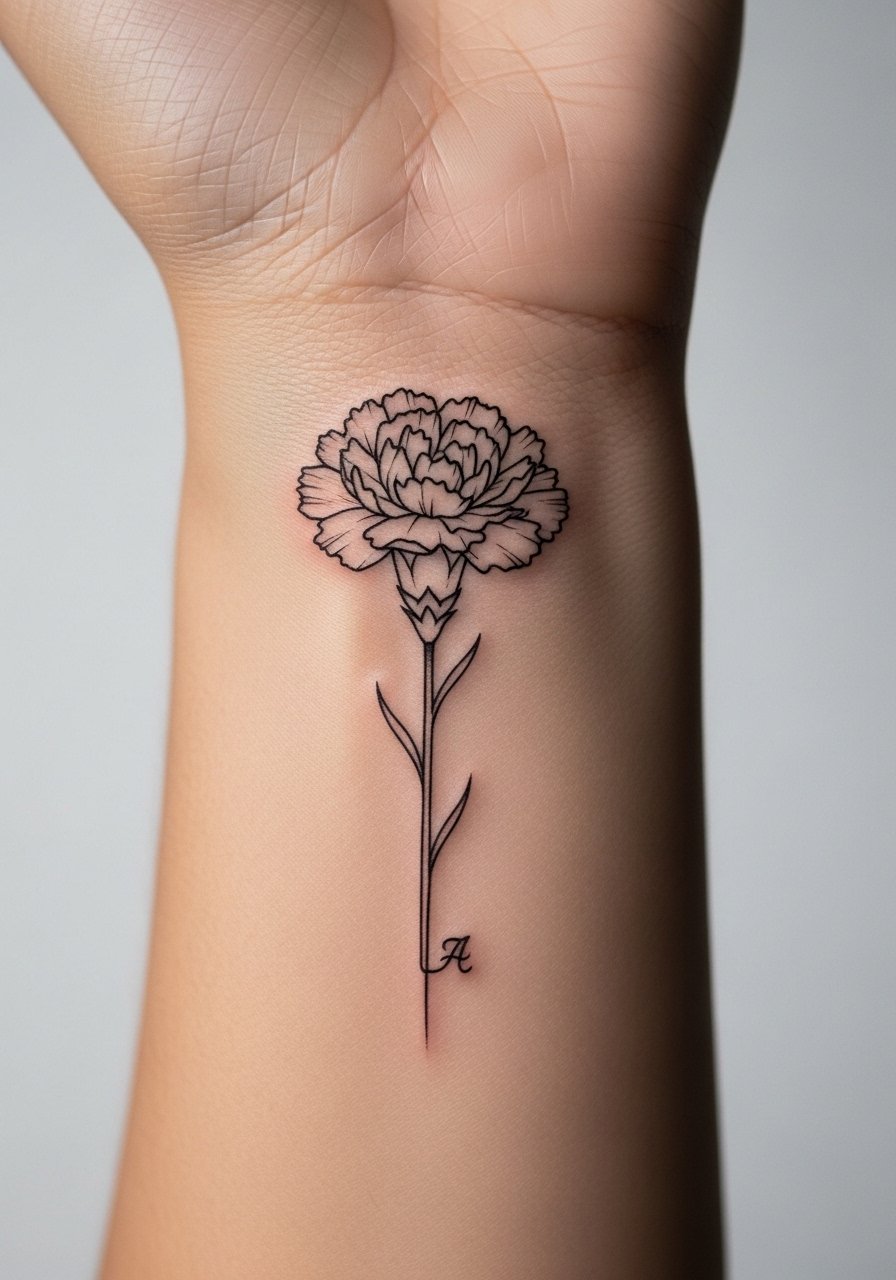
Style/Technique: Memorial micro with initials
Pain Level: 2/10
Session Time: 30 to 45 minutes
Best For: Inner wrist, behind ear, anyone commemorating a person or event
A tiny initial tucked into the stem base keeps the meaning private while the flower stays front and center. For readability, initials should be no smaller than 3 millimeters in height and done in a 3RL to avoid blurring. This idea leans sentimental and works across budgets since it is compact. If cultural symbolism is part of the reason, mention it to your artist so they avoid accidental appropriation and adapt the style respectfully.
Mistake to Avoid: Making the initial so small it fills in as a dot after healing.
If any of these ideas have you bookmarking artists, here are the actual items I reach for when I get fine-line work.
Essentials For Tiny Carnations
Aftercare & Healing:
- gentle tattoo salve (~$8-15), to keep lines protected without clogging.
- unscented healing ointment (~$7-12), for the first 48 hours.
Tools & Prep:
- fragrance-free soap (~$5-10), gentle daily wash.
- non-stick sterile gauze (~$6-12), for travel healing.
Comfort & Protection:
- breathable tattoo cover bandage (~$10-20), handy for short-term protection.
- broad-spectrum mineral sunscreen (~$12-18), essential once healed.
8. Single-Flower Thigh Piece

Style/Technique: Single thigh bloom
Pain Level: 4/10
Session Time: 45 to 90 minutes
Best For: Thigh, people wanting larger scale without heavy fill
A thigh placement allows a slightly larger single carnation with more petal detail, while still keeping the linework fine. Use a mix of 1RL for petal edges and 5RL for soft stem shading to balance detail with longevity. This placement is great for seasonal show-off and easy to hide. Expect a longer session and plan clothing that will not rub while healing.
Mistake to Avoid: Wearing tight elastic over a fresh thigh piece, which can drag scabs and ruin lines.
9. Tiny Carnation Behind the Ear
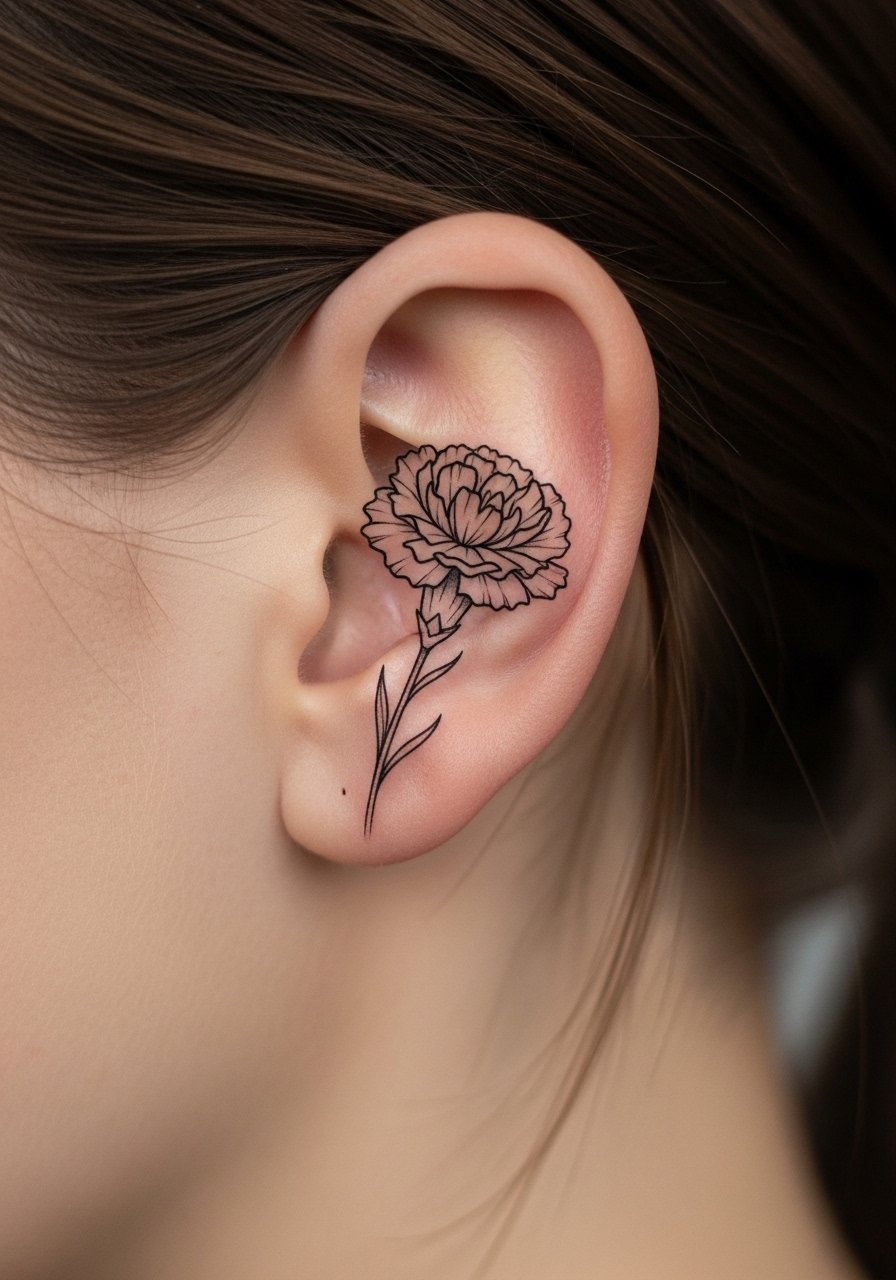
Style/Technique: Discreet behind-ear bloom
Pain Level: 2/10
Session Time: 15 to 25 minutes
Best For: Behind ear, nape, people wanting almost-hidden ink
This tiny placement reads like a secret detail when hair parts. It works because the scale keeps the carnation from aging into muddiness. Use only 1RL and keep the petal count low. Aftercare is simple but watch for hair products during healing. This is a low-cost option that looks intimate and deliberate when revealed.
Mistake to Avoid: Letting hair dye sit on a fresh tattoo before it fully healed.
10. Micro-Realism Petal Detail
Style/Technique: Micro-realism with dotwork
Pain Level: 4/10
Session Time: 1 to 2 hours
Best For: Forearm, anyone wanting realistic texture in a small space
Dotwork and micro-realism add petal texture without heavy shading blocks. Artists use tight stipple passes and tiny curved strokes to mimic ruffled petals. Ask for graduated dot density so edges stay crisp. This technique ages gracefully when done with conservative contrast. It costs more due to patience required, but the result reads like a tiny botanical print.
Mistake to Avoid: Pressuring the artist to darken the dots into full shading, which loses the micro effect.
11. Wrapped Stem Around Finger

Style/Technique: Finger-wrapping stem
Pain Level: 6/10
Session Time: 30 to 50 minutes
Best For: Finger, anyone wanting an on-hand symbol
Wrapping a carnation stem around a finger looks delicate and jewelry-like. The challenge is the skin moves and the piece can blur faster. Use slightly bolder stem lines and leave petal edges minimal. Plan for touch-ups within the first year. If you want longevity, place the wrap higher on the finger where skin stretches less.
Mistake to Avoid: Expecting a finger wrap to remain as sharp as an arm piece without annual refreshes.
12. Tiny Carnation with Script Date
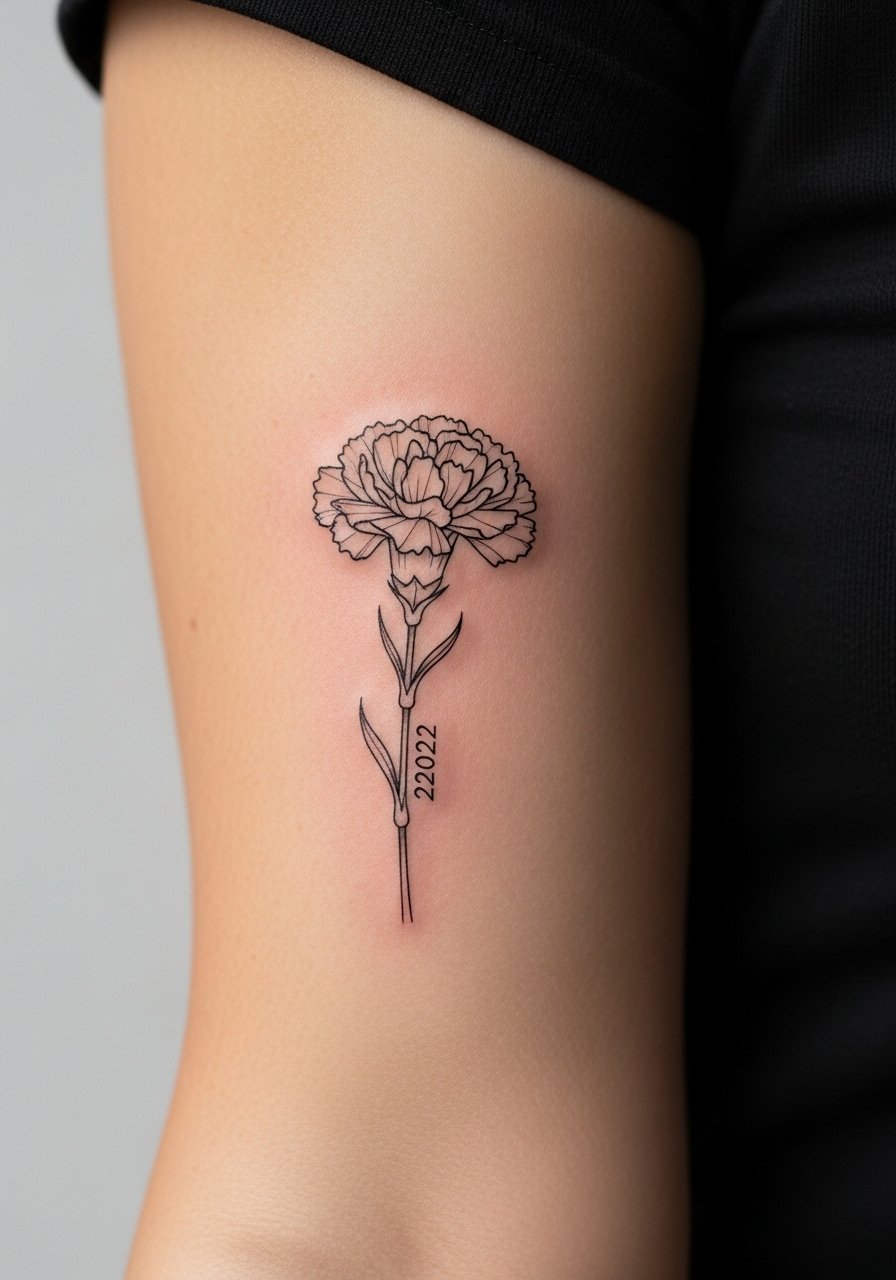
Style/Technique: Floral plus micro script
Pain Level: 3/10
Session Time: 30 to 60 minutes
Best For: Inner bicep, anyone marking an anniversary or birth
Combining a tiny date in elegant script along a stem keeps the memorial element subtle. Script should be done in a 3RL for clarity, and dates need spacing of at least 4mm between characters. This pairing feels intimate and age-friendly. If the date is meaningful, bring exact typeface inspiration to avoid a mismatch between flower style and lettering.
Mistake to Avoid: Choosing overly ornate script that looks cluttered next to fine petals.
13. Mirrored Carnations on Collarbone
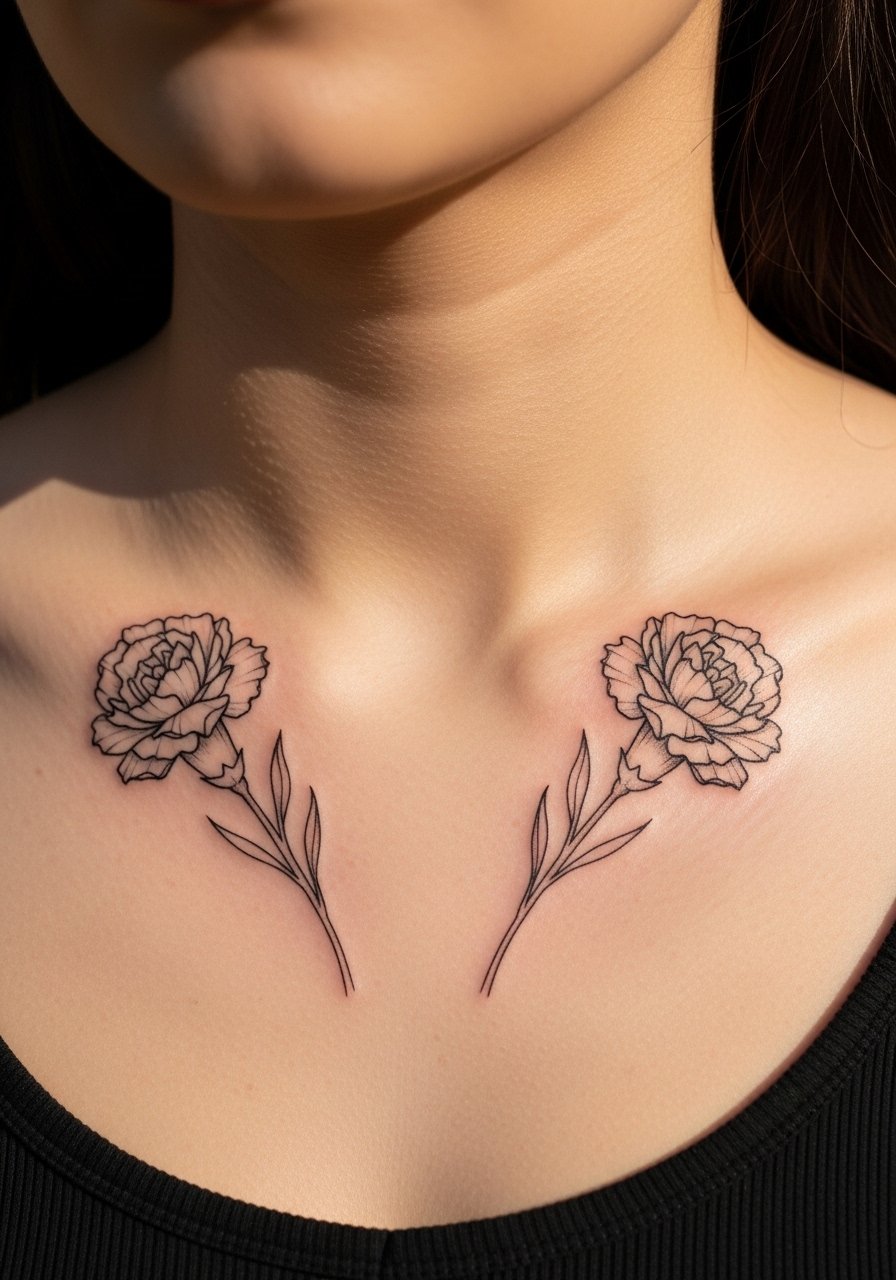
Style/Technique: Symmetrical mirrored placement
Pain Level: 3/10
Session Time: 45 to 75 minutes total
Best For: Symmetry lovers, visible but balanced ink
Mirrored carnations create a balanced, wearable frame near jewelry lines. Ask the artist to stencil both sides at once to ensure symmetry. Keep petals minimal and stems slightly angled for natural motion. This looks clean with minimal aftercare fuss. Budget for a slightly longer appointment so the artist can adjust for body asymmetry.
Mistake to Avoid: Getting each side done in separate sessions without rescaling the second stencil.
14. Tiny Carnation Fingerprint Fill
Style/Technique: Fingerprint dot fill
Pain Level: 3/10
Session Time: 40 to 70 minutes
Best For: Wrist, anyone wanting texture without color
Using fingerprint-style dots inside petals creates a tactile, vintage look that reads like an engraving. It works visually because the dots suggest depth without heavy lines. It is time-intensive so expect a mid-range price. This detail pairs well with single-needle outlines and prevents the petals from looking flat against skin with more melanin.
Mistake to Avoid: Filling petals solidly instead of using dot gradients, which makes the piece heavy.
15. Fine-Line Carnation Sleeve Accent

Style/Technique: Sleeve accent integration
Pain Level: 5/10
Session Time: 1 to 2 hours per session
Best For: Sleeve builders, people combining botanical elements
A carnation can be an anchor in a larger fine-line sleeve if scaled correctly. Use mixed needle sizes: 1RL for petal lace, 5RL for subtle background stems, and greywash to separate elements. This technique creates a cohesive sleeve without heavy blocks of black. Budget for multiple sessions and plan negative space so future pieces fit.
Mistake to Avoid: Making the carnation too dense, which prevents room for neighboring designs later.
Fine-Line Aftercare Habits
Thin layers work best. Apply a pea-sized amount of gentle tattoo salve twice a day. Too much product traps moisture and softens lines.
Grab non-stick sterile gauze for the first night if your artist advises covering. It keeps sheets clean and avoids pulling scabs.
Most people forget sunscreen until months later. Once healed, protect fine-line carnations with mineral sunscreen for face and body every time you expect sun exposure.
If you have oily skin, ask for slightly bolder stems. That one adjustment stops lines from spreading and is easier to plan at the appointment than to fix later.
