
I got my first piece when I was 19 and immediately learned tattoos age like friendships: some get better, some fade fast if you treat them poorly. Over the years I tattoo hopped and sat for pieces in sun, salt water, and everyday life. I’ve noticed about 7 out of 10 clients stick with black-based styles for longevity, and roughly 3 in 10 now pick micro work for subtlety. These picks reflect what actually lasts and still looks intentional years later.
I grouped these styles by how they age, where they shine on the body, and what to expect from sessions and aftercare. I cover small to sleeve options, placement notes, and realistic session times, with budget-friendly product links sprinkled where it helped me save a bad heal. If you want a style that still reads well after sun, sweat, and years, these are the ones I recommend.
1. Traditional Americana
Style/Technique: Bold linework, limited palette, black outlines with solid color fills
Pain Level: 4/10
Session Time: 1–3 hours
Best For: Arms, chest, calves, people who want classic readable pieces
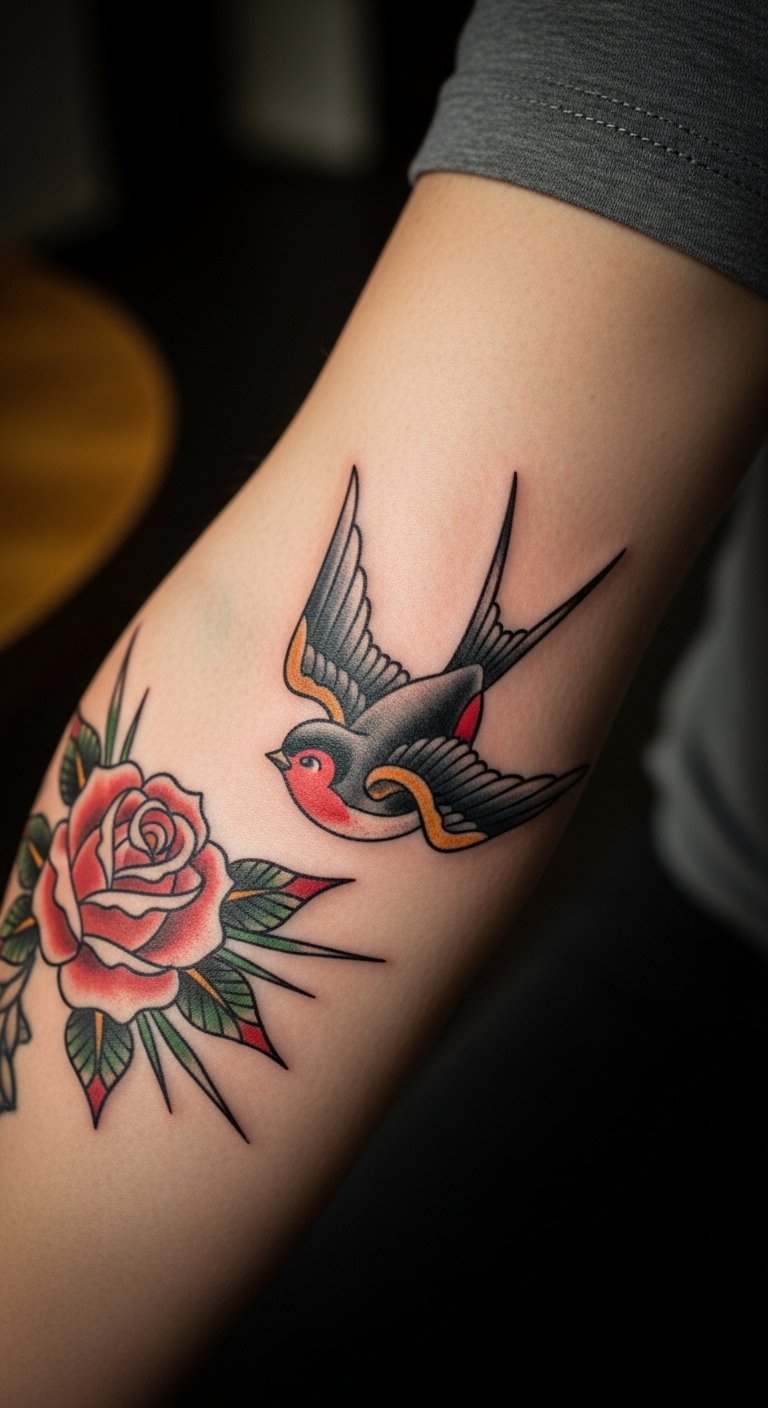
Old school readability is why I keep coming back to this. Bold black outlines prevent muddiness as the skin moves and ages, and saturated color holds surprisingly well. Size-wise, 3–6 inches keeps details clear on an arm. Pick an artist known for line consistency, because shaky lines are obvious a few years in. Expect basic aftercare routine, and plan for a touch-up in 5–10 years if you sunbathe a lot. I used tattoo-ink-black for reference.
Mistake to Avoid: Choosing tiny details inside thin outlines, it blurs over time
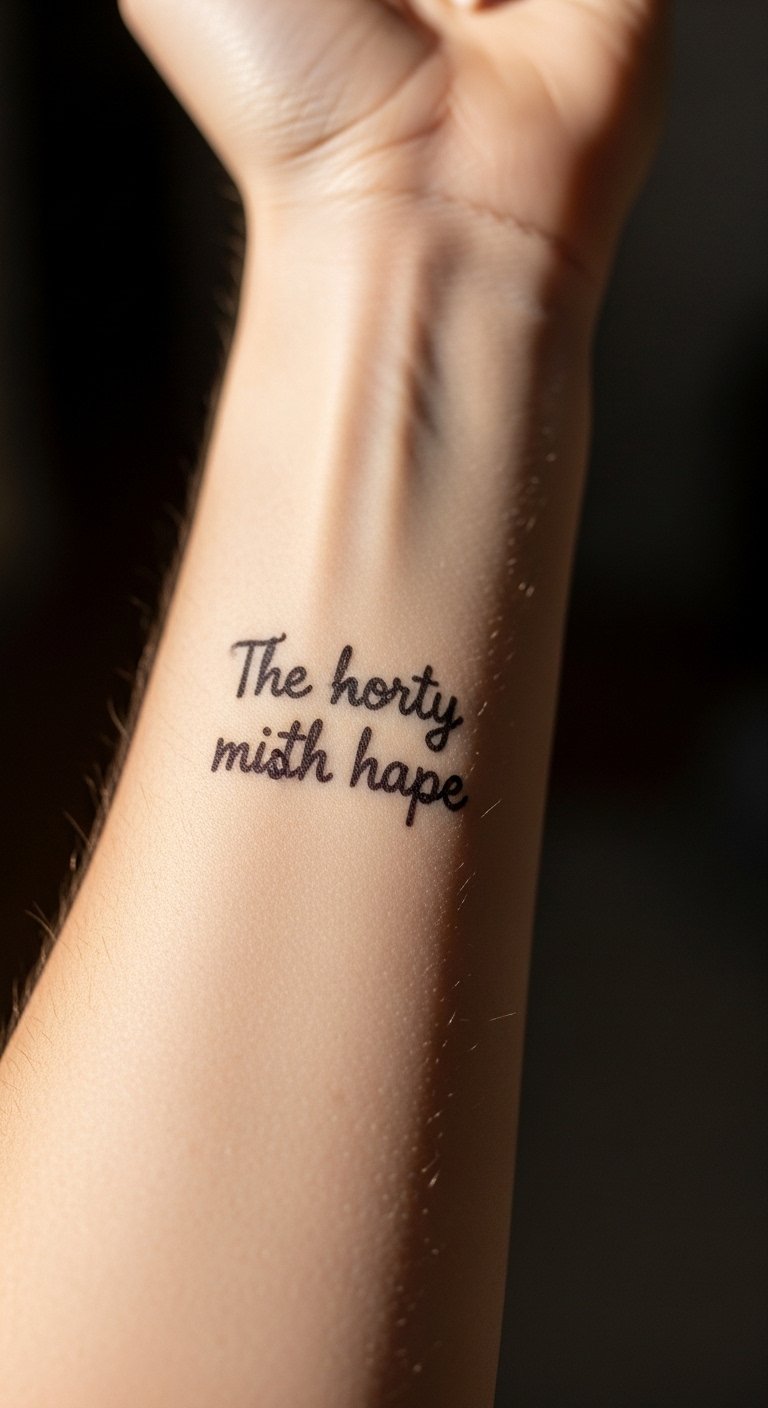
2. Fine-Line Script and Lettering
Style/Technique: Single-needle, delicate cursive or block lettering
Pain Level: 3/10
Session Time: 30 minutes–2 hours
Best For: Wrists, ribs, behind ear, minimalists
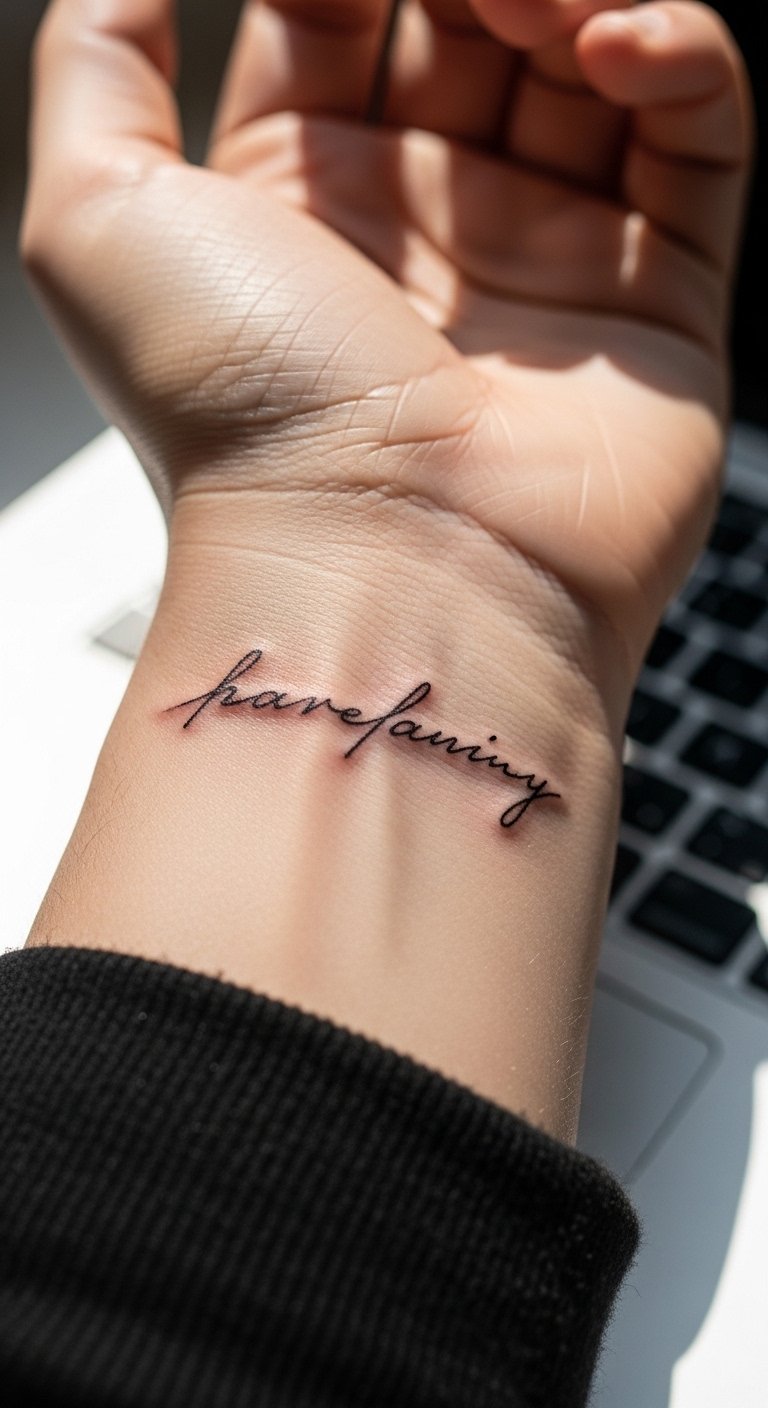
I used to get tiny quotes and had several blur because lines were placed too close. The trick: keep letters slightly larger than you think, about 1/8 inch minimum stroke. Single-needle looks elegant, but it needs a steady artist; I vet portfolios for consistent thin lines. Aftercare is straightforward, but expect faster fading if you wear bracelets or rub the area. For touch-ups I keep tattoo-aftercare-ointment on hand.
Mistake to Avoid: Getting script too small, it fills in after healing
3. Blackwork Geometric
Style/Technique: Solid black shapes, repetitive geometry, high contrast
Pain Level: 5/10
Session Time: 1–6 hours (multiple sessions for large pieces)
Best For: Thighs, back, forearms, people who like graphic looks
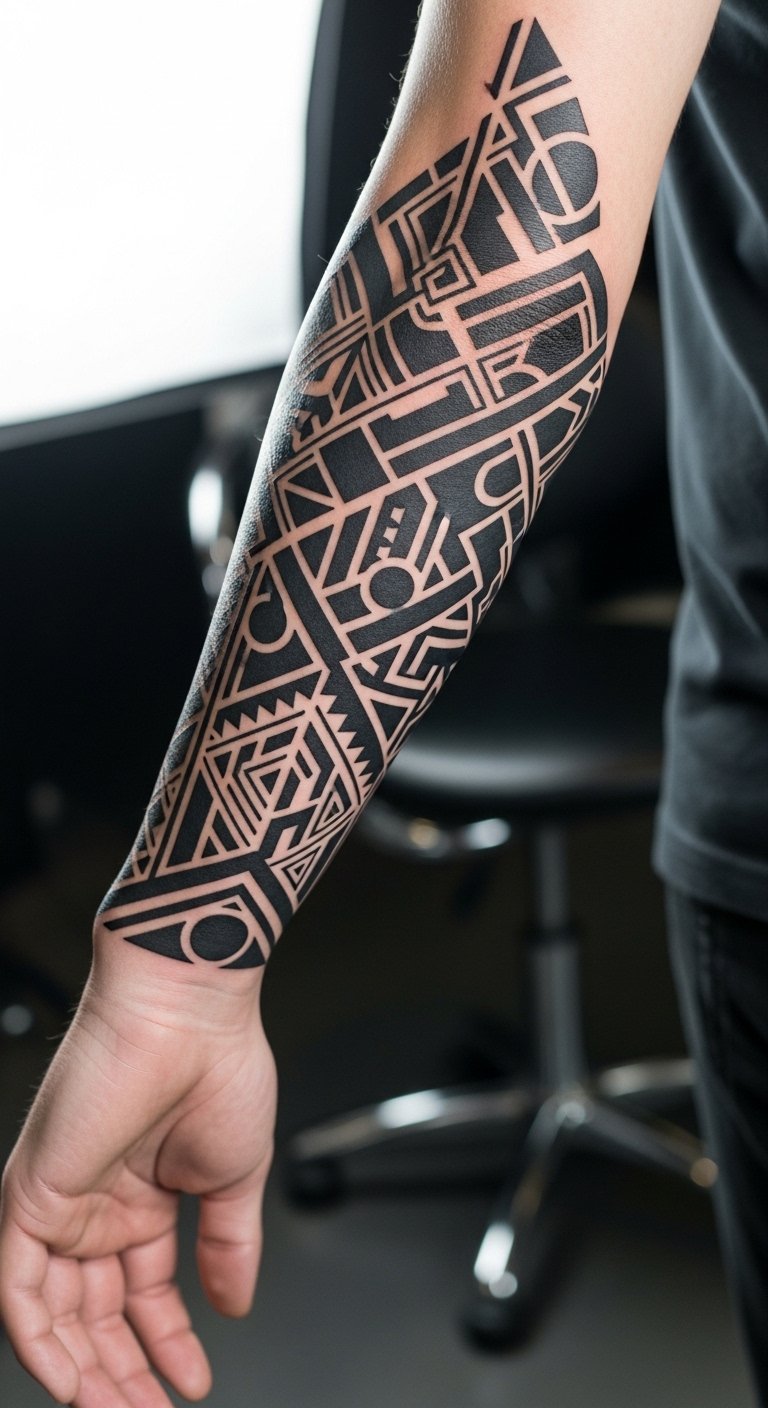
I picked a blackwork forearm band a few years ago and love the way heavy black ages, it stays bold. These designs are forgiving because shapes read at a distance and hold against skin changes. Sizing matters: fill larger areas for a striking look, and ask your artist about placement to avoid joints where cracking occurs. Solid black areas need consistent aftercare to avoid scabbing that ruins saturation. I used tattoo-needle-kit as a buying reference.
Mistake to Avoid: Packing too much tiny detail into solid black areas, it muddies
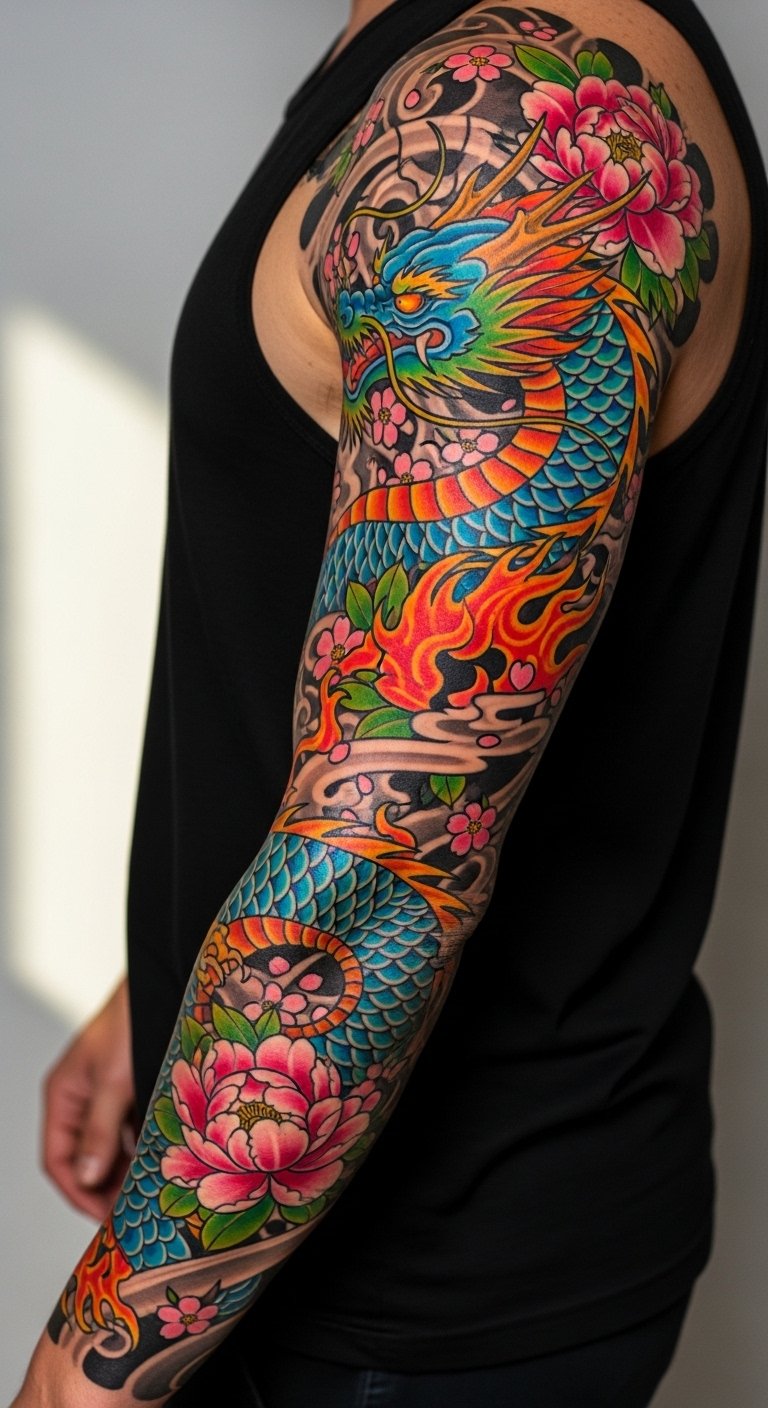
4. Japanese Traditional (Irezumi)
Style/Technique: Bold outlines, flowing scenes, strong motifs like koi and waves
Pain Level: 6/10
Session Time: Multiple long sessions, 10+ hours total
Best For: Full back, sleeves, chest, people wanting narrative pieces
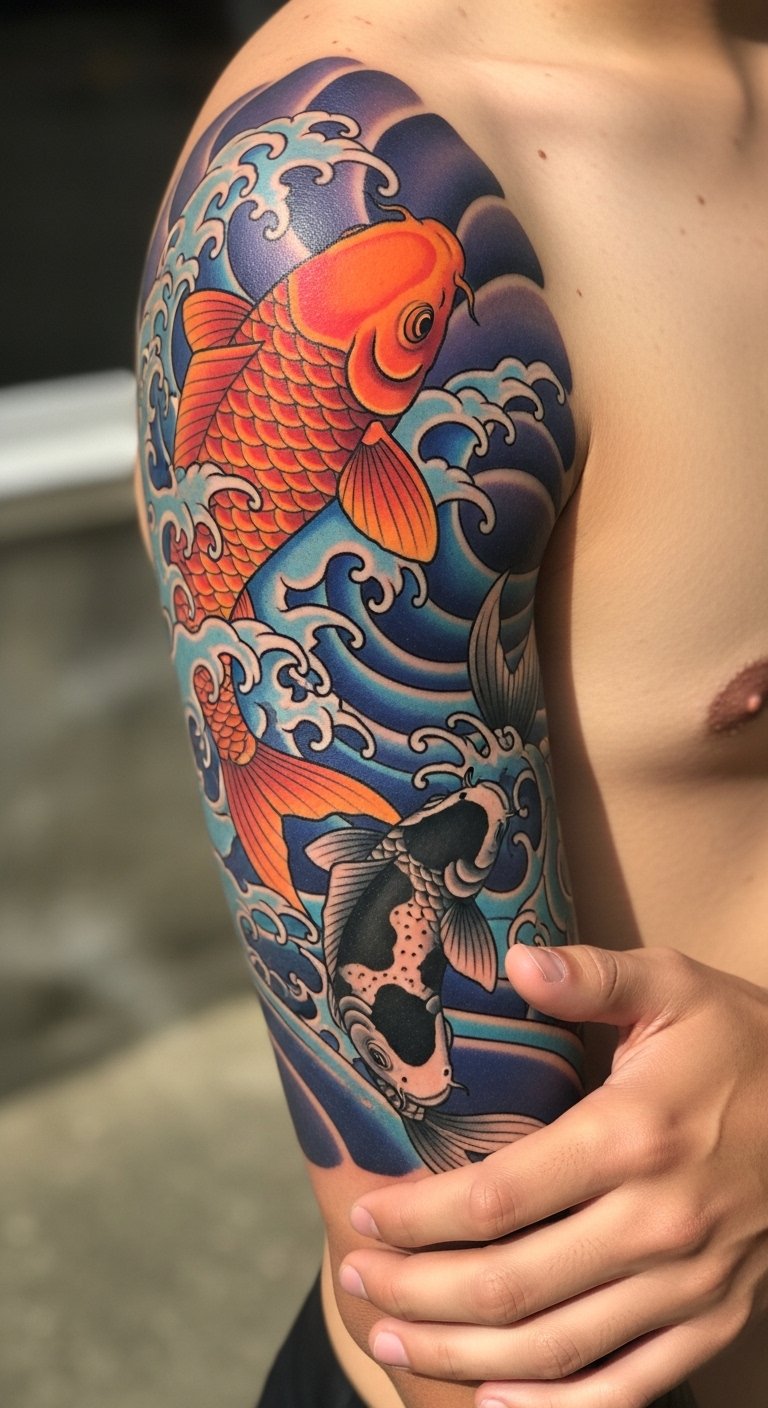
I lived through a few long Irezumi sessions, and noticed how well these age when the composition is balanced. The large shapes and contrast prevent early blurring; color saturation can last a decade with sun care. These are big commitments, plan placement around muscle changes and weight fluctuation. Artist choice matters hugely, find someone who understands flow and negative space. Expect more involved aftercare after each session. I still recommend a UV-blocking lotion like tattoo-sunscreen.
Mistake to Avoid: Rushing an Irezumi into too few sessions, the balance suffers
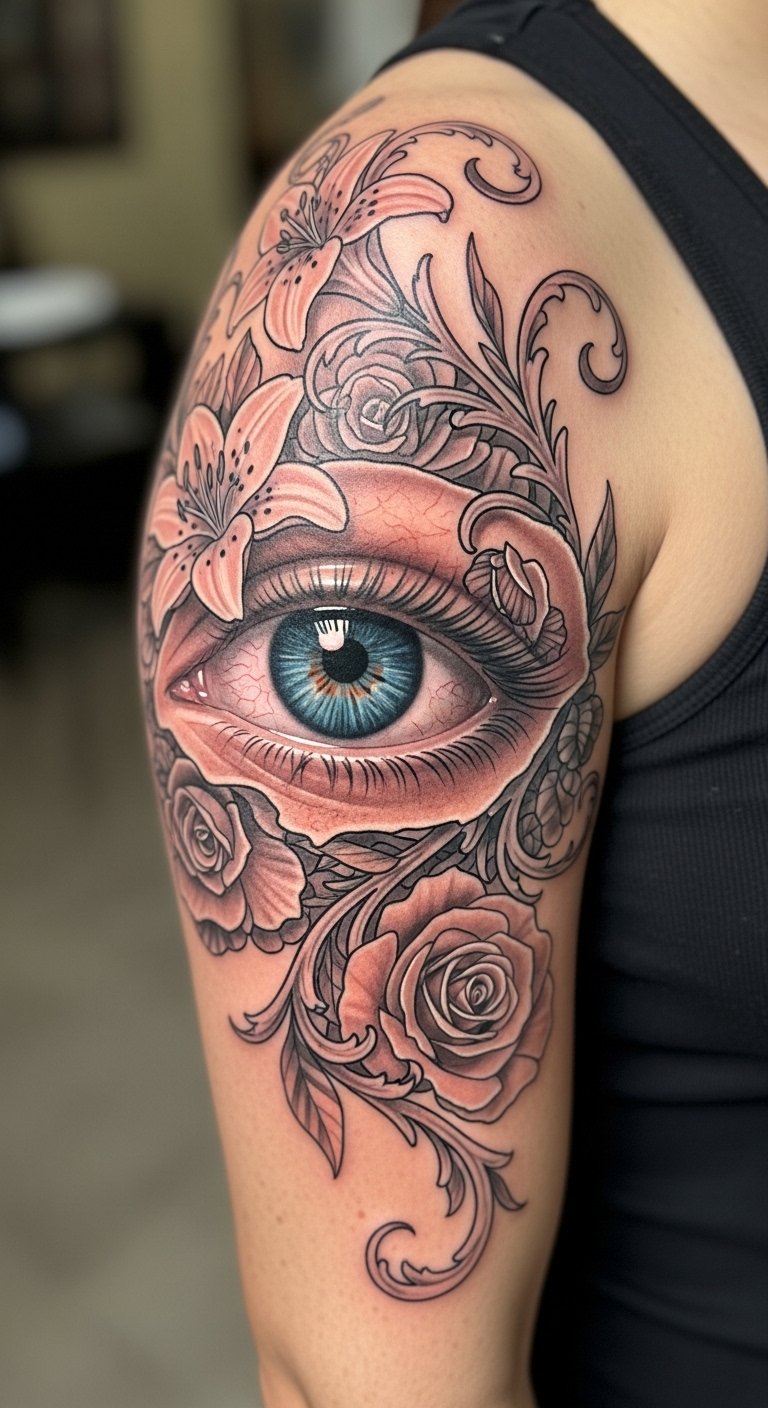
5. Realism Portraits
Style/Technique: Photo-real shading, grayscale or color realism
Pain Level: 7/10
Session Time: 3–8 hours per piece
Best For: Upper arm, chest, back, people wanting lifelike images
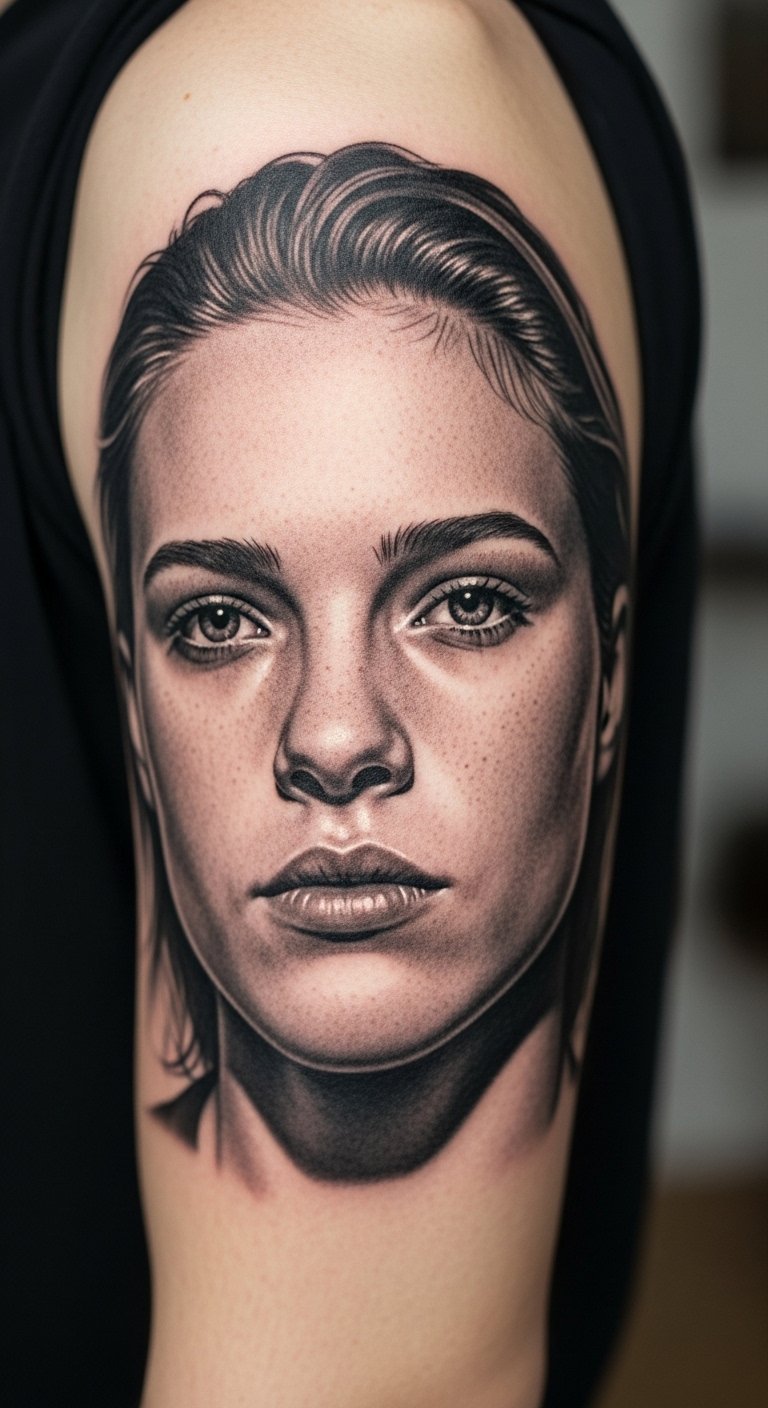
I had a portrait done and learned that skin texture and placement change the result. Realism needs space, usually 4+ inches, to keep features legible as ink spreads slightly. A talented realism artist can translate photos, but poor contrast in the reference wrecks the outcome. Expect longer sessions and careful aftercare to avoid scabbing that destroys subtle shading. I keep a hydrating barrier like healing-ointment nearby during the healing window.
Mistake to Avoid: Using low-contrast photos for reference, it flattens on skin
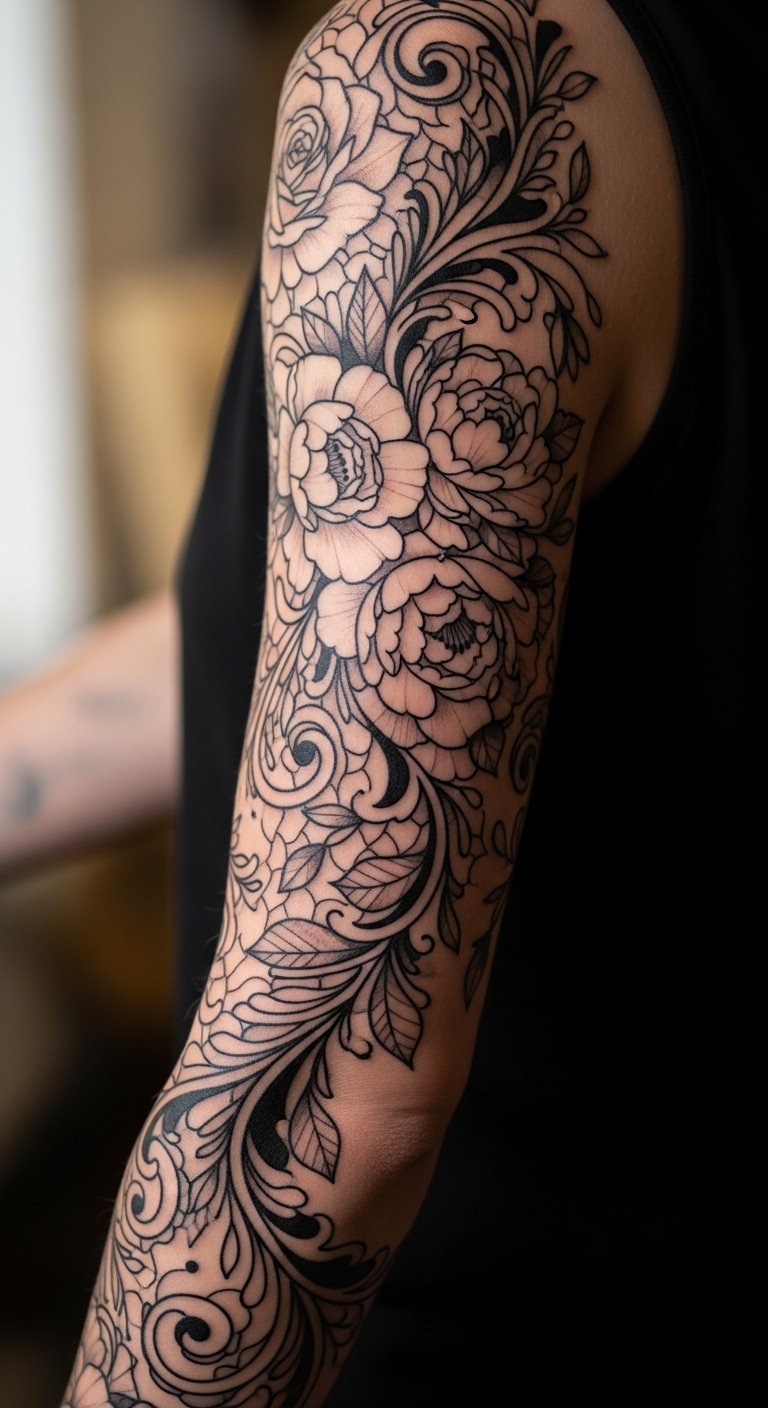
6. Neo Traditional
Style/Technique: Classic structure with modern color gradients and detail
Pain Level: 5/10
Session Time: 2–5 hours
Best For: Upper arm, calf, chest, fans of bold but detailed art
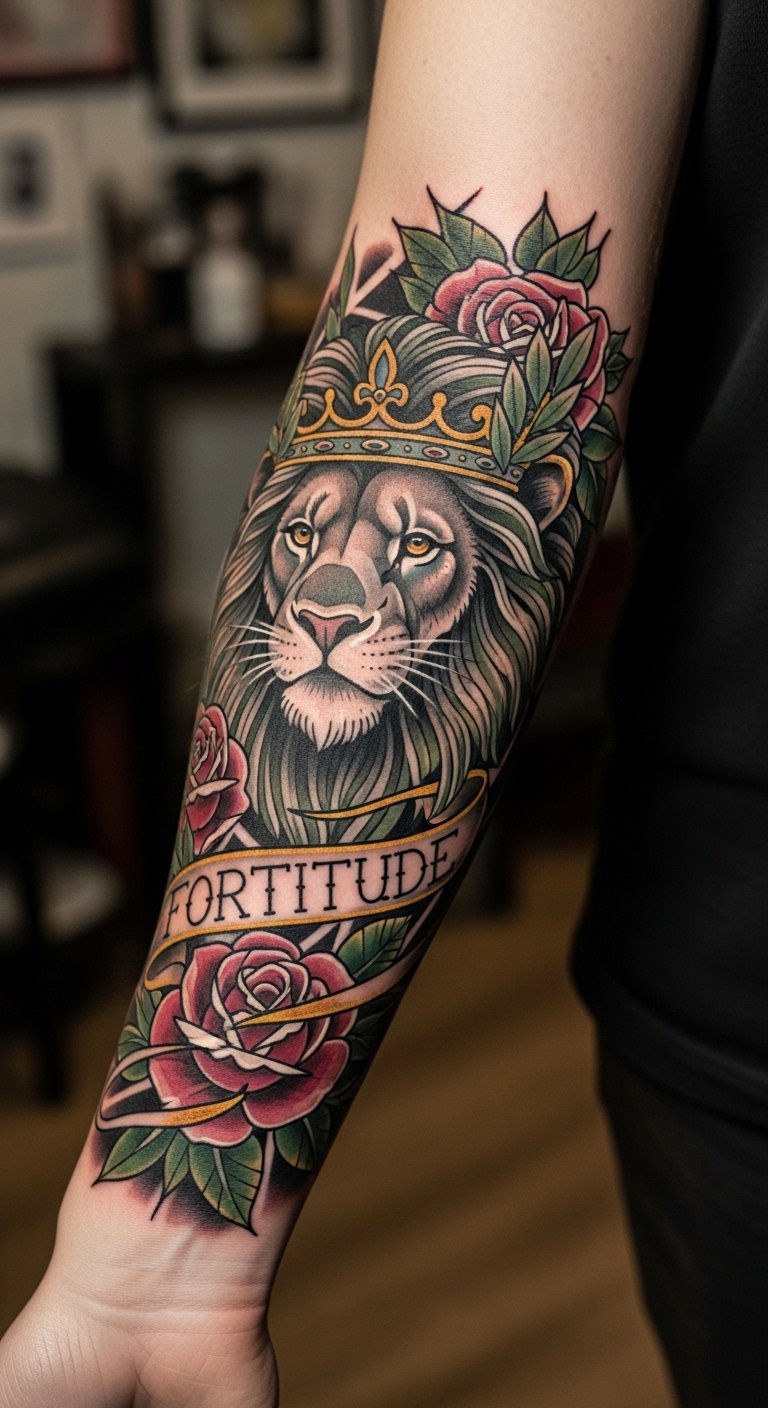
Neo traditional keeps the readability of American traditional but adds subtle shading and color depth, which helps it look contemporary as it ages. I had a floral neo piece that softened well over five years. Size and saturation help longevity, go medium to large for the extra detail. Your artist should be fluent in both linework and painterly shading. Aftercare is similar to solid color tattoos, and occasional touch-ups keep vibrancy. For color care, check color-safe-sunblock.
Mistake to Avoid: Choosing overly tiny color transitions, they can merge over time
7. Watercolor Tattoos
Style/Technique: Bleeding colors, minimal outlines, painterly washes
Pain Level: 4/10
Session Time: 1–3 hours
Best For: Shoulders, ribs, calves, those wanting soft color effects
I loved a watercolor wrist piece for a year and then realized sun exposure eats the subtle edges faster than solid inks. Watercolor looks fresh when placed away from friction and direct sun. Larger, slightly more saturated areas help retention. Choose an artist who layers pigments strategically so you get longevity without heavy outlines. Plan for touch-ups every few years. I rely on spf-sunscreen when wearing short sleeves.
Mistake to Avoid: Putting watercolor on high-friction spots, it fades unevenly
8. Dotwork and Pointillism
Style/Technique: Tiny dots forming gradients and shapes, lots of texture
Pain Level: 5/10
Session Time: 1–4 hours
Best For: Inner forearm, ribs, hands if bold, geometry lovers
Dotwork ages interestingly because the dot density can hide slight spreading, keeping shapes readable. I had a dot mandala that stayed crisp because the artist used deliberate spacing. For longevity, scale matters: larger mandalas retain center detail. Artists need patience and technique, so portfolio review is essential. Expect stinging in concentrated sessions and slower healing in high-density areas. I pair healing with mild-cleansing-wash during the first week.
Mistake to Avoid: Cramming dots too densely in small areas, it looks muddy after healing
9. Minimalist Icons
Style/Technique: Simplified symbols, small single-color marks
Pain Level: 2/10
Session Time: 15–45 minutes
Best For: Fingers, behind ear, ankle, first-timers

Minimal pieces are low commitment but I found many fade quickly when placed on high-movement zones like fingers. The secret is to size them a touch larger than you want and pick calmer skin zones. Minimalist black holds best, avoid faint color washes. Artist precision is crucial, because every tiny wobble is visible. Plan a touch-up within 1–3 years for high-use areas. For home care I like travel-size-ointment.
Mistake to Avoid: Choosing fingers or palms for very tiny icons, they blur fast
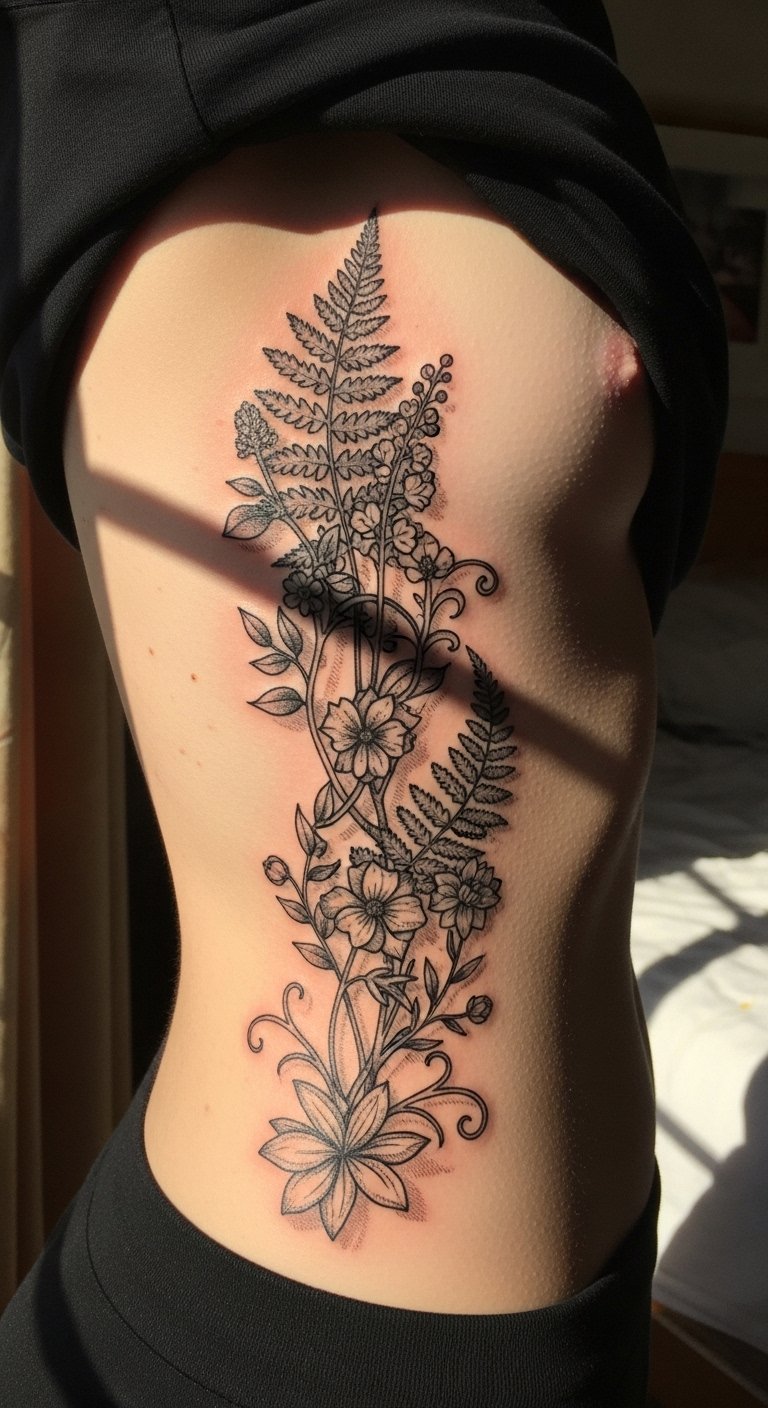
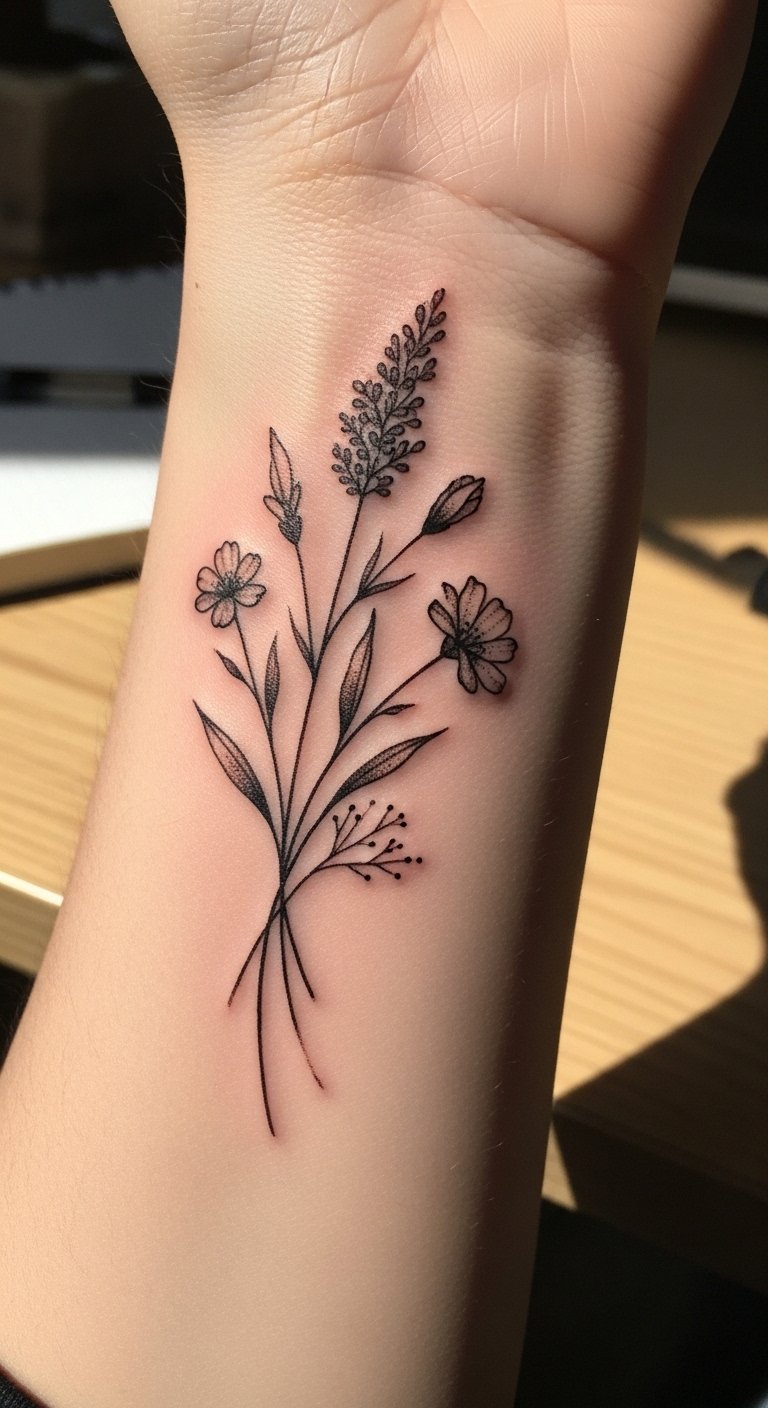
10. Botanical Micro-Realism
Style/Technique: Tiny realistic plants and flowers with fine shading
Pain Level: 3/10
Session Time: 30 minutes–2 hours
Best For: Wrist, collarbone, ankle, delicate style lovers
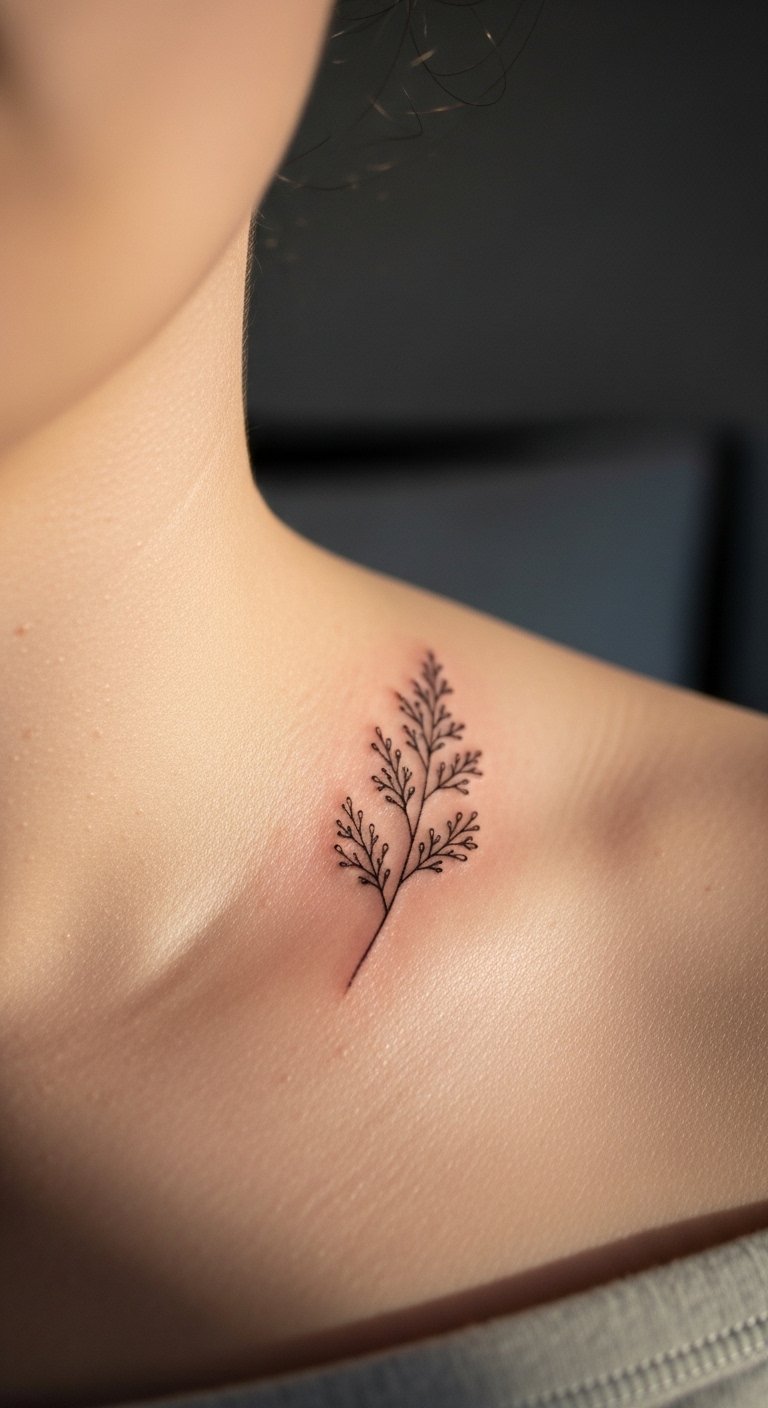
I got a micro fern on my collarbone and was shocked at how well the fine shading survived a year of sun and necklaces. Micro-realism needs just enough negative space to breathe, so 1.5–3 inches tends to be ideal. Choose an artist with clear micro work examples, because sloppy stippling ruins these. Aftercare must avoid friction from clothing, and expect to refresh tiny shading after a few years. I keep gentle-heal-balm on hand.
Mistake to Avoid: Compressing many tiny elements into a very small area, it loses clarity
11. Surrealist Composite
Style/Technique: Mixed motifs, unexpected juxtapositions, fine detail
Pain Level: 6/10
Session Time: 2–8 hours
Best For: Upper arm, thigh, back, lovers of narrative art
I commissioned a surreal piece combining animals and objects and noticed it reads better when sized medium-large, so the visual joke survives movement. These require artists who understand composition and how ink settles on skin. Placement should avoid joints where the composition might warp. Healing expects regular inspection for scabbing because layered shading can react differently. For reference and upkeep, I saved a portfolio-inspiration-book.
Mistake to Avoid: Cramping a complex scene onto a tiny patch, you lose the story
12. Illustrative Black-and-Gray
Style/Technique: Line art with soft gray shading, storytelling focus
Pain Level: 5/10
Session Time: 1–4 hours
Best For: Sleeve panels, chest pieces, anyone wanting tattooed illustration
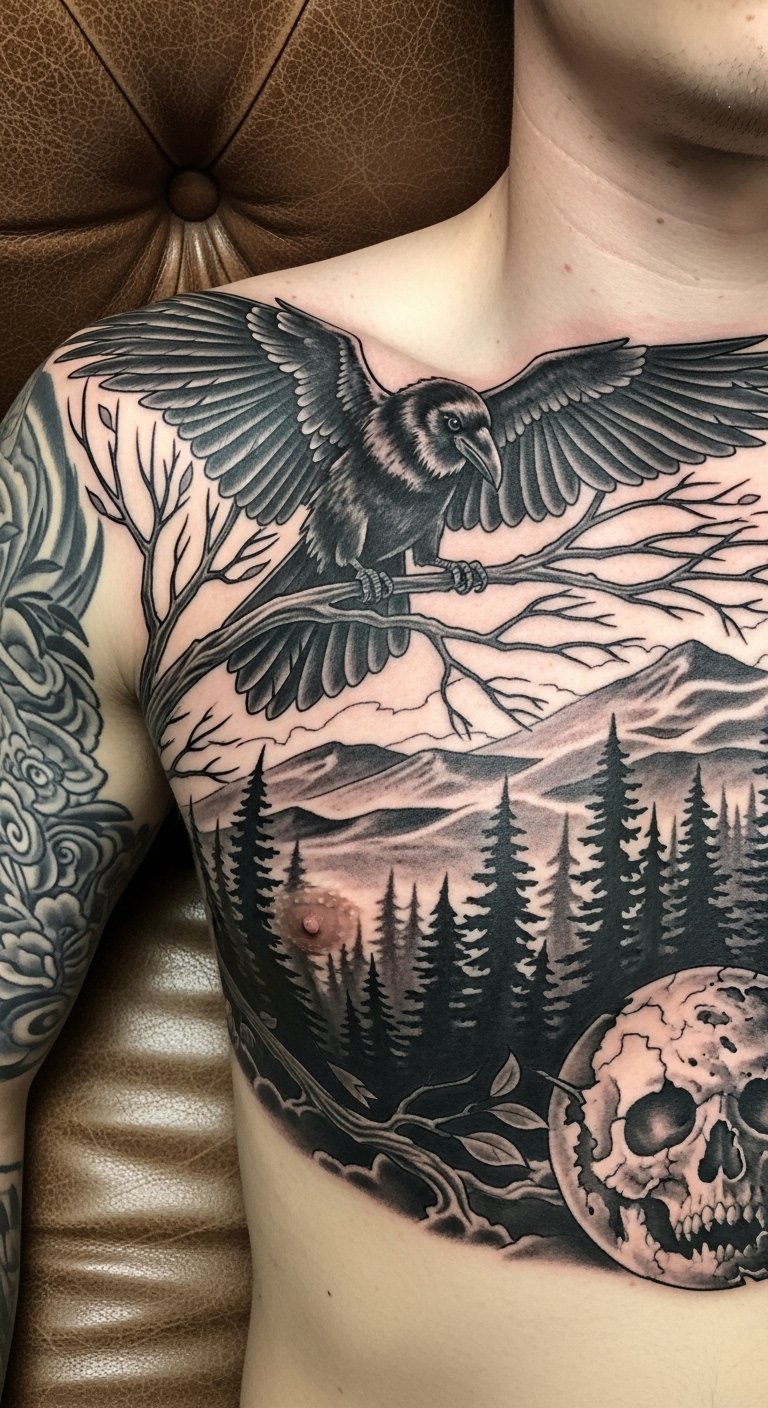
Illustrative black-and-gray holds up because it plays to contrast rather than fine color. I paired one with lettering and it harmonized over years without much touch-up. Size matters, keep panels at least a few inches so line and shading stay distinct. Find an artist who sketches well freehand. Expect medium healing time and be ready to moisturize frequently for even pigment settling. I use fragrance-free-lotion during the second week.
Mistake to Avoid: Crowding multiple illustrative elements without negative space, it reads busy later
13. Chicano Fine Line
Style/Technique: Smooth gray washes, fine script, black realism influence
Pain Level: 4/10
Session Time: 1–4 hours
Best For: Forearm, chest, lower leg, lovers of soft tonal work
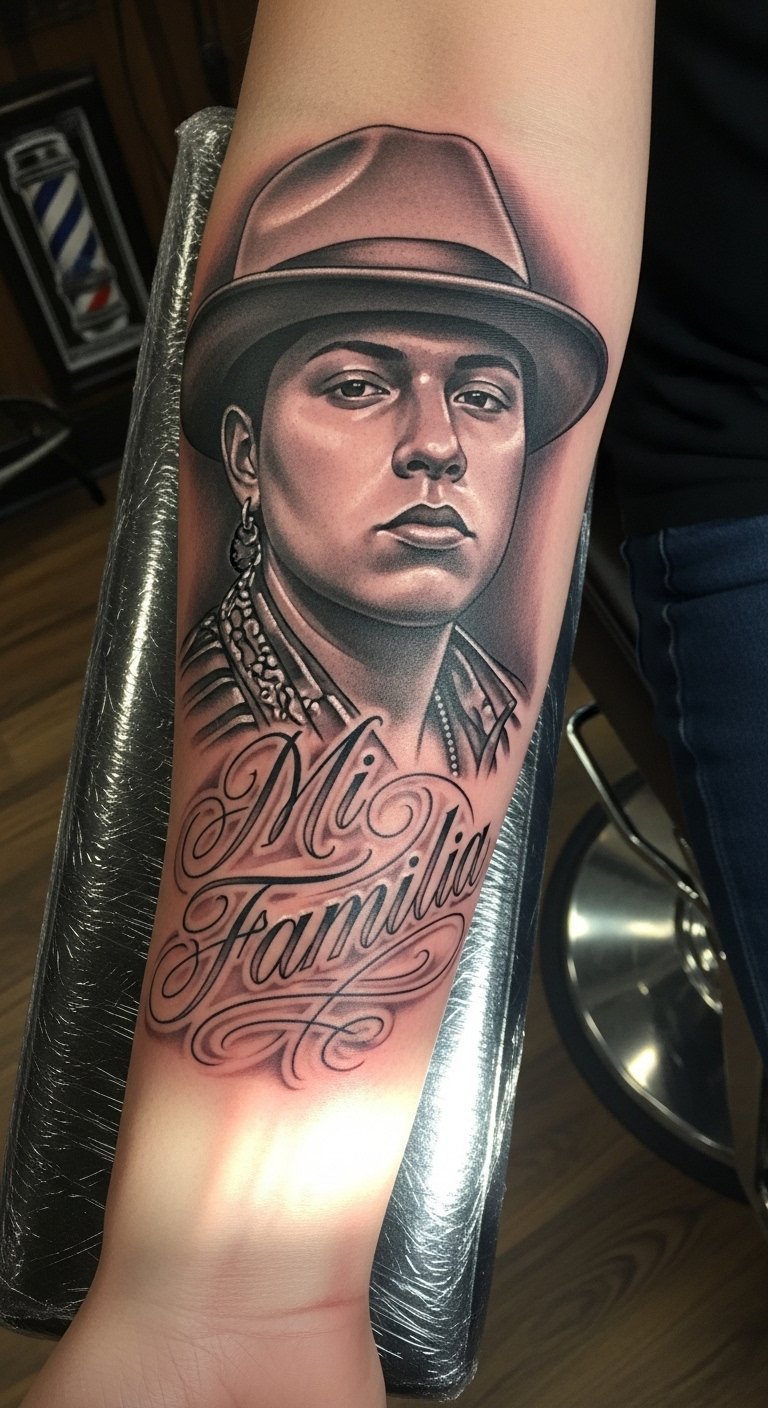
I noticed chicano pieces age gracefully because artists often plan shadows and highlights for the skin surface. The soft grayscale reads well on a range of skin tones. Keep portraits and scripts separate enough that both can breathe. Artists who understand skin undertones will select pigment saturation accordingly. Expect moderate session times and steady aftercare to avoid dark scabbing. I reference shade-neutral-ointment for healing.
Mistake to Avoid: Placing script over shaded portrait areas, it reduces legibility
14. Tribal and Polynesian
Style/Technique: Bold black patterns, repetitive motifs based on culture
Pain Level: 6/10
Session Time: 2–8 hours
Best For: Legs, arms, torso, people wanting cultural patterns
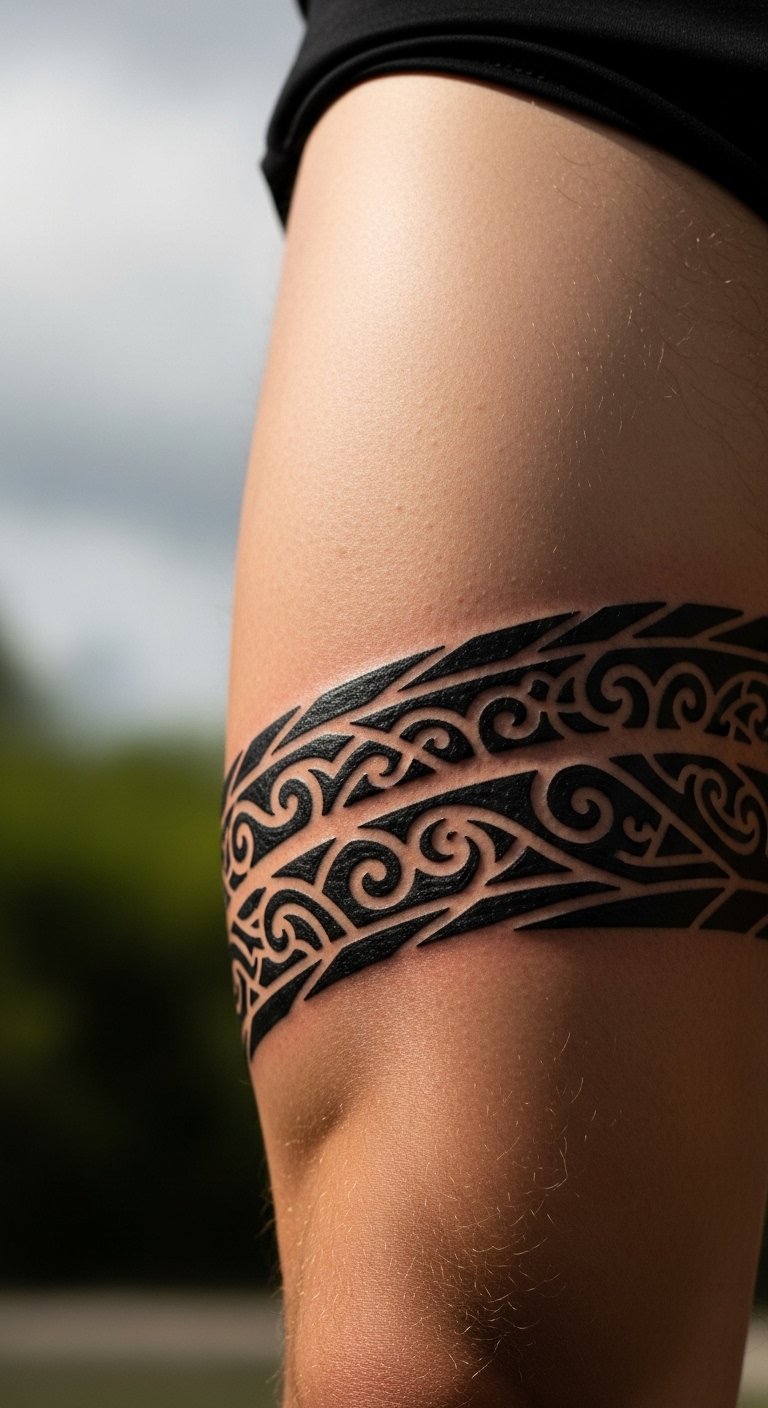
I tried a small tribal band and was surprised how integrated black shapes resist obvious aging. These patterns look best when scaled to body contours, so an artist familiar with flow and cultural meaning is non-negotiable. Expect longer blocks for saturation and plan placement to complement muscle lines. Aftercare is the same as heavy blackwork, and touch-ups may be needed where skin stretches. For prepping sessions I pack sterile-stencil-paper.
Mistake to Avoid: Copying cultural motifs without consulting the artist on placement and meaning
15. Etching and Engraving Style
Style/Technique: Fine cross-hatching and line shading mimicking prints
Pain Level: 5/10
Session Time: 1–4 hours
Best For: Upper arm, rib, back, people who like vintage looks
I love how etching-style tattoos age, the linework reads like texture rather than a flat mark. They need a bit of space for the hatch marks to remain distinct, so 3 inches or larger is safer. Artists must be patient and precise; rushed hatching becomes indistinct. Expect slightly longer healing where multiple cross-lines sit close. I often show artists vintage-engraving-books as reference.
Mistake to Avoid: Doing tiny etching in very small spaces, it fills in and loses texture
16. Illustrative Neo-Japanese
Style/Technique: Modern motifs with Japanese composition cues and bold flow
Pain Level: 6/10
Session Time: Multiple sessions, 6–12 hours total
Best For: Full sleeves, backs, people wanting narrative and motion
I noticed these pieces hold up because the artist plans movement and scale from the start. The larger panels and strong outlines help the composition stay coherent as the skin changes. Expect commitment in session count and cost, but the payoff is a dynamic piece that travels with your body. Aftercare between sessions is crucial to avoid uneven healing. For touch-ups and maintenance I use tattoo-specific-healer.
Mistake to Avoid: Letting multiple artists work on the same narrative without a unified plan
17. Minimal Geometric
Style/Technique: Clean shapes, thin lines, measured symmetry
Pain Level: 3/10
Session Time: 20 minutes–2 hours
Best For: Collarbone, inner arm, ankle, those who want subtle structure
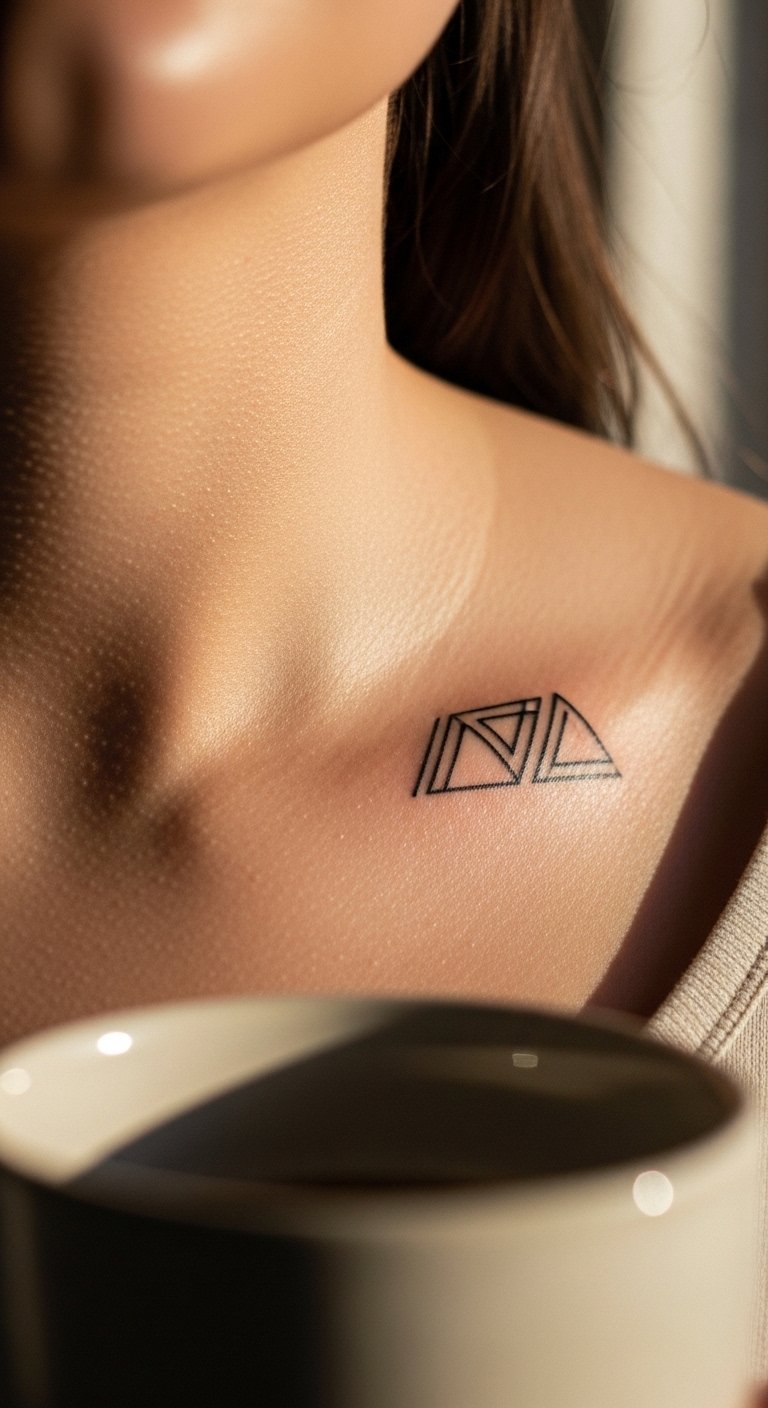
I got a tiny geometric cluster and found symmetry keeps it readable longer than organic lines. Make lines bold enough to survive slight spreading; that usually means thicker than you might prefer initially. Artists who use proper machines and needles for fine geometry make a big difference. Geometrics on curved areas need careful placement or they warp when you move. Keep sunscreen handy for exposed spots. I bought precision-stencil-kit for planning.
Mistake to Avoid: Picking ultra-thin lines for geometric shapes, they blur quickly
18. Scripted Handwriting
Style/Technique: Personal handwriting transferred into ink, often sentimental
Pain Level: 2/10
Session Time: 15–60 minutes
Best For: Rib, wrist, forearm, memorial pieces
I tattooed a loved one’s handwriting and it still reads personal years later. Real handwriting has quirks that translate well in ink, but you must keep strokes larger than the original pen sample for longevity. Pick a clean scan and an artist who maps line width accurately. Aftercare is standard, but avoid tight sleeves rubbing the fresh lines. I keep antibacterial-wash for first week cleaning.
Mistake to Avoid: Copying tiny handwriting exactly, it will fill in as it heals
19. Biomechanical Fusion
Style/Technique: 3D illusions blending mechanical elements with anatomy
Pain Level: 6/10
Session Time: 2–6 hours
Best For: Forearms, calves, shoulders, those wanting dramatic 3D effects
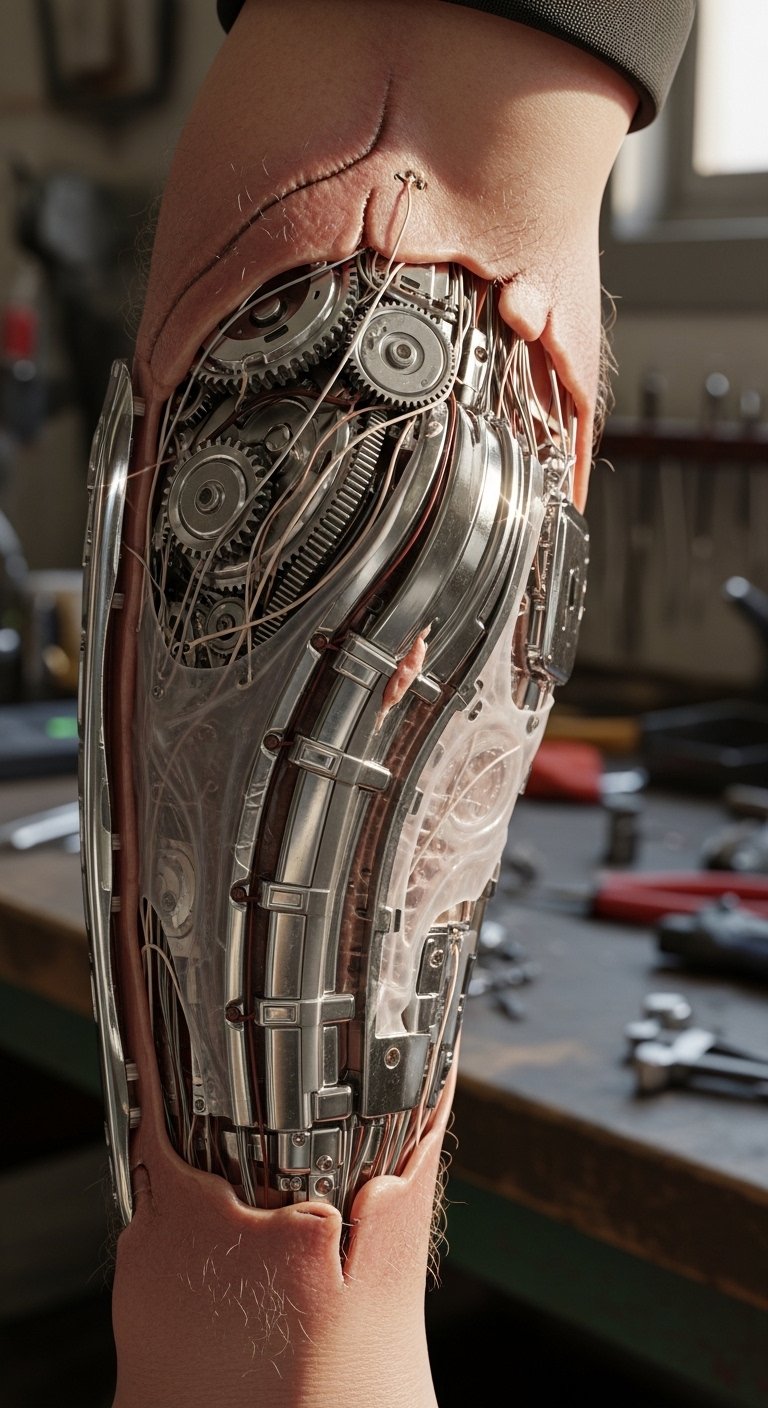
I experimented with a biomechanical forearm and learned that bold contrasts and shadowing make the illusion durable. These need medium to large size so shading gradients maintain depth. Artists must understand light and anatomy to pull it off; poor shadowing reads flat. Healing can be tricky in layered shading zones, so follow aftercare strictly. I often reference 3d-shading-guide when planning.
Mistake to Avoid: Trying small-scale biomechanical illusions, they lose depth quickly
20. Scripted Calligraphy
Style/Technique: Ornate calligraphic lettering with flourishes and balance
Pain Level: 3/10
Session Time: 30 minutes–2 hours
Best For: Chest, back, forearm, those wanting decorative text
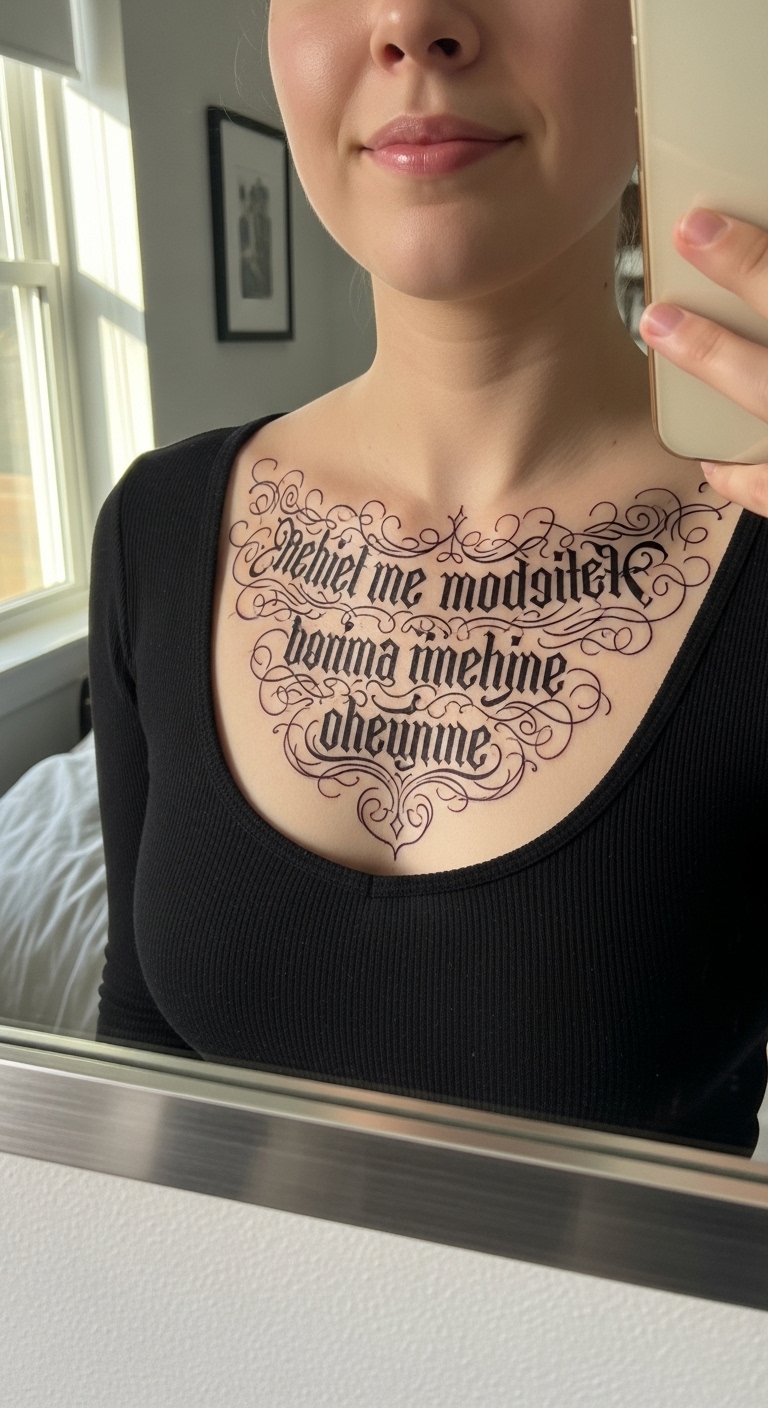
I had calligraphy inked across my chest and I noticed the negative space makes letters hold up. You need slightly wider strokes than pen work to avoid filling in. Placement on flatter surfaces like chest keeps lettering steady, avoid joints. Choose an artist who practices proportion and flow. Expect modest touch-ups for crisp edges after a year. I use ink-safe-cleanser during healing.
Mistake to Avoid: Using extremely thin ornamental strokes, they thicken as the tattoo ages
21. Abstract Expression
Style/Technique: Freeform shapes, brush-like strokes, bold mark-making
Pain Level: 4/10
Session Time: 1–3 hours
Best For: Thigh, arm, back, people who want art-like tattoos
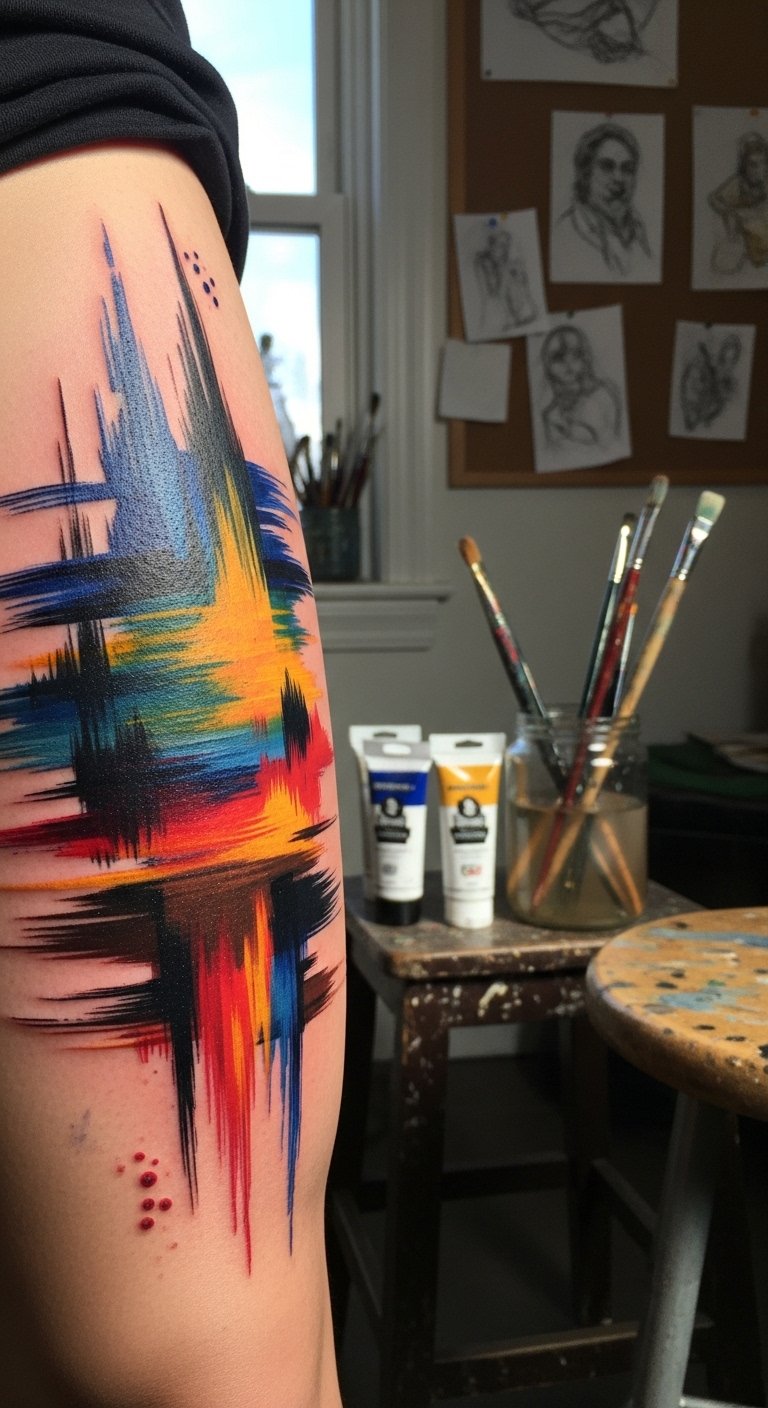
I got an abstract brush stroke on my thigh and it kept its energy because the marks were intentionally large and bold. Abstract work ages like painting, so bigger areas read better than tiny gestures. Artists who can mimic brush stroke textures in ink create a convincing result. Aftercare focuses on preventing scabbing in layered color. For auditioning artists I keep artist-sketchbook examples.
Mistake to Avoid: Making brush-like strokes too small, they lose texture after healing
22. Minimal Portrait Silhouettes
Style/Technique: Simple silhouette with minimal interior detail, high contrast
Pain Level: 3/10
Session Time: 30–90 minutes
Best For: Nape, chest, forearm, subtle portrait lovers

I used a silhouette for a memorial piece and it stayed crisp because the high-contrast edge resists spreading visually. Keep silhouettes at least 2 inches so the shape doesn't look blob-like with time. Artist precision for a clean outline is essential. Aftercare is simple, and occasional touch-ups help maintain the edge. I recommend keeping edge-smoothing-ointment for the first two weeks.
Mistake to Avoid: Making silhouette too small, it loses recognizable shape
23. Single-Needle Florals
Style/Technique: Extremely fine lines and subtle shading using a single needle
Pain Level: 3/10
Session Time: 30 minutes–2 hours
Best For: Inner wrist, clavicle, ankle, people wanting delicate botanicals
I experimented with single-needle floral and liked the whispery look, but it needs sheltered placement. Thin stems will blur if rubbed constantly. Size up to maintain petal definition over time. Pick an artist with proven single-needle results, because technique is everything. Aftercare includes avoiding jewelry friction and moisturizing so lines settle evenly. I use single-needle-care-kit as a home reference.
Mistake to Avoid: Putting single-needle florals where bracelets or straps rub them daily
24. Stippling Landscape
Style/Technique: Tiny dots creating depth for horizons and atmospheres
Pain Level: 4/10
Session Time: 1–3 hours
Best For: Forearm, thigh, rib, scenic lovers
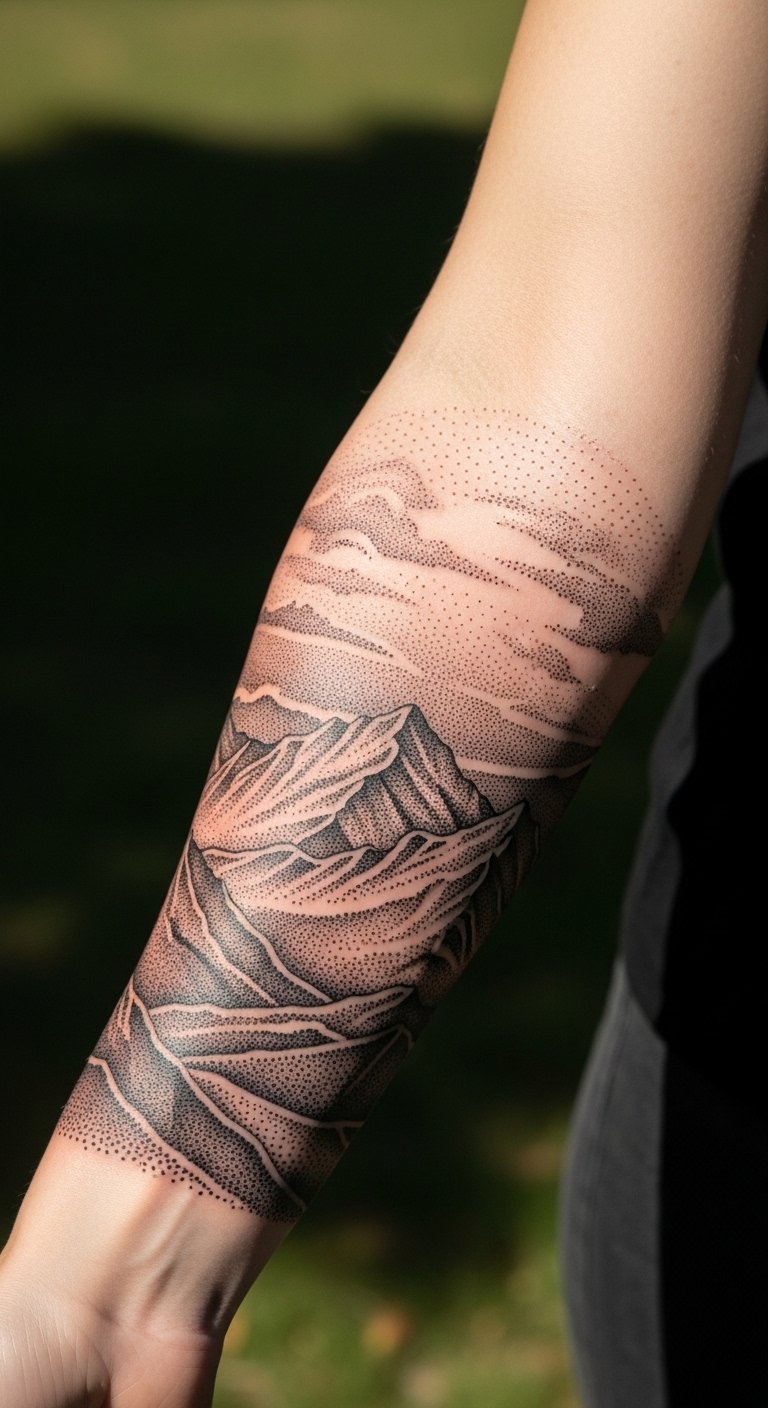
I had a stipple horizon and its texture hid minor spreading, so the scene still reads as dots rather than smudges. Stippling takes time, so choose a patient artist. Larger scenes maintain perspective better than tiny strips. Plan placement to avoid joints that break continuous dot gradients. Healing is mildly slow in dense areas, so follow cleansing and moisturization. I keep dotwork-guidebook for inspiration.
Mistake to Avoid: Trying a detailed stipple scene at very small scale, you lose depth
25. Negative Space Design
Style/Technique: Uses uninked skin within inked areas to form shapes and patterns
Pain Level: 4/10
Session Time: 1–4 hours
Best For: Sleeves, back pieces, people who like contrast without heavy color
I favored negative space elements in a sleeve and the result has held up because the skin itself becomes part of the composition. These designs depend on crisp edges, so artists must be meticulous. Negative space can trick the eye into larger shapes, so you can get impact without full saturation. Keep an eye on areas where skin tone changes, and plan touch-ups to maintain edge sharpness. I recommend precision-aftercare-balm.
Mistake to Avoid: Letting edges fray by choosing faint outlines, negative space needs crisp borders
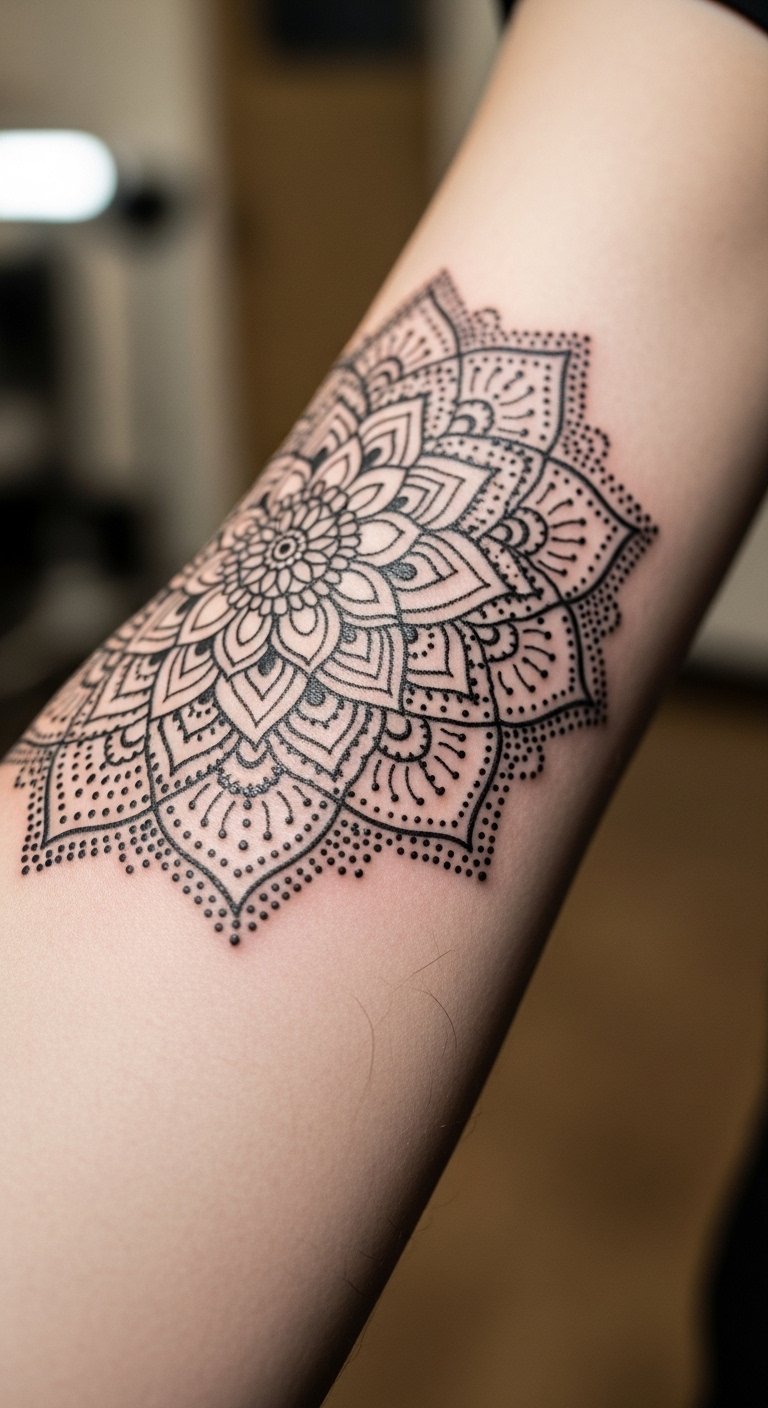
26. Mandala and Sacred Geometry
Style/Technique: Symmetrical radial designs with repeat patterns and balance
Pain Level: 4/10
Session Time: 1–6 hours
Best For: Sternum, back, thigh, spiritual or meditative aesthetics
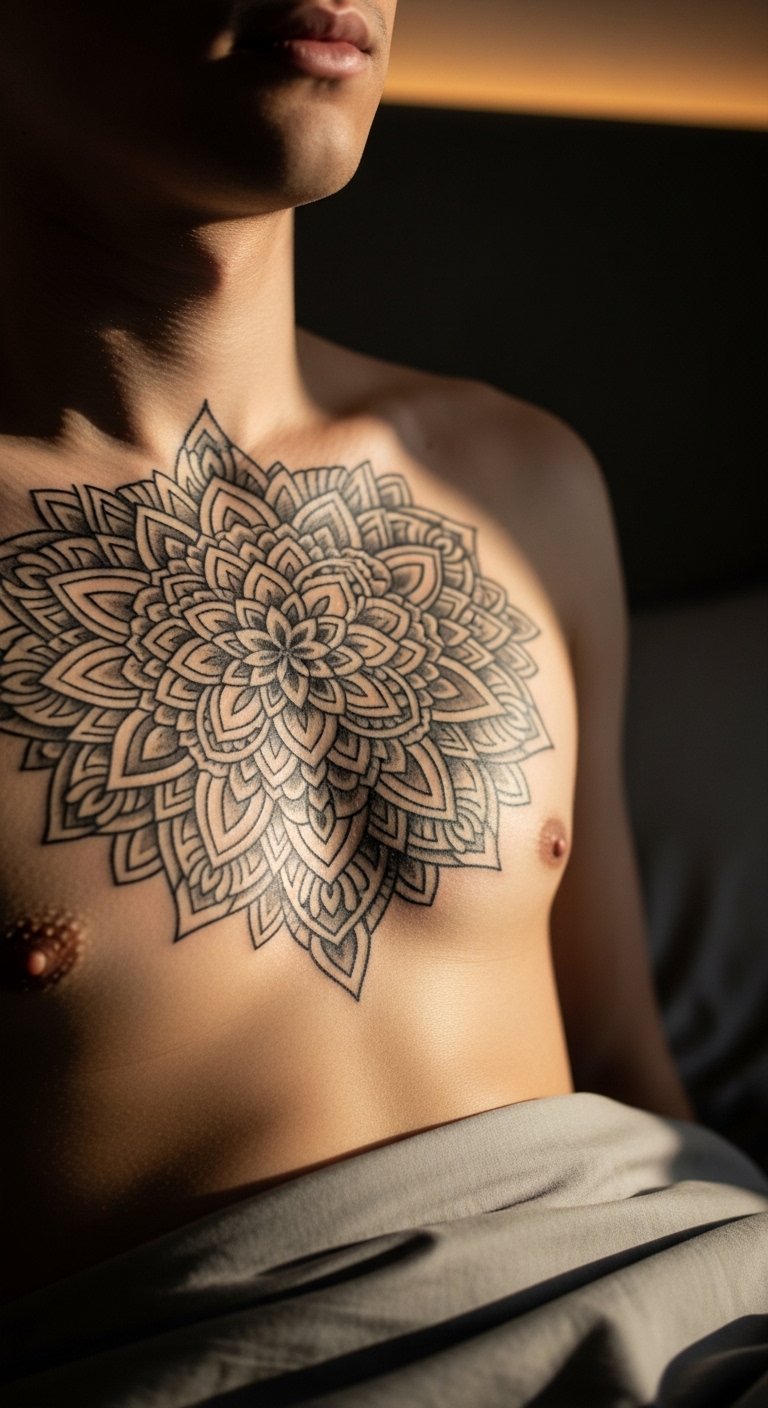
I got a sternum mandala and love how symmetry helps it age evenly, because all sides spread uniformly. Mandalas need scale so inner repeat details do not blur; I recommend 4 inches minimum. Artists who measure and transfer accurately prevent skewed centers. Healing requires protecting the center from tight clothing. Expect touch-ups on high-movement boundaries after a few years. I used symmetry-stencil-kit to plan placement.
Mistake to Avoid: Starting a mandala too small, the central detail collapses as ink spreads
Tattoo Aftercare Products
Healing & Cleansing:
- mild-cleansing-wash (~$8-15)
- antibacterial-wash (~$10-20)
Moisturizing & Protection:
- fragrance-free-lotion (~$6-12)
- healing-ointment (~$8-15)
- precision-aftercare-balm (~$12-25)
Sun Protection:
- tattoo-sunscreen (~$10-20)
- color-safe-sunblock (~$12-25)
I learned the hard way that skipping SPF and using scented lotion wrecks color and linework. Proper aftercare keeps touch-ups minimal and helps preserve the piece for years, not just months.
Tattoo Care Tips
Clean Gently: Use mild-cleansing-wash with lukewarm water and pat dry, do not scrub.
Moisturize Lightly: Apply a thin layer of healing-ointment then switch to fragrance-free-lotion after a few days.
Protect From Sun: Keep new ink covered and use tattoo-sunscreen after healed, frequent reapplication is key.
Avoid Soaking: No pools, hot tubs, or long baths for two weeks, it softens scabs and pulls pigment.
Plan Touch-Ups: Budget for minor touch-ups in 1–5 years, especially for delicate or pale colors.
Choose the Right Placement: Think about clothing, friction, and sun exposure for the long haul; sleeves and backs often age better.
Vet Your Artist: Inspect healed photos in an artist’s portfolio to confirm their work ages well, not just fresh shots.
