
I kept buying one giant pot and thinking that would solve a tiny balcony problem, until every seed drowned or shaded its neighbor and nothing grew. The fix was simple and humiliating, a switch to smaller, deliberately spaced containers and a plan for light instead of blind optimism. After trying this in three rentals I learned which small-scale setups survive busy weeks and faulty watering habits.
These nine ideas are practical setups for renters, balcony dwellers, and anyone with a windowsill who wants fresh herbs, a bit of salad, or a tidy pollinator stop. Most projects cost under $75 to start and take beginner to intermediate skill. Expect low-maintenance options and renter-friendly hacks, plus a few quicker builds that need one afternoon. I mention exact soil mixes, spacing, and a couple of small tools that saved me time when I moved between apartments.
1. Narrow Rail Planter with Brackets
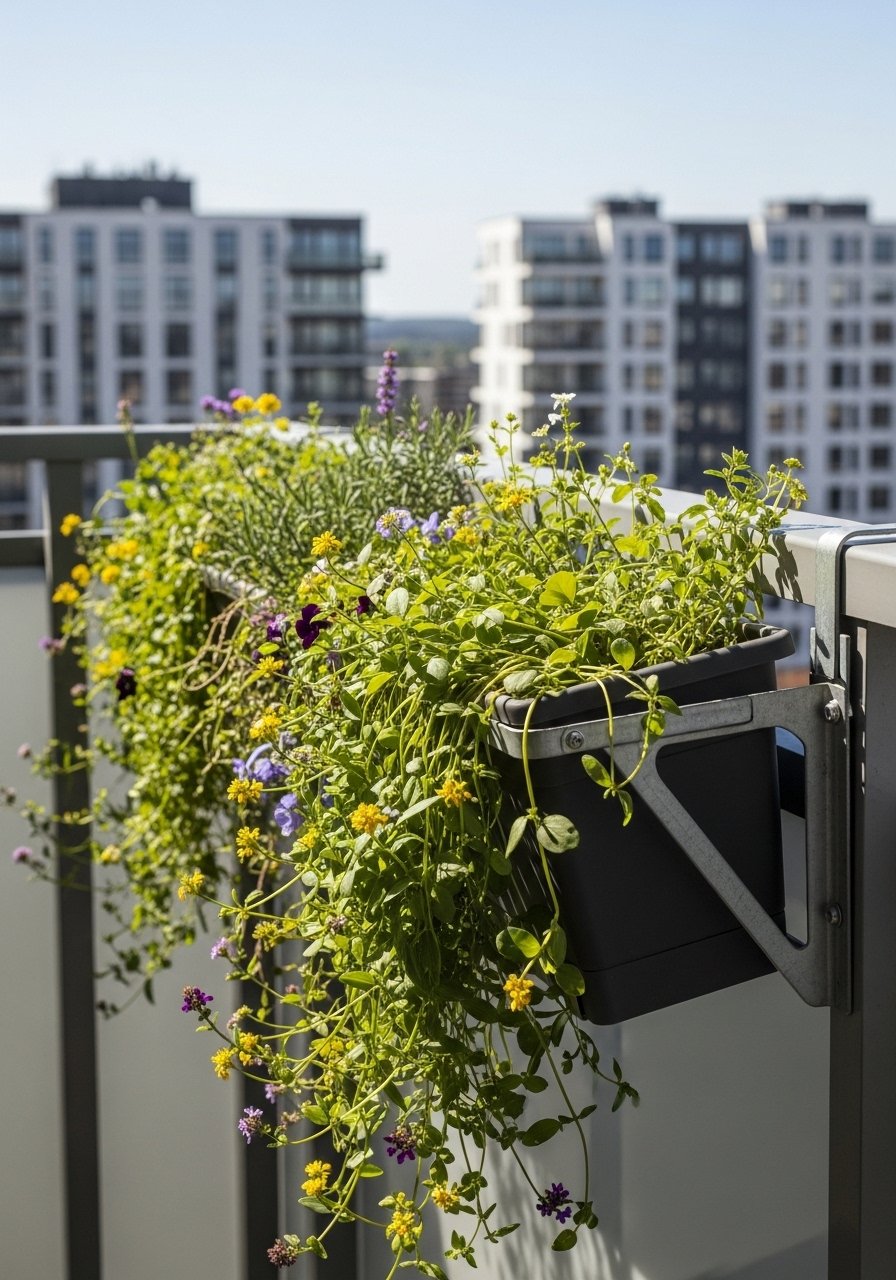
A railing planter stretches a tiny footprint into usable soil, which visually widens a balcony without clutter. What makes this work is the bracketed support so the weight is off the ledge, and a 2 to 1 mix of potting soil to perlite for quick drainage. I space lettuce and thyme about 4 to 6 inches apart so roots do not tangle. For brackets I use a simple railing-mount planter bracket and a lightweight rail planter box. Budget friendly and fast to install, this fits petite and full balconies.
Mistake to Avoid: Don’t hang a heavy ceramic trough without brackets, it will sag or fall and damage the railing.
2. Windowsill Hydroponic Herb Kit

Hydroponic kits cut soil mess and squeeze a lot of growth into a thin sill. A 3 to 4 plant kit with a 1.5 liter reservoir keeps basil and cilantro fed for two weeks between top-ups. The visual payoff is lush, clean leaves and instant kitchen access. I recommend a small hydroponic herb kit and an extra LED clip grow light for darker windows. This is a stronger option when soil space is zero and you want faster germination.
Mistake to Avoid: Do not use tap water without letting chlorine off for 24 hours, plants resist sudden chemicals in small reservoirs.
3. Vertical Pocket Planter Wall
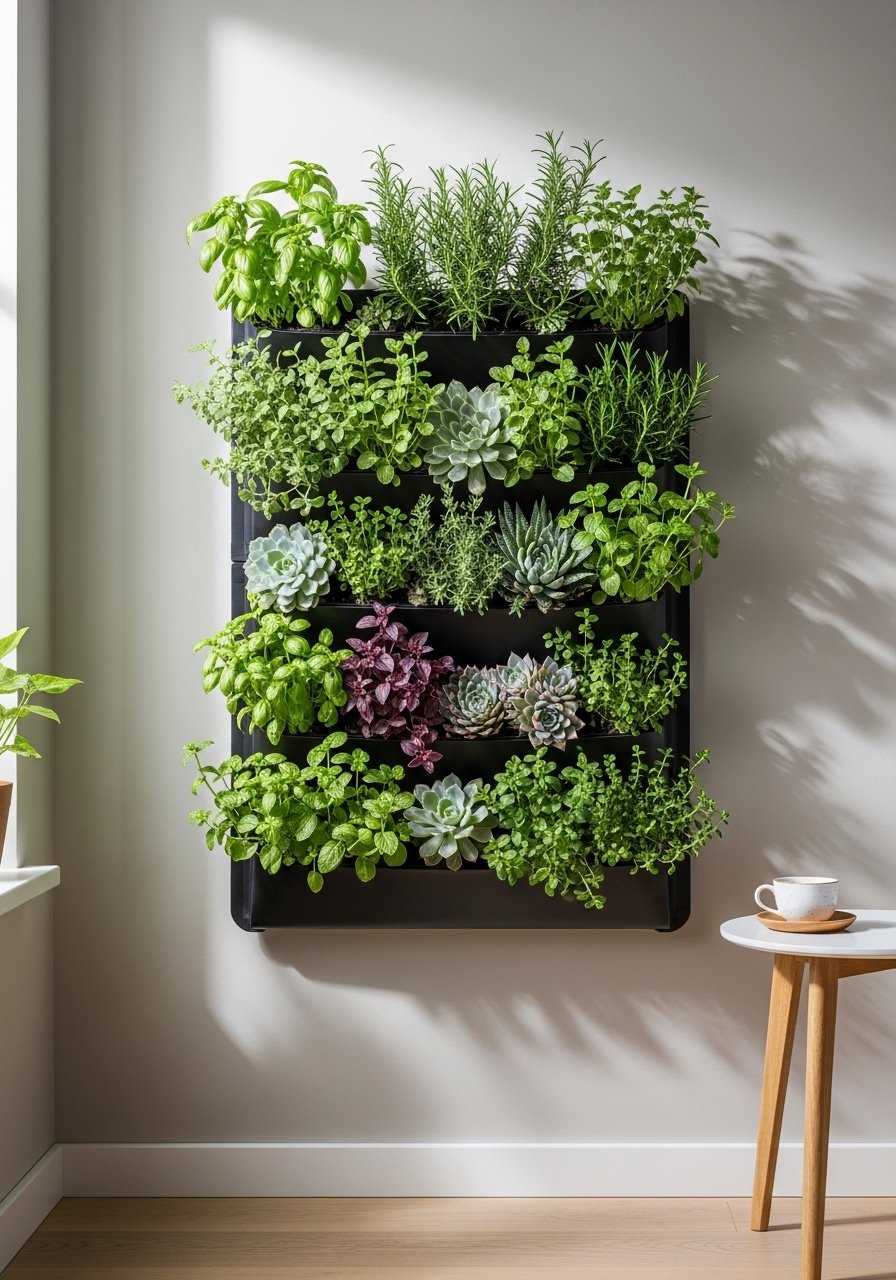
A vertical pocket planter converts wall space into a garden and creates a green focal point. Pick breathable fabric pockets and a wall frame that keeps pockets 1 to 2 inches from drywall so moisture does not transfer. I use a 60 percent potting mix and 40 percent coconut coir ratio for lighter weight and retained moisture. A fabric pocket planter and a set of wall anchors for planters make the install renter friendly if you remove anchors later. This works well for small herbs and trailing flowers.
Mistake to Avoid: Don’t crowd pockets with full-size plants, most will outgrow the pocket and wilt from root competition.
4. Hanging Trio of Lightweight Planters
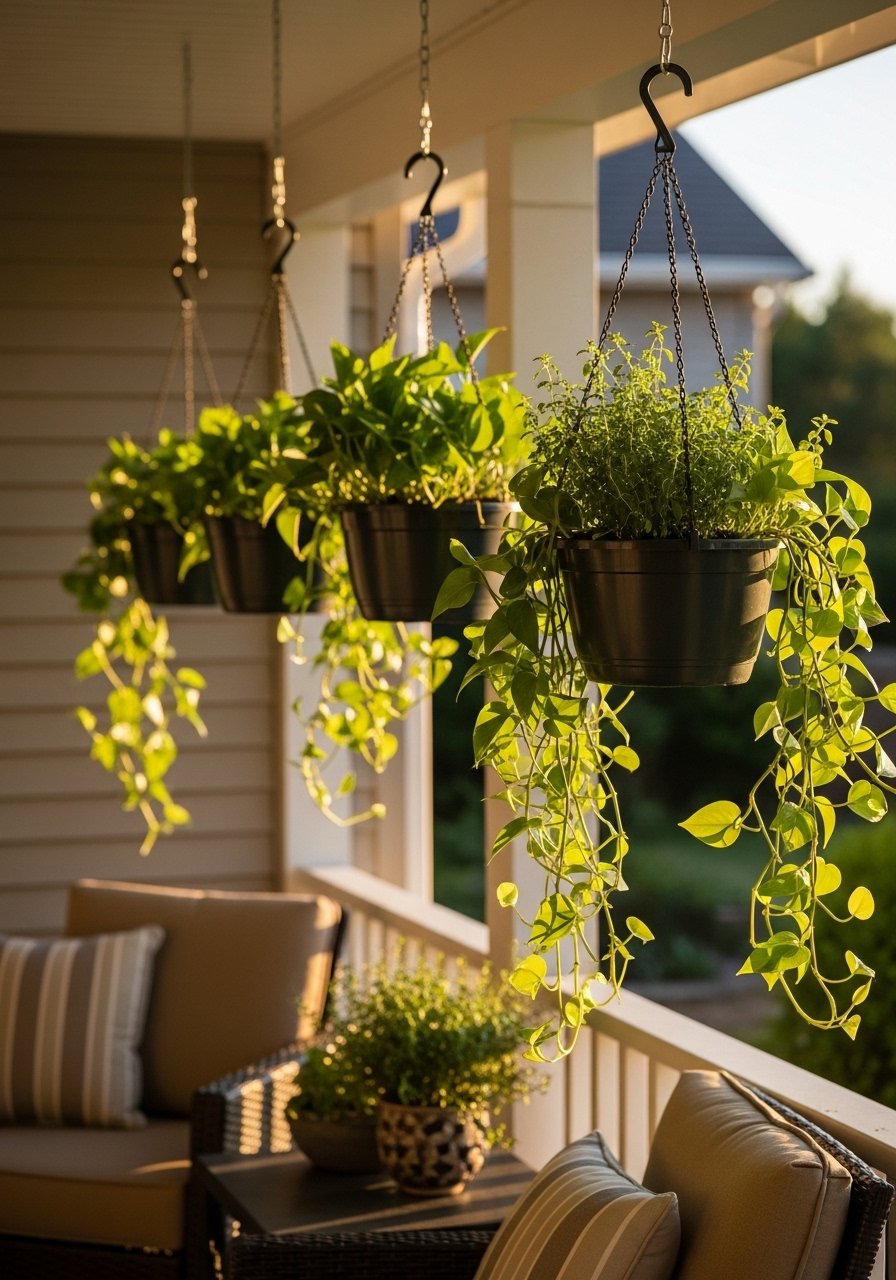
Hanging planters free up floor and rail space while adding vertical motion. Use lightweight plastic or fabric hangers and hang at staggered heights for visual balance. For trailing varieties I pot with a 3 to 1 mix of potting soil to perlite and leave 1 inch of space to the rim for easy watering. I like the ease of a hanging planter set and a simple macrame hanger. This setup suits people who want a soft, layered look without heavy pots.
Mistake to Avoid: Do not use heavy clay pots overhead, they are a safety risk and stress the hooks.
5. Recycled Crate Veg Patch

Turning crates or laundry baskets into planters is cheap and charming, and it is one of the gaps most roundups miss. Line a wooden crate with landscape fabric, fill with a 2 to 1 potting mix to compost blend, and plant shallow veggies like radish, lettuce, and dwarf cherry tomatoes spaced 6 to 8 inches apart. I use a breathable fabric grow bag when I need something lighter to move. This is renter friendly, inexpensive, and easy to pack up at move out.
Mistake to Avoid: Don’t skip drainage holes when upcycling containers; trapped water causes root rot fast in small volumes.
6. Mini Greenhouse Cloche for Seedlings
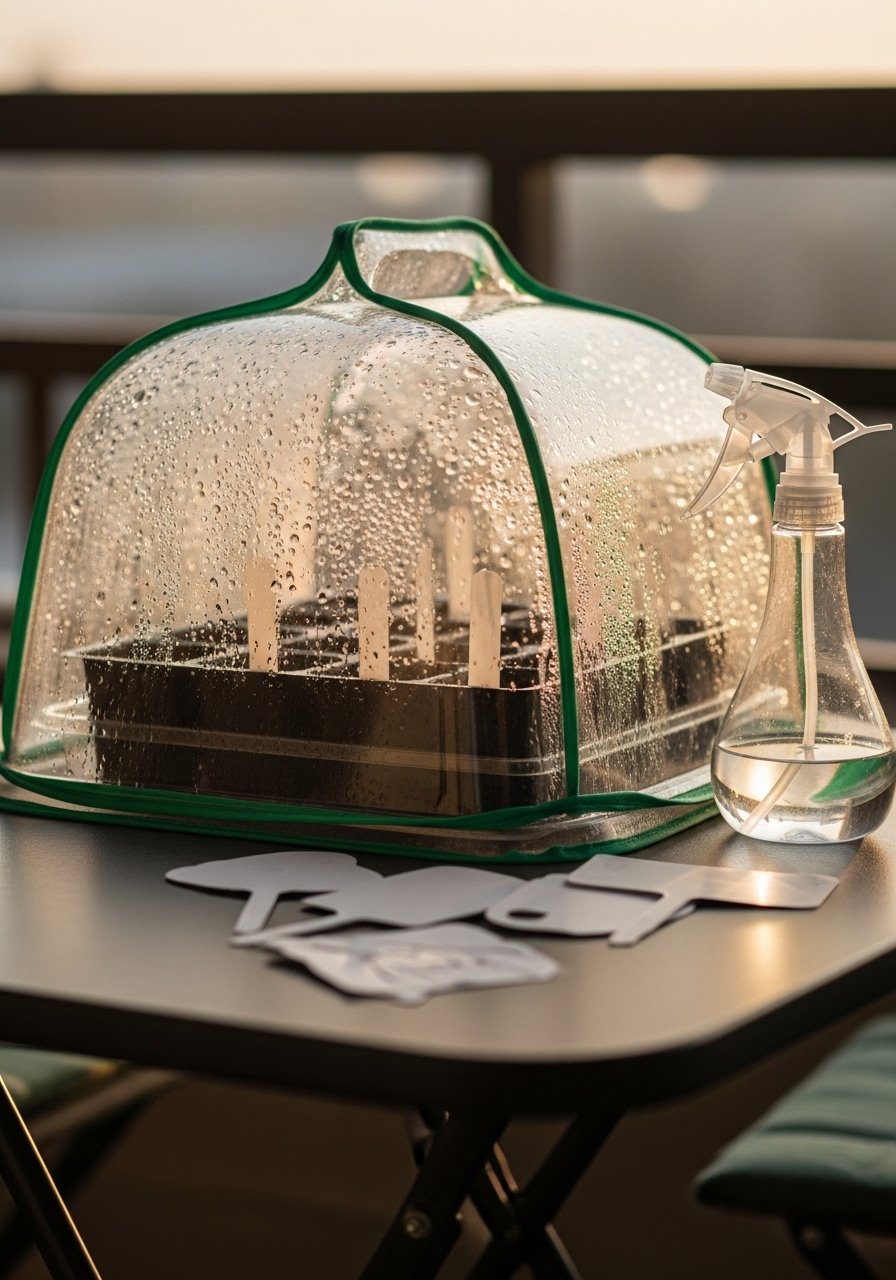
A clear cloche or mini greenhouse speeds germination and extends seasons. Use a small tray with a humidity dome and keep the inside temperature about 70 to 75 degrees for most herb seeds. I open vents daily for 10 minutes once the first true leaves appear to prevent damping off. A compact seedling tray with dome and a refill bag of seed starting mix make this plug-and-play. This is a great early-spring move for tiny balconies.
Mistake to Avoid: Don’t forget to vent the dome; constant sealed humidity invites mold and weak stems.
7. Stackable Self-Watering Tower

A stackable self-watering tower is compact and efficient for small spaces. The reservoir below feeds up through wicks, so a tower 3 tiers high can feed four small pots between waterings. Use a moisture meter to catch drying before wilting. I use a stackable self-watering planter and a soil moisture meter. This is a solid swap for traditional troughs when you need fewer daily interventions.
Mistake to Avoid: Don’t overfill the reservoir after transplanting; new roots need oxygen and can drown in an overwatered base.
If any of these ideas have you ready to shop, these are the essentials I actually buy before trying a new layout.
Essentials for Tiny Gardens
Containers & Supports:
- Rail planter box (~$20-45), lightweight and bracket ready.
- Fabric pocket planter (~$15-30), breathable vertical pockets.
Lights & Propagation:
- Clip grow light LED (~$18-35), small and directional.
- Seedling tray with dome (~$12-25), started every season.
Soil & Watering:
- Seed starting mix (~$8-18), light and sterile.
- Soil moisture meter (~$10-20), quick checks save plants.
8. Over-the-Door Shoe Organizer Salad Wall
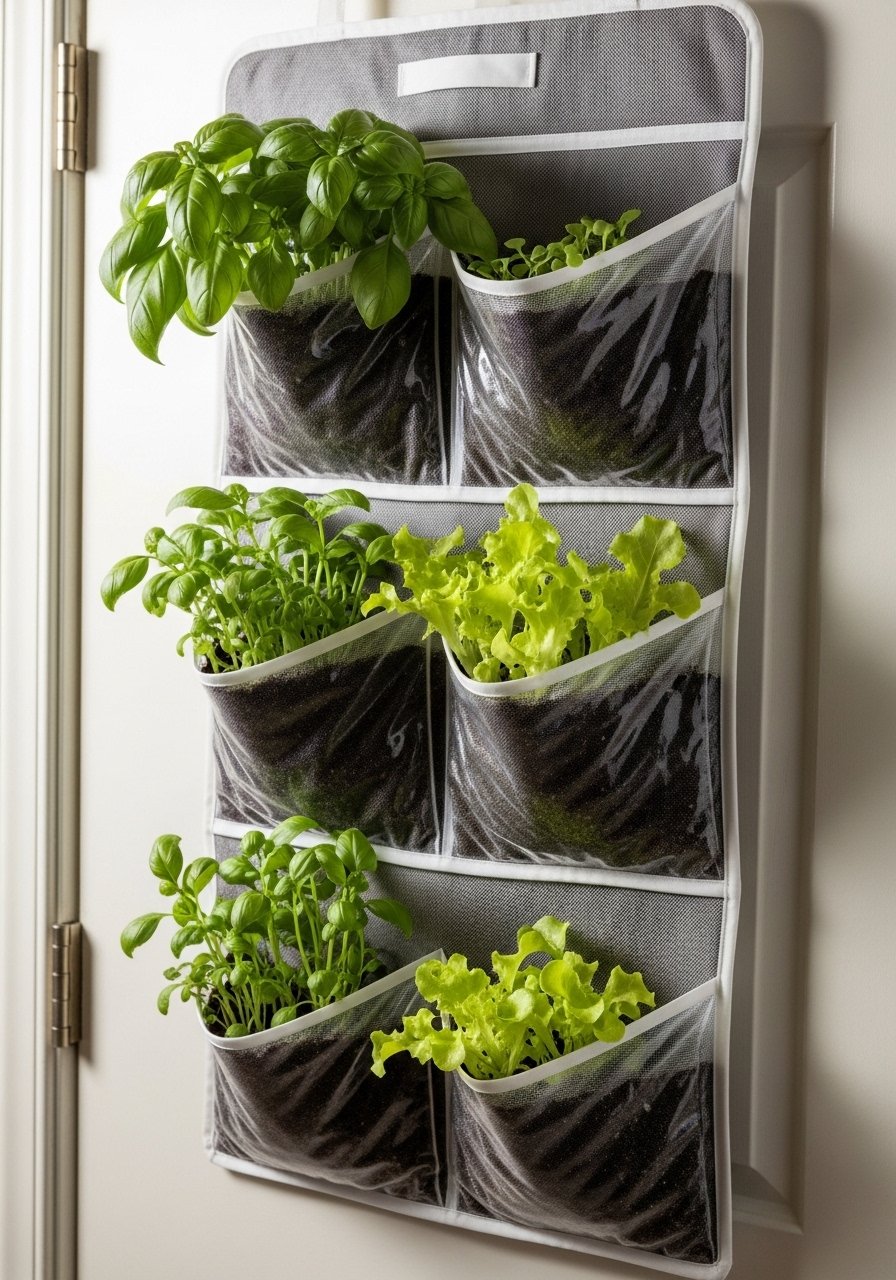
The hanging shoe organizer is an overlooked small-space garden hack that few articles emphasize. Use large canvas pockets, fill the bottom third with a moisture-retentive mix of 70 percent potting soil and 30 percent compost, and keep pockets rotated for even light. Salad greens like arugula and baby spinach fit 3 to 4 plants per pocket. A simple over-the-door organizer and a pack of all-purpose potting soil make this quick. It is cheap, movable, and works inside where light is fair.
Mistake to Avoid: Don’t ignore drainage; line pockets with a thin layer of pebbles or landscape fabric to prevent soggy bottoms.
9. Narrow Shelf LED Microgreen Station

Microgreens give the fastest harvest with the least space. A narrow metal shelving unit with a 2-foot LED strip on each shelf yields continuous salad weeks. Use 10 by 20 seed trays and keep seeding density at about 40 to 50 grams per tray for balanced growth. I pair a metal utility shelf with a LED grow light strip. This is ideal for someone who wants high output from 1 square foot.
Mistake to Avoid: Don’t overcrowd microgreen trays; too dense and they become leggy and prone to mold.
Small Garden Habits That Stick
Thin watering beats sporadic drenching. Water lightly every other day for small pots, aiming for even dampness not soggy soil. A soil moisture meter makes this simple and prevents overwatering.
Grab a clip grow light LED for darker windows. A single lamp on a timer gives consistent light and is cheaper than a full fixture.
Rotate pots weekly by 90 degrees. Plants lean toward the light and uneven growth is the most obvious giveaway of a neglected window garden.
Most people pile heavy pots on a balcony and regret it. Choose lightweight fabric or plastic containers like a fabric grow bag to move plants easily and avoid railing stress.
Keep a small seedling tray and dome on hand. Starting one tray every two weeks gives a steady supply of greens without a big time sink. A seedling tray with dome is the only real prep tool you need.
