
For months I kept asking artists for thinner strokes and still left with fuzzy floral curls after healing. I finally learned to ask for single-needle line weight, minimal shading, and deliberate negative space. That one change meant the motifs read like drawn jewelry even six months later. If you want Art Nouveau fine line work that ages, being exact about needle, spacing, and placement matters more than the flash photo.
These ideas are deliberately low-coverage, mostly single-session or two-session pieces that fit people who want elegant visible work or pieces they can conceal for work. Expect midrange pricing for single-needle precision and plan small sessions. I learned what holds up best across five shops I have visited, and these picks lean toward designs that survive scrubbing, sunscreen, and years of sun.
1. Alphonse Mucha Profile Portrait
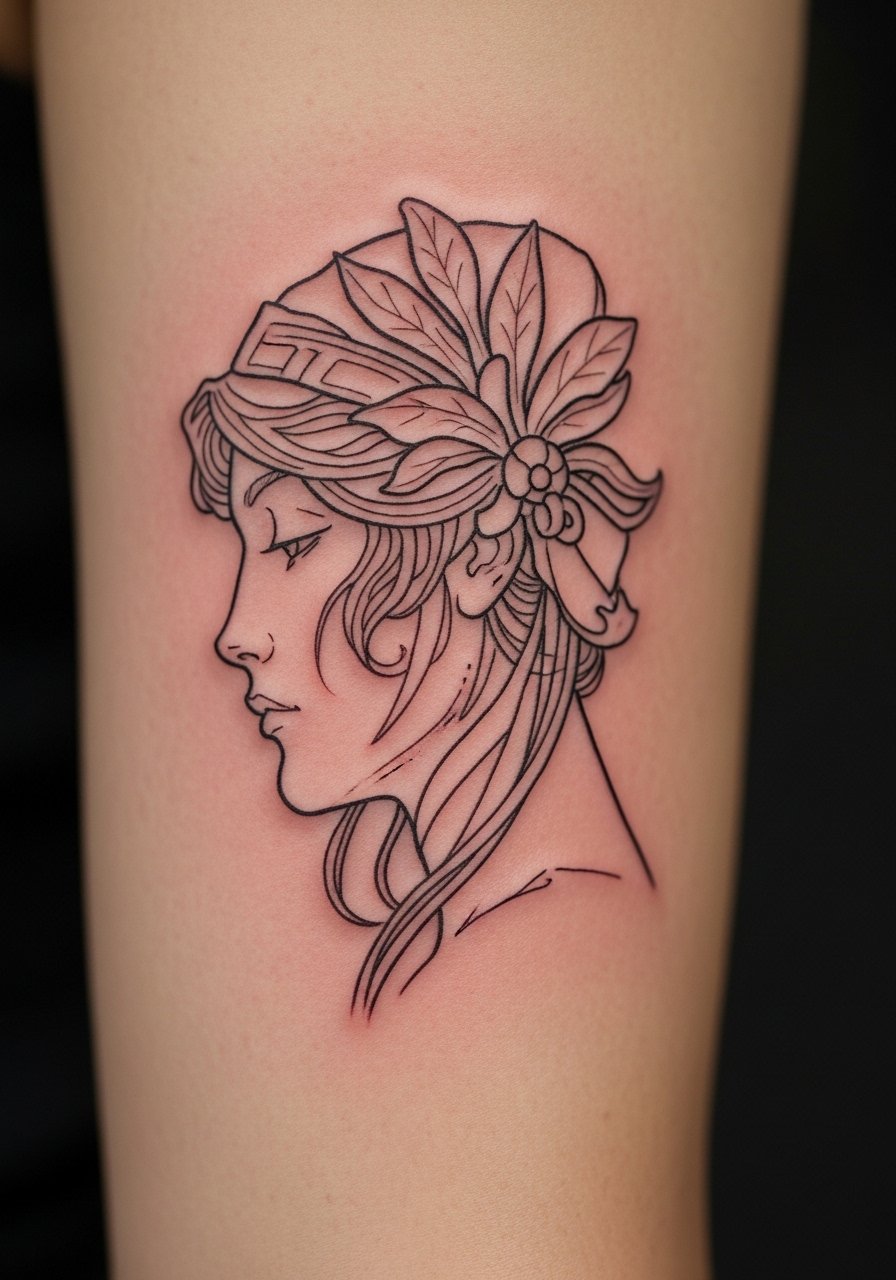
Style/Technique: Alphonse Mucha inspired fine-line portrait
Pain Level: 4/10
Session Time: 2 to 4 hours
Best For: Upper arm, thigh, anyone who prefers a coverable classic
A narrow-profile portrait works because the eye follows a single continuous curve. Artists use 1RL needle groupings for hairline detail and 3 to 5 millimeter negative space around the face so floral borders do not blur into the portrait over time. Pair with a delicate transfer stencil and a small aftercare balm. I like to bring single-needle tattoo cartridges for reference and a travel jar of tattoo aftercare balm for healing.
Mistake to Avoid: Asking for "fine" without specifying single-needle or 1RL, which often leads to heavier liners that blur.
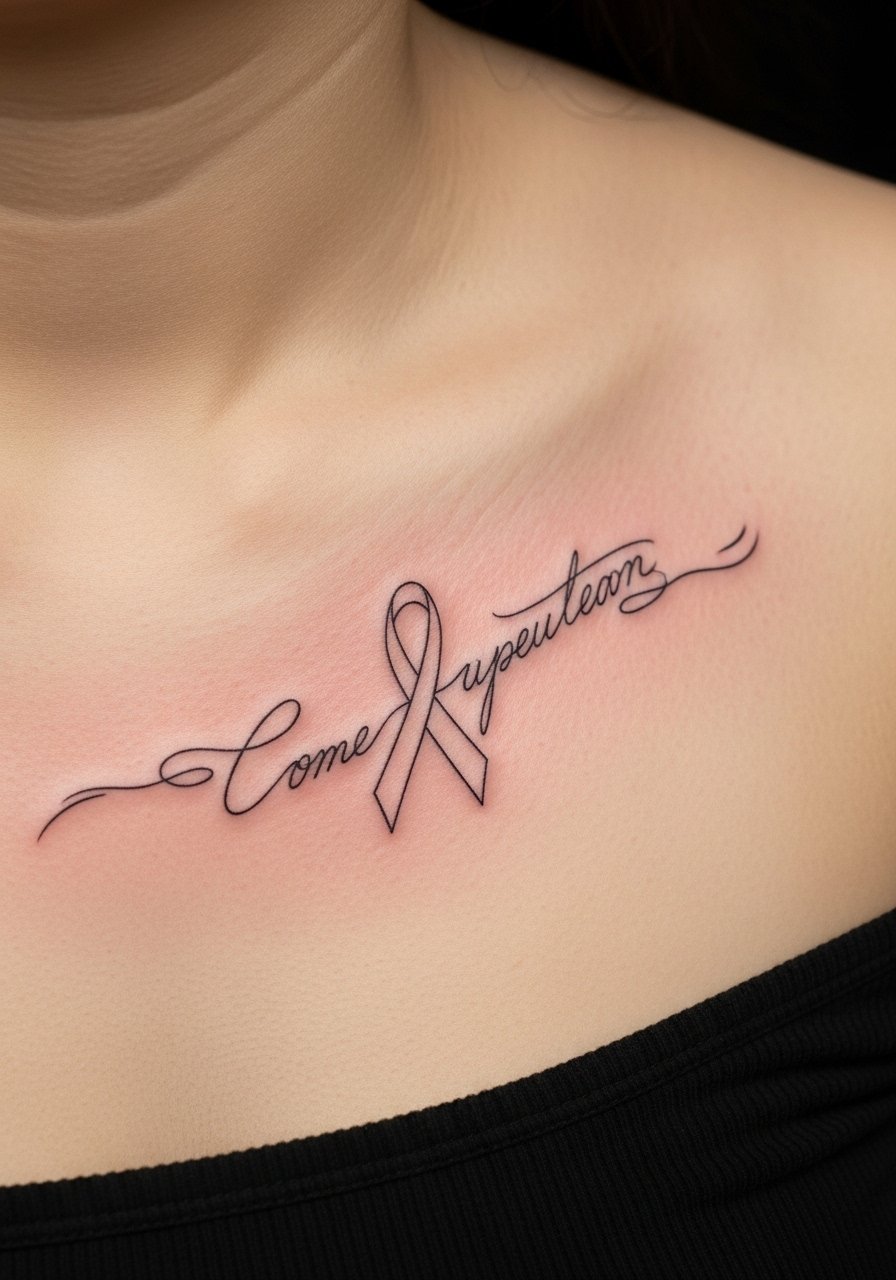
2. Botanical Necklet With Negative Space
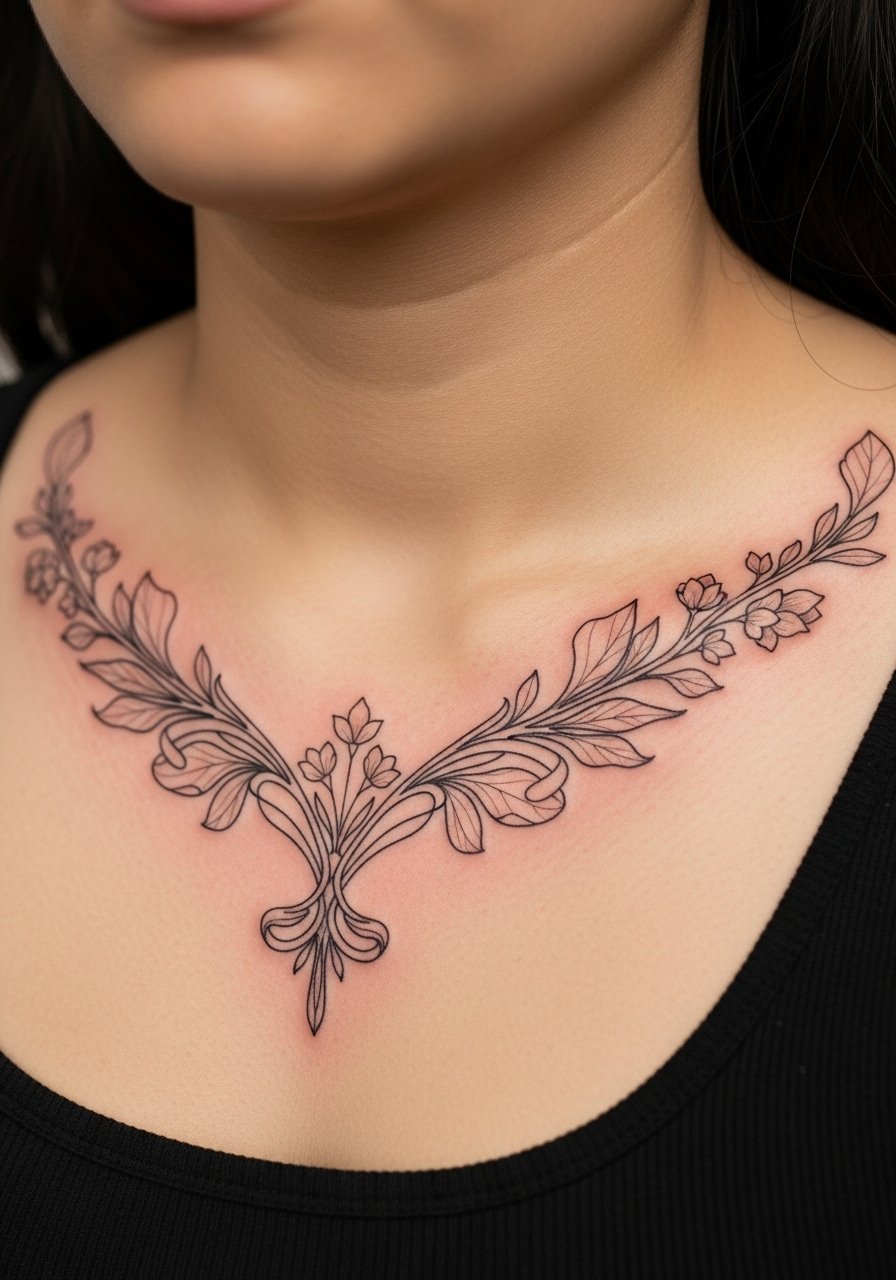
Style/Technique: Botanical linework with negative space
Pain Level: 3/10
Session Time: 1 to 2 hours
Best For: Collarbone, chest, people who want a subtle jewelry effect
A necklet reads like a necklace if the stems curve evenly and the leaves sit 4 to 6 millimeters apart to keep airflow and prevent scabbing lines from touching. This is a beginner-friendly placement if you want a visible piece. Use a light stencil, ask for single pass linework, and plan short sessions. Bring a lightweight sensitive-skin sunscreen stick for long-term maintenance and a fragrance-free wipe for the first week.
Mistake to Avoid: Crowding the design at the neckline so elements merge after healing.
3. Flowing Hair Panel On Rib
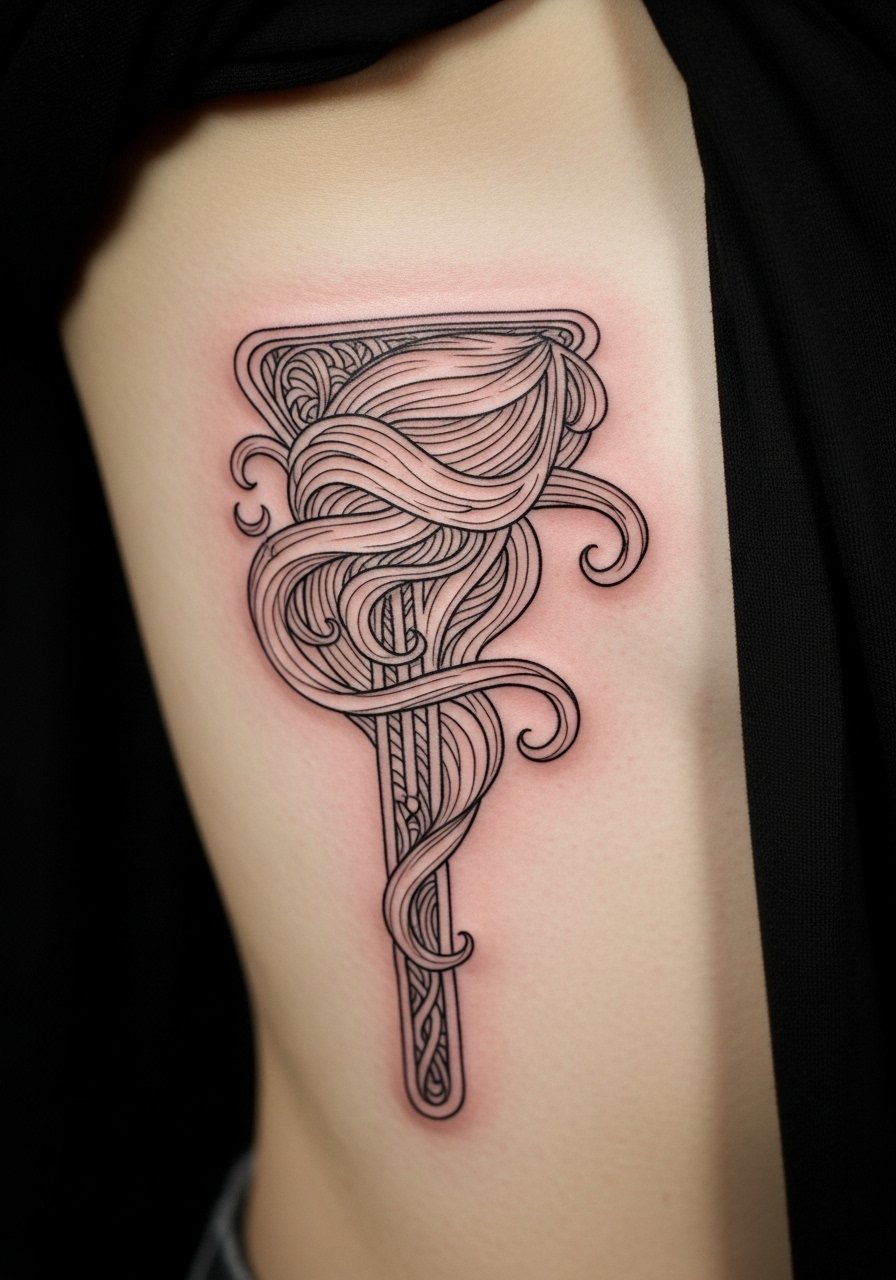
Style/Technique: Flowing hair panel, single-needle shading
Pain Level: 6/10
Session Time: 2 to 3 hours
Best For: Rib, side torso, people okay with higher pain for a dramatic panel
The rib gives length to flowing hair motifs, which is why artists use staggered line density, not heavy fill. A 3 to 7 line-per-inch variation in stroke density creates movement without solid shading. For texture, ask for hairlines that taper to a point rather than blunt ends. Pin a reference for flow and bring a sanitizing barrier film to keep the area clean while you travel home.
Mistake to Avoid: Requesting full shading instead of subtle tapering, which obliterates the hairlike effect.
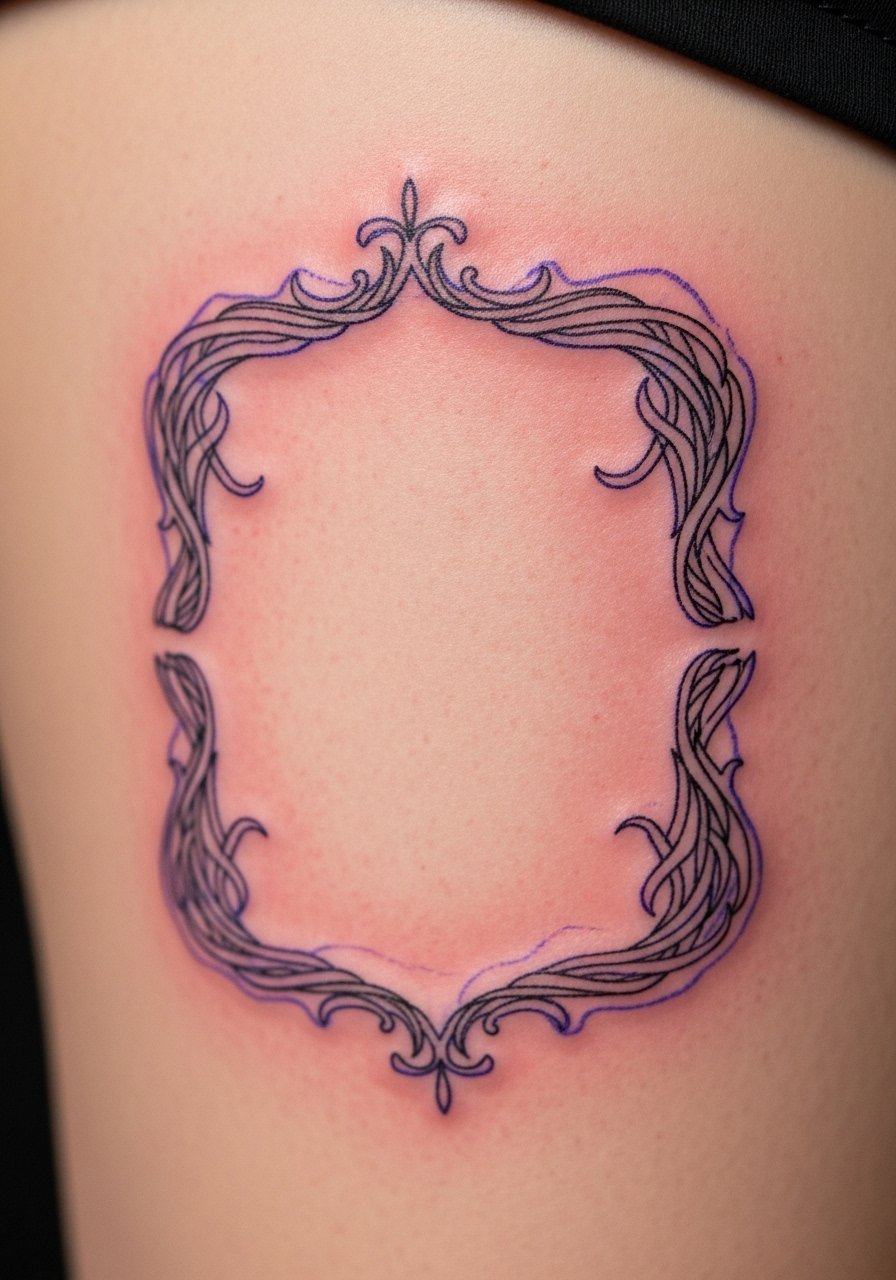
4. Ornate Mirror Locket On Inner Wrist
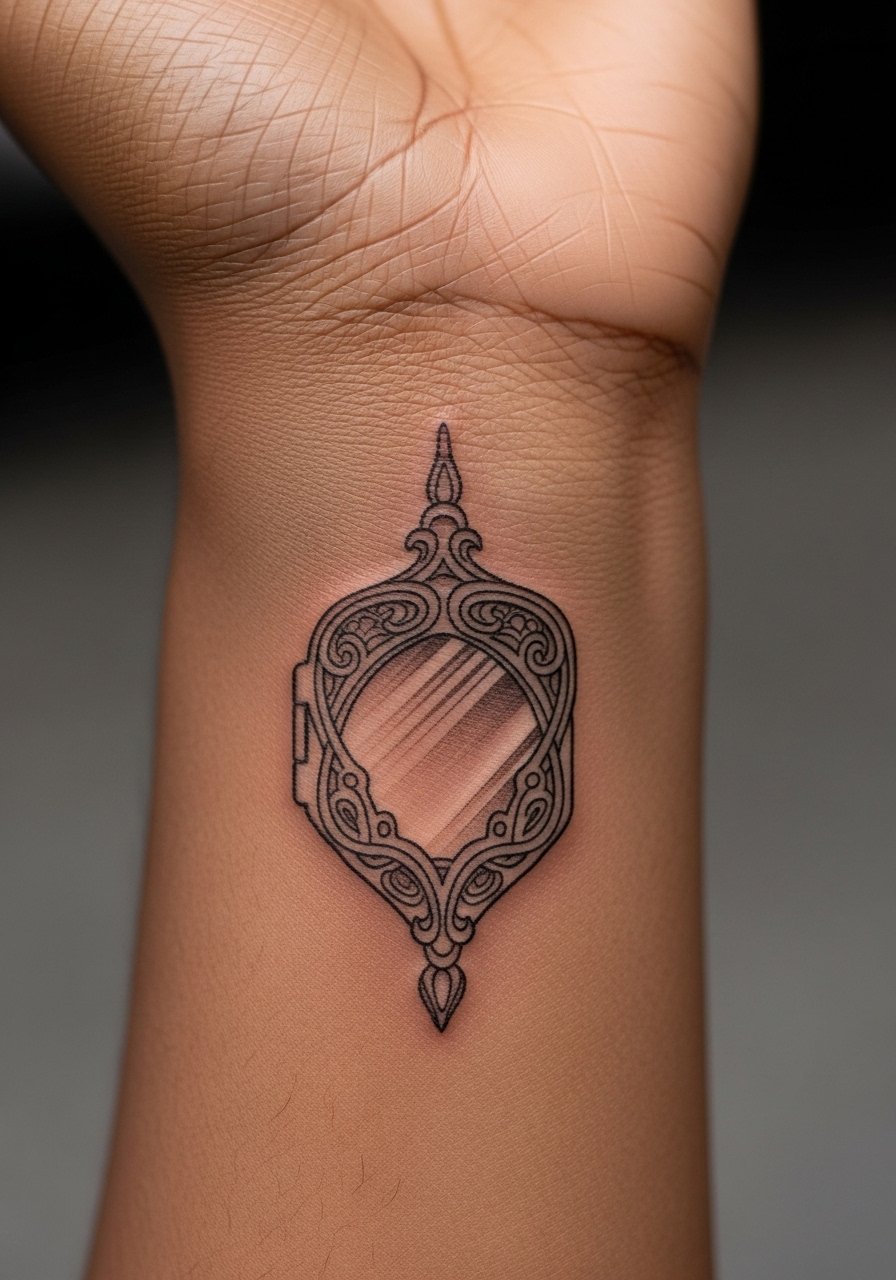
Style/Technique: Ornamental locket with minimal fill
Pain Level: 2/10
Session Time: 1 to 1.5 hours
Best For: Inner wrist, forearm, people wanting jewelry-style visibility
A tiny mirror locket reads as jewelry when the frame stays thin and the interior uses negative space rather than gray wash. Keep the outer frame no wider than 2 to 3 millimeters. This piece fits beginner to intermediate skill levels and looks good in work-visible spots. Ask your artist to avoid heavy black in the center and instead use hairline hatching if you want texture. Bring transfer stencil paper if you test placement at home.
Mistake to Avoid: Filling the locket with solid black, which removes the delicate jewelry look.
5. Stylized Crescent Behind Ear
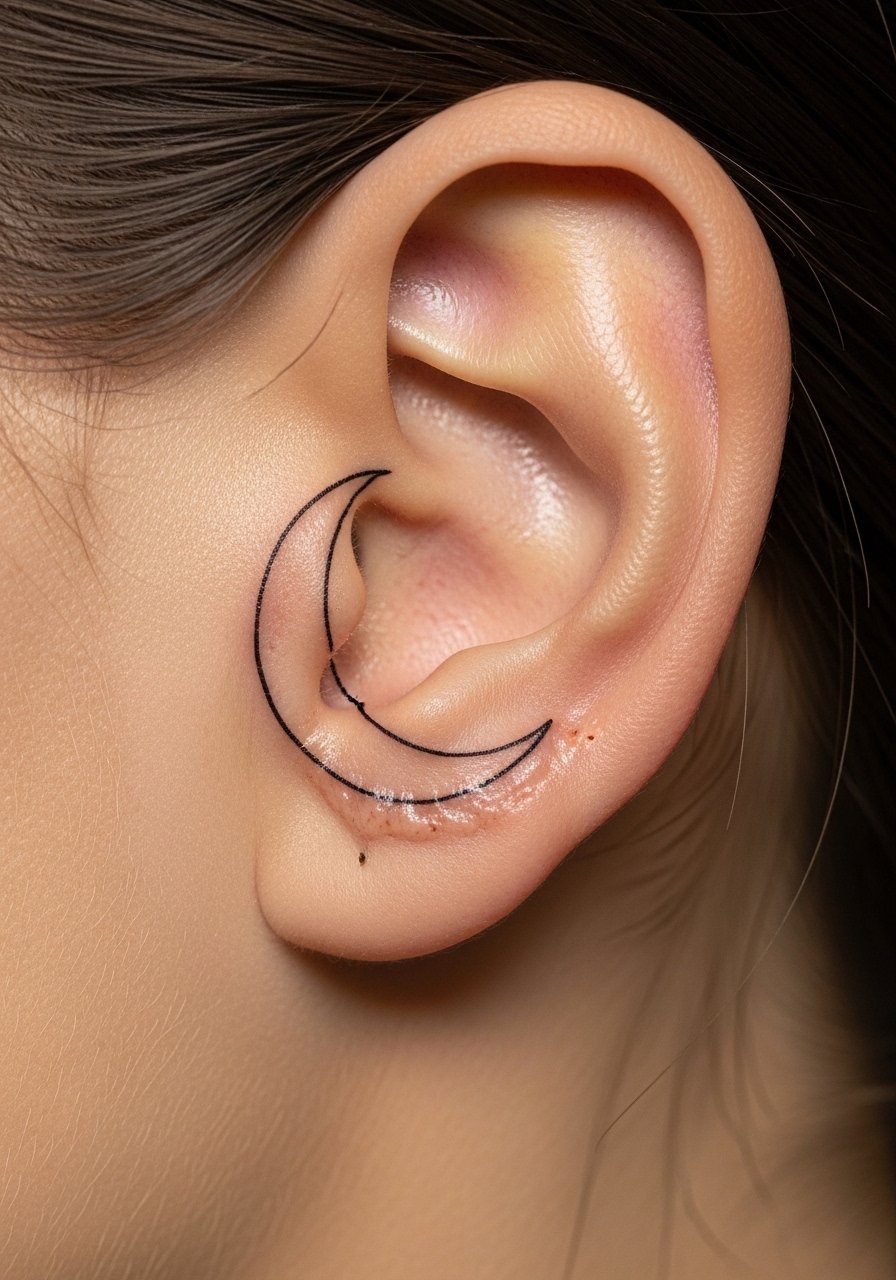
Style/Technique: Small placement, single-needle symbol
Pain Level: 3/10
Session Time: 30 to 45 minutes
Best For: Behind ear, hairline coverage, low-visibility requirement
The behind-the-ear spot stays discreet and ages nicely if lines are kept micro-thin. Use a 1RL or 3RL for small curves and allow about 2 to 3 millimeters of uninterrupted skin at the edge to keep definition. Because the area moves when you sleep, plan for slightly more touch-up potential. Pack a travel-size grip-n-clean soap for first-day cleaning.
Mistake to Avoid: Making the motif too dense; small placements need breathing room to heal cleanly.
6. Peacock Feather Single-Line Sweep
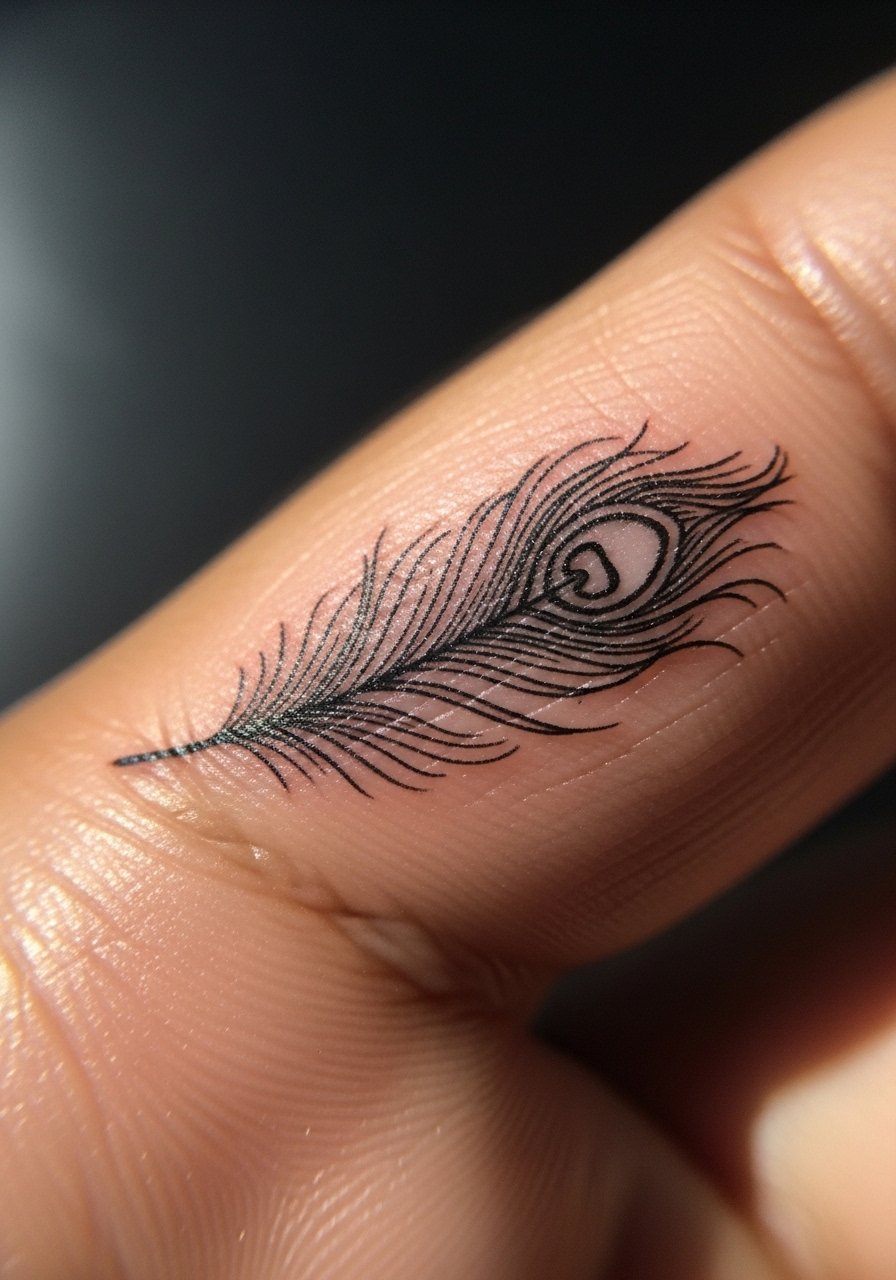
Style/Technique: Single-line feather with micro-details
Pain Level: 1/10
Session Time: 30 to 60 minutes
Best For: Fingers, small visible spots, people wanting subtle detailed accents
Single-line feathers translate well to fingers and smaller placements when artists keep the quill thin and the eye of the feather open. Use spacing of 2 to 4 millimeters inside the eye to avoid the center filling in. Fingers wear differently so expect gradual softening and occasional touch-ups. A tiny jar of tattoo aftercare balm is helpful because hands need reapplication after washing.
Mistake to Avoid: Requesting dense inner detail on a finger piece where friction causes early fading.
7. Decorative Hair Frame On Thigh
Style/Technique: Frame-style hair and floral border
Pain Level: 4/10
Session Time: 1.5 to 3 hours
Best For: Thigh, larger coverable areas, people who want statement pieces
A thigh frame gives a lot of room for ornamental lines without risking quick blur. Keep main border lines at 1 to 2 millimeters and interior details at micro-width. Thigh skin tolerates longer sessions and heals flat, which preserves hairline strokes. I usually ask for two short sessions to let the stencil settle and to check spacing. Pack a breathable bandage and fragrance-free healing cream for the first week.
Mistake to Avoid: Packing too many small motifs into the same frame so negative space disappears after healing.
If any of these ideas have you bookmarking artists and supplies, here are the basics I actually use and recommend.
Fine Line Tattoo Kit
Needles & Cartridges:
- Single-needle tattoo cartridges (~$12-25), for artist reference and practice drawings.
Aftercare & Cleaning:
- Tattoo aftercare balm (~$8-20), fragrance free.
- Green soap (~$6-15), for first-day cleaning.
- Breathable bandages (~$8-18), for transit protection.
Tools & Extras:
- Tattoo transfer paper (~$10-20), for testing placement at home.
- Skin-safe barrier film (~$7-15), keeps ink off clothes while healing.
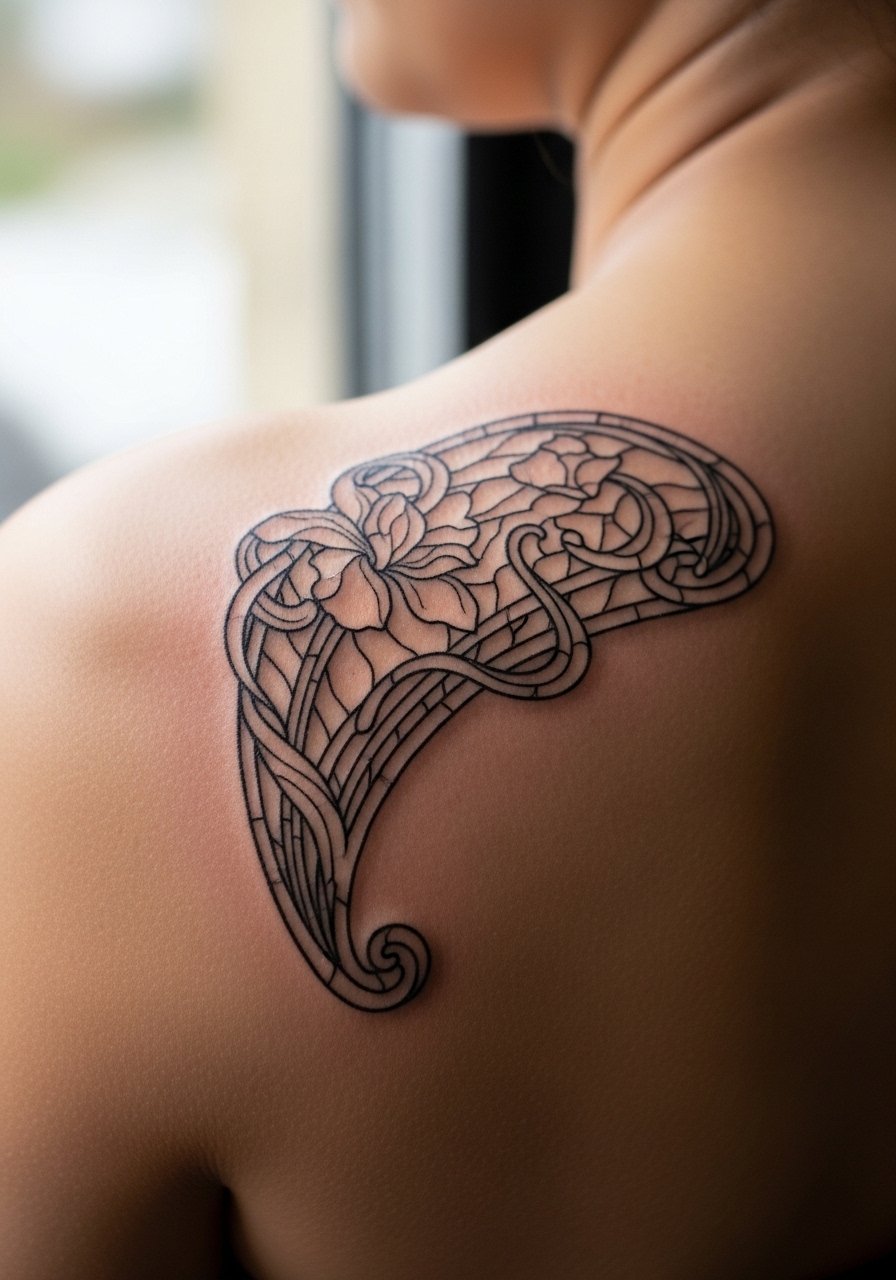
8. Stylized Iris With Frame
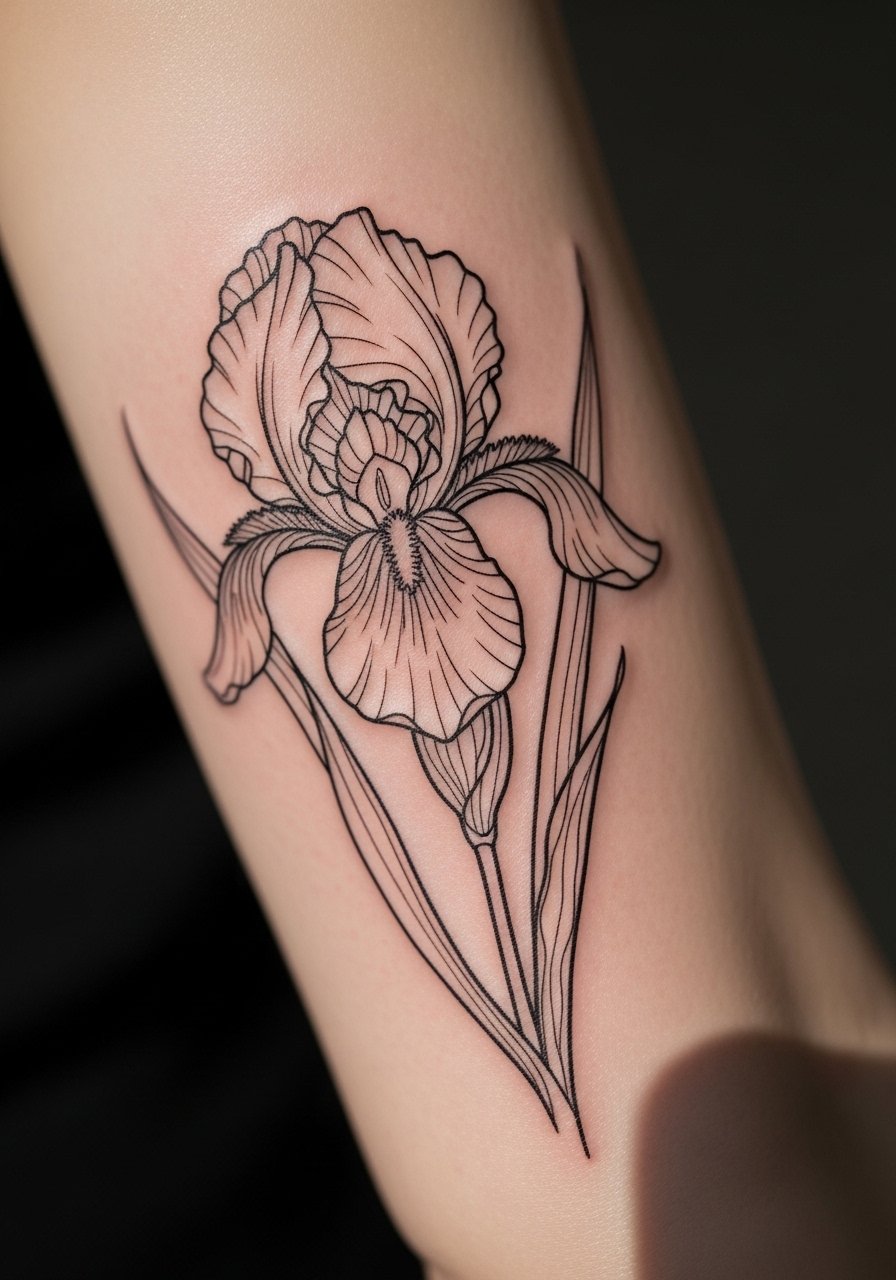
Style/Technique: Floral iris with ornamental frame
Pain Level: 3/10
Session Time: 1 to 2 hours
Best For: Forearm, people wanting visible but refined florals
An iris with a thin ornamental frame reads like an Art Nouveau sketch when petals have 1 to 2 millimeter tapered tips and no dense fill. Ask for light hatch shading rather than solid gray tones to let the skin act as highlight. This design pairs well with wrist or locket motifs, and it is beginner-friendly for artists who know single-pass lines. I carry a small jar of fragrance-free healing cream to calm any spot that gets slightly overworked.
Mistake to Avoid: Asking for heavy gray shading inside petals, which fills in and loses the drawing-like quality.
9. Ribboned Script Banner
Style/Technique: Script banner with hairline ribbons
Pain Level: 3/10
Session Time: 45 minutes to 1.5 hours
Best For: Chest, collarbone, people who want personal text with ornament
A ribbon banner supports script when the ribbon edge remains thin and the lettering stays small but legible. Use single-needle letters at 2 to 3 millimeter height for lowercase scripts to maintain clarity. Choose placement where the ribbon will not be stretched daily. For aftercare, gentle cleansing and a thin layer of healing balm keep the letters sharp during the peel.
Mistake to Avoid: Squeezing long text into a tiny ribbon, which turns into a gray smudge over time.
10. Architectural Stained Glass Accent
Style/Technique: Architectural linework with micro-curves
Pain Level: 5/10
Session Time: 2 to 3 hours
Best For: Upper back, shoulder, people who want decorative panels
Tiny stained glass accents work when the leading lines stay thin and colored panes are left as negative space or minimal tint. Ask for outlines at about 1.5 millimeters and interior separations at 3 to 5 millimeters to keep panes distinct. If you want color, pick thin washes rather than solid fills so the piece keeps a drawn quality. Bring a reference for repeating motifs and a jar of satin healing ointment for the first three days.
Mistake to Avoid: Requesting saturated color in tiny panes, which tends to bleed and lose crispness.
11. Mirror-Faced Muse With Decorative Halo
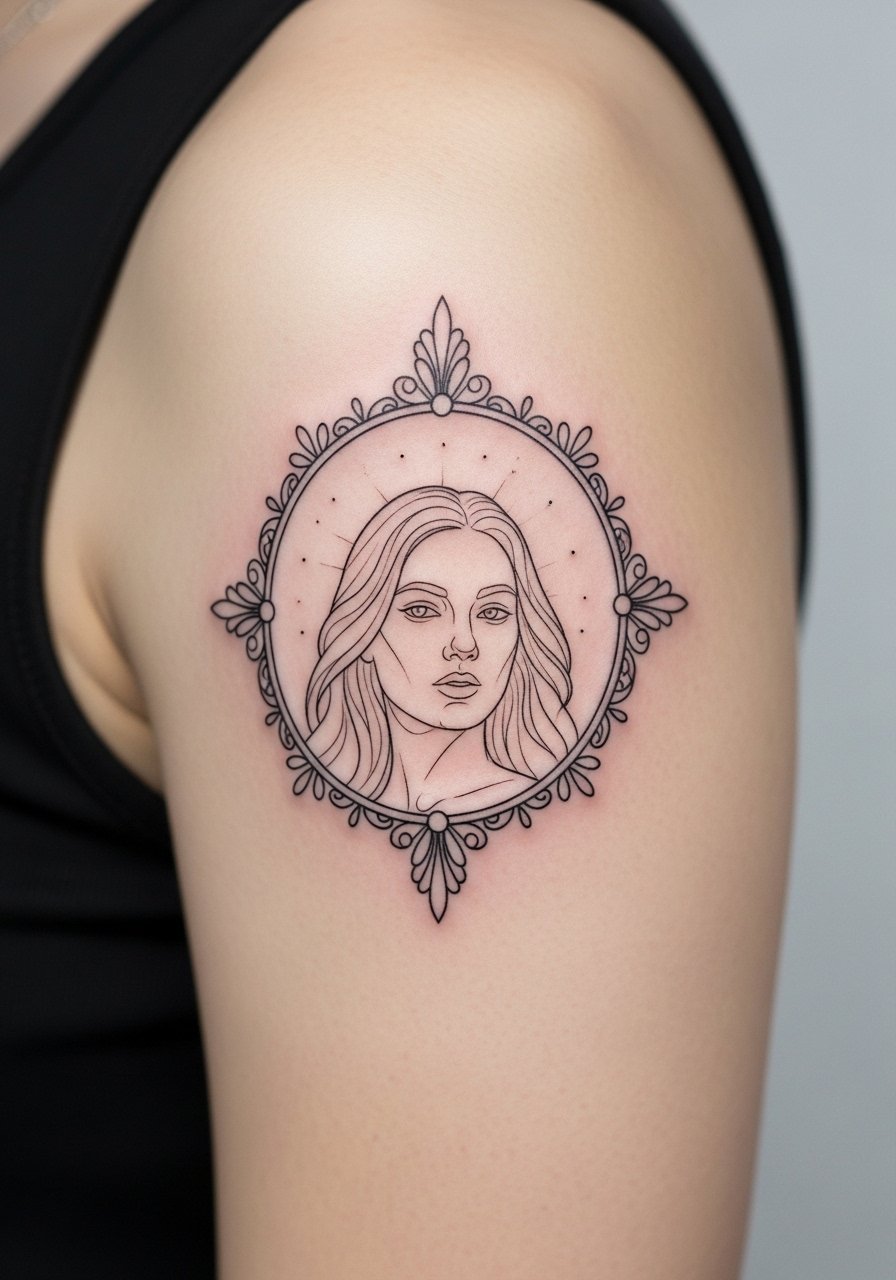
Style/Technique: Portrait with halo ornamentation
Pain Level: 4/10
Session Time: 2 to 4 hours
Best For: Upper arm, people wanting a focal piece that is coverable
A muse portrait with an ornamental halo benefits from defined spacing between face and halo lines, typically 4 to 6 millimeters. Keep halo lines continuous and avoid heavy stippling near the face so skin highlights remain. This design ages well if the portrait lines are single pass and the halo remains airy. I like to bring a small travel first aid kit to studio visits for minor nicks and aftercare needs.
Mistake to Avoid: Letting the halo touch the portrait edge, which can create a muddled outline after healing.
Fine Line Healing Habits
Thin layers beat one heavy layer most of the time. Applying a thin smear of tattoo aftercare balm every eight hours keeps skin supple without suffocating it.
Keep tattoos out of direct sun for at least four weeks. A sunscreen stick for sensitive areas is easy to carry and reapply, especially for collarbones and wrists.
When testing placement at home, use tattoo transfer paper and photograph it at the same angle your artist will work from to confirm scale.
Most finger and hand work needs touch-ups. A lightweight fragrance-free healing cream during the first month helps reduce scabbing and preserves thin strokes.
