
I almost did not try no-bake desserts for summer. It sounded too simple to be impressive. Then I made a citrus cheesecake in July that people actually fought over, and I was hooked. This guide is the version I arrived at after three messy tries and one late-night rescue frosting. It keeps things fast, cools reliably in hot kitchens, and uses only a handful of pantry ingredients so you can make dessert without turning on the oven.
This guide covers six reliable no-bake summer desserts you can mix, chill, and serve. Expect 20 to 40 minutes of active time per recipe, chill windows of 4 to 8 hours, and easy swaps for dairy-free or gluten-free diets. I have tested this three times to get the chilling and texture right, and I admit I am still not sure this is the best way. It has worked every time for house guests, pool parties, and a Tuesday night when I did not feel like baking.
What You'll Need
Core Ingredients:
- Cream cheese block (~$3-$8)
- Heavy cream or coconut cream (~$2-$6)
- Graham crackers or gluten-free crackers (~$3-$5)
- Granulated sugar or a 1:1 sugar substitute (~$3-$6)
- Gelatin powder or agar-agar for vegan option (~$6-$12)
- Dark chocolate or cocoa powder (~$3-$8)
- Fresh fruit: berries, peaches, citrus (local grocery)
Equipment:
- Mixing bowls set (~$15-$30)
- Hand mixer (~$20-$60)
- Silicone molds or popsicle trays (~$8-$18)
- Small mason jars or dessert glasses (~$10-$20)
- Microplane zester (~$8-$15)
Optional Upgrades:
- Ice cream maker (~$40-$150)
- Electric whisk attachment (~$15-$40)
Step 1: Build a Foolproof No-Bake Crust
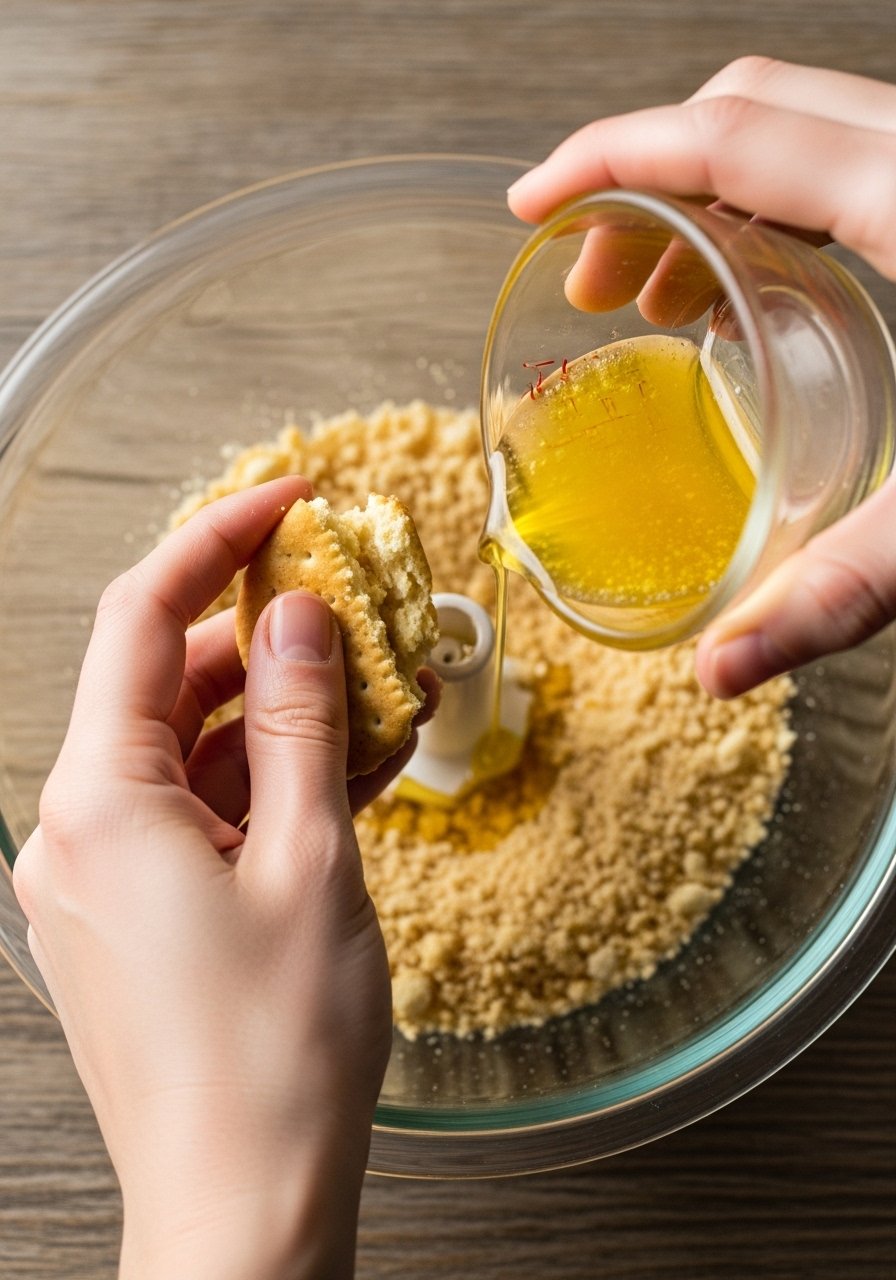
Pull the crust together first. Pulse 1 1/2 cups crushed crackers with 5 tablespoons melted butter until the texture is like damp sand. Press into the bottoms of jars or a 9-inch springform tin using the bottom of a measuring cup to compact it. Chill for at least 20 minutes so it firms up. This step uses the principle that a well-compressed base prevents sogginess later, so press firmly without crushing the jar. I almost skipped compacting once and the filling pulled right through.
Mistake to Avoid: Not compressing the crust firmly will let the filling slide and make the dessert look sloppy.
Step 2: Quick No-Bake Cheesecake Filling
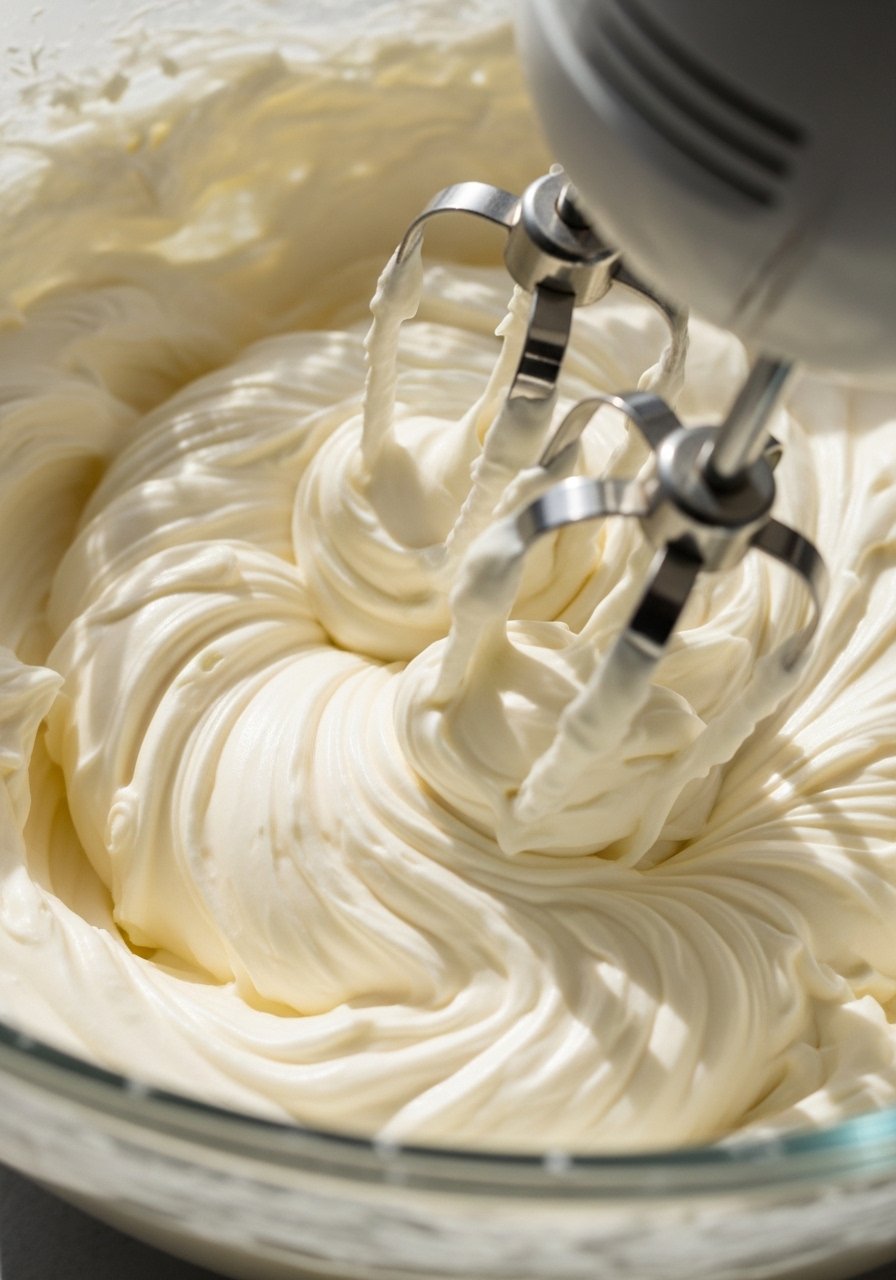
Most people start by overwhipping. Start with room-temperature 8 ounces cream cheese, beat until smooth, then add 1 cup heavy cream and 1/3 cup sugar and whip to soft peaks, about 2 to 3 minutes. For a firmer set, dissolve 1 teaspoon gelatin in 1 tablespoon warm water and fold it in while warm. That gelatin step is the stabilizer that keeps slices clean and creamy. I tried skipping gelatin and the cheesecake sagged after an hour. If you want dairy-free, use coconut cream plus 1 teaspoon agar-agar dissolved in hot water.
Mistake to Avoid: Folding in room-temperature gelatin that has set will create lumps in the filling.
Step 3: Bright Fruit Granita for Contrast
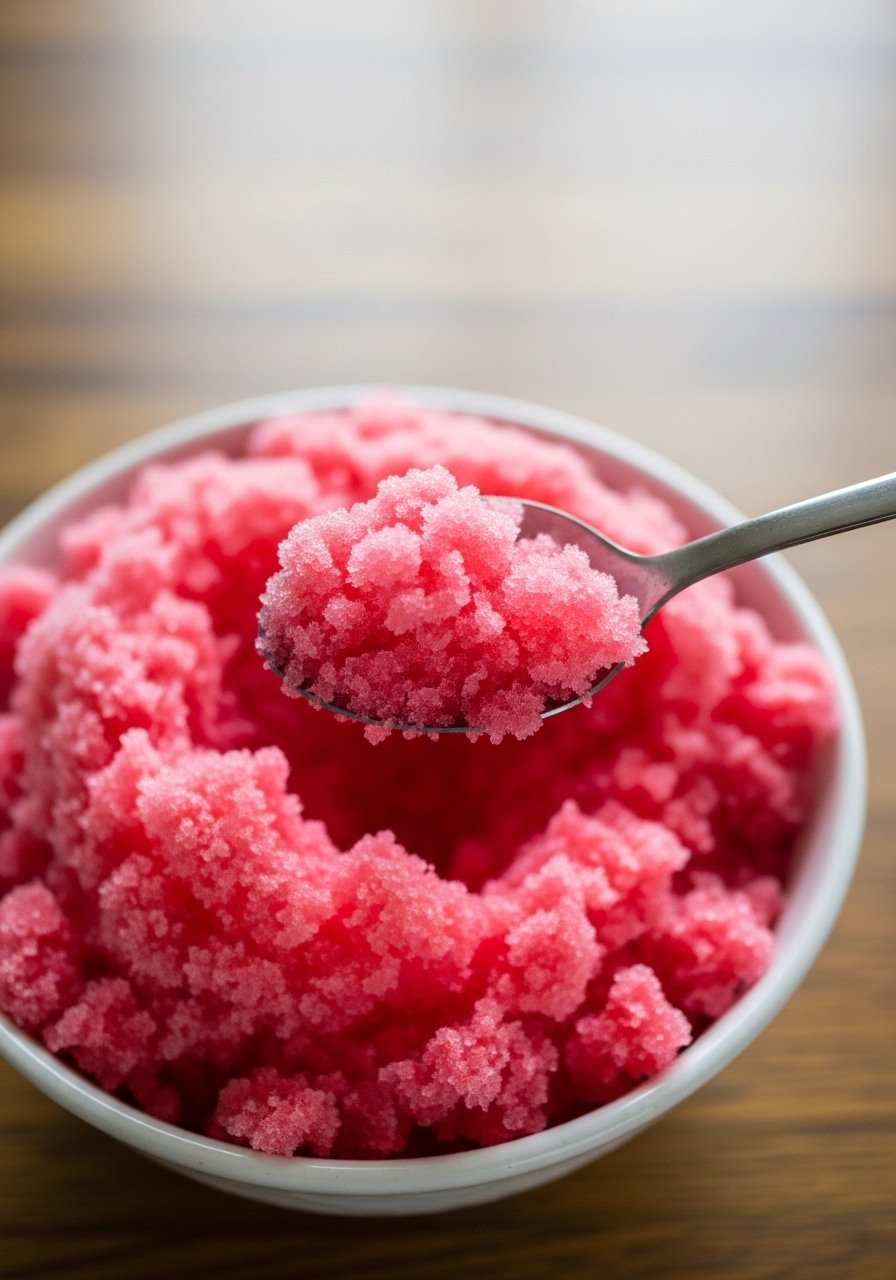
This is where the dessert starts to look special. Make a 1:1 simple syrup using 1 cup sugar and 1 cup water, heat until dissolved, cool, then blend with 2 cups fruit puree. Freeze the mixture in a shallow pan and scrape with a fork every 30 minutes until grainy, usually 3 to 4 scrapes over 2 to 3 hours. The grainy texture is the sensory win, crisp and cool to the tongue, and it contrasts the silky filling. A citrus squeeze or a pinch of salt brightens the whole thing. I swapped mango for strawberries for a party and it vanished.
Mistake to Avoid: Freezing the puree in a deep container will create a solid block instead of flakeable granita.
Step 4: Frozen Yogurt Bark for Quick Serving
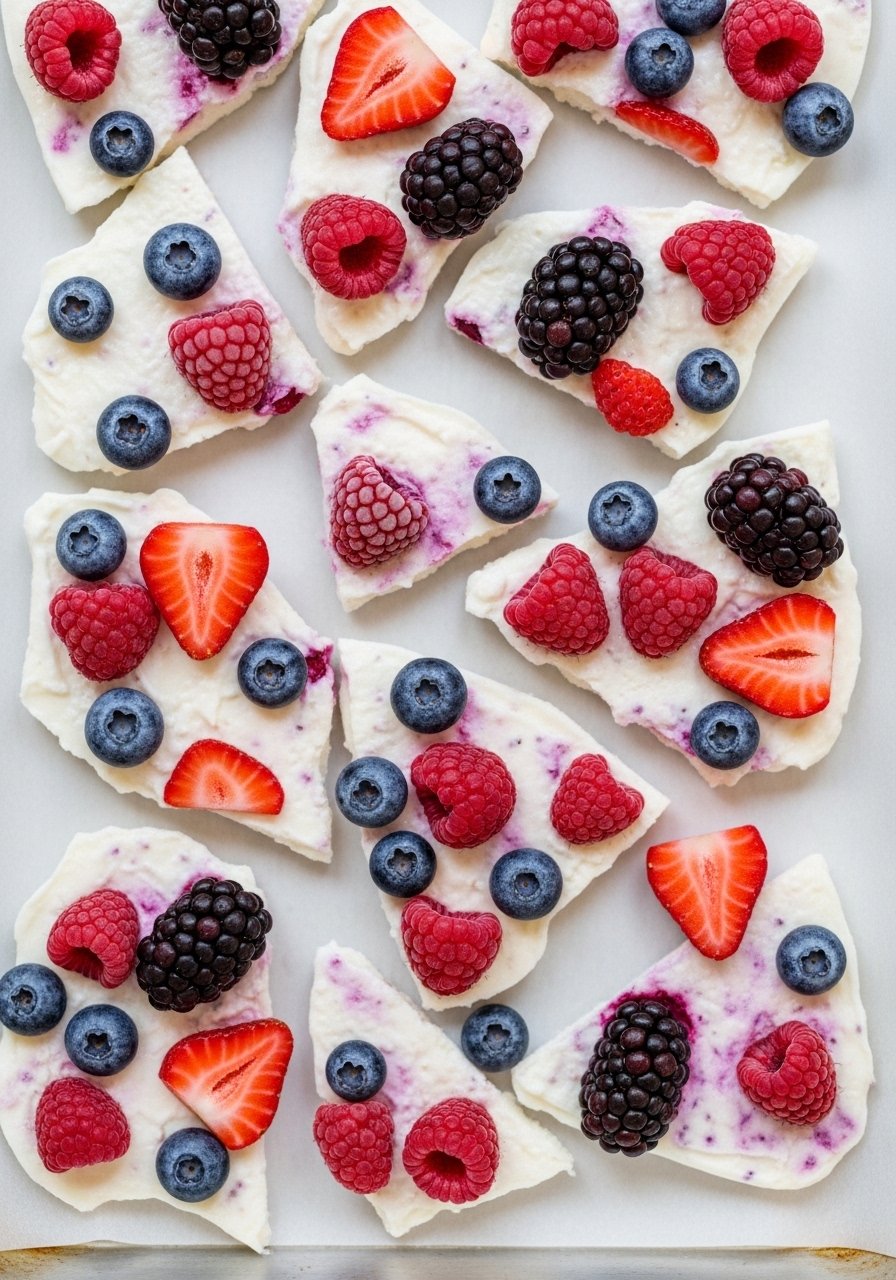
I used to overthink bark toppings. Spread 2 cups Greek yogurt mixed with 2 tablespoons honey onto a parchment-lined tray until about 1/4 inch thick. Scatter chopped fruit and a handful of toasted nuts or granola, then freeze for 4 to 6 hours until solid. Break into pieces for a crunchy-creamy snack. Bark stores well in a freezer bag and weighs almost nothing when you toss a handful into a picnic cooler. If you need dairy-free, use thick coconut yogurt and a little extra sweetener.
Mistake to Avoid: Spreading the yogurt too thin will cause pieces to melt immediately when served outdoors.
Step 5: Chocolate Mousse That Sets in the Fridge
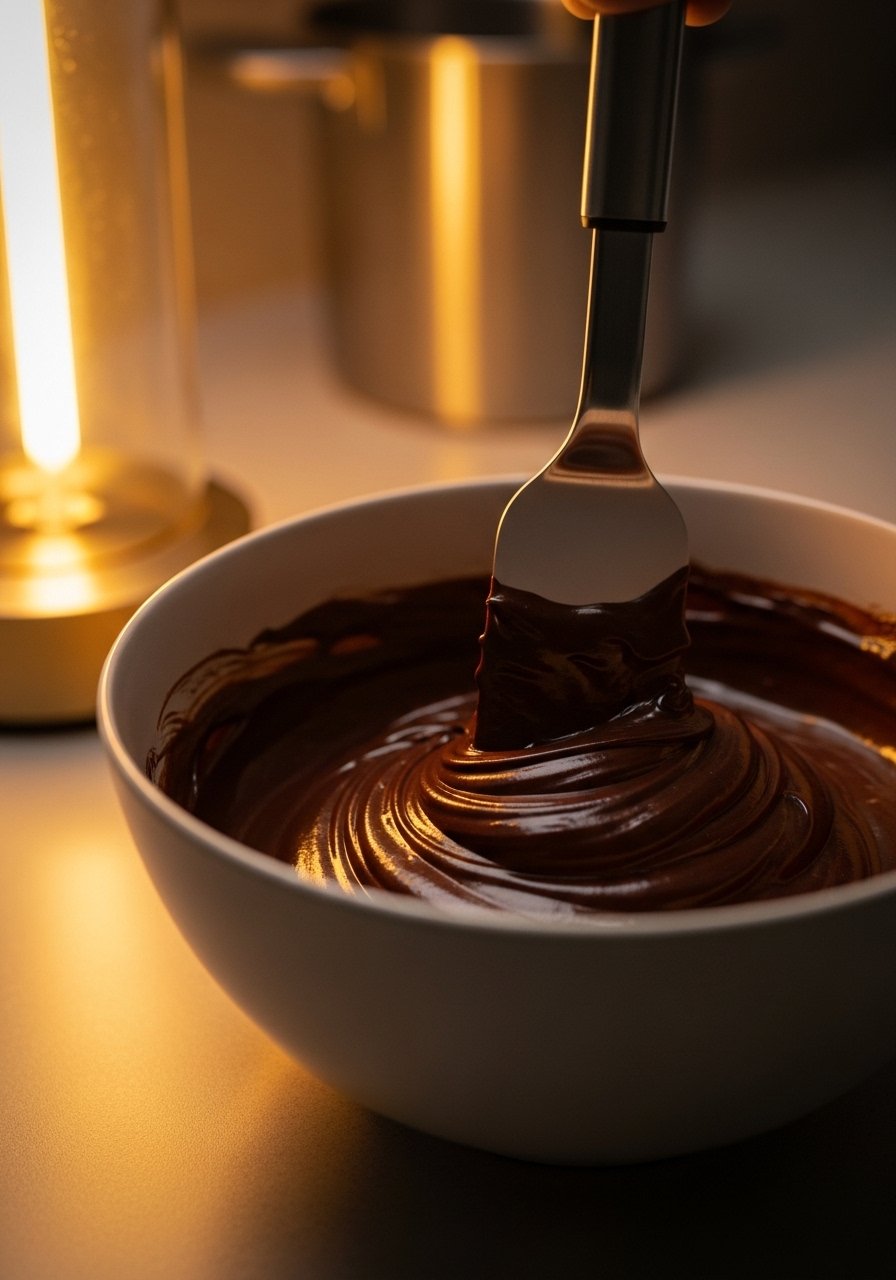
This part feels like cheating but it works. Melt 6 ounces dark chocolate over a bain-marie and let cool slightly. Fold into 1 cup softly whipped cream and 1 lightly beaten egg yolk for silkiness. For safety and extra stability, use pasteurized egg products or skip yolk and add 1 teaspoon dissolved gelatin. Chill at least 2 hours. The principle here is temperature control: warm chocolate folded into cool cream sets into a glossy, airy mousse without overworking. The mouthfeel is silkier if you stop at soft peaks.
Mistake to Avoid: Folding very hot chocolate into whipped cream will deflate it and produce a dense result.
Step 6: Assemble Layered Parfaits and Chill
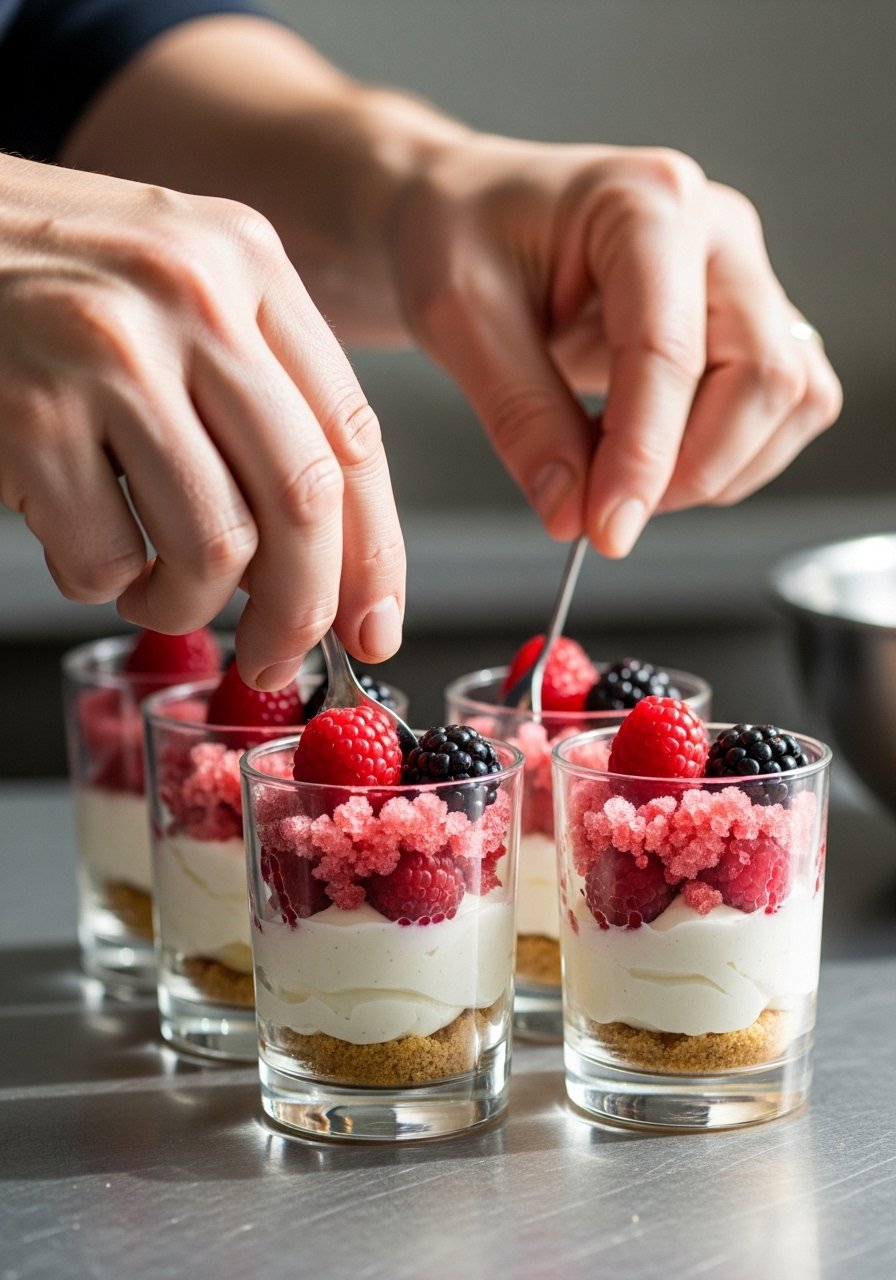
Measure as you go for neat layers. Start with 2 tablespoons crust, add 1/3 cup cheesecake filling, then a spoon of granita or a dollop of mousse. Repeat once. Chill 4 to 8 hours, overnight preferred for clean slices and time for flavors to marry. A final sprinkle of zested citrus or flaky sea salt makes the flavors pop. I almost skipped overnight chilling the first time and regretted it. When assembling for a crowd, make components ahead and keep granita frozen separate until service.
Mistake to Avoid: Trying to serve parfaits before the recommended chill time will give you a runny mess.
Cooking Tips
Make-ahead plan: Prepare crusts and creamy fillings a day ahead and store covered in the fridge. Reheat no part, just assemble with frozen components at service time using a set of mason jars (~$10-$20).
Dairy-free swap: Replace heavy cream with canned coconut cream and use agar-agar (~$6-$12) for setting, dissolving it in hot water before folding in.
Freezer management: Use a shallow metal pan for granita to speed freezing, and a silicone spatula (~$6-$12) to scrape cleanly.
Texture balance: Aim for one crunchy, one creamy, and one icy component per serving. The contrast is what makes a no-bake dessert feel complete.
Portion and scaling: Double the recipes by keeping the same ratios. For crusts use a 1:3 butter-to-cracker ratio by volume for reliable results.
Shortcuts that work: Use store-bought cookie crumbs for crusts and frozen fruit purée to avoid extra prep, and keep a hand mixer (~$20-$60) on the counter for quick whipping.
Presentation trick: Top each jar with a tiny mint leaf or a thin citrus twist right before serving to read as fresh, not fussy. A microplane zester (~$8-$15) makes this quick.
Most people end up spending between $500 and $800 when they finally commit to refreshing a room. I know that seems unrelated, but the point is small upgrades like a good set of jars or a sturdy mixer change the way you approach cooking. After making this for 20+ weeknights I keep a stash of frozen granita and bark in the freezer for emergencies.
Your First Batch
Make one recipe start to finish this weekend and learn the timing. Use the crust press and chill times above and treat the first attempt as practice. The real win is learning how long your fridge and freezer take to set things, then adjusting freeze windows by 30 minutes. Pack leftovers in airtight containers and label with the date. You will get faster and more confident with each batch, and serving a cold dessert on a hot day will always feel like a small celebration.
