
I kept making ice cream that looked fine in the bowl and turned into a freezer brick the next day. After ruining two batches with icy crystals and one batch that split because I heated the custard too fast, I learned which swaps actually matter. These nine no-machine recipes are the ones that survived my clumsy first attempts and the tasting-panel verdicts from friends who call themselves honest.
If you want weeknight desserts that feel a little special, these recipes fit. Most are low-skill and use staples, a few need a whisk or a blender. Budget is modest, about $1 to $3 per serving for pantry-forward versions and $5 to $8 for richer custard styles. I tested this three times to get the timing right on the custard-based ones.
1. No-Churn Classic, Sweetened Condensed Base

The simplest reliable base is one 14-ounce can of sweetened condensed milk folded into 2 cups of heavy cream whipped to soft peaks. The sugar and milkfat in the condensed milk keeps the mix scoopable straight from the freezer, so you skip machines. It tastes rich without needing eggs, so it fits home cooks who want a quick dessert and people who avoid raw eggs. Budget and time: under $10 total, 10 minutes prep, chill optional. Use hand-mixer-with-beaters if you do not have a whisk.
Mistake to Avoid: Overwhipping the cream until it goes stiff, which makes the final ice cream grainy.
2. Stove-Top Custard, Silky French Base

This is the traditional egg-yolk custard that yields dense, creamy texture. Warm 2 cups whole milk and 1 cup heavy cream, temper 4 egg yolks with 3/4 cup sugar, then cook gently until the mixture coats the back of a spoon. Cook to about 175 to 180 degrees F, then cool and churn by hand-freeze method. It takes a little attention and a thermometer, but it rewards with the classic mouthfeel restaurants have. Works for weekend desserts when you have an hour. I tested this three times to lock in the right cook temperature. Use an instant-read-thermometer.
Mistake to Avoid: Heating the custard too quickly, which cooks the yolks into curds rather than a smooth base.
3. Ice-and-Salt Bag Shake for Soft Serve
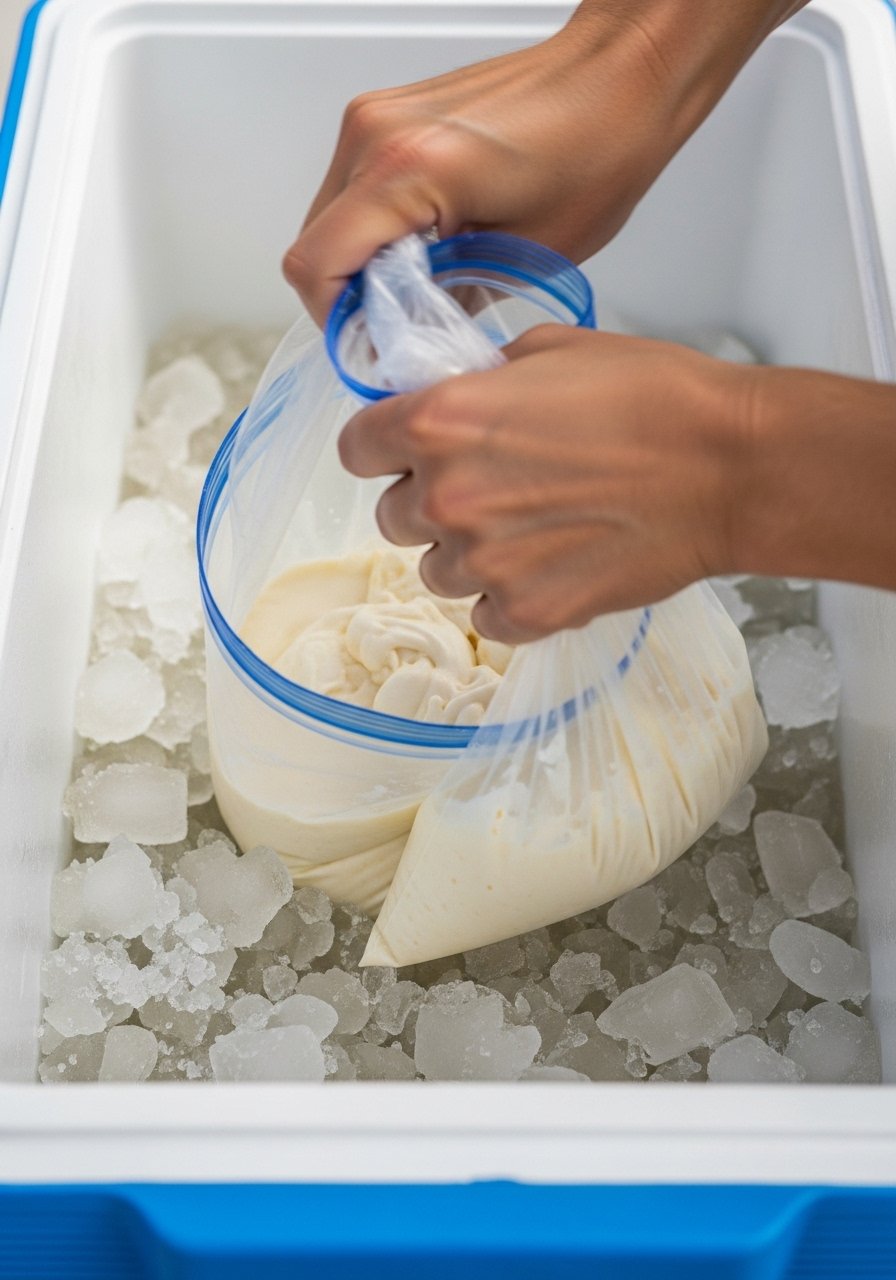
This old-school method gives soft-serve texture without a machine. Put the base in a sealed quart bag, double-bag it, then pack crushed ice around it with a generous handful of rock salt in a large cooler or bowl. Shake and rotate the bag for 8 to 12 minutes until it firms to a spoonable soft-serve. It is great for kids’ parties and portable desserts, fits small-batch needs, and requires only ice and salt. Use heavy-duty gallon-zip-top-bags for a leak-safe seal.
Mistake to Avoid: Not double-sealing the bags, which lets salty water in and ruins the flavor.
4. Frozen Fruit Sorbet, Blender Shortcut
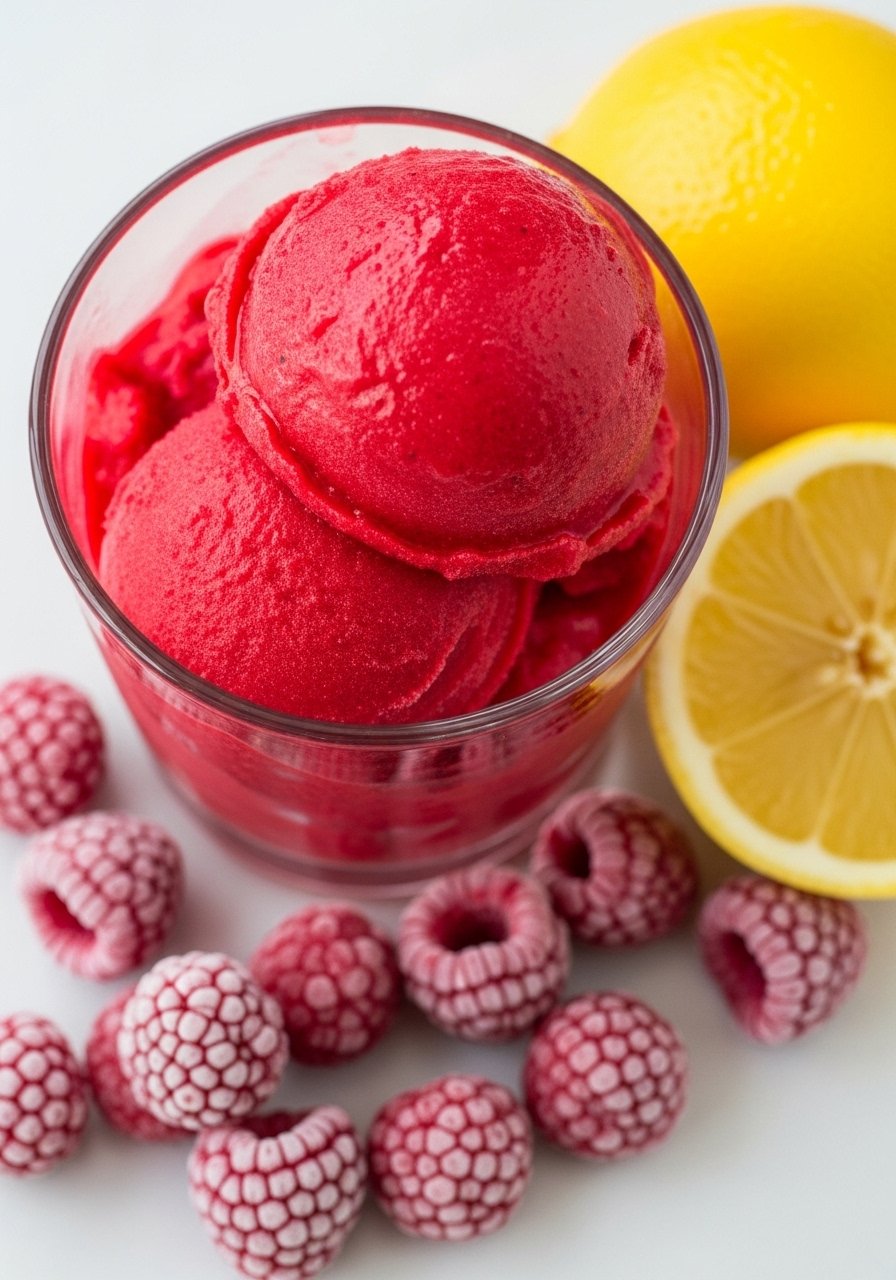
For a dairy-free option, pulse 4 cups of frozen fruit with 1/2 cup simple syrup and 1 tablespoon lemon juice in a high-speed blender until smooth. If the blender struggles, let fruit sit for two minutes then pulse in short bursts. A teaspoon of vodka or a tablespoon of light corn syrup keeps the sorbet softer in the freezer, useful when you want scoopable texture. This fits vegan diets and is quick for 2 to 4 servings. Use a high-speed-blender for the smoothest result.
Mistake to Avoid: Running the blender on high continuously, which warms the fruit and makes the mix icy when refrozen.
5. Coffee or Matcha Sweetened Condensed Flip
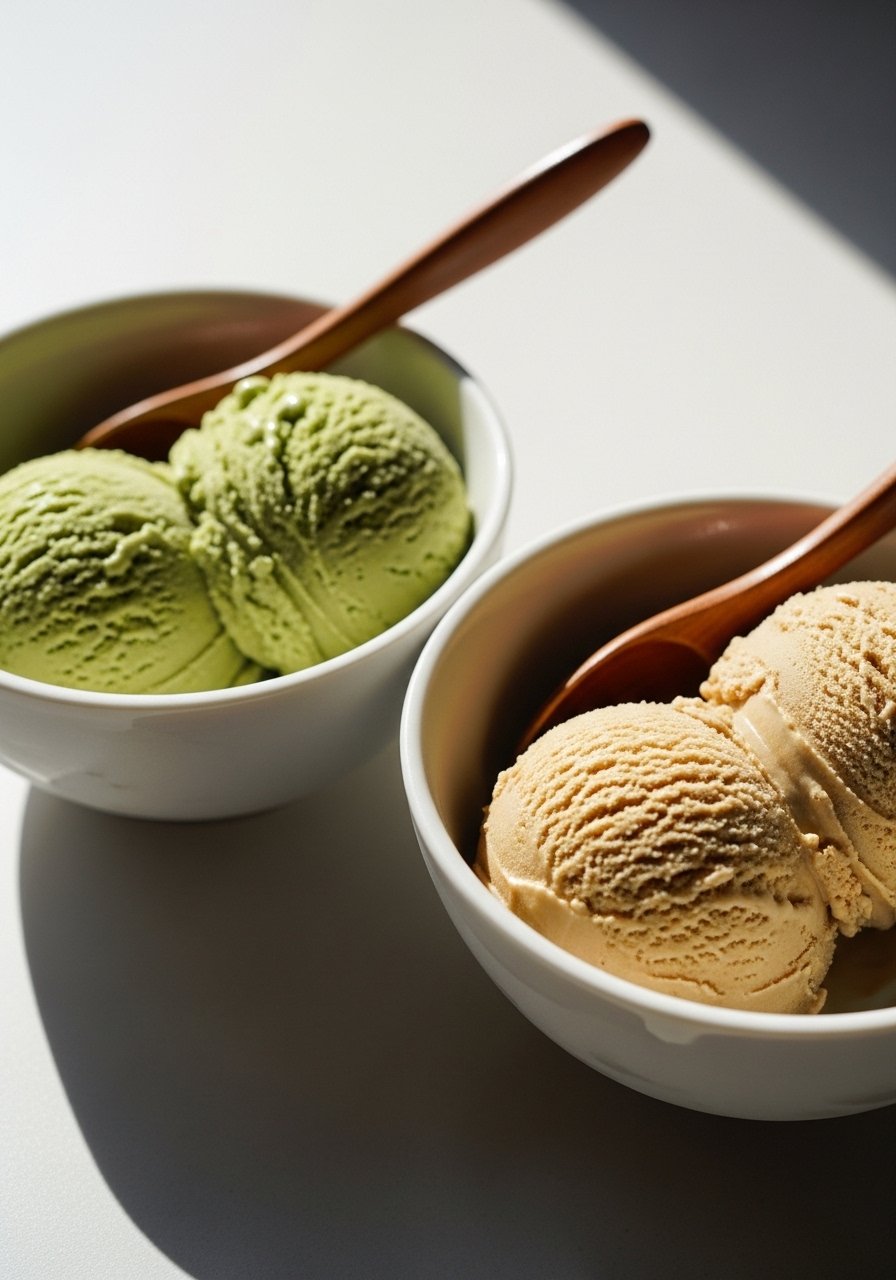
Take the no-churn condensed milk base and flavor it with 2 tablespoons instant espresso dissolved in 1 tablespoon hot water, or 2 teaspoons matcha whisked into 1 tablespoon warm water. Fold into the base gently for even color and flavor. The condensed milk keeps the texture smooth while the dissolved powder gives authentic flavor without grain. This is an easy upgrade for adults or guests who want a grown-up scoop. Budget-friendly and about 10 minutes. Try instant-espresso-powder for the coffee twist.
Mistake to Avoid: Adding hot water or hot espresso directly to cold cream, which can cause separation.
6. Coconut Milk Vegan Base with Cornstarch Stabilizer

Use two 13.5-ounce cans of full-fat coconut milk, 1/2 cup maple syrup, and a cornstarch slurry of 1 tablespoon cornstarch plus 2 tablespoons cold water. Heat the milk and maple syrup, whisk in the slurry, simmer briefly to thicken, cool, then freeze in a shallow pan, whisking every 30 minutes. The cornstarch cuts the icy mouthfeel that coconut milk can give. This fits dairy-free diets and keeps scoopable without eggs. Use full-fat-coconut-milk on the shopping list.
Mistake to Avoid: Freezing the mix straight from the stove without chilling, which traps heat and makes large ice crystals.
7. Freeze-and-Whisk Chunky Mix-In Technique
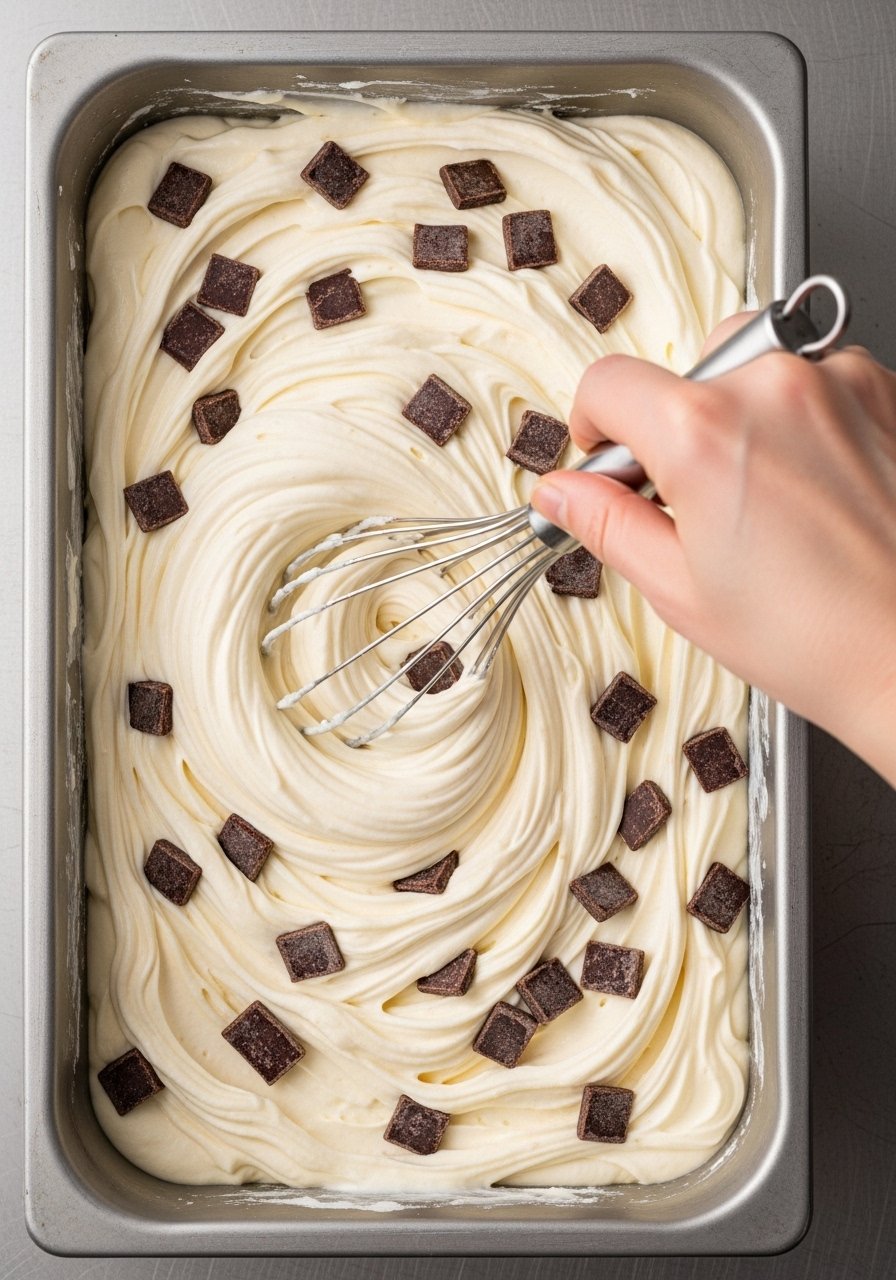
If you like chunks, this manual churn works well. Pour a base into a shallow metal pan, freeze for 30 minutes then whisk vigorously to break crystals, repeat every 30 minutes for about three hours until almost set. Stir in crushed cookies, fruit, or fudge in the last whisk so mix-ins stay suspended. This method is forgiving for scaled batches and avoids having mix-ins grind in a machine. Works for medium-skill home cooks and yields evenly distributed texture. Use an airtight-container to store finished ice cream.
Mistake to Avoid: Adding mix-ins at the first freeze, which buries them and makes beating them out impossible.
8. Quick Frozen Yogurt, Tangy Weeknight Scoop

Stir 3 cups full-fat Greek yogurt with 1/2 cup honey and 2 tablespoons milk for creaminess, then freeze in a shallow dish. For best texture, stir firmly once after 45 minutes and again an hour later. Greek yogurt gives a tangy, creamy result that is lower in fat and faster to set than custard. It scales easily from 2 to 8 servings and reheats by letting sit five minutes at room temperature for easy scooping. Use plain-Greek-yogurt.
Mistake to Avoid: Using nonfat yogurt, which freezes rock hard instead of scoopable.
9. Granita and Shaved-Ice Style Frozen Dessert

Granita is a frozen dessert you scrape, not scoop, so icy crystals are the point. Mix 2 cups water with 1 cup sugar and citrus zest, dissolve, add 1 cup juice, freeze in a shallow pan. Scrape with a fork every 30 minutes toward the end to create distinct flakes. It is fast, forgiving, and excellent for hot afternoons or adult palates when boozy additions are folded in. This method fits those who like textured ice desserts and it takes under three hours start to finish. Use a metal-baking-dish for even freezing.
Mistake to Avoid: Freezing too deep in a tall container, which prevents even scraping and yields hard blocks.
Your Pantry and Equipment
- Honestly the most useful tool, an instant-read-thermometer (~$12-25). It stops a custard from curdling.
- Hand mixer with beaters (~$20-45). For whipping cream in the no-churn base.
- High-speed-blender (~$60-150). Useful for sorbets and silky purées.
- Gallon-zip-top-bags (~$8-15). For the bag-shake method and leak safety.
- Airtight-container-set (~$15-30). Keeps ice cream from fridge odors and freezer burn.
- Full-fat-coconut-milk (two 13.5-ounce cans, ~$4-8). For vegan bases that still feel rich.
- Metal-baking-dish (~$15-30). Shallow pans freeze faster for granitas and manual churns.
- Instant-espresso-powder (~$8-20). For quick coffee-flavored batches.
Cooking Tips Worth Stealing
Chill everything first. Put your bowl and beaters in the fridge for 15 minutes before whipping. A cold bowl makes cream whip faster and flakier, and silicone-bowl-covers help if you prep ahead.
Dissolve powders in a small amount of warm liquid, then cool them before adding to dairy. That is the easiest way to avoid grainy specks from undissolved matcha or coffee. Try a small-glass-jar for mixing.
Use a shallow pan for freezing, not a tall container. Shallow means faster freeze time and smaller crystals. A metal-sheet-pan works better than a deep bowl.
If you want softer texture, add one tablespoon of light corn syrup or a teaspoon of vodka per pint. Alcohol lowers the freezing point just enough to keep scoops pleasant, and light-corn-syrup is pantry-stable.
