
I still remember the nervous rush before my first meaningful piece — a small, simple symbol that fit my rib cage and a story I loved. Since then I've collected designs and ideas from studio chats and late-night sketches; I've noticed roughly 40% of people I talk to prefer subtle placements, and healing usually takes 2–3 weeks for most clients. This guide shares real ideas that age well and sit comfortably with everyday life.
Designs here focus on clarity, placement, and longevity: simple lines, micro-realism, script, and symbolic motifs that work across skin tones and ages. I cover placements from fingers to ribs, session time estimates, and why certain styles last longer. Budget varies — tiny pieces can be $60–$200, larger sessions $150–$600 — and I include aftercare pointers so your ink settles cleanly.
Minimal Crescent Moon
Style/Technique: Fine-line minimalism
Pain Level: 3/10
Session Time: 0.5–1 hour
Best For: First-timers, wrist/behind-ear placements
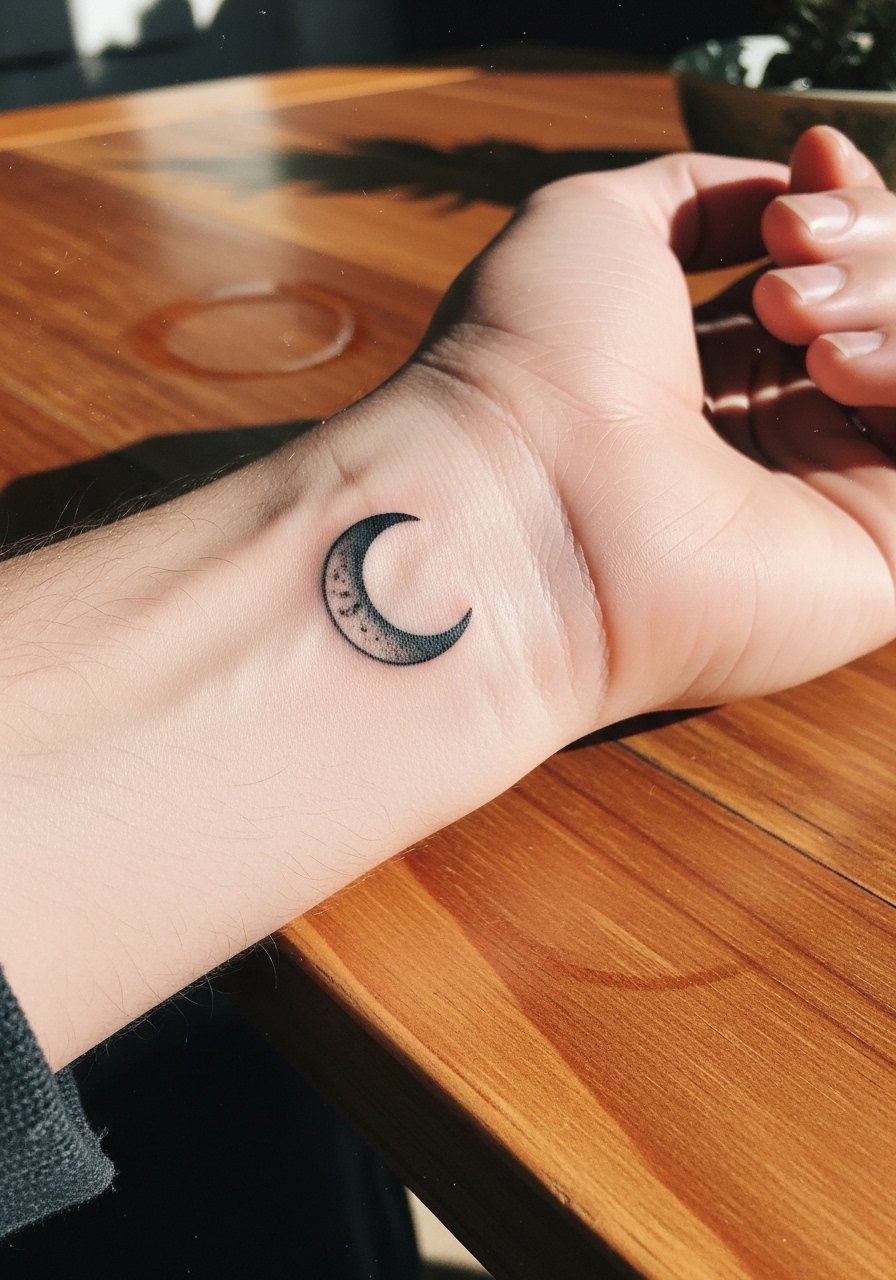
I love the crescent moon for its instant readability and symbolic weight without bulk. It works well in a single fine-line pass, which ages gracefully if placed on low-friction zones like the inner wrist or collarbone. Consider a lightweight cotton sleeve when healing and a gentle fragrance-free cleanser like tattoo-aftercare-balm to keep it hydrated. I’ve noticed small celestial pieces remain popular with clients in their 20s and 30s.
Mistake to Avoid: Pressuring for overly dense shading in a micro moon — it blurs over time.
Tiny Constellation Cluster
Style/Technique: Dotwork & micro-line
Pain Level: 2/10
Session Time: 0.5–1 hour
Best For: Fingers, ankle, behind ear
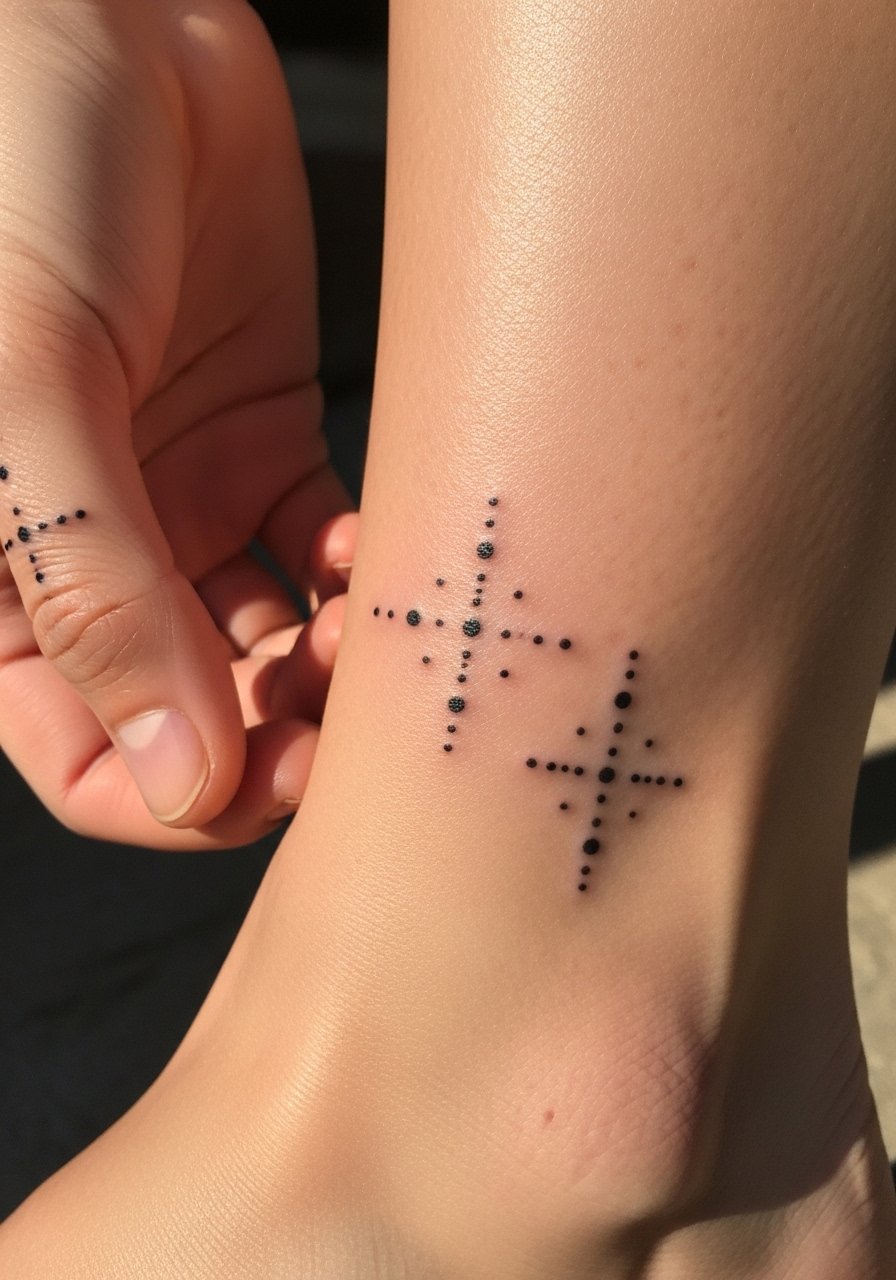
A tiny constellation reads like a private map — place it where you can glance at it. I suggest spacing dots conservatively so individual stars don’t merge as the ink spreads. Use a light aftercare salve like healing-salve and avoid tight rings or socks while it flakes. Constellations pair beautifully with small script or a single accent star for a layered story.
Mistake to Avoid: Crowding stars too close; give each dot breathing room.
Single-Line Portrait Silhouette
Style/Technique: Continuous-line minimal portrait
Pain Level: 4/10
Session Time: 1–2 hours
Best For: Forearm, upper arm, chest
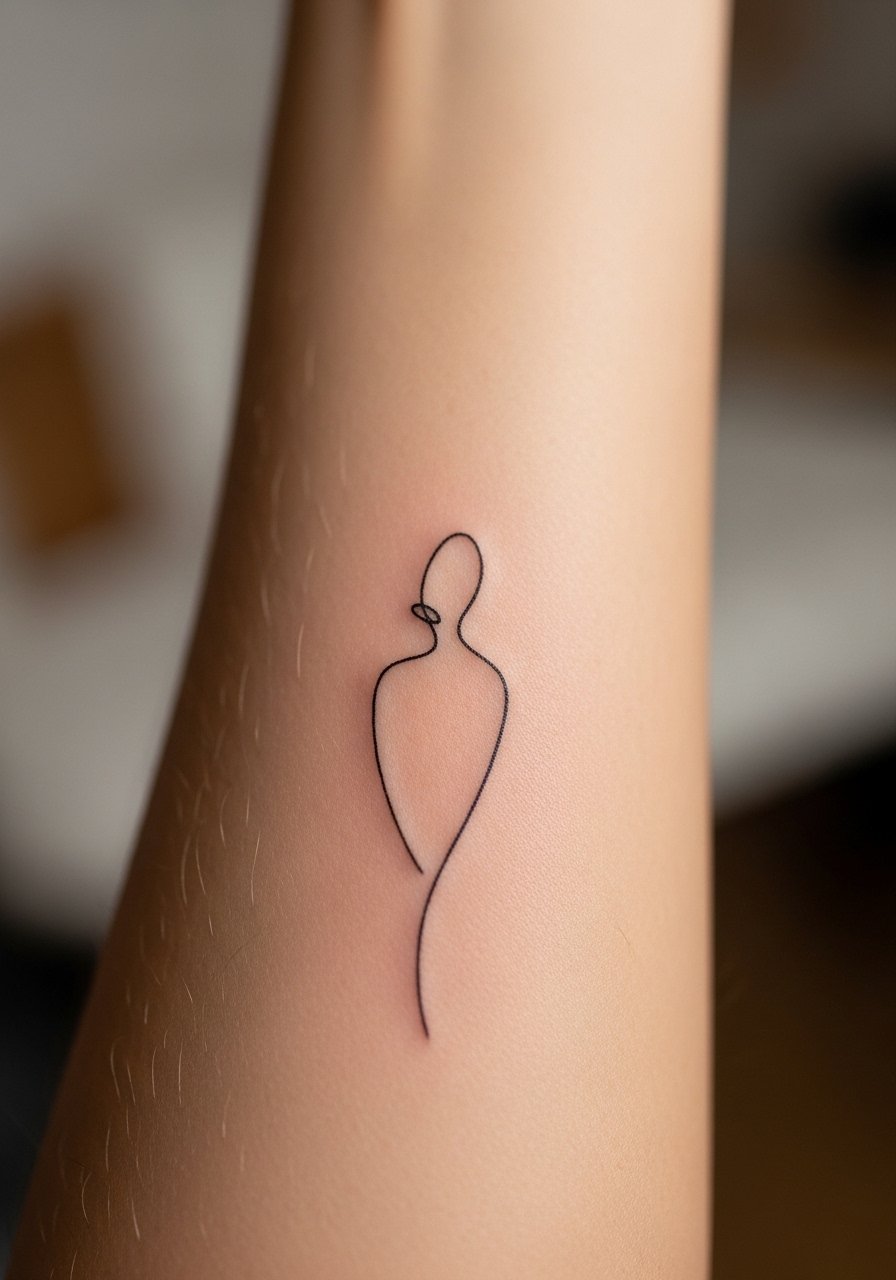
A single-line silhouette captures a face or pet outline with surprising emotion. I tell clients it’s about gesture more than detail — find an artist who excels in confident, uninterrupted strokes. Keep size moderate (2–3 inches) to preserve line integrity and consider sterile-tattoo-needles as a reminder to choose a clean, pro studio. These pieces age well when lines aren’t too hair-fine.
Mistake to Avoid: Shrinking the design too small — continuous lines need space to breathe.
Small Roman Numerals
Style/Technique: Classic script/numbering
Pain Level: 2/10
Session Time: 15–45 minutes
Best For: Wrist, behind ear, inner finger
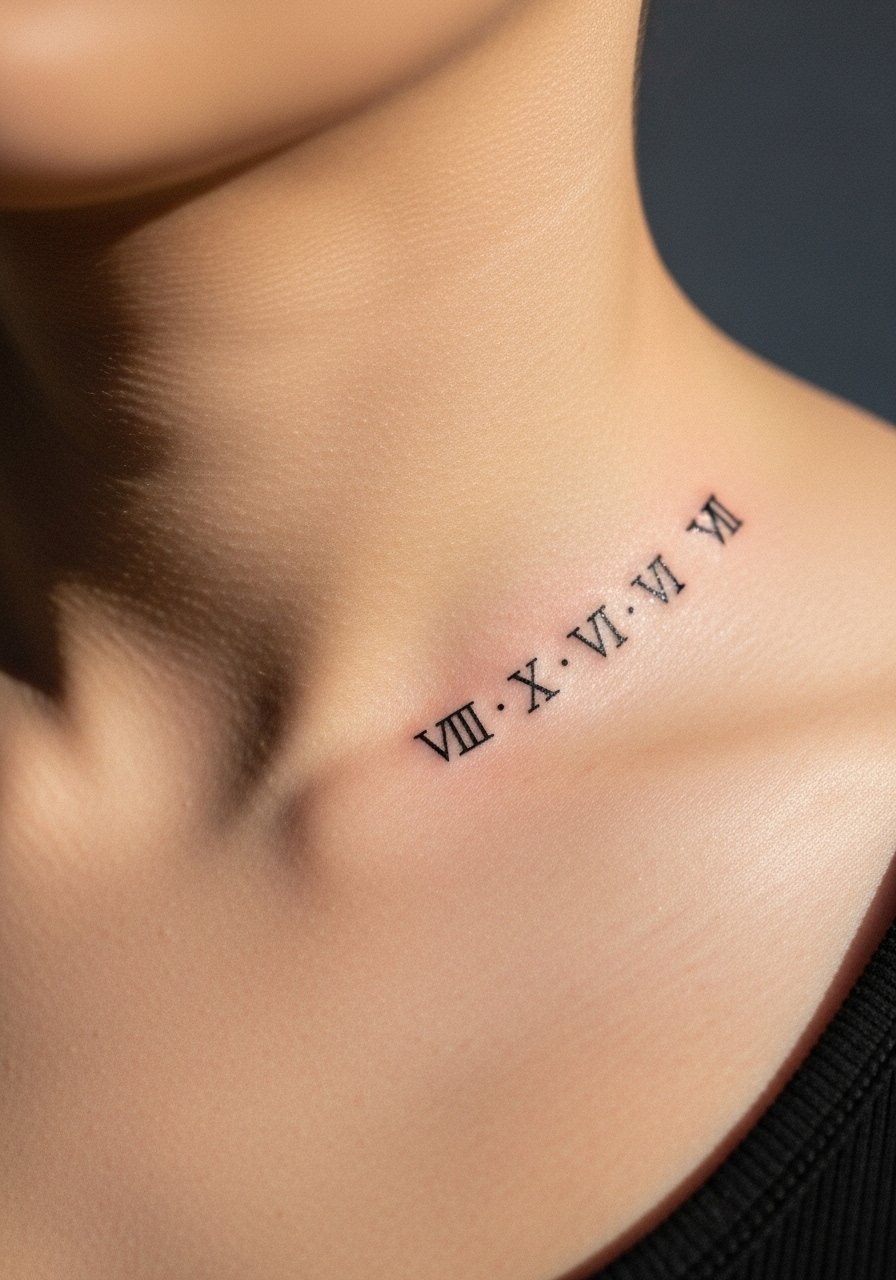
Roman numerals are timeless and discreet. I recommend bold-enough strokes so digits don’t blur — around 1/16–1/8 inch line width. They pair well with a light clear-bandage while healing and minimal rubbing from clothing. For touch-ups later, budget for a quick session; I’ve noticed clients often return after a year for refinement. Protect them from sun with a non-greasy SPF once healed.
Mistake to Avoid: Picking an overly delicate font that fills in quickly.
Micro Floral Stem
Style/Technique: Micro-realism botanical
Pain Level: 3/10
Session Time: 30–60 minutes
Best For: Rib, ankle, behind-the-knee
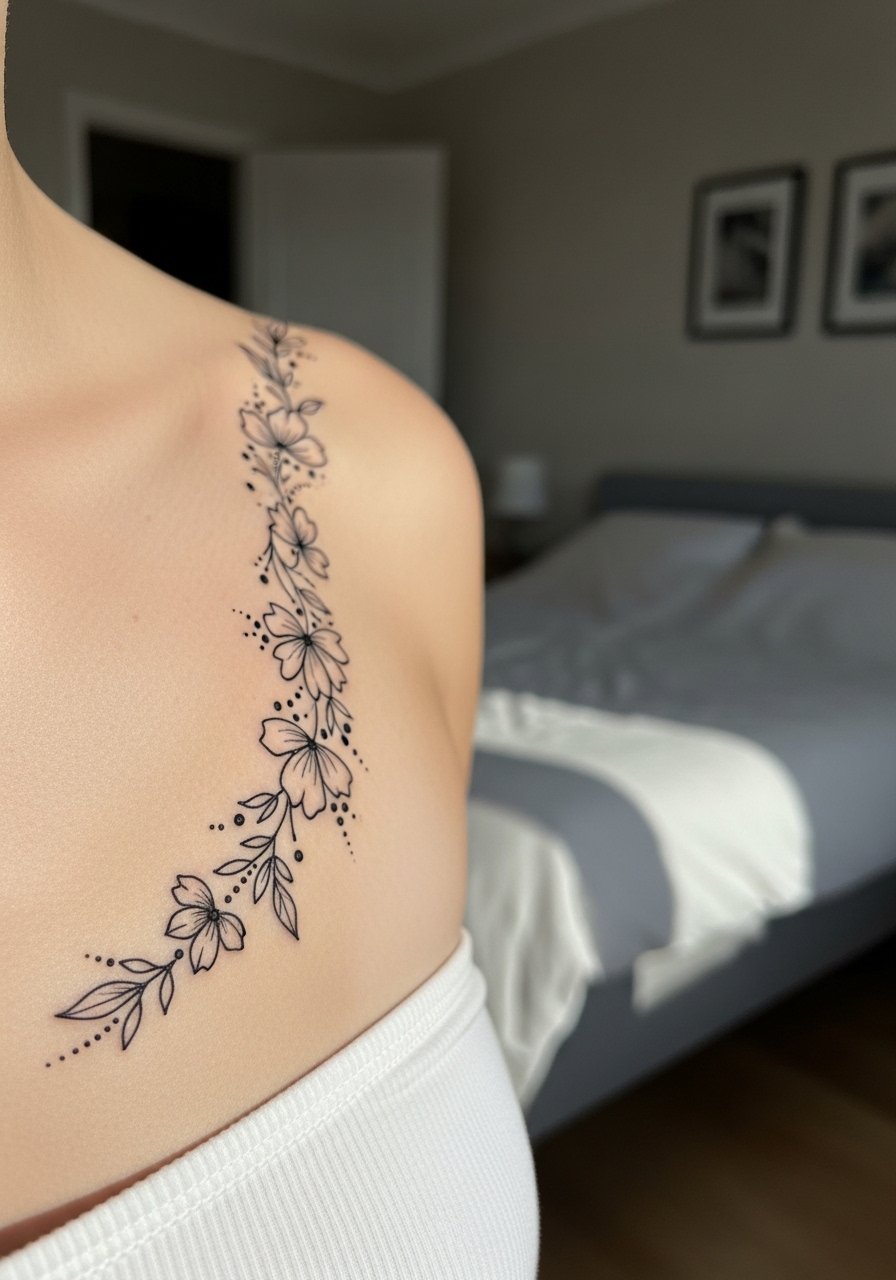
A single floral stem is quietly personal and photographs beautifully. I favor designs with small negative-space highlights rather than heavy shading to avoid early fading. For aftercare, a fragrance-free moisturizer like tattoo-ointment keeps details crisp while healing. Placement along the rib or side creates movement with breath and clothes, which is why I recommend slightly larger scale there.
Mistake to Avoid: Asking for dense color fill in a micro stem — it loses delicacy.
Tiny Anchor with Wave
Style/Technique: Neo-traditional mini
Pain Level: 3/10
Session Time: 45 minutes–1 hour
Best For: Wrist, ankle, foot
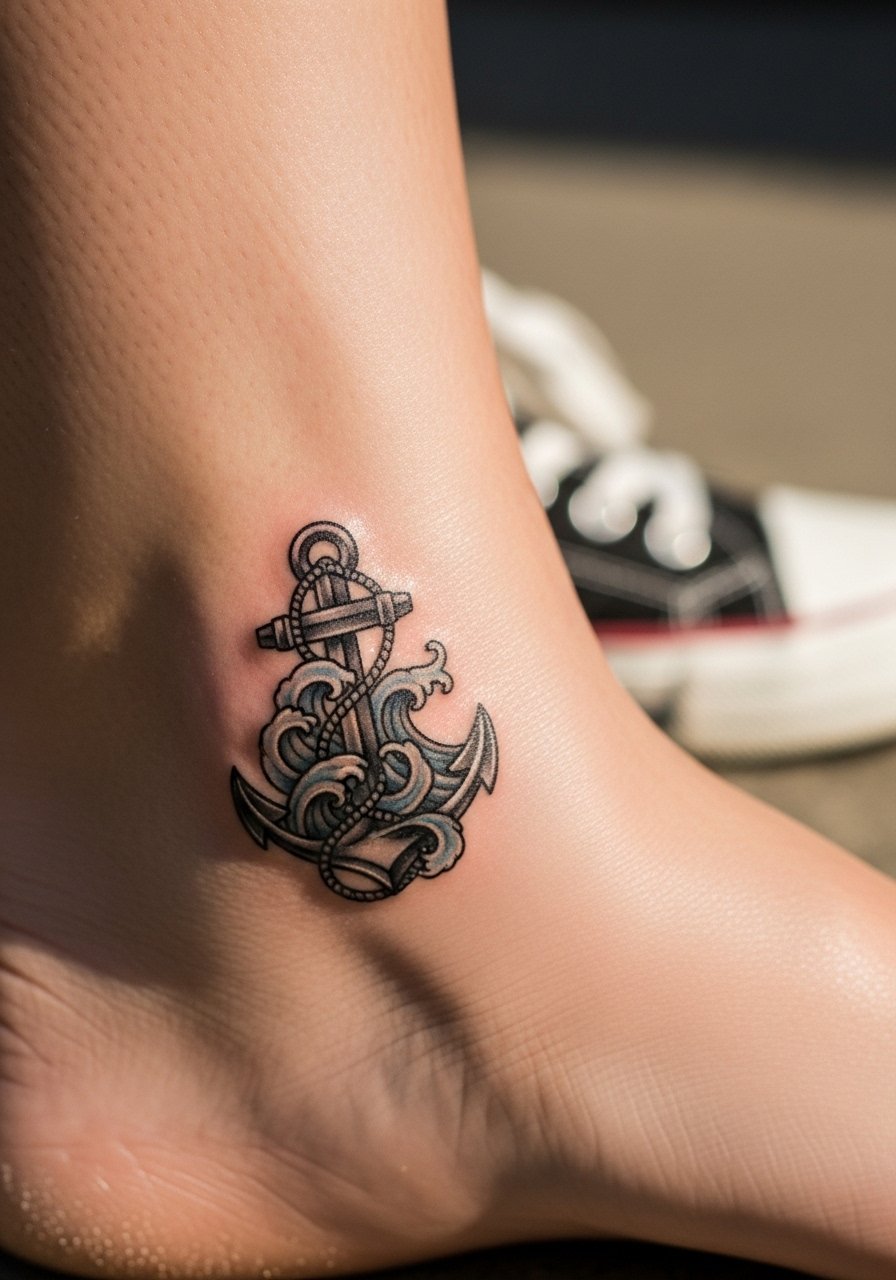
Anchors signal steadiness; the tiny wave adds motion. I suggest a modest pop of color for contrast but keep saturation low to avoid early fading on high-movement spots like the foot. Use a breathable bandage initially and consider spf-50-sunscreen after healing to protect exposed spots. This combo reads well in casual or nautical wardrobes and needs occasional touch-ups.
Mistake to Avoid: Placing heavy color on the foot — it fades faster there.
Coordinates of a Loved Place
Style/Technique: Fine-line numeric script
Pain Level: 2/10
Session Time: 15–45 minutes
Best For: Inner wrist, side rib, collarbone
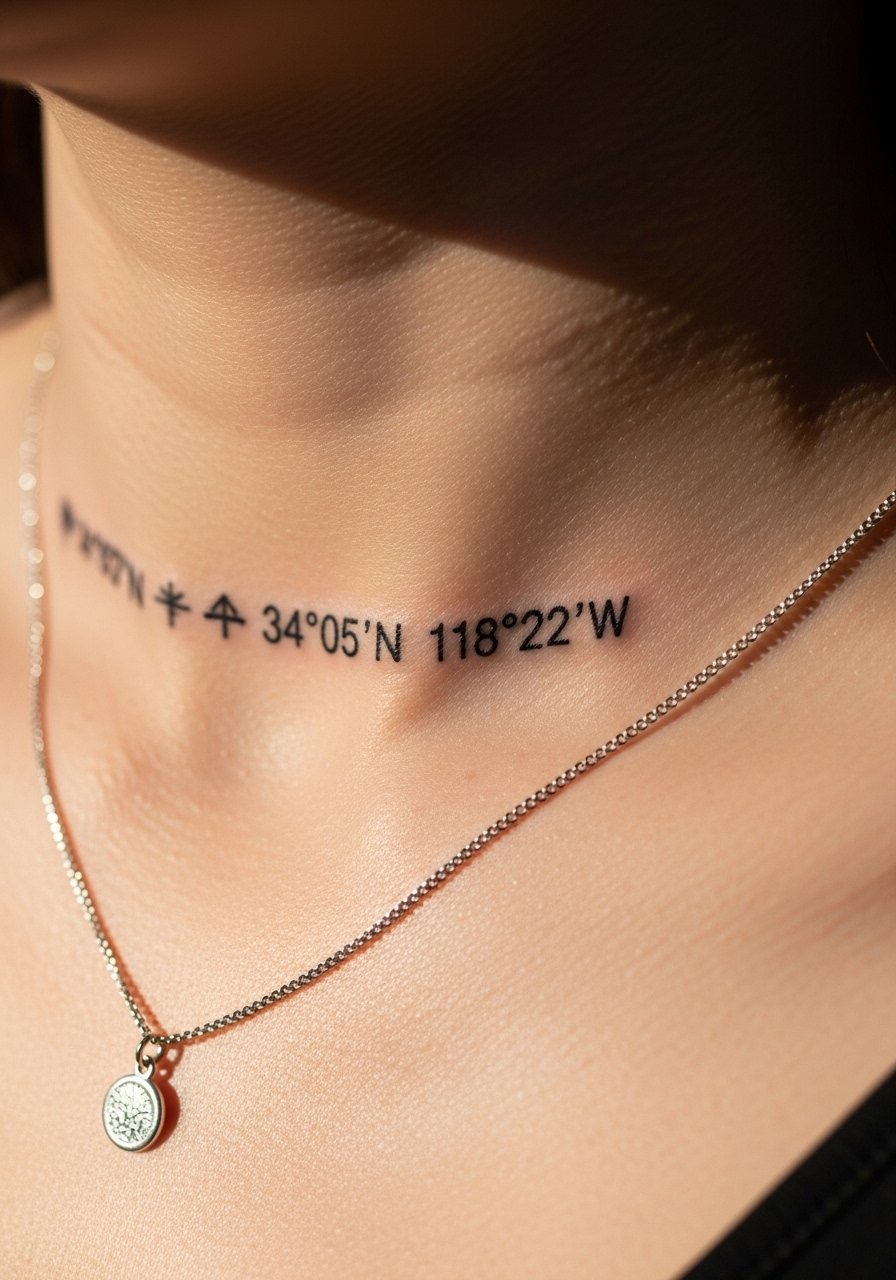
Coordinates are discreet and deeply personal. I tell clients to double-check GPS formatting and choose a font with clear spacing — tiny numerals can blur if too thin. A simple sealing ointment like fragrance-free-salve helps early healing. This idea pairs well with a faint dot or heart marker and stays meaningful without explanation.
Mistake to Avoid: Relying on an artist who rushes numerals; clarity matters.
Tiny Wave Line
Style/Technique: Single-stroke minimalism
Pain Level: 1–2/10
Session Time: 10–20 minutes
Best For: Finger, behind ear, ankle
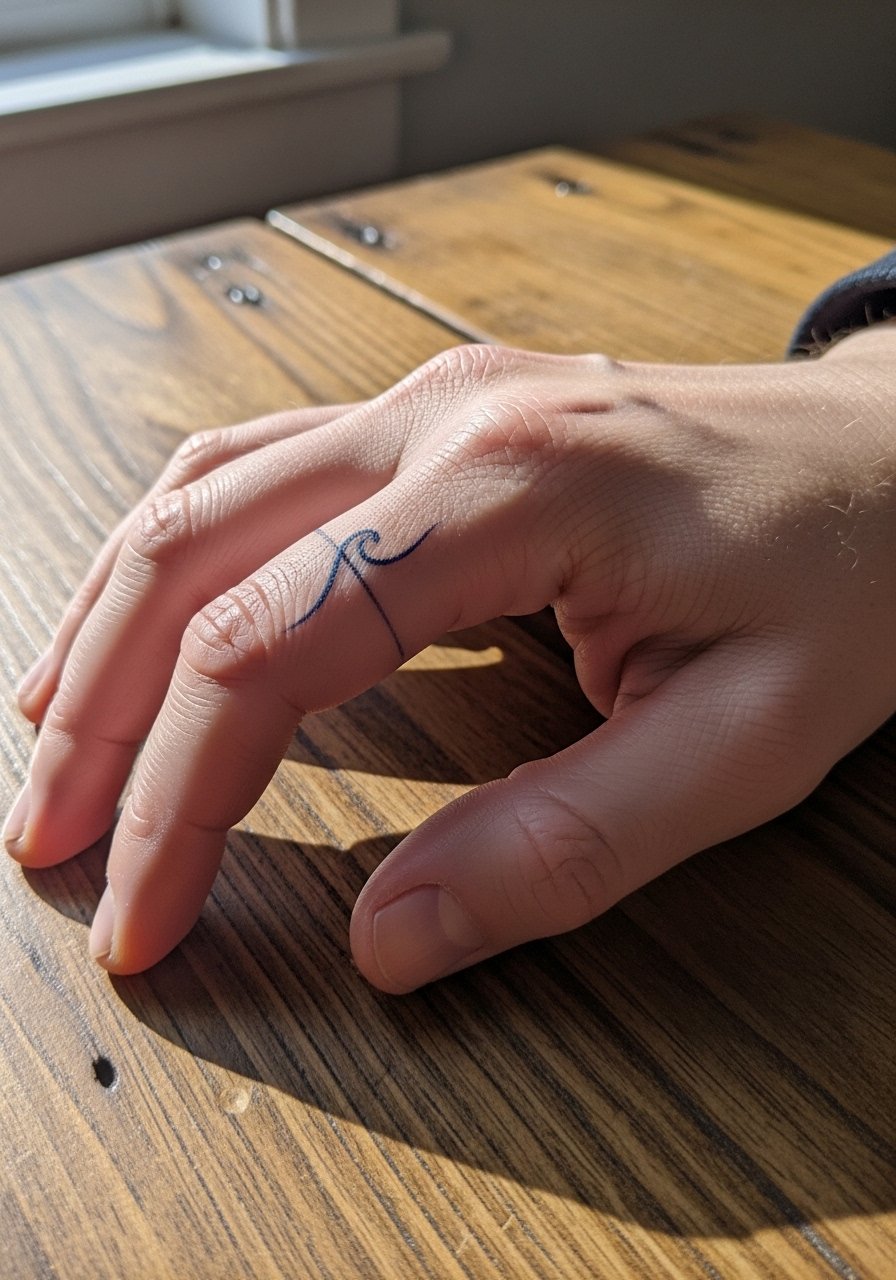
A small single-stroke wave is elegant and low-commitment. It’s ideal for travel lovers and surfers; I recommend the outside of the finger only if you accept frequent touch-ups, as hands see heavy wear. Protect it with waterproof bandage initially and a gentle cleanser; I often suggest green-soap at the studio stage. Wave lines look effortless and age gently in less-exposed spots.
Mistake to Avoid: Putting micro designs on high-abrasion areas if you want permanence.
Minimal Arrow Motif
Style/Technique: Geometric/linework
Pain Level: 2–3/10
Session Time: 20–45 minutes
Best For: Forearm, clavicle, behind ear
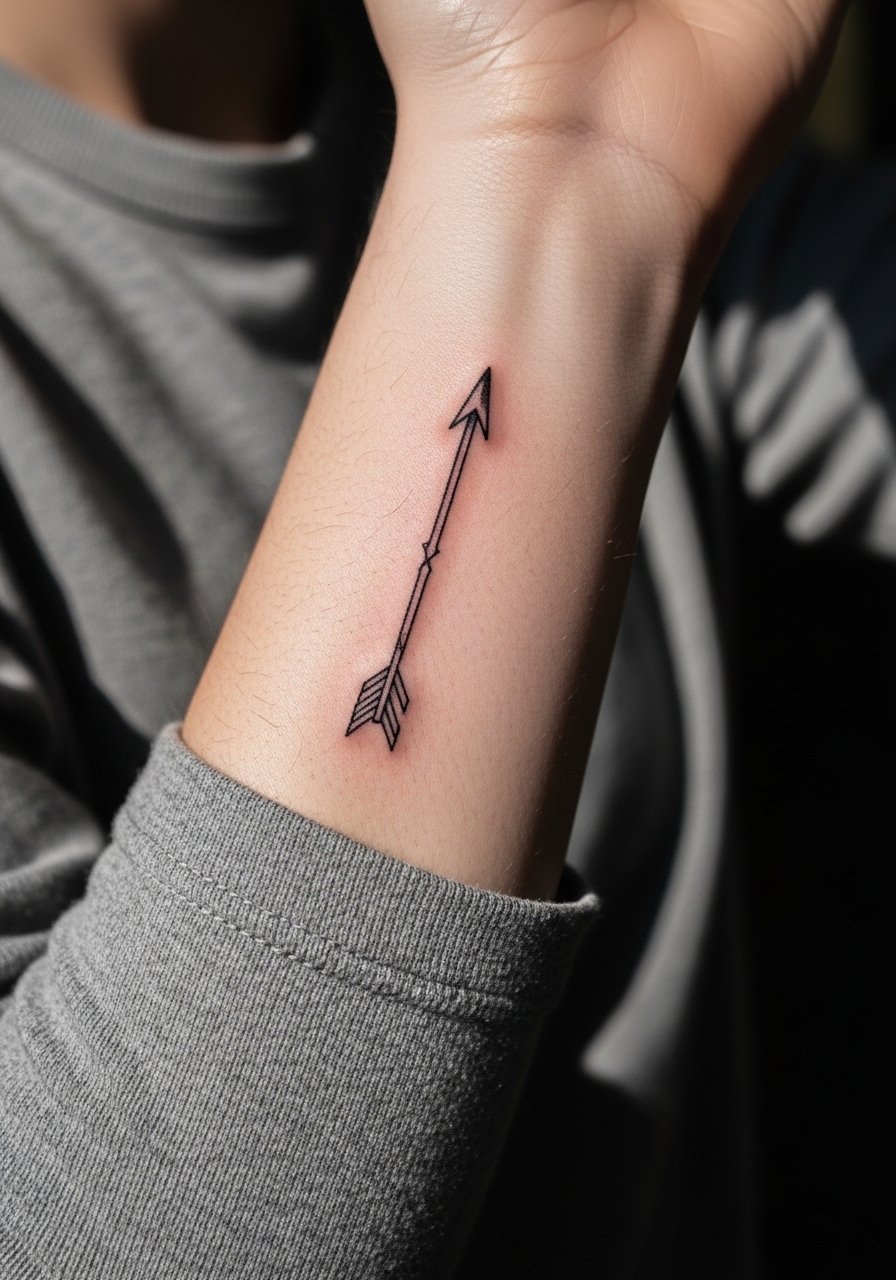
An arrow symbolizes direction and intent. I prefer a slightly bolder shaft to prevent breakup and recommend 1–2 inches for forearms so the angle reads clearly. Use a thin layer of healing-salve during the peeling phase. Arrows pair well with script or coordinates and are an understated way to carry a message.
Mistake to Avoid: Choosing an ultra-thin shaft — it can look patchy later.
Micro Script Word
Style/Technique: Cursive micro script
Pain Level: 3/10
Session Time: 30–60 minutes
Best For: Side rib, wrist, inner arm

A single-word script can carry a powerful personal reminder. I advise selecting fonts where letters aren’t overly looped to avoid smudging as ink settles. Keep length short — 4–10 characters — and use aftercare like tattoo-ointment to maintain legibility. I’ve noticed words placed on the inner arm age more softly than on high-movement areas.
Mistake to Avoid: Copying ornate calligraphy that shrinks into an unreadable blob.
Tiny Geometric Mountain
Style/Technique: Geometric linework
Pain Level: 2–4/10
Session Time: 30–60 minutes
Best For: Upper arm, calf, chest
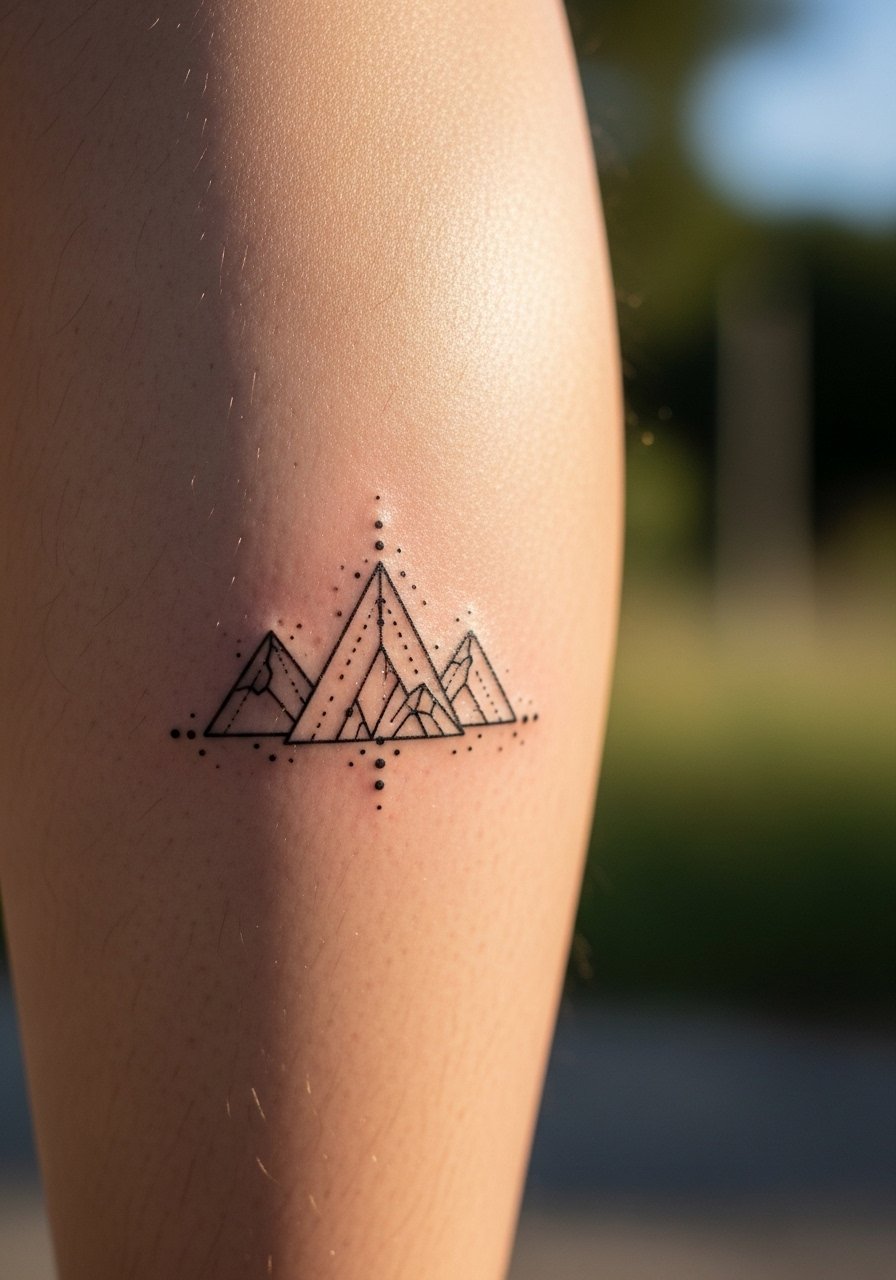
Geometric mountains balance minimalism and form. They scale well and travel across genders. Keep lines crisp and avoid excessive dot shading at micro scale. I usually recommend a modest size (1.5–2 inches) and suggest spf-50-sunscreen after healing for outdoor spots. Mountains pair beautifully with tiny compass marks for a layered meaning.
Mistake to Avoid: Overcomplicating the geometry at tiny sizes — it muddles.
Micro Paw Outline
Style/Technique: Minimal outline
Pain Level: 2/10
Session Time: 20–30 minutes
Best For: Ankle, wrist, shoulder blade
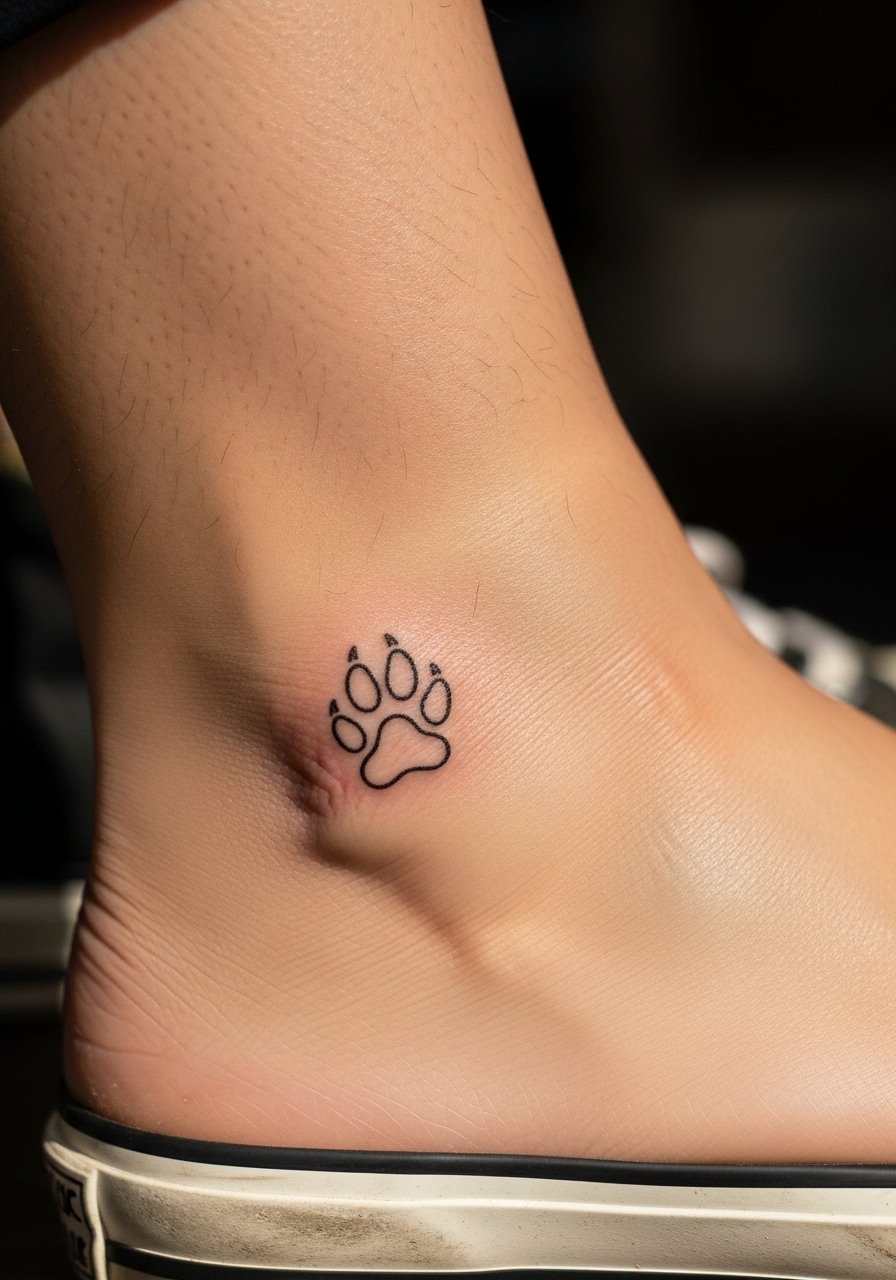
For pet lovers, a tiny paw outline is straightforward and emotionally rich. Keep the paw small but not microscopic (about 0.5–1 inch) so pads remain distinct. During healing, avoid tight socks that rub the area and use a gentle cleanser like green-soap when washing. These pieces often become daily comfort marks for clients.
Mistake to Avoid: Going too tiny — the pads merge and lose shape.
Micro Compass
Style/Technique: Fine-line geometric
Pain Level: 3/10
Session Time: 30–60 minutes
Best For: Chest, wrist, forearm
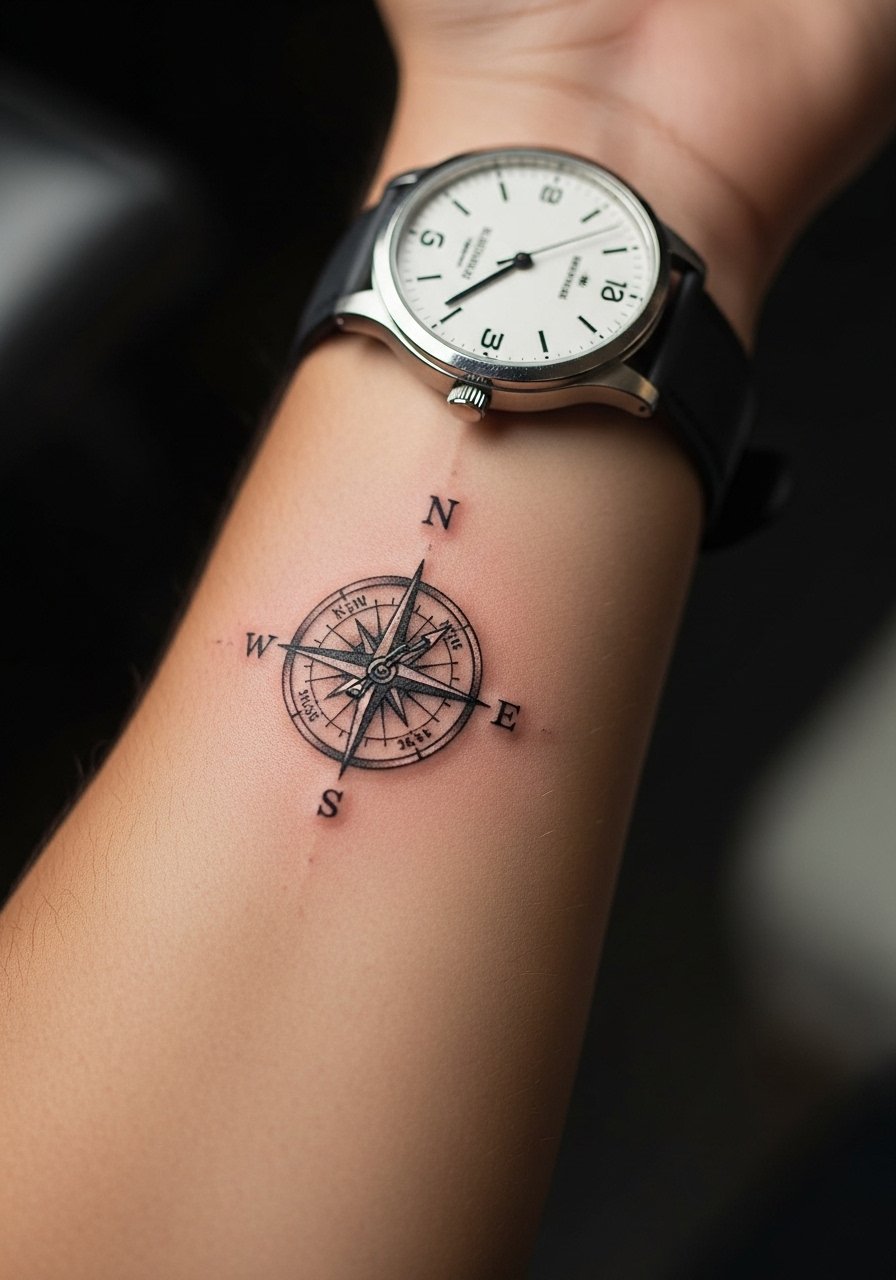
A micro compass suggests guidance without being showy. I recommend keeping directional points distinct and the needle slightly bolder to retain contrast. Consider a size around 1–1.5 inches. Aftercare with tattoo-aftercare-balm helps preserve the fine points. This design works well as a standalone or paired with coordinates.
Mistake to Avoid: Making each compass point too thin — they blur inward over time.
Tiny Heart Outline
Style/Technique: Simple outline
Pain Level: 1–2/10
Session Time: 10–20 minutes
Best For: Finger, behind ear, wrist
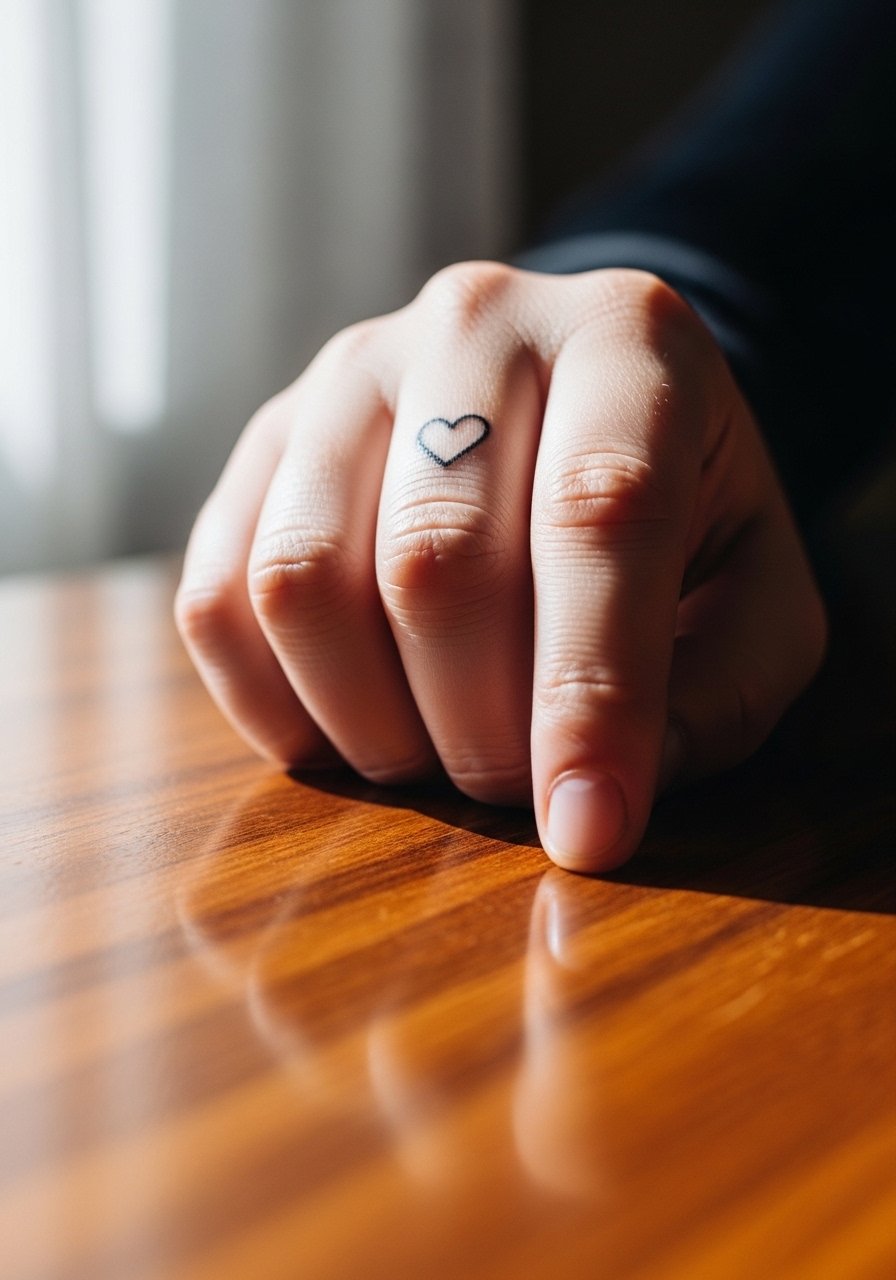
A tiny heart is classic and flexible across placements. I tell clients to consider the finger’s wear patterns — hearts there need touch-ups more often. Use a topical like fragrance-free-salve and avoid harsh hand scrubbing while it peels. Healed hearts can be charming and discreet conversation starters.
Mistake to Avoid: Choosing the inner finger if you want zero future maintenance.
Tiny Anchor Line Art (Unique Idea)
Style/Technique: Single-line illustrative anchor
Pain Level: 3/10
Session Time: 30–45 minutes
Best For: Side wrist, ankle, lower forearm
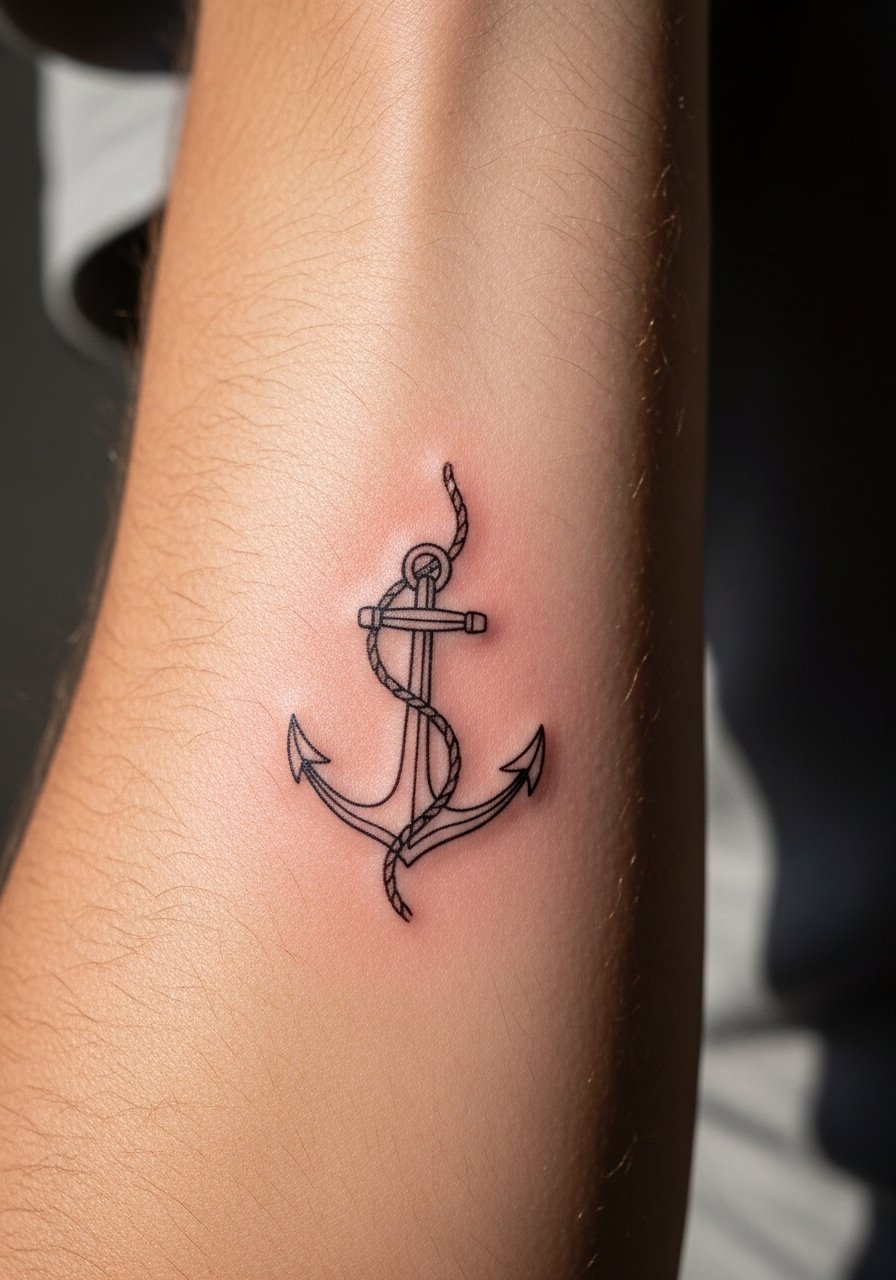
This single-line anchor variant is a fresh twist I’ve suggested when clients want symbolism without heavy ink. It requires a steady hand from an artist used to continuous strokes. Keep it at least 1.5 inches to preserve the single-line character. Pair with healing-salve and gentle cleaning; it reads modern and wearable.
Mistake to Avoid: Shrinking a continuous anchor under 1 inch — the flow disappears.
Minimal Soundwave Tattoo (Unique Idea)
Style/Technique: Micro soundwave engraving
Pain Level: 3/10
Session Time: 30–60 minutes
Best For: Inner arm, rib, collarbone
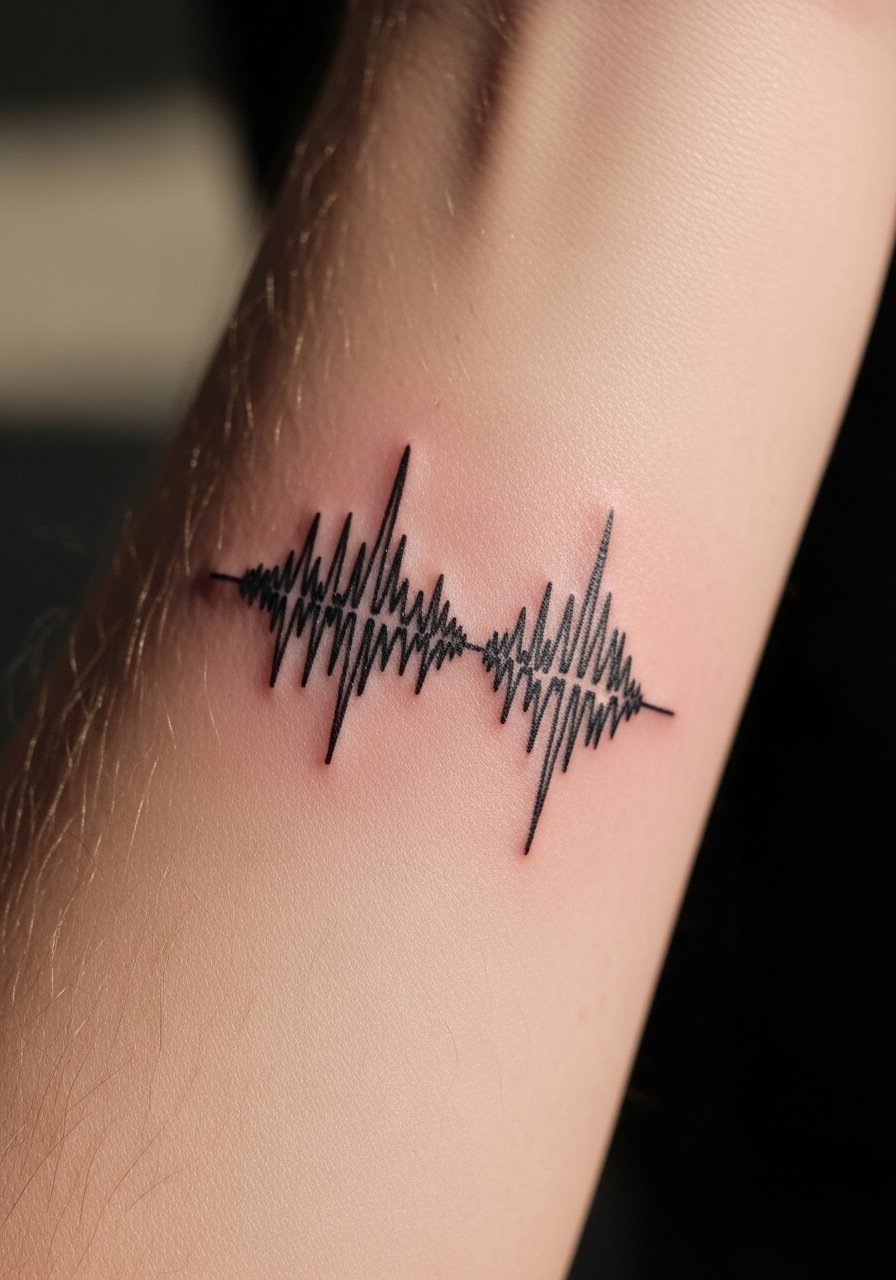
I began recommending tiny soundwave tattoos for a loved one’s laugh or a phrase snippet — they’re highly personal and scannable with some apps. Keep the soundwave length short and the line weight consistent so it remains legible over years. Aftercare with tattoo-ointment helps the crisp lines remain clear. These are unique keepsakes that start great conversations.
Mistake to Avoid: Compressing too many audio seconds into a micro line — it smears.
Palm-Sized Single Leaf
Style/Technique: Micro-realism leaf
Pain Level: 3–4/10
Session Time: 45–75 minutes
Best For: Shoulder, forearm, rib
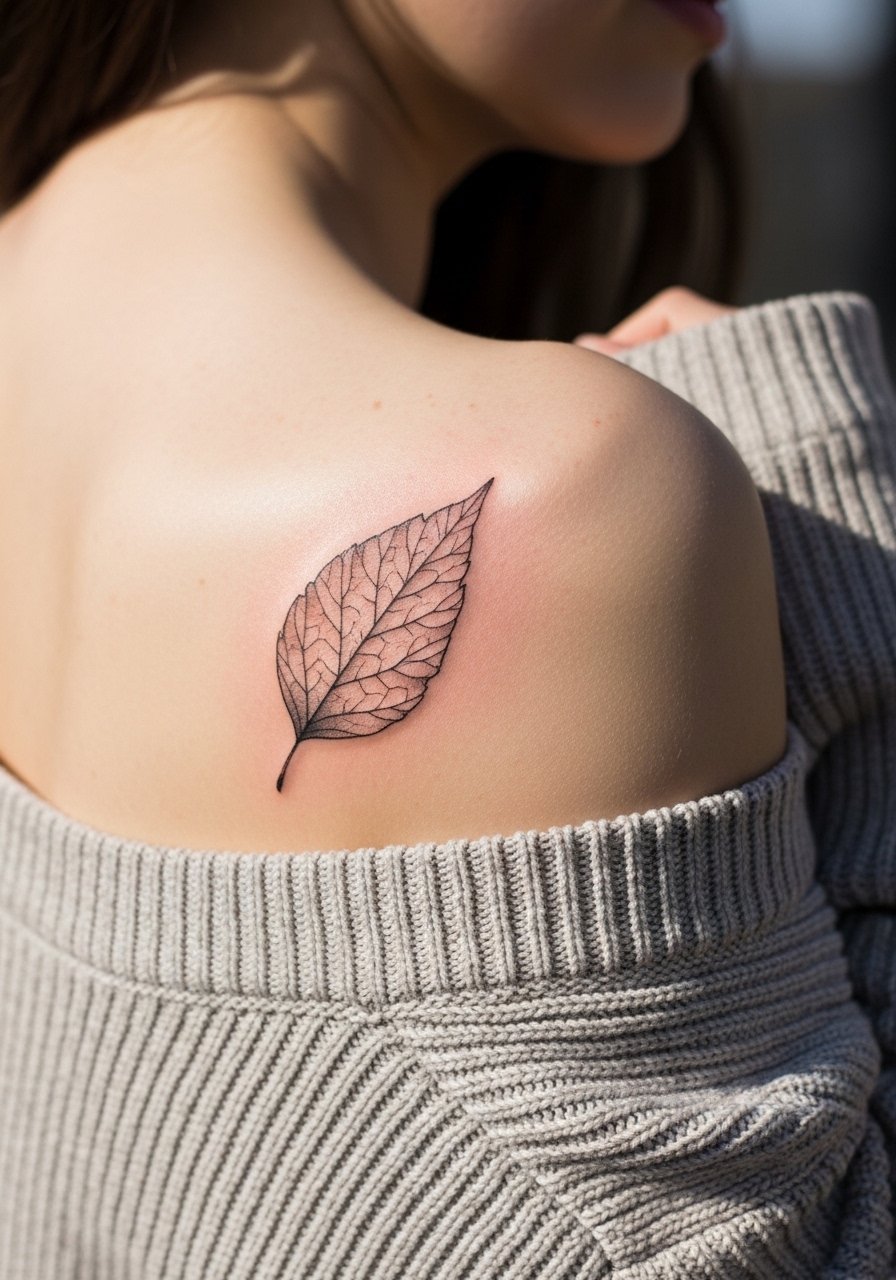
A palm-sized leaf can be both delicate and statement-making without overwhelming the canvas. I recommend slight vein work rather than heavy fill so it ages naturally. Scale around 2–3 inches works well on shoulders or ribs. Use spf-50-sunscreen on exposed areas once healed. Leaves pair well with seasonal symbolism and personal growth narratives.
Mistake to Avoid: Making veins too dense — they can blur into a patch.
Micro Lighthouse
Style/Technique: Tiny neo-traditional
Pain Level: 3/10
Session Time: 45–75 minutes
Best For: Forearm, calf, chest
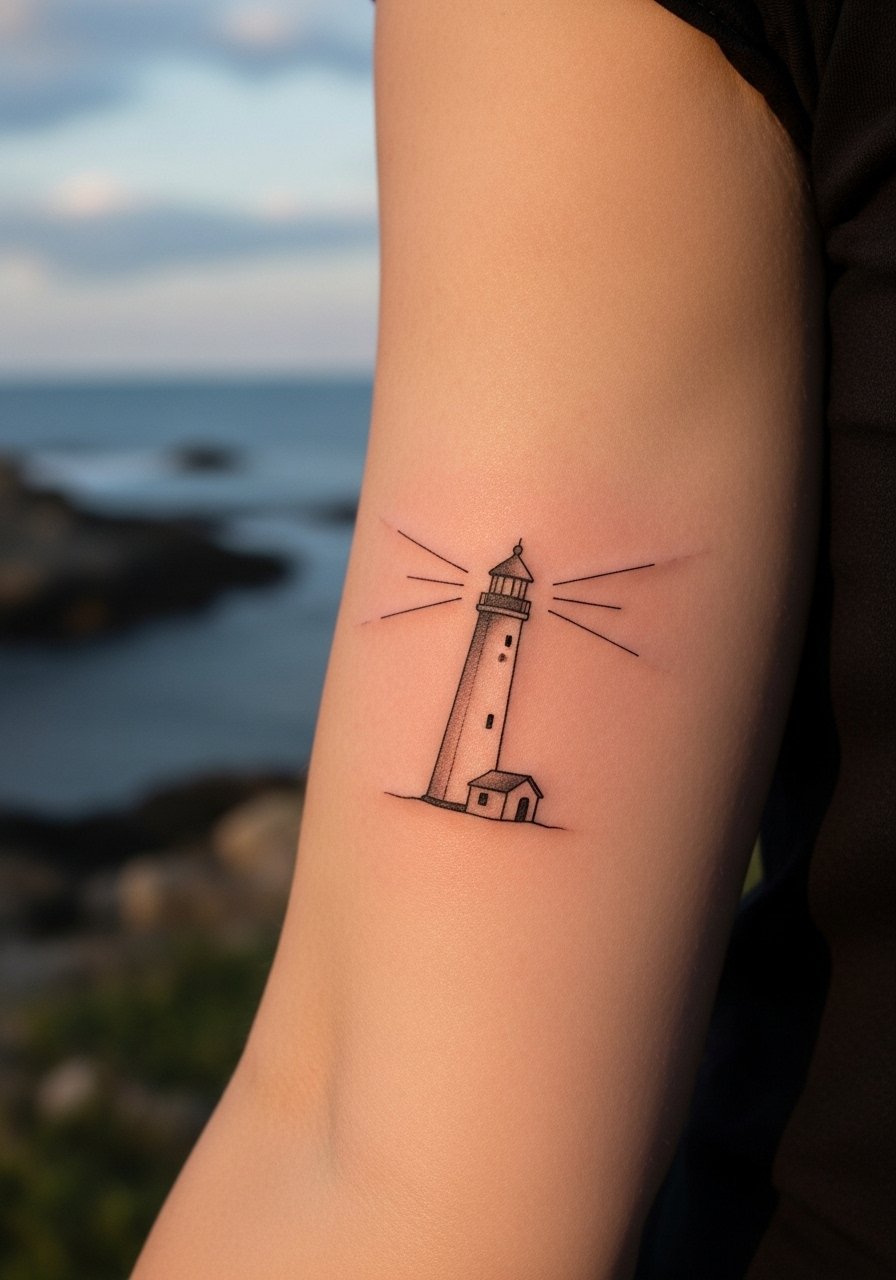
A tiny lighthouse represents guidance and safe harbors. I recommend a slightly bold outline to hold the shape and minimal beam lines to imply light. Choose an artist with steady line control and use a protective ointment like tattoo-aftercare-balm. Lighthouses work well for those who travel or have sea ties.
Mistake to Avoid: Overcomplicating the beams — small details fade fast.
Tiny Botanical Bracelet
Style/Technique: Fine-line wraparound
Pain Level: 3–5/10
Session Time: 1–2 hours
Best For: Wrist, ankle
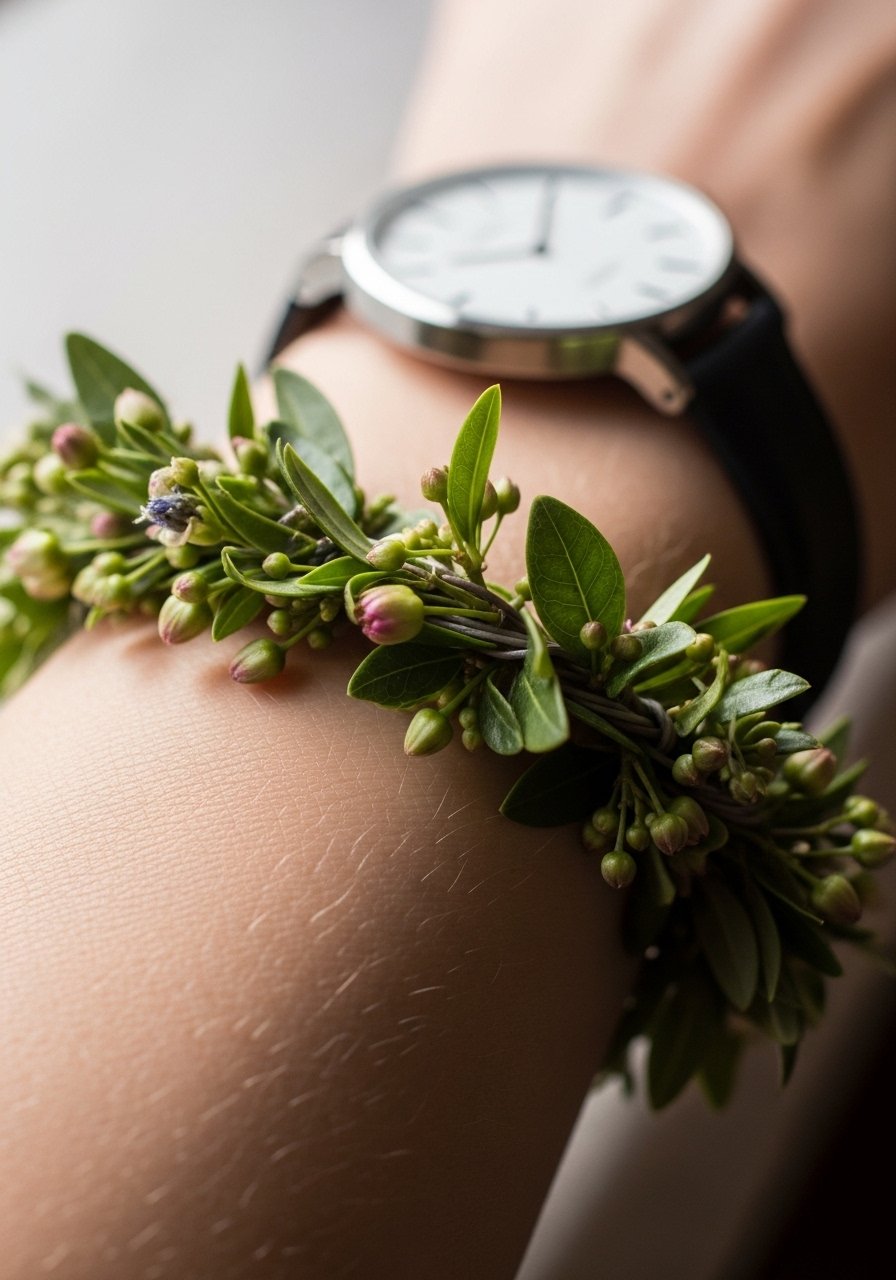
A botanical bracelet feels like jewelry and photographs beautifully. I advise leaving slight negative space between elements so the band doesn’t blur into a solid line. Expect 1–2 hours depending on wrap length, and use fragrance-free-salve in the first week. These translate well into layered designs with rings and watches.
Mistake to Avoid: Crowding elements so closely the band becomes a thick line.
Micro Key Outline
Style/Technique: Mini illustrative outline
Pain Level: 2–3/10
Session Time: 20–40 minutes
Best For: Side rib, collarbone, forearm
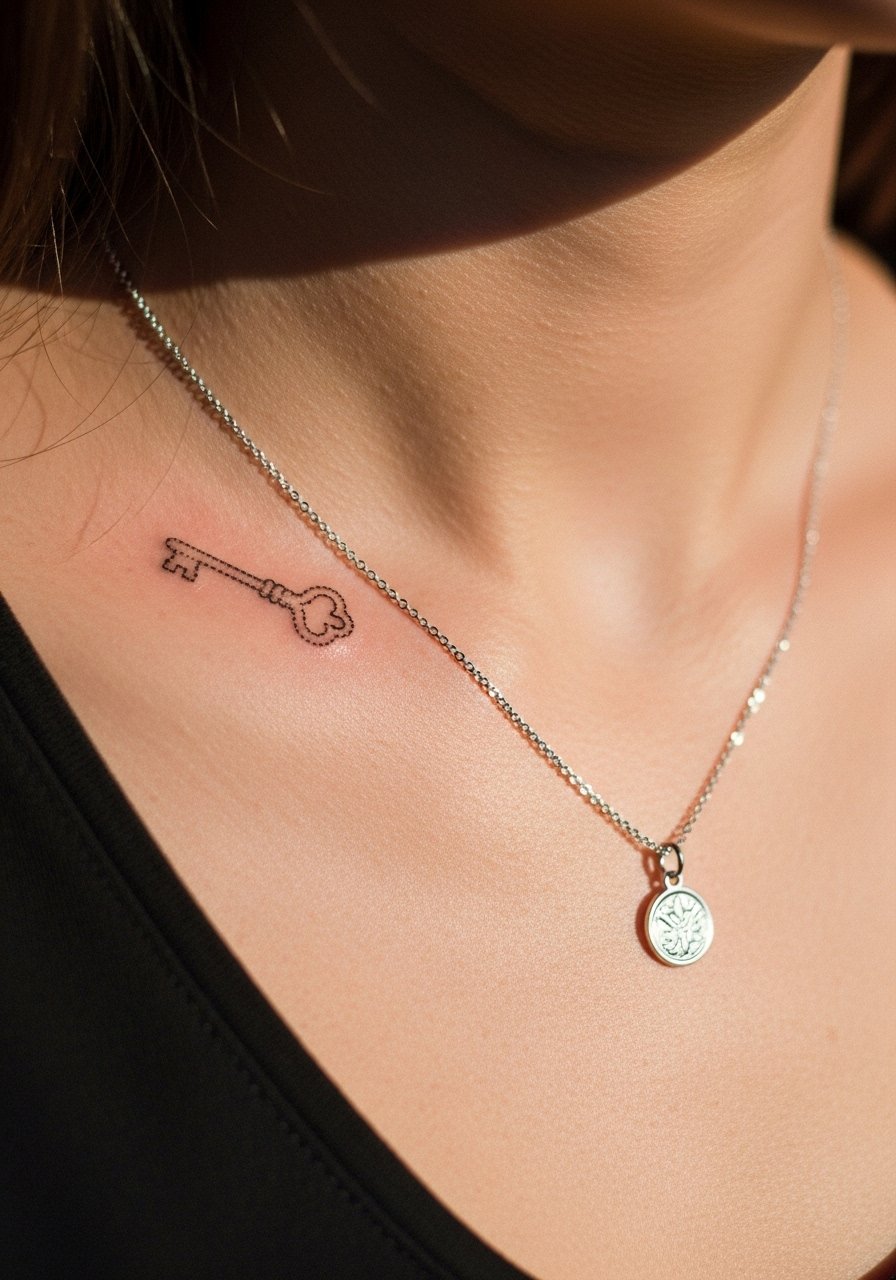
A small key can symbolize access or memory. Keep the key simple with a bold shaft and subtle bow detail; too many teeth will muddle. Size around 1–1.5 inches preserves the silhouette. A light aftercare balm like healing-salve during healing keeps edges crisp. Keys are versatile and often paired with initials.
Mistake to Avoid: Insisting on ornate teeth at micro scale — they blur.
Minimal Line Heartbeat
Style/Technique: Single-line EKG-inspired
Pain Level: 2–3/10
Session Time: 20–40 minutes
Best For: Wrist, chest, ankle
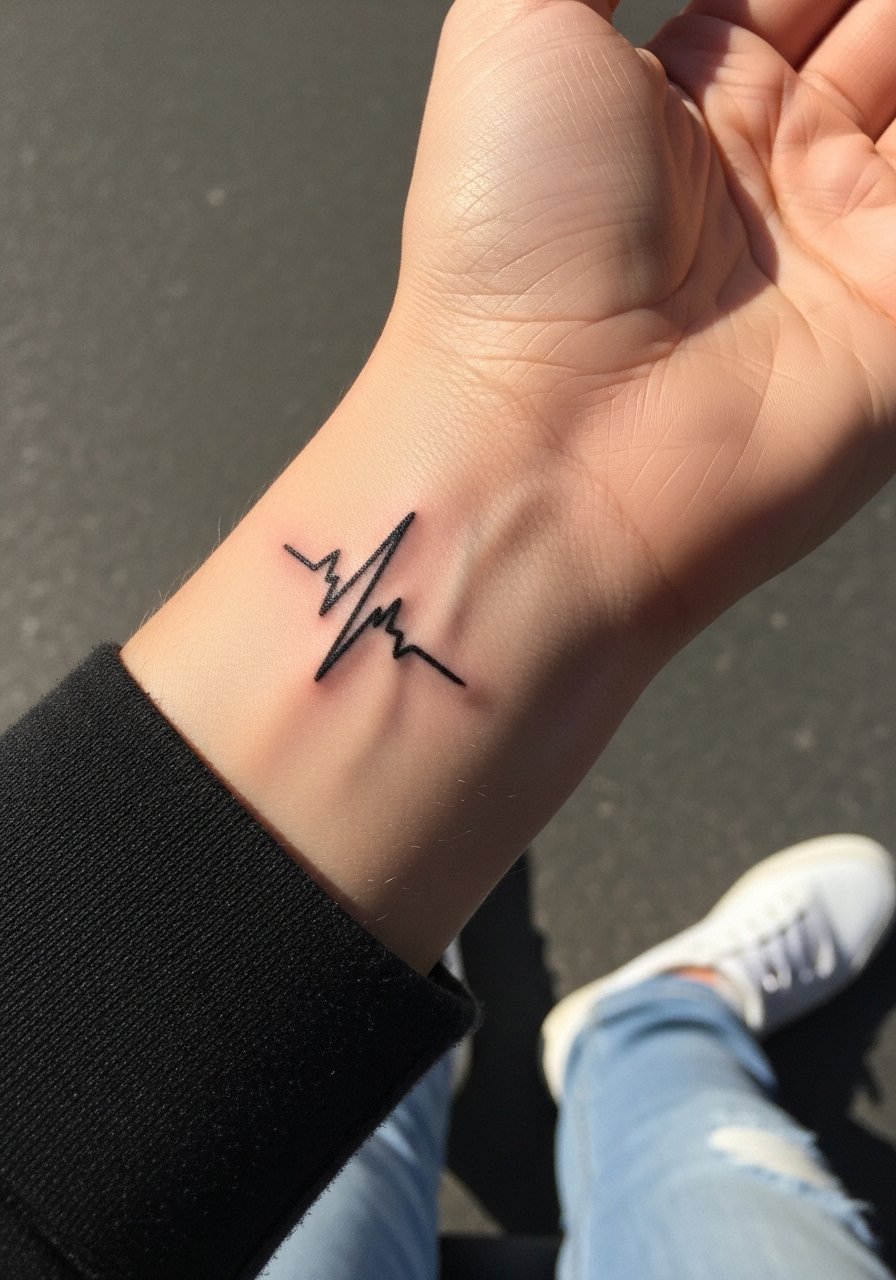
A heartbeat line is subtle yet loaded with feeling. Keep peaks bold enough to remain distinct; I usually recommend a 1–2 inch length. Avoid thin hairlines on high-motion spots. Use a mild cleanser like green-soap initially and a light moisturizer during peeling. This motif often appeals to those who want symbolic reminders of resilience.
Mistake to Avoid: Compressing too many peaks — they lose meaning and clarity.
Micro Pinecone or Seed
Style/Technique: Micro-realism dotwork
Pain Level: 3–4/10
Session Time: 30–60 minutes
Best For: Behind ear, ankle, wrist
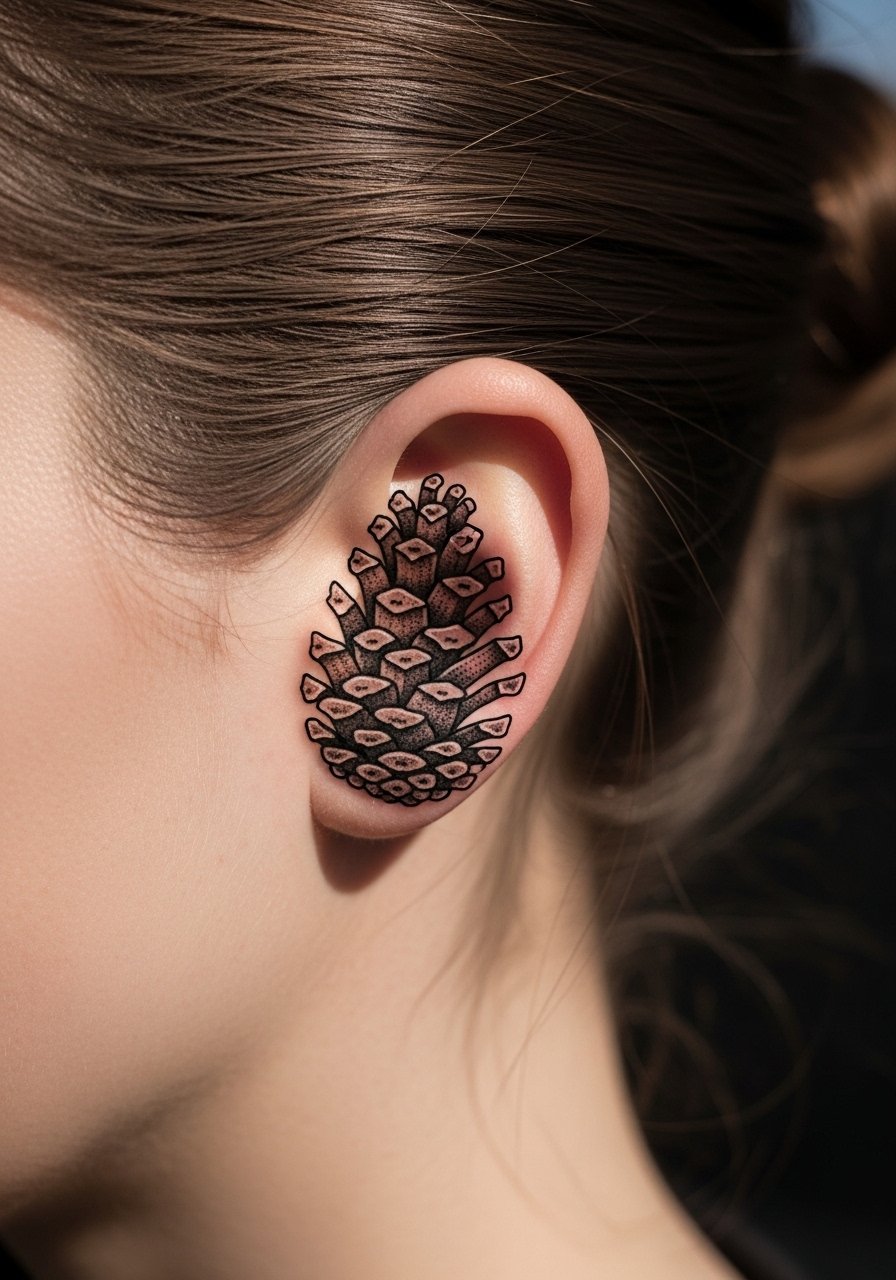
Pinecones and seeds suggest growth and grounding. I recommend modest dotwork rather than heavy shading so the texture persists. Keep it under 1.5 inches for behind-ear placements and expect a quick session. Aftercare with tattoo-ointment prevents scabbing that obscures details. These motifs are quietly symbolic and low-profile.
Mistake to Avoid: Asking for a dense shaded fill at micro scale.
Tiny Feather Outline
Style/Technique: Fine-line illustrative
Pain Level: 2–3/10
Session Time: 30–60 minutes
Best For: Rib, shoulder, forearm
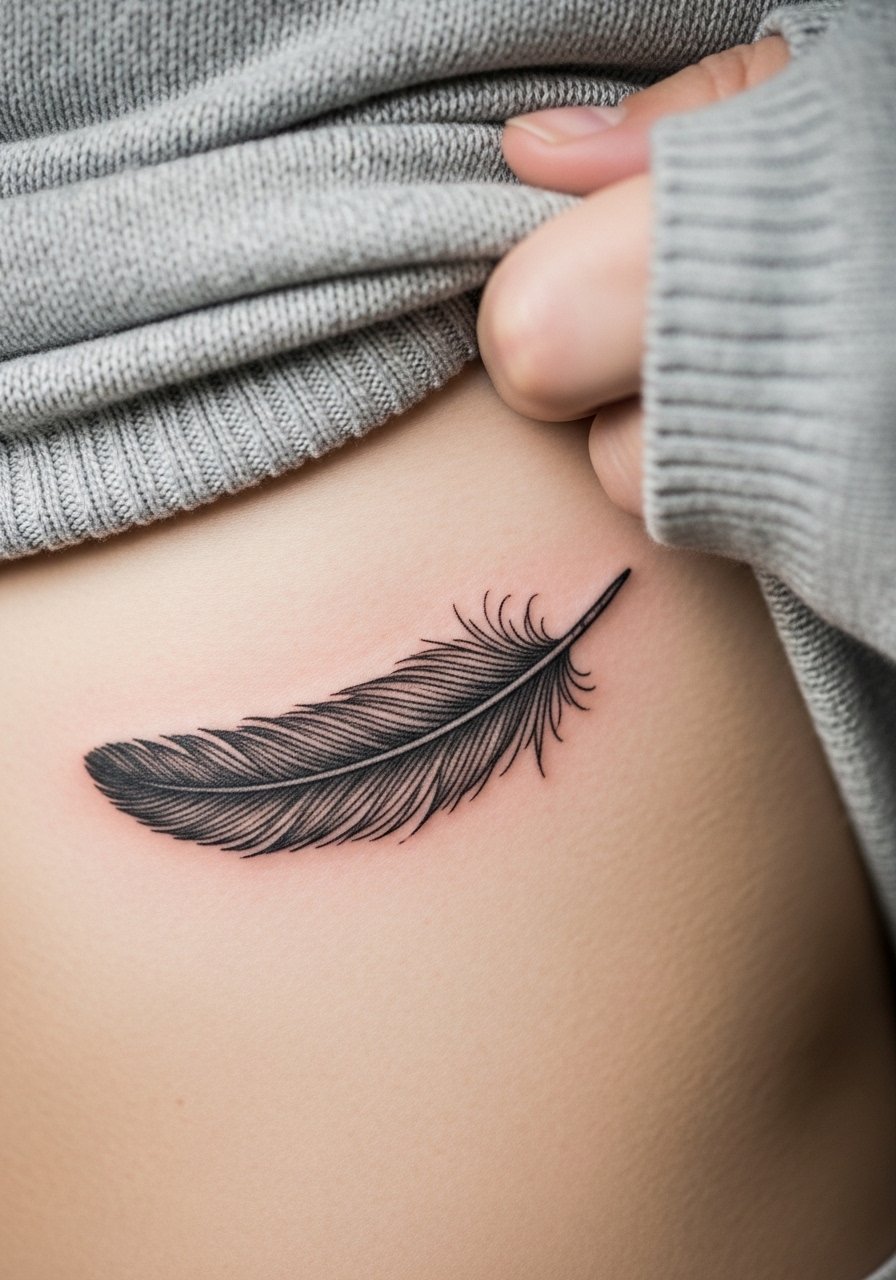
Feathers convey lightness and movement. I advise a gentle taper and slightly bolder quill to preserve shape. Place on areas with some flatness for better healing. Keep moisturized with fragrance-free-salve and avoid tight clothing rubbing the area. Feathers age elegantly when not overworked.
Mistake to Avoid: Requesting too many micro barbs — they blur into a patch.
Tiny Book Spine or Bookmark
Style/Technique: Micro-illustrative symbol
Pain Level: 2–3/10
Session Time: 20–45 minutes
Best For: Side of finger, inner wrist, forearm

For book lovers, a tiny book spine or bookmark is uniquely personal. Keep text minimal or symbolic marks instead of words to avoid illegibility. Finger placement looks sweet but needs touch-ups; inner wrist is a lower-maintenance alternative. Use gentle aftercare like tattoo-aftercare-balm and expect to protect it from constant handling initially.
Mistake to Avoid: Expecting readable micro-text on such a small motif.
Minimal Crescent + Star Pairing
Style/Technique: Fine-line duo motif
Pain Level: 2–3/10
Session Time: 20–40 minutes
Best For: Collarbone, wrist, ankle
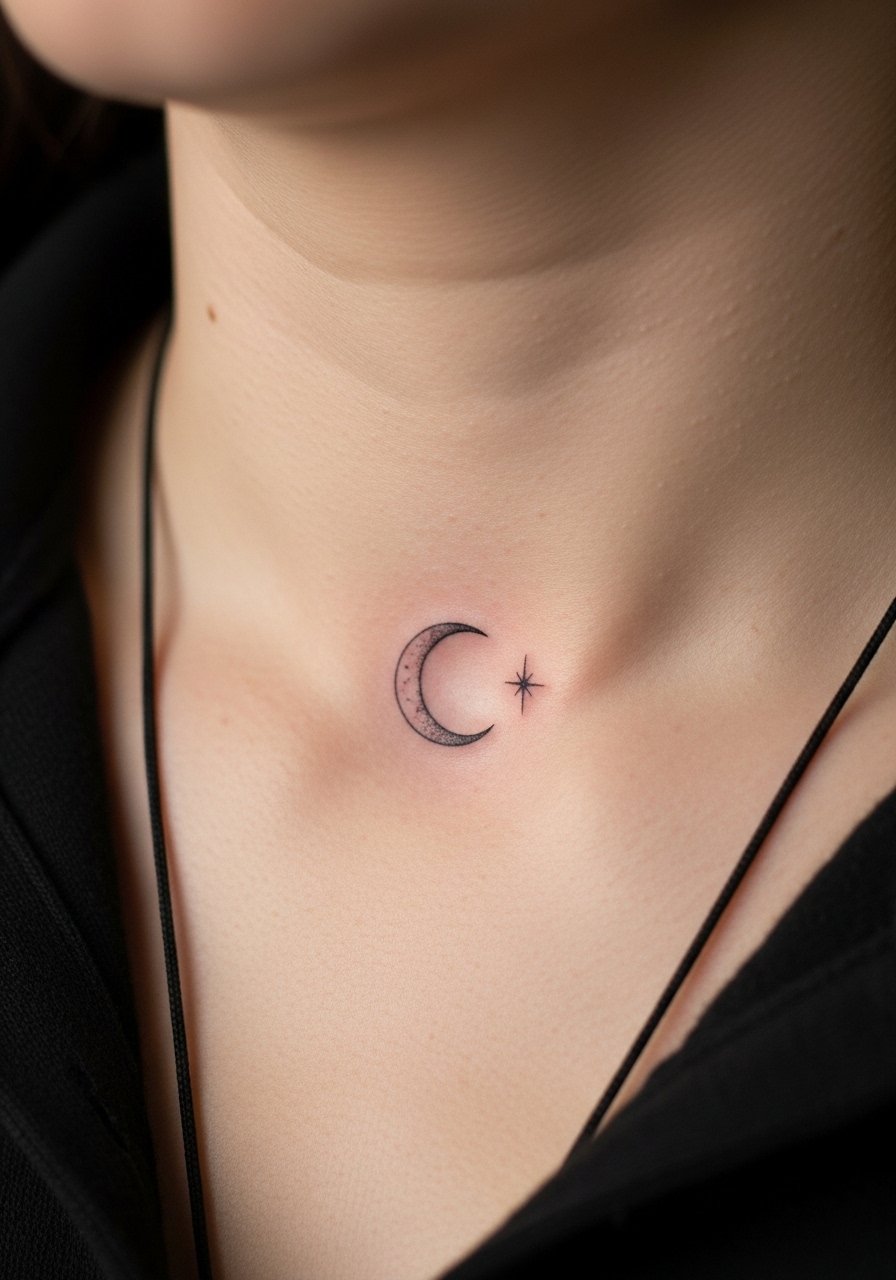
Pairing a crescent with a star gives a clear narrative without crowding the area. Keep the star tiny and the crescent slightly bolder so both remain distinct. Aftercare with spf-50-sunscreen after healing keeps exposed placements bright. I’ve noticed this pairing appeals to clients wanting subtle symbolism that still photographs well.
Mistake to Avoid: Making both elements the same hairline thickness — they blend together.
Micro Sun Line
Style/Technique: Minimalistic radiant linework
Pain Level: 2–3/10
Session Time: 20–40 minutes
Best For: Wrist, shoulder, back of neck
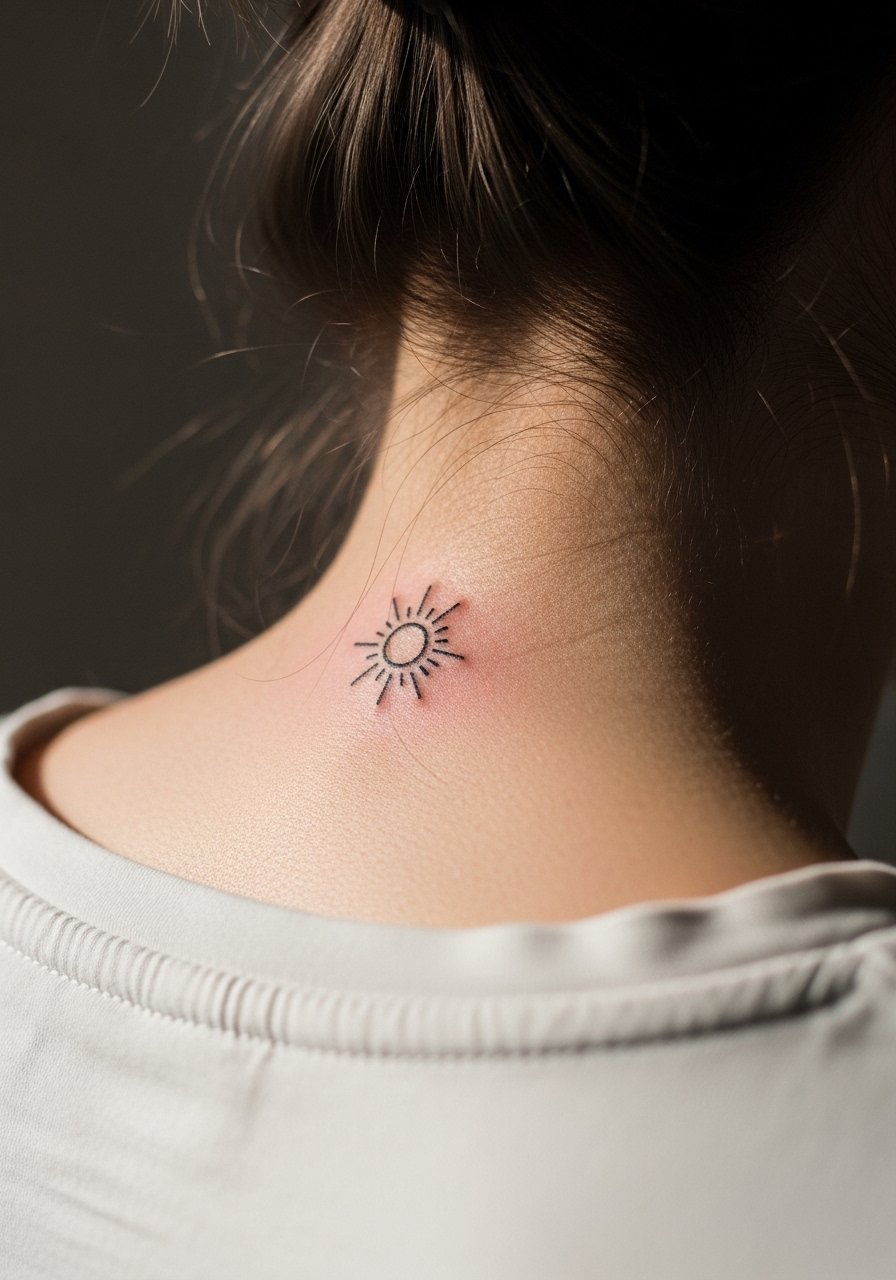
A tiny sun is a cheerful, simple reminder. I recommend short rays and a moderate center circle so the design doesn't become a smudge. Keep scale to 0.75–1.5 inches and use a light healing ointment like healing-salve during scabbing. Suns are versatile and work well with other small celestial tattoos.
Mistake to Avoid: Requesting long, thin rays at micro size — they break down.
Micro Bicycle Icon
Style/Technique: Minimal line illustration
Pain Level: 2–3/10
Session Time: 30–45 minutes
Best For: Ankle, forearm, calf
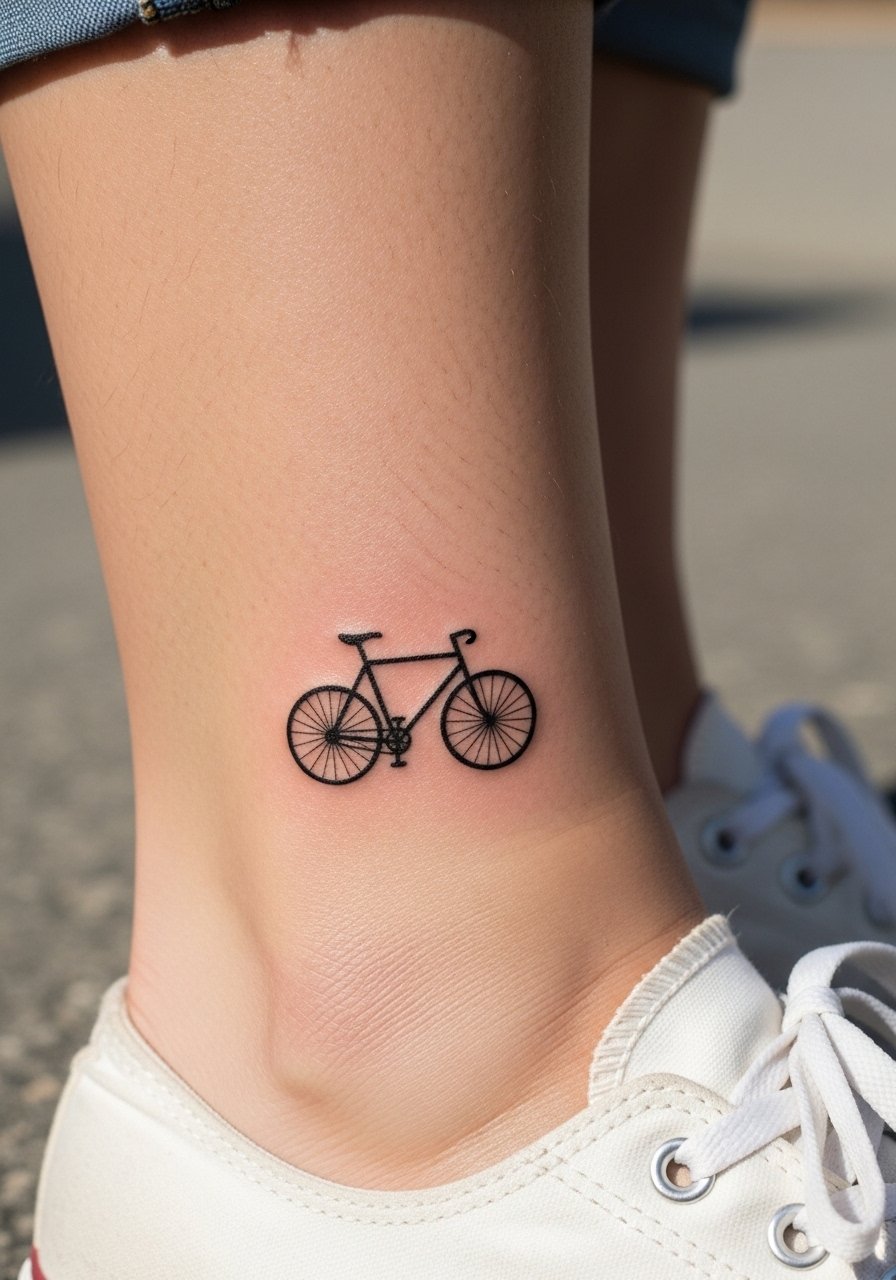
Cycling enthusiasts often ask for a compact bicycle icon. Keep details sparse — two wheels and a hint of frame — to ensure longevity. Place where shoe contact is minimal and use fragrance-free-salve during the first week. These are playful, low-profile nods to hobbies.
Mistake to Avoid: Insisting on spokes and tiny mechanics at micro scale.
Micro Mountain Range Wrist Wrap
Style/Technique: Tiny continuous-line wrap
Pain Level: 3–4/10
Session Time: 45–75 minutes
Best For: Wrist, forearm
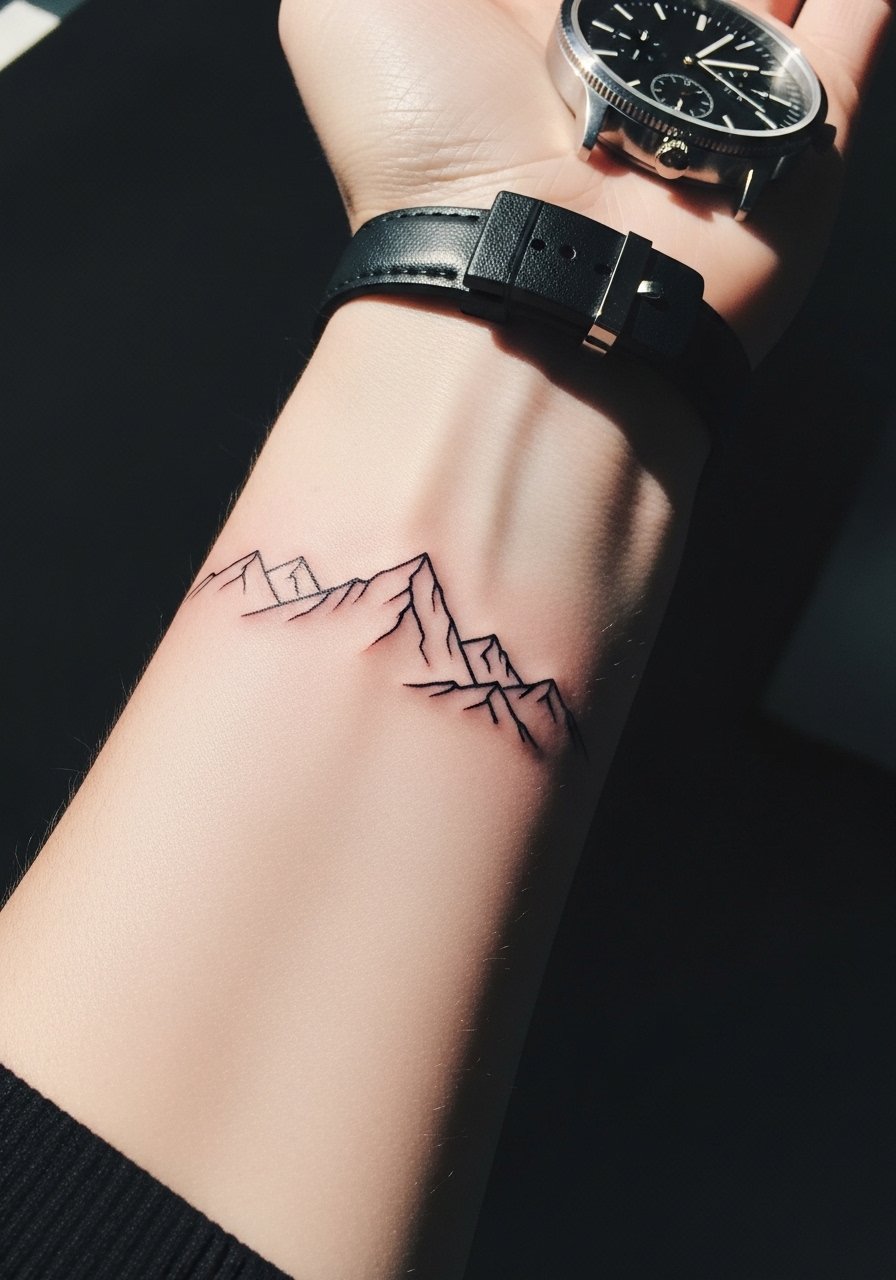
A wrist-wrap mountain range acts like a tiny landscape bracelet. I recommend slight gaps between peaks so the band doesn’t become solid. Expect 45–75 minutes and plan for minimal watch friction while healing. A gentle cleanser like green-soap at the studio and a protective ointment at home keep lines crisp.
Mistake to Avoid: Crowding peaks — it turns into a single dark band.
Micro Sunflower Seed (Fresh Idea)
Style/Technique: Micro-realism seed/petal focus
Pain Level: 3/10
Session Time: 30–60 minutes
Best For: Thumb, wrist, behind ear
A single sunflower seed or petal is a subtle, less-common botanical idea I’ve been sketching for studio clients. It reads as a symbol of growth and potential but is compact enough for near-hand placement. Small dotwork keeps texture without dense fill. Use tattoo-ointment and avoid constant hand creams during the first week.
Mistake to Avoid: Requesting full bloom at micro scale — it loses petal detail.
Micro Paper Plane
Style/Technique: Tiny illustrative line
Pain Level: 1–2/10
Session Time: 15–30 minutes
Best For: Rib, ankle, wrist
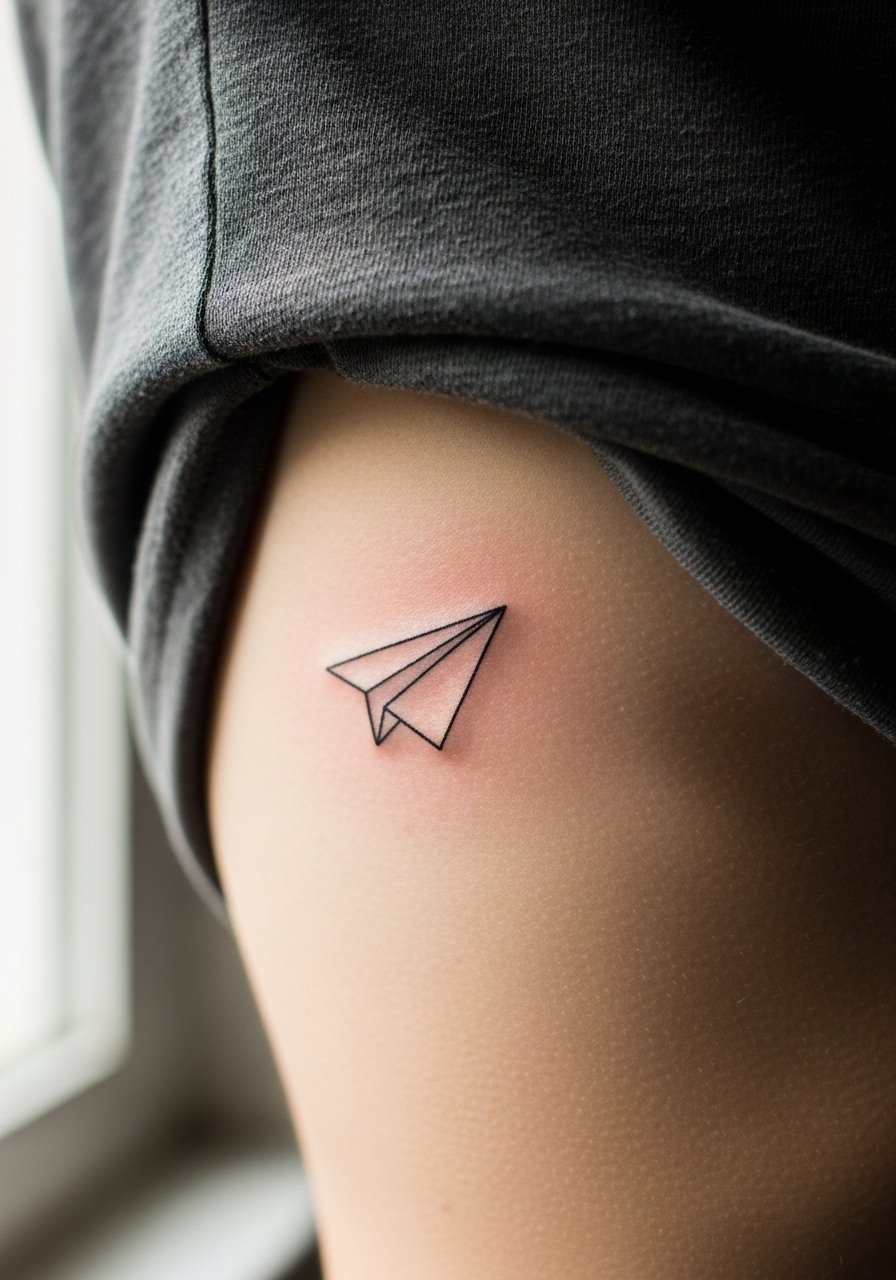
A micro paper plane suggests travel and whimsy. Keep folds minimal and the main crease slightly bolder to preserve shape. It’s a fast, low-pain option and pairs well with tiny directional marks. Aftercare with healing-salve and avoiding tight waistbands ensures it heals cleanly.
Mistake to Avoid: Packing too many crease lines — the motif muddles.
Tattoo Aftercare Products
Healing & Cleansing:
- green-soap (~$8–$20)
Moisturizing & Protection:
- tattoo-aftercare-balm (~$8–$25)
Sun Protection:
- spf-50-sunscreen (~$10–$30)
I've found consistent aftercare cuts down visible scabbing for most clients; roughly 1 in 4 people I see need a touch-up within a year, often from sun exposure or friction. Proper cleansing and daily SPF once healed makes a noticeable difference in color longevity.
Tattoo Care Tips
Keep it Clean: Gently wash with green-soap twice daily to remove bacteria without stripping moisture.
Moisturize Lightly: Apply a thin layer of tattoo-aftercare-balm to prevent heavy scabbing.
Avoid Direct Sun: Use spf-50-sunscreen on healed ink to slow fading.
Skip Swimming: Hold off on pools and oceans for at least two weeks to prevent infection.
Choose an Artist for the Style: Match the design to an artist’s portfolio — linework needs a steady-lined specialist.
Plan for Touch-Ups: Budget for a small touch-up session within 6–12 months if your piece is in a high-wear spot.
