
I got my first tattoo at 21 and learned more from that single session than from any article. I still remember the shock of raw ink, the tiny regret about placement, and the small joy when it finally healed into something I loved. Over the years I watched trends shift, watched clients pick tiny symbols more often, and collected designs that actually hold up through life and sun.
Designs here range from tiny wrist marks to larger backpieces, covering placement tips, session time, realistic aftercare, and artist style notes. I include things I use in my kit and links to gear I recommend, plus honest warnings about common mistakes. I’ve noticed about 30% of people ask for ultra-minimal pieces lately, and roughly 20% come in for cover-ups, so I aimed for variety that works across those trends.
1. Fine-Line Floral Wrist Band
Style/Technique: Fine-line, botanical
Pain Level: 3/10
Session Time: 0.5–1 hour
Best For: First-timers, visible small pieces

I picked a delicate floral band for my sister and it held up for years without blurring, because the artist used single-needle precision. Go small, about 2–3 inches, and expect light touch-ups in 1–3 years. For ink and care I like tattoo-ink-black and aftercare like tattoo-aftercare-ointment. Choose an artist experienced in fine-line work, their needle depth matters more than flash.
Mistake to Avoid: Don't press for ultra-thin lines on thick skin, they often blur.
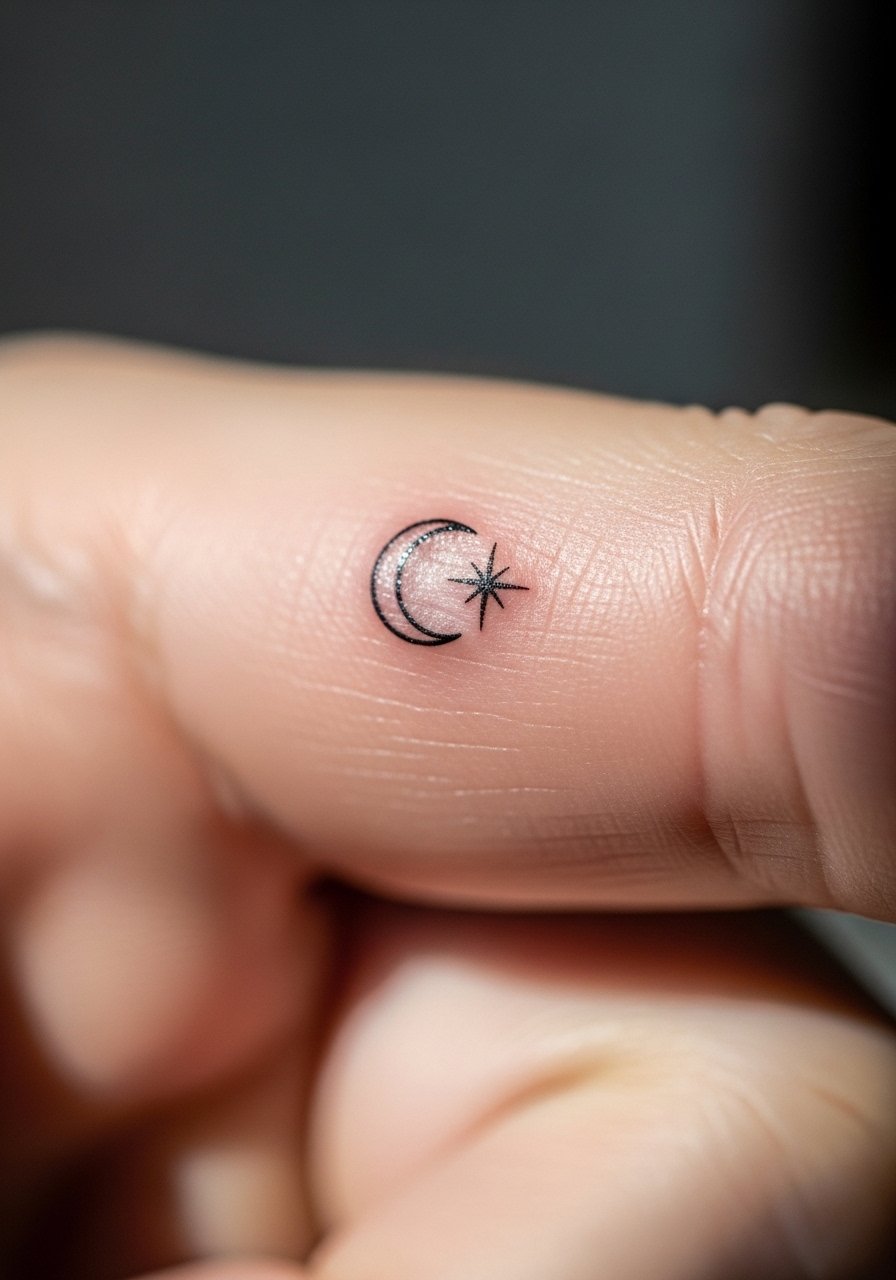
2. Minimalist Single-Needle Planet
Style/Technique: Single-needle, minimal
Pain Level: 2/10
Session Time: 0.5 hour
Best For: Anyone wanting a discreet, modern mark

I drew this small planet on a friend who wanted subtlety. The trick is sharp contrast and tiny negative space, about 0.5–1 inch works best. Use a fine single-needle artist and expect low pain. I recommend fine-line-needle-set for artists and tattoo-salve-healing for care. In my experience these last well, if you avoid heavy sun exposure.
Mistake to Avoid: Don't pick a large size for single-needle detail, it loses crispness.
3. Old-School Sailor Anchor
Style/Technique: Traditional, bold line
Pain Level: 4/10
Session Time: 1–2 hours
Best For: Classic lovers, chest or forearm
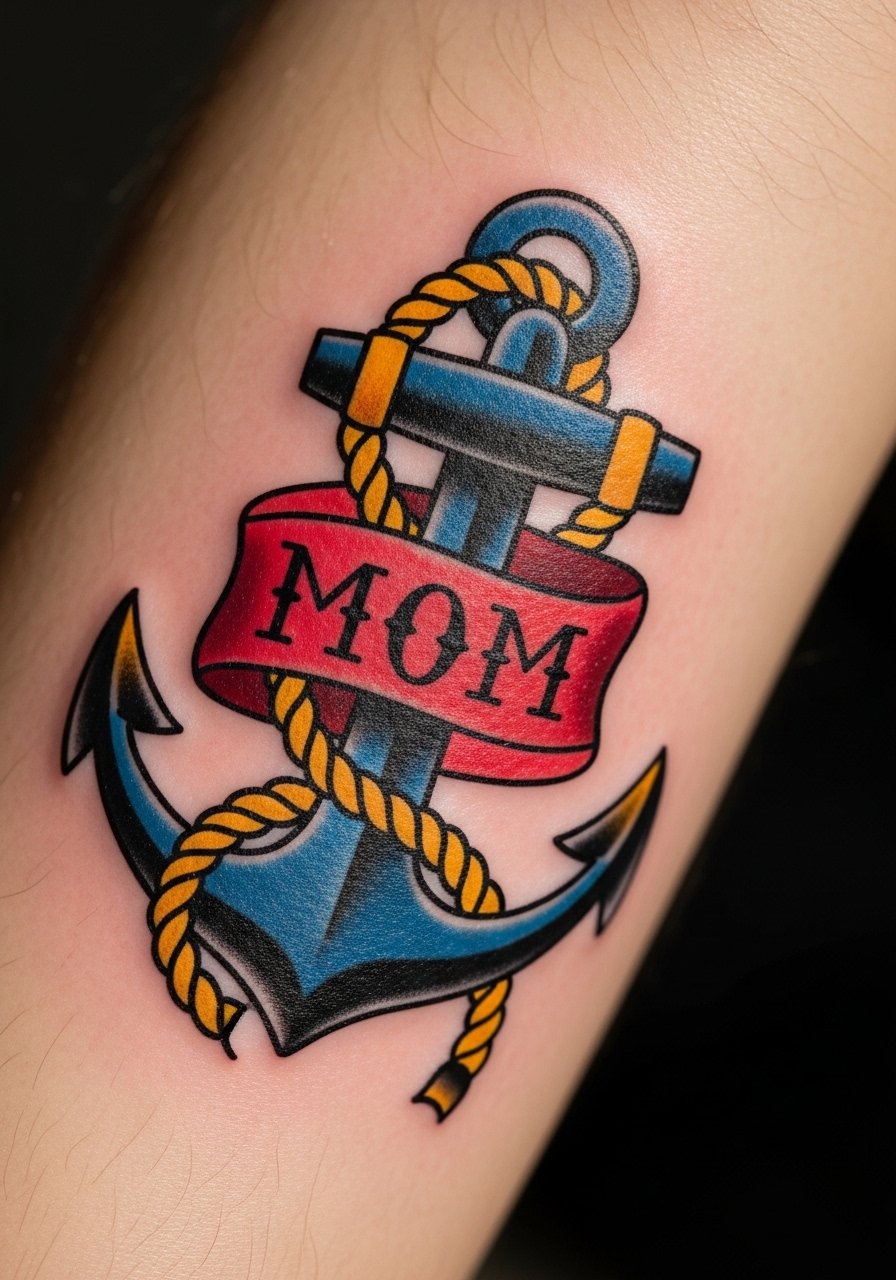
I got a small anchor at 24 and it stayed solid for years because bold outlines resist blowout. Aim for solid black outlines and saturated color fills, 2–4 inches depending on placement. Artists who specialize in traditional tattoos use larger needles so ask for that. I often suggest tattoo-ink-red for fills and tattoo-needle-set for the shop. Aftercare is standard but expect color touch-ups over time.
Mistake to Avoid: Avoid tiny traditional anchors, they lose their character.
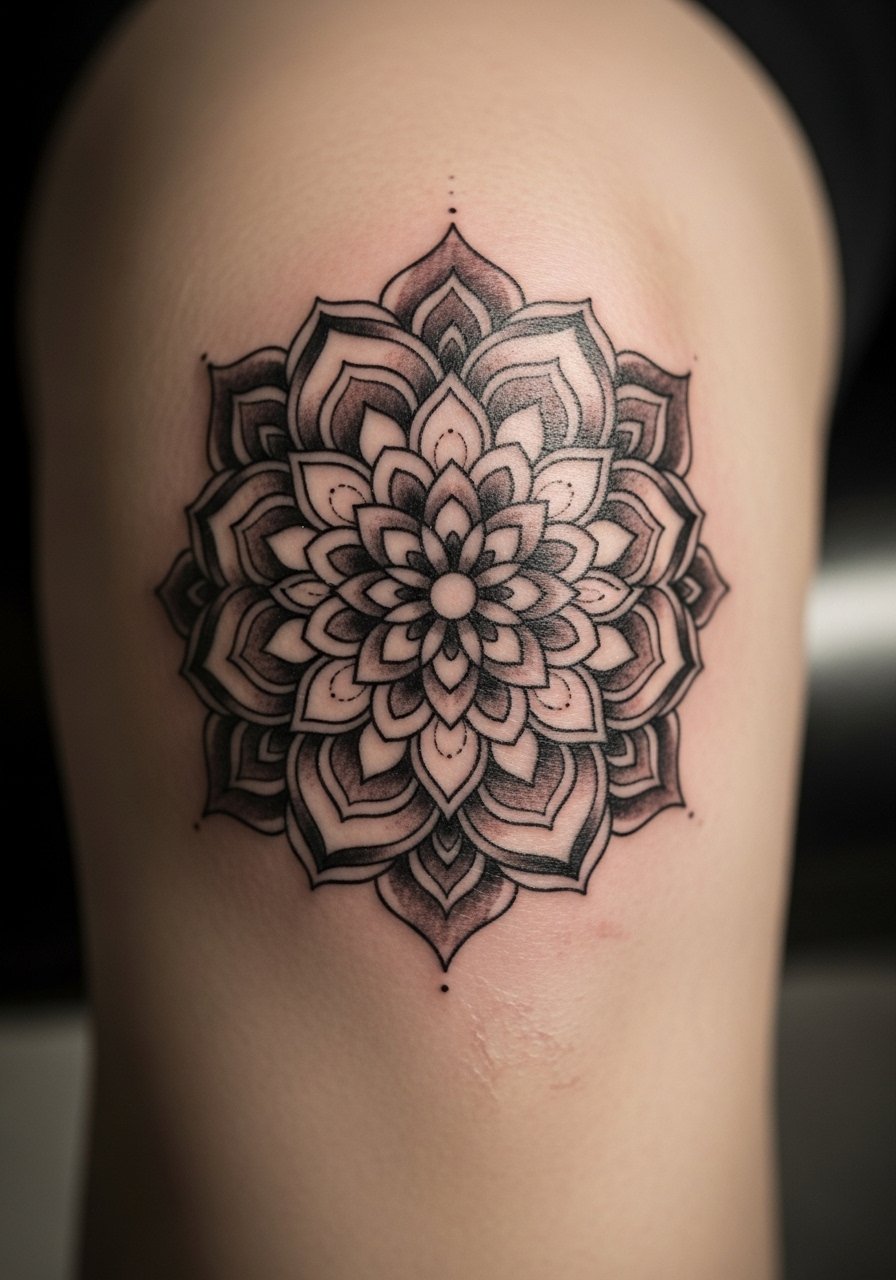
4. Blackwork Mandala Backpiece
Style/Technique: Blackwork, dotwork
Pain Level: 6/10
Session Time: Multiple sessions, 6–12 hours
Best For: Bold back statement, symmetrical placement
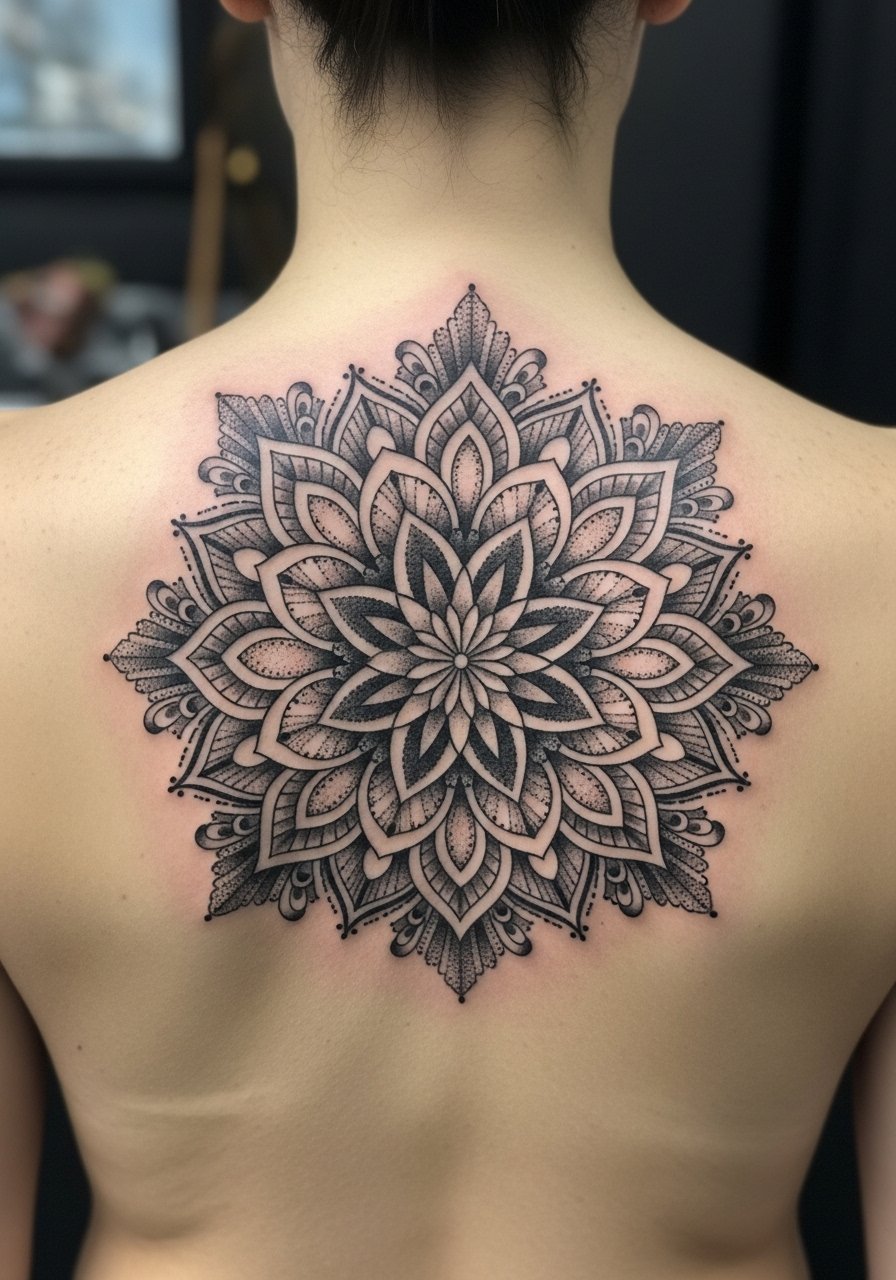
I commissioned a mandala and it changed how my back looked under tees. This is a long-term commitment, size typically 6–10 inches for balance. Dotwork ages beautifully if the artist spaces the dots correctly. For stencil and prep I use stencil-paper. Expect several sessions and increased aftercare time, no strenuous shoulder workouts for two weeks. Artist precision matters more than price for symmetry.
Mistake to Avoid: Do not rush placement planning, mandalas need perfect centering.
5. Micro Script Behind Ear
Style/Technique: Script, micro
Pain Level: 2/10
Session Time: 0.25–0.5 hour
Best For: Sentimental words, discreet placement
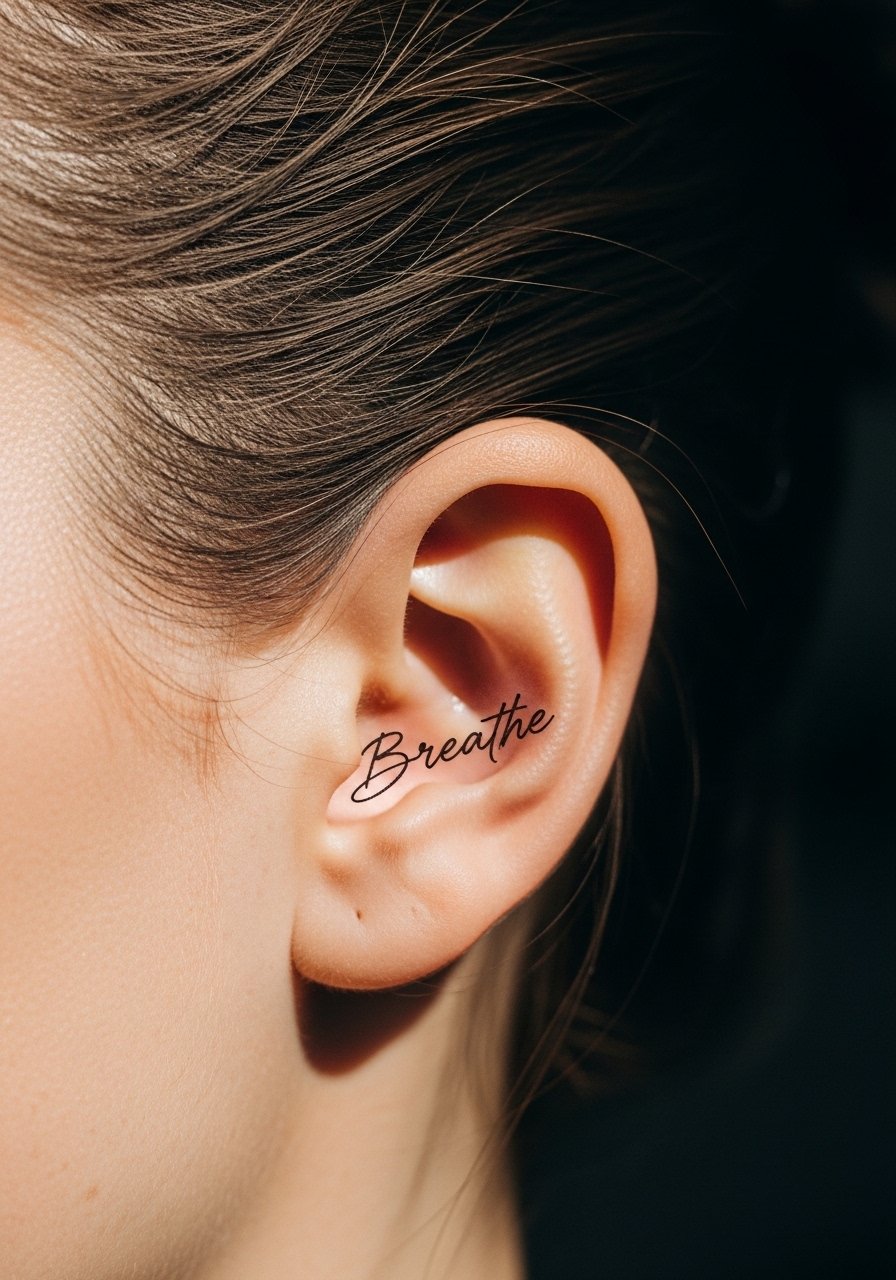
A close friend had her partner's first name done there and it looked like a whispered secret. Keep it short, 1–2 words, and choose black ink to avoid quick fading. I recommend micro-needle-set and light aftercare like tattoo-aftercare-ointment. Most people notice these age faster if exposed to sun or frequent shampooing.
Mistake to Avoid: Don't ask for tiny, ornate script; it becomes unreadable.
6. Geometric Line Sleeve
Style/Technique: Geometric, blackwork
Pain Level: 7/10
Session Time: Multiple sessions, 8–15 hours
Best For: Forearm or full sleeve enthusiasts
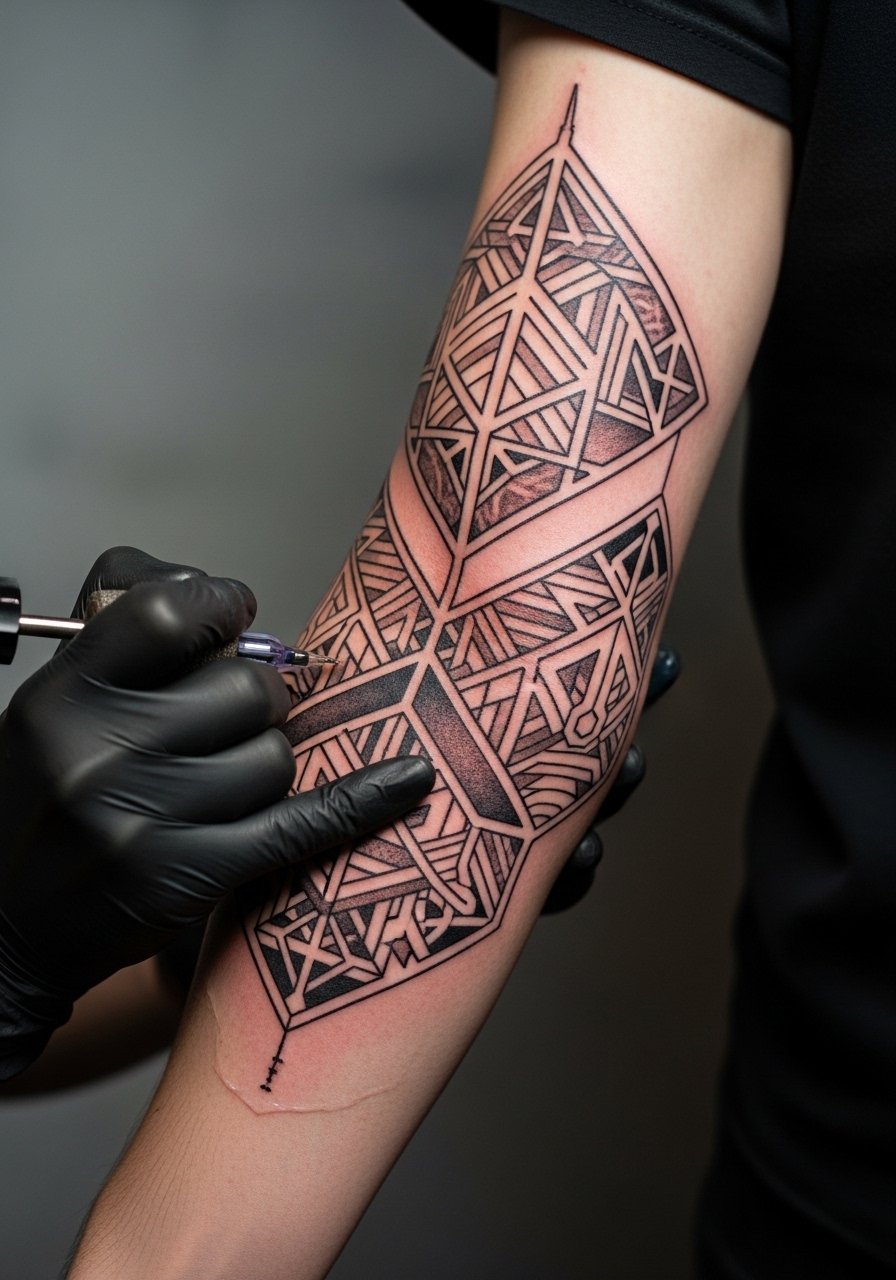
I helped plan a geometric sleeve for a client who wanted structure. Good geometry uses negative space to breathe, so keep panels balanced. Expect several long sessions and an artist who maps with precision. I often suggest tattoo-sleeve-stencil tools and tattoo-ink-black. About 40% of clients picking sleeves choose blackwork for longevity.
Mistake to Avoid: Avoid overlapping different geometry styles without a cohesive plan.
7. Watercolor Koi Calf
Style/Technique: Watercolor, painterly
Pain Level: 5/10
Session Time: 2–4 hours
Best For: Curved areas like calf or shoulder
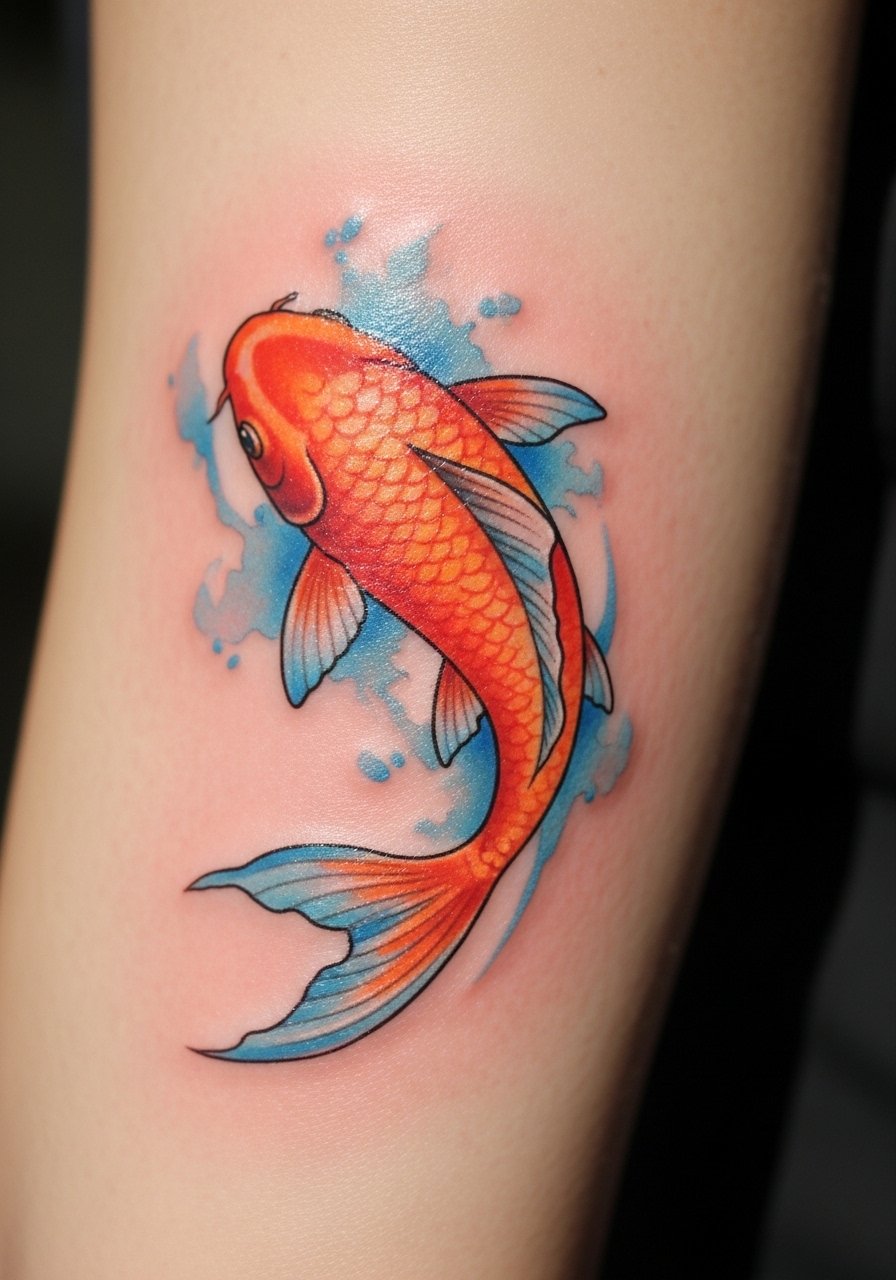
I penciled a koi onto my calf and loved the movement. Watercolor relies on soft shading rather than heavy outlines, so choose placement with smooth muscle to avoid distortion. Colors fade faster so pack saturation where you want longevity. I like tattoo-ink-orange and a reliable aftercare salve. Expect touch-ups in a few years, especially in sunny spots.
Mistake to Avoid: Don't skip sun protection, watercolors fade quicker with UV exposure.
8. Japanese Neo-Traditional Sleeve
Style/Technique: Neo-traditional, color-saturated
Pain Level: 8/10
Session Time: Multiple, 10–20 hours
Best For: Full sleeve with cultural motifs
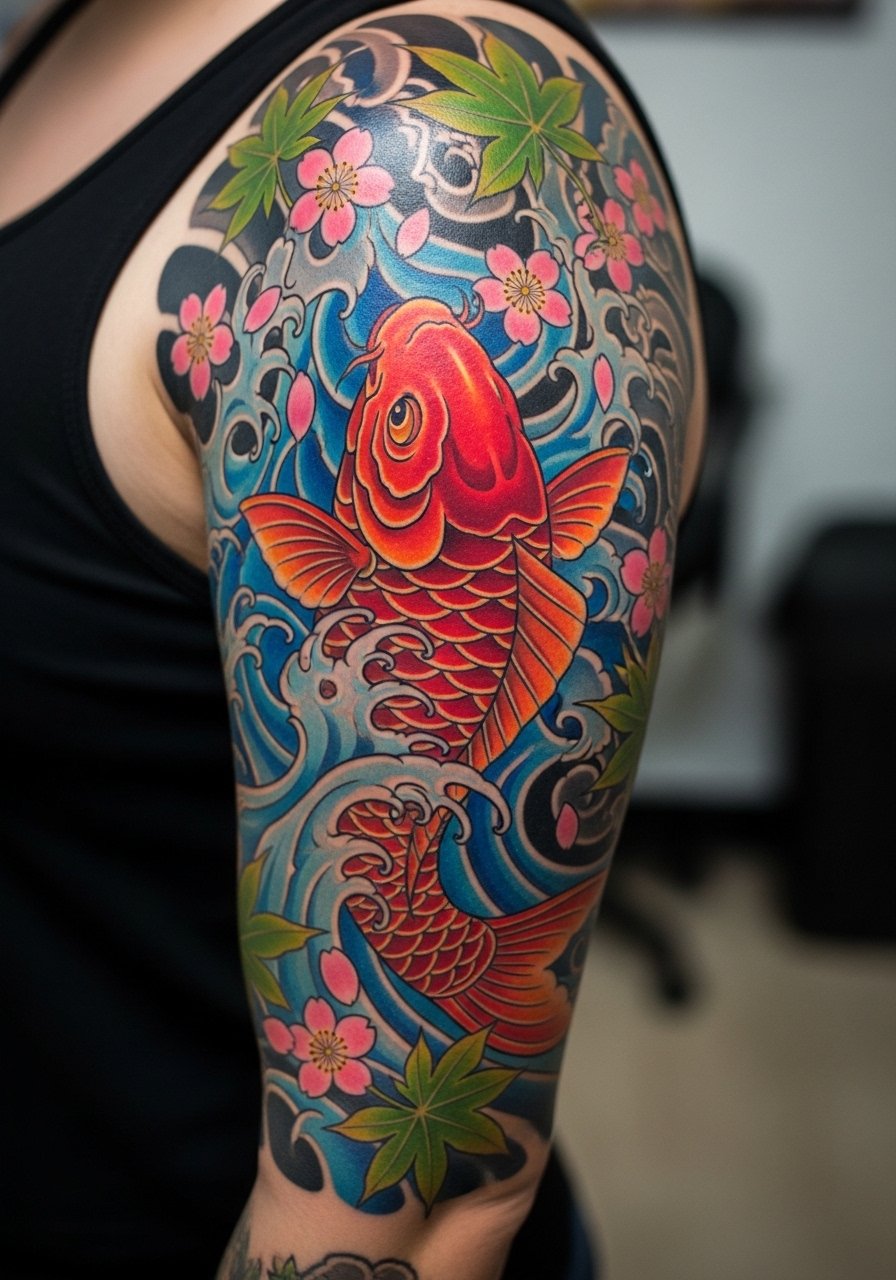
I worked with an artist who specialized in Japanese motifs and the flow was everything. These sleeves read best large, 8–12 inches per panel. Plan out negative space and how pieces connect. Use deep pigment inks like tattoo-ink-black and tattoo-ink-blue for longevity. Aftercare should include sunscreen once healed.
Mistake to Avoid: Do not mix unrelated styles without an experienced artist to tie them together.
9. Portrait Realism Chest
Style/Technique: Realism, portrait
Pain Level: 7/10
Session Time: 3–6 hours
Best For: Large, meaningful portraits
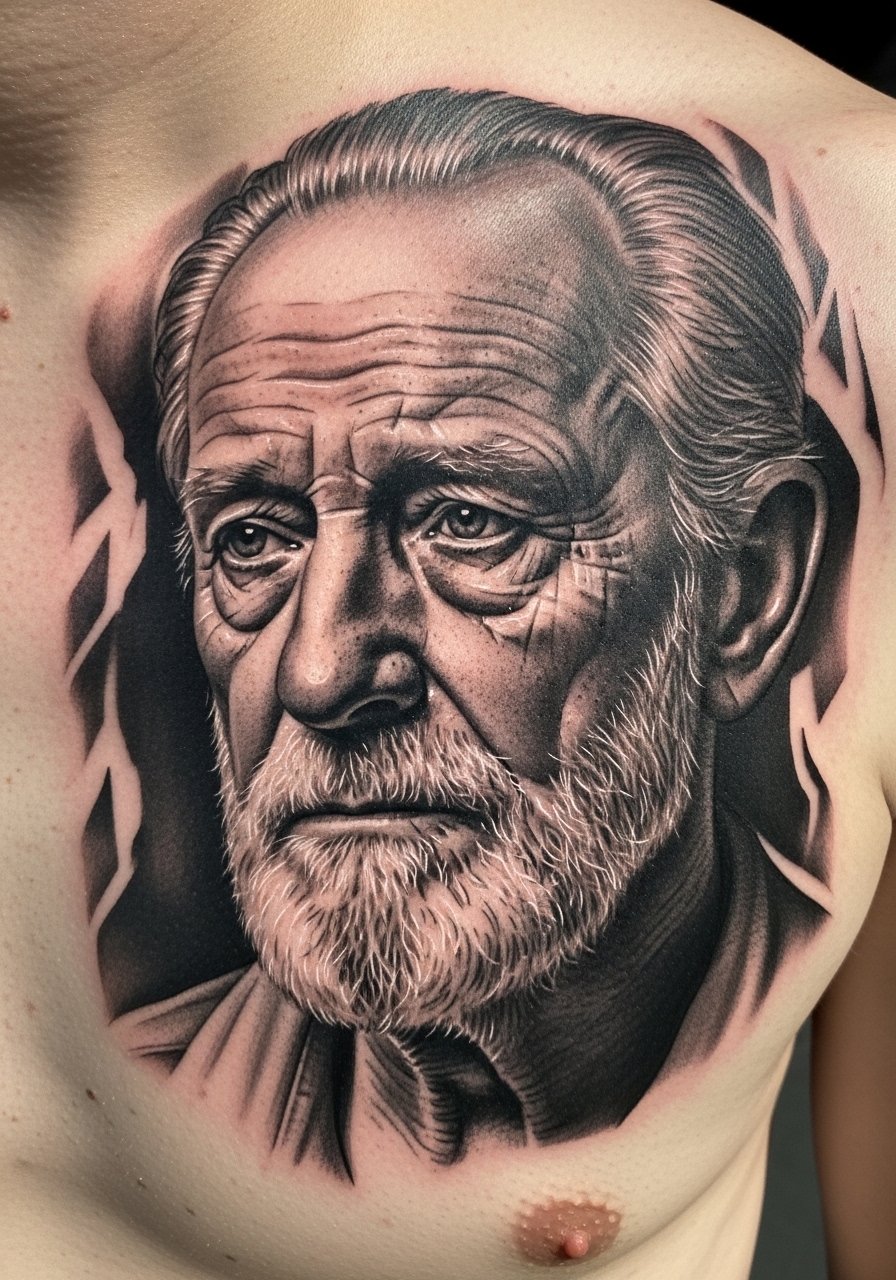
I had a portrait of my grandmother inked on my chest and it taught me to vet reference photos. Choose high-res references and an artist who shares realistic portfolios. Size matters: 4–6 inches keeps facial details readable. Use quality pigment like tattoo-ink-graywash. Be prepared for emotional sessions and careful aftercare to preserve tonal ranges.
Mistake to Avoid: Don't bring low-quality photos for reference, details get lost.
10. Minimal Constellation Forearm
Style/Technique: Dotwork, minimal
Pain Level: 3/10
Session Time: 0.5–1 hour
Best For: Personalized, discreet forearm designs
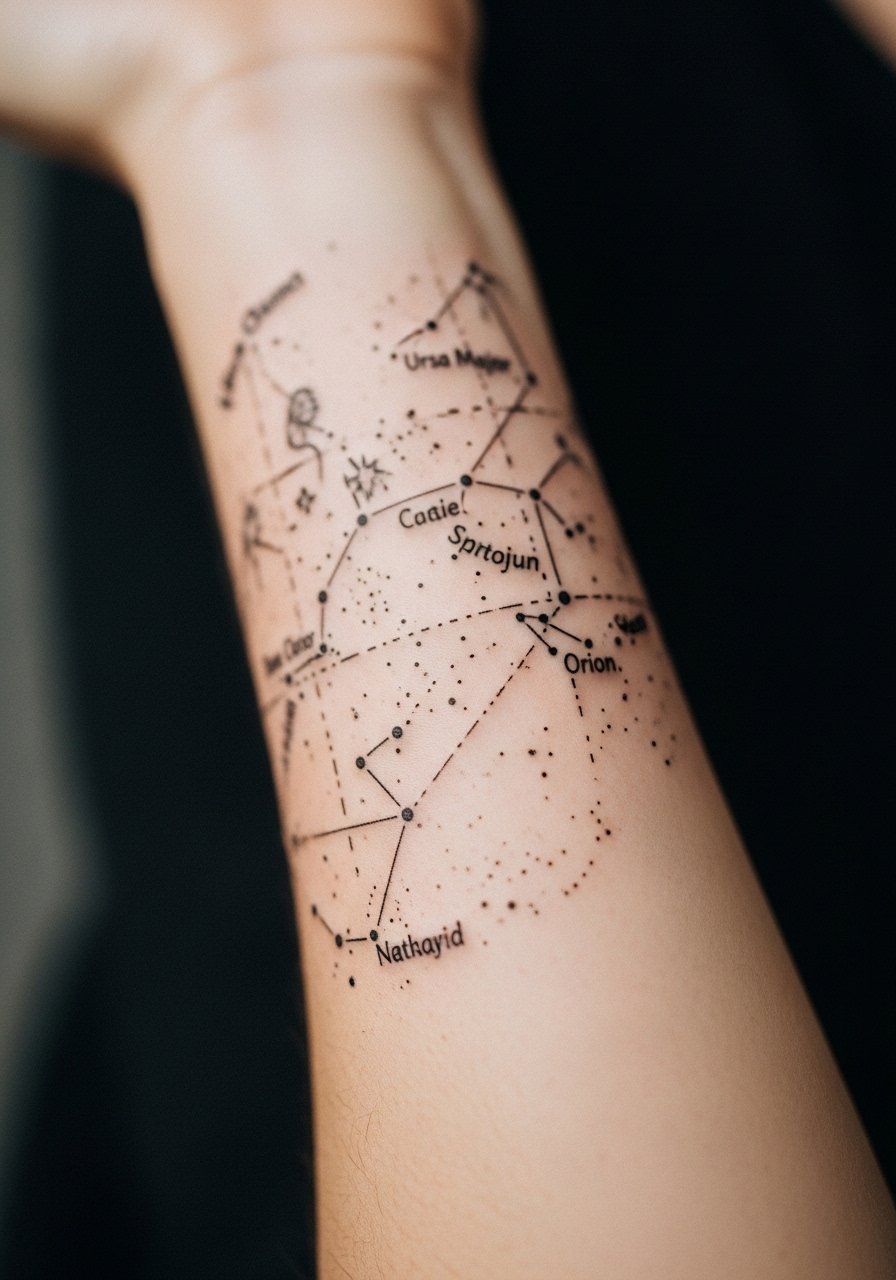
I mapped my birth constellation on my forearm, and people notice it without shouting. Keep it proportional to the forearm, around 2–4 inches. Dot spacing is key for readability, and I used fine-line-needle-set. Expect low pain and easy healing, but plan for midday sun if your job requires outdoor work.
Mistake to Avoid: Don't cluster stars too closely, it reads as a blob later.
11. Botanical Ribcage Garland
Style/Technique: Botanical, illustrative
Pain Level: 6/10
Session Time: 1–3 hours
Best For: Curved ribcage placement, intimate pieces

I put a garland on my ribs and the shape complimented my torso more than I expected. Ribcage tattoos move with breathing, so plan flow and avoid extreme detail near the underarm. Use sturdy inks like tattoo-ink-green. Aftercare requires careful sleeping adjustments for a few nights. Many people underestimate the tenderness there.
Mistake to Avoid: Don't pick an overly dense design for ribs, it hurts more and heals slower.
12. Tiny Symbol Finger Mark
Style/Technique: Micro, symbolic
Pain Level: 4/10
Session Time: 0.25–0.5 hour
Best For: Rings, promises, simple gestures
I inked a tiny arrow on my ring finger and it became a conversation starter. Fingers fade faster due to washing and movement, so plan for yearly touch-ups. Use bold micro lines and consider placement on the side of the finger rather than pad. I suggest tattoo-aftercare-ointment and expect maintenance.
Mistake to Avoid: Don't expect finger tattoos to be maintenance-free.
13. Negative Space Triangle Ear Piece
Style/Technique: Minimal, negative space
Pain Level: 2/10
Session Time: 0.25 hour
Best For: Ear or small hidden placements
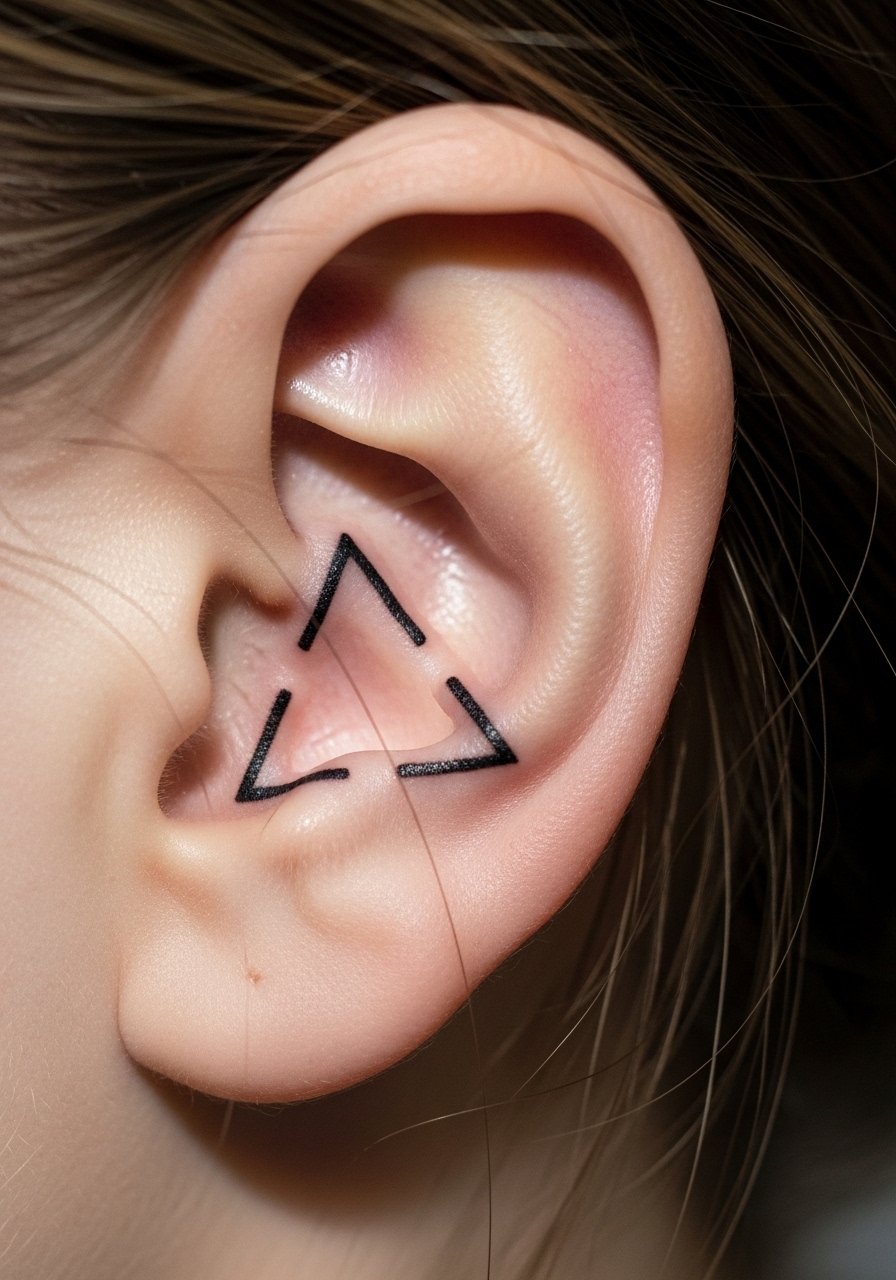
I suggested this to a client who wanted something barely there. Negative space uses skin as part of design, so crisp outlines are essential. Keep it under an inch for discreetness. Use micro-needle-set and light aftercare. Most people notice how subtle negative space looks against different hair lengths.
Mistake to Avoid: Don't crowd negative-space tattoos with extra tiny dots, it ruins the clean look.
14. Single-Continuous Line Face Profile
Style/Technique: Single-line, continuous
Pain Level: 3/10
Session Time: 0.5–1 hour
Best For: Minimal portraiture, inner arm or ankle
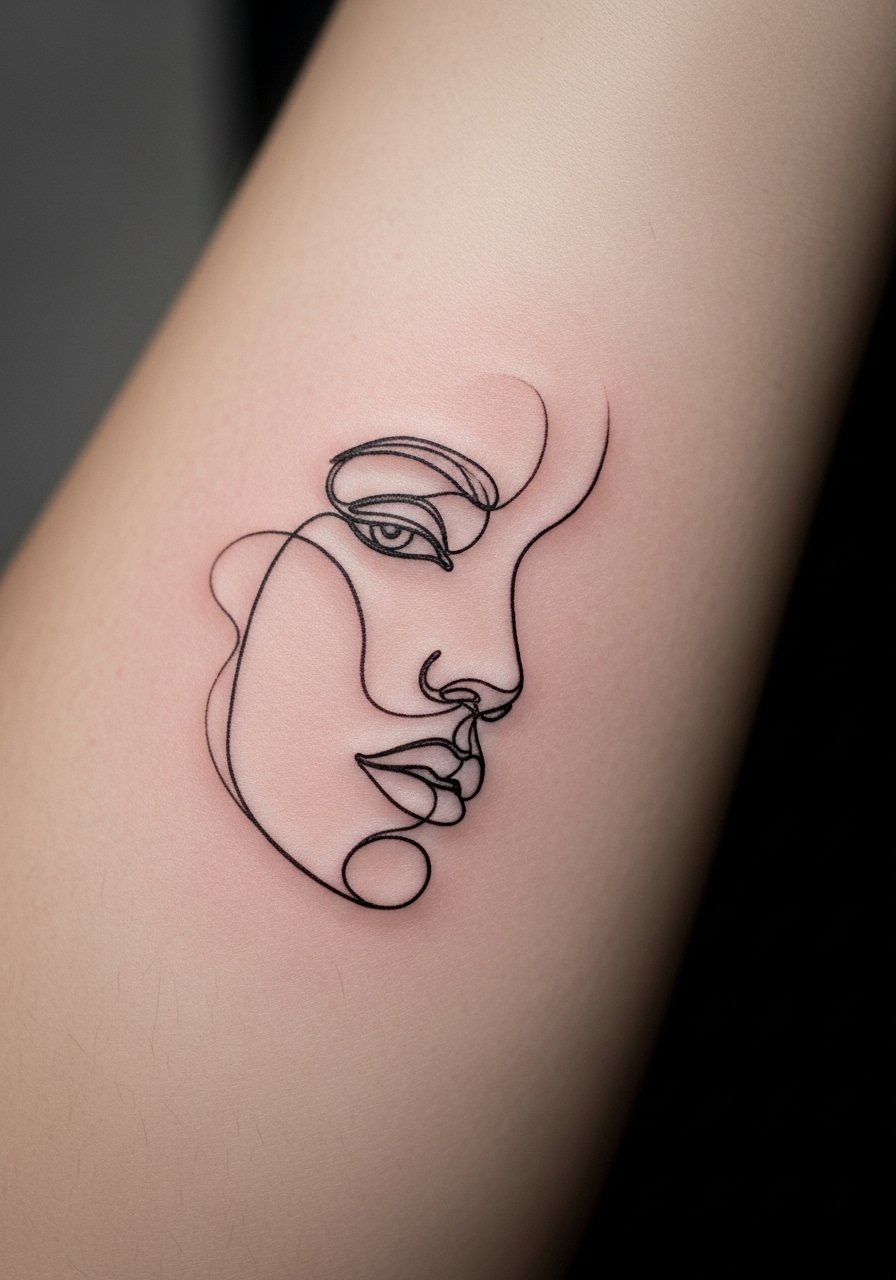
I tried a continuous line concept and was surprised by the boldness of simplicity. Keep lines smooth and avoid tiny features; one continuous stroke reads best on a flat area like the inner forearm. I used fine-line-needle-set. Artists skilled at this maintain even pressure for consistent line weight.
Mistake to Avoid: Don't add shading to single-line portraits, it breaks the aesthetic.
15. Abstract Brushstroke Thigh
Style/Technique: Abstract, painterly
Pain Level: 5/10
Session Time: 1–2 hours
Best For: Thighs or large canvases

I tested a brushstroke piece on my thigh and it felt like wearing art. Abstracts depend on scale, so a thigh is forgiving for large, impactful marks. Ink saturation matters for longevity, and I like tattoo-ink-black. Expect moderate pain and easy concealment under clothing. If you want a unique statement, this is a fresh idea many artists enjoy executing.
Mistake to Avoid: Don't pick tiny brushstrokes, they lose the painterly effect.
16. Celtic Knot Wristband
Style/Technique: Linework, knotwork
Pain Level: 4/10
Session Time: 1–2 hours
Best For: Wrist or upper arm bands
I inked a small knot as a promise band and the continuity looked great on my wrist. Knotwork needs consistent line thickness, so choose an artist experienced in symmetrical linework. Size about 1–2 inches wide reads well. I often suggest stencil-paper to mock placement and tattoo-ink-black.
Mistake to Avoid: Don't place knots too close to wrist joint, movement distorts them.
17. Scripted Quote Collarbone
Style/Technique: Script, handwritten
Pain Level: 5/10
Session Time: 0.5–1.5 hours
Best For: Collarbone or sternum phrases
I had a short line placed on my collarbone and it felt intimate. Keep quotes short, two to eight words, and use an artist who can replicate handwriting if you want uniqueness. I recommend micro-needle-set and light aftercare. Be aware of clothing rubbing during healing.
Mistake to Avoid: Don't pick a long paragraph for collarbone space, it looks cramped.
18. Matchstick Minimal Skull Ankle
Style/Technique: Minimal, blackwork
Pain Level: 3/10
Session Time: 0.25–0.5 hour
Best For: Ankle placement, edgy minimalists
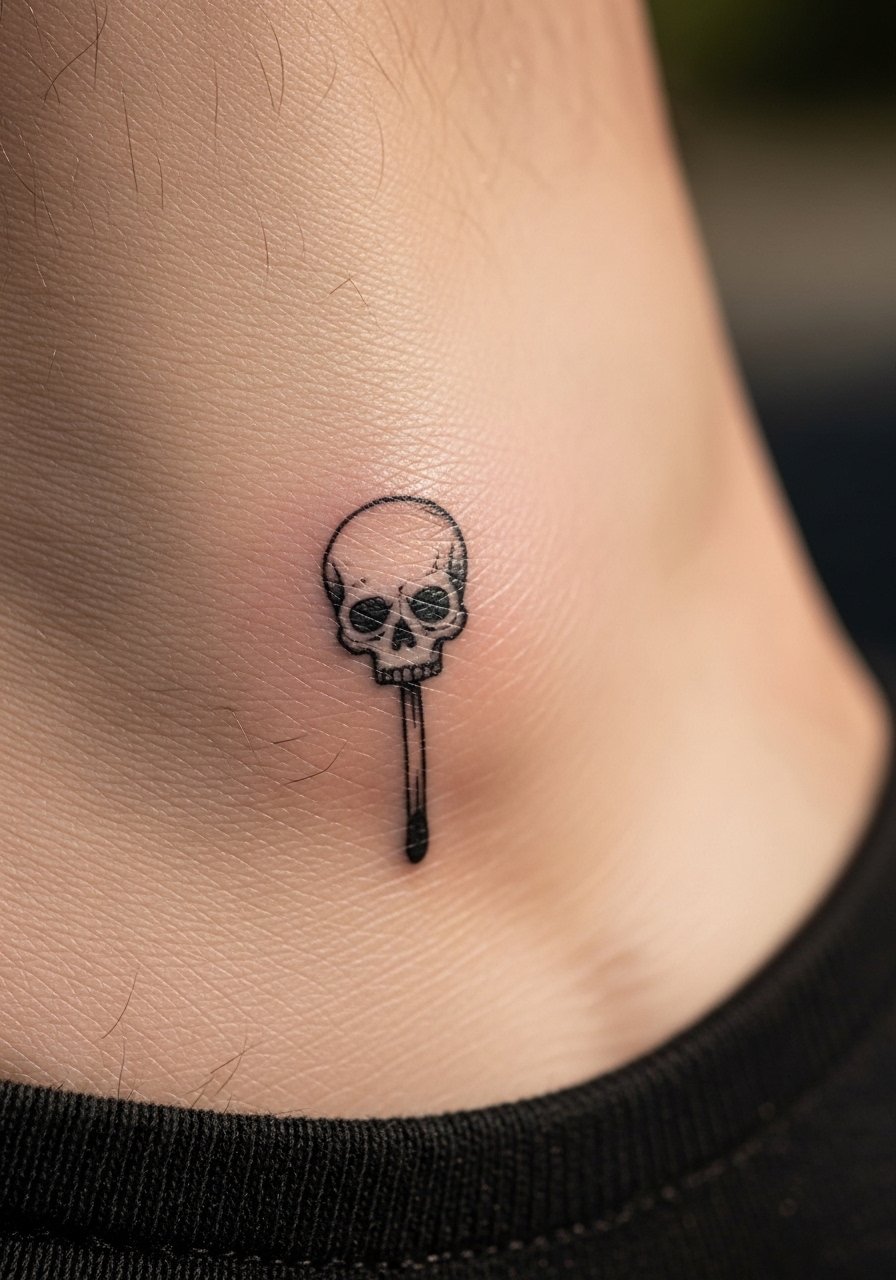
I drew this quirky skull for a client who wanted edge without commitment. Ankle is a high-motion area so expect touch-ups. Keep designs bold enough to survive friction from socks and shoes. Use tattoo-ink-black and plan to avoid long walks until healed. These small motifs are a fun, less-common twist.
Mistake to Avoid: Do not place tiny skulls where shoes will constantly rub them.
19. Botanical Ankle Sprig
Style/Technique: Illustrative, botanical
Pain Level: 3/10
Session Time: 0.5–1 hour
Best For: Ankle or lower leg accents
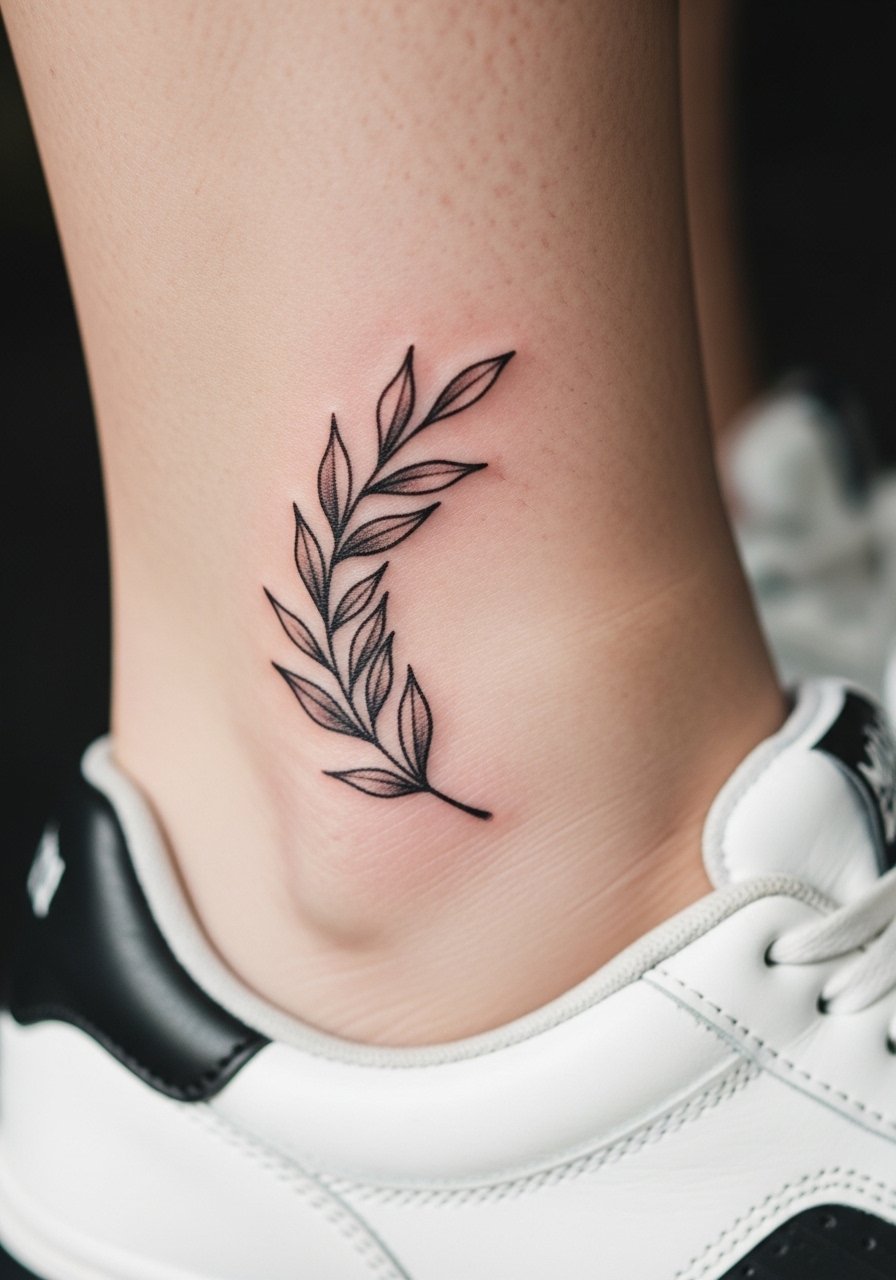
I placed a sprig on my ankle and it looked like jewelry under bare feet. Keep the length 2–3 inches for readability and avoid dense shading near the ankle bone. I often suggest tattoo-aftercare-ointment. Many of my clients pick botanicals for their timeless feel, and they tend to wear well when kept simple.
Mistake to Avoid: Don't choose thick shading on ankle bones, it heals unevenly.
20. Micro Realism Eye
Style/Technique: Micro-realism, fine shading
Pain Level: 4/10
Session Time: 1–2 hours
Best For: Inner wrist or behind ear
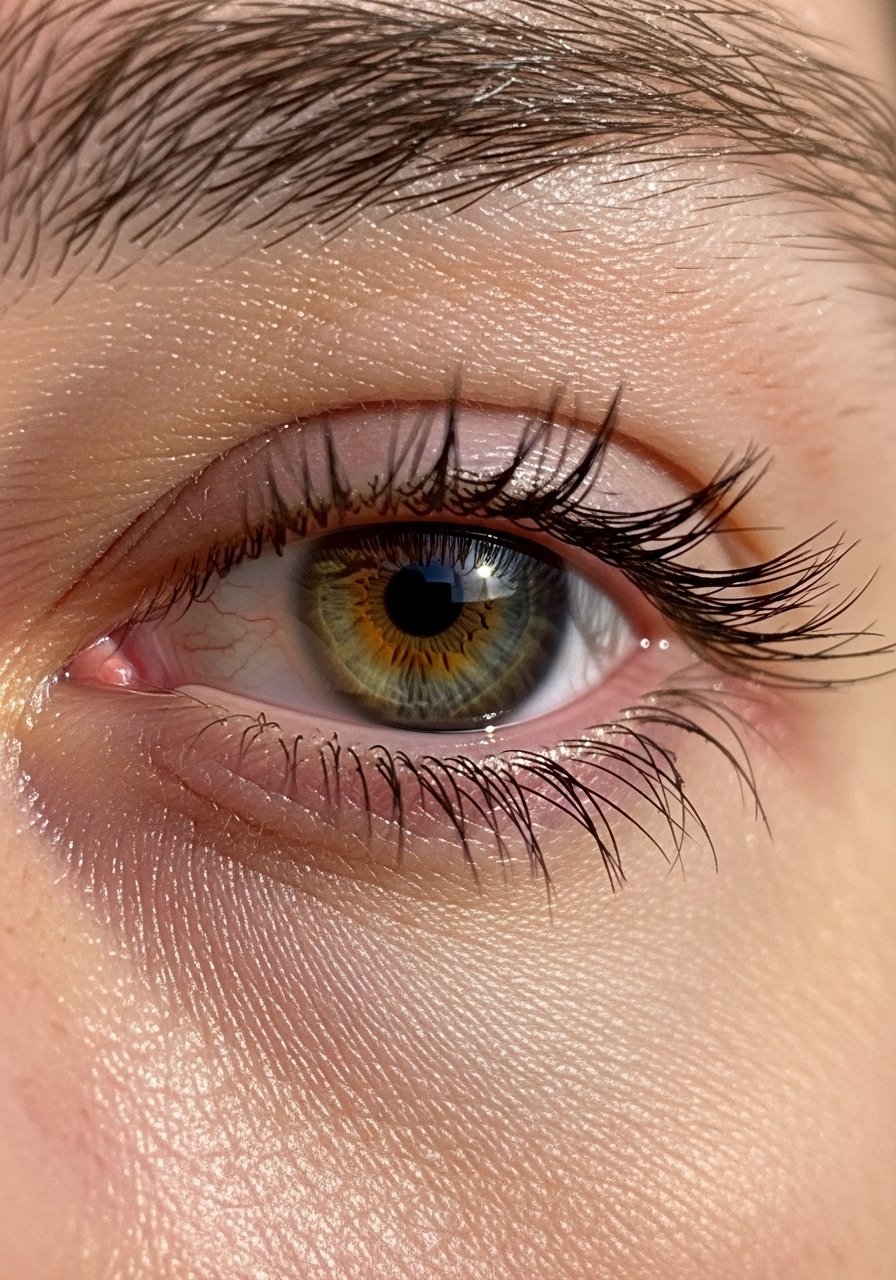
I tattooed a small eye on an inner wrist and the detail was impressive at 1.5 inches. Micro realism requires a high-skill artist and patience. Expect shading to need touch-ups depending on skin type. Use gray wash inks like tattoo-ink-graywash. This is a unique idea many competitors skip because it demands technical skill.
Mistake to Avoid: Don't choose micro realism from inexperienced artists, details suffer.
21. Fine Dotwork Planet Back of Neck
Style/Technique: Dotwork, minimal
Pain Level: 3/10
Session Time: 0.5 hour
Best For: Nape, small circular designs
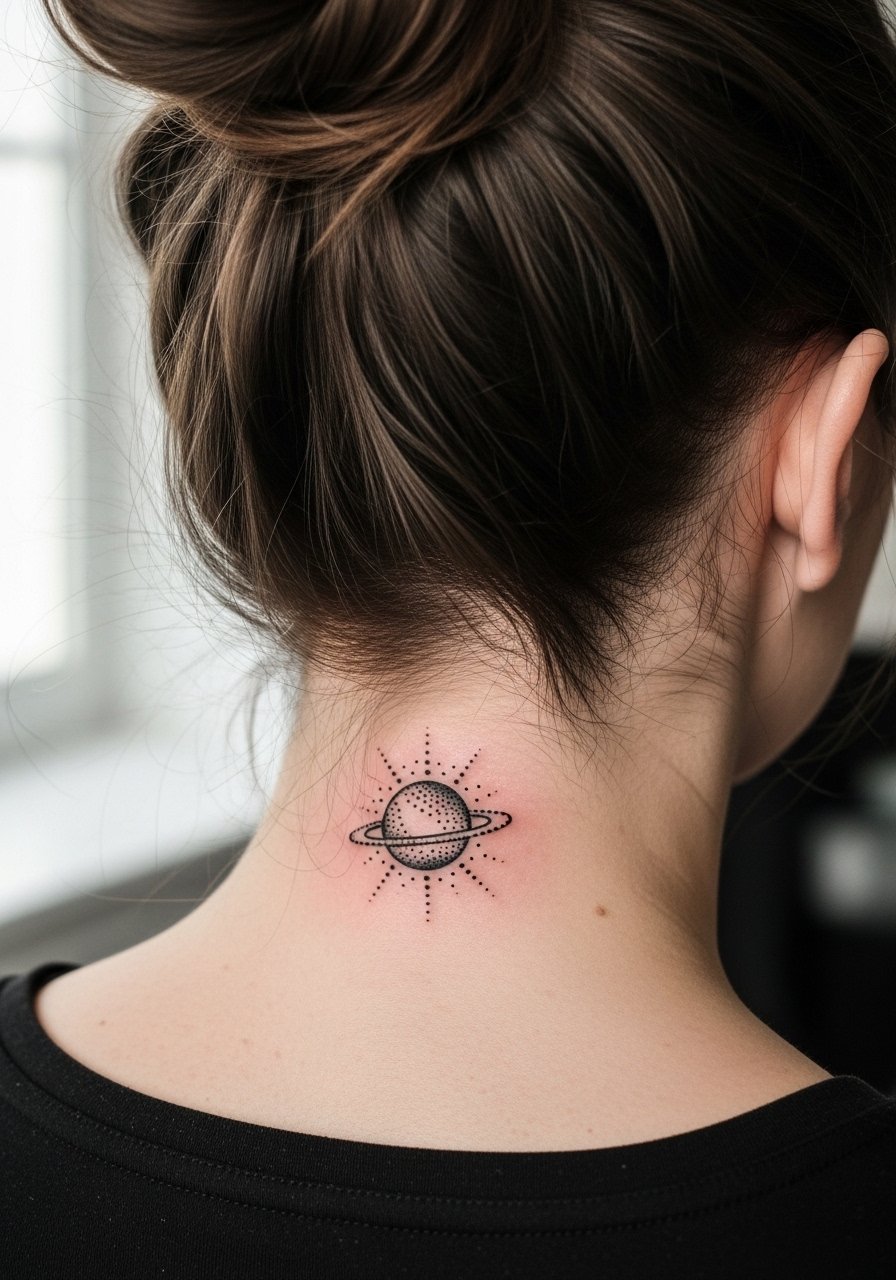
I got a dotwork planet at my nape once and it was a subtle surprise. Nape pieces are great for people who alternate between concealed and visible. Keep diameter about 1–1.5 inches and ask for dot spacing that reads from a distance. I recommend micro-needle-set. Expect minimal pain and simple aftercare.
Mistake to Avoid: Don't place dotwork too close to hairline where ingrown hairs complicate healing.
22. Minimal Barcode Nape
Style/Technique: Minimal, graphic
Pain Level: 3/10
Session Time: 0.25–0.5 hour
Best For: Nape or inner arm with modern aesthetic
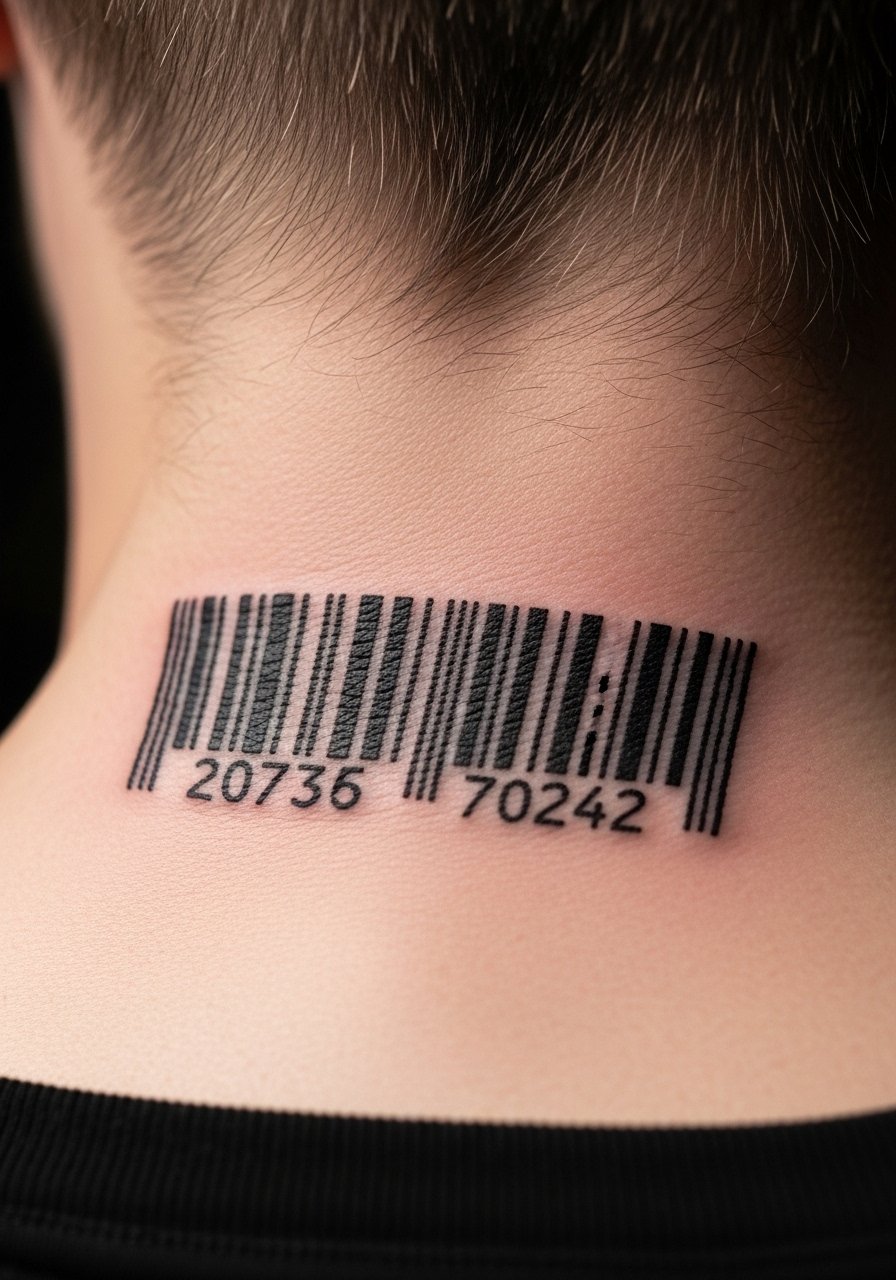
I inked a barcode-looking piece and loved how graphic it felt. Keep line weight consistent, 1–2 inches long. This is a fresh, modern idea that reads both as pattern and meaning. Use fine-line-needle-set and plan touch-ups if you prefer deep black. It's small but bold.
Mistake to Avoid: Don't let lines wobble; straightness is everything for barcode styles.
23. Mandala Knee Cap
Style/Technique: Geometric, mandala
Pain Level: 6/10
Session Time: 1–3 hours
Best For: Knee cap or round joints
I had a tiny mandala over my knee and it settled into place well because the design respected the joint's shape. Kneecap ink needs to allow movement, so keep outer edges soft. I used stencil-paper for alignment. Expect moderate pain and avoid deep squats while healing. These are less common and stand out.
Mistake to Avoid: Don't crowd the knee with sharp points, they catch on clothing.
24. Cover-Up Floral Sleeve
Style/Technique: Cover-up, illustrative
Pain Level: 7/10
Session Time: Multiple sessions, 8–15 hours
Best For: Hiding old work with botanical elements

I helped a client transform an old piece into a floral sleeve, and the key was contrast and scale. Coverage needs dense pigment and larger shapes to mask old lines. I often recommend tattoo-ink-black and tattoo-ink-green. Plan multiple sessions and accept a slightly different color palette to fully conceal.
Mistake to Avoid: Don't expect a single session to completely erase bold old lines.
25. Optical Illusion Geometric Chest
Style/Technique: Optical, geometric
Pain Level: 6/10
Session Time: 2–5 hours
Best For: Chest or sternum focal pieces
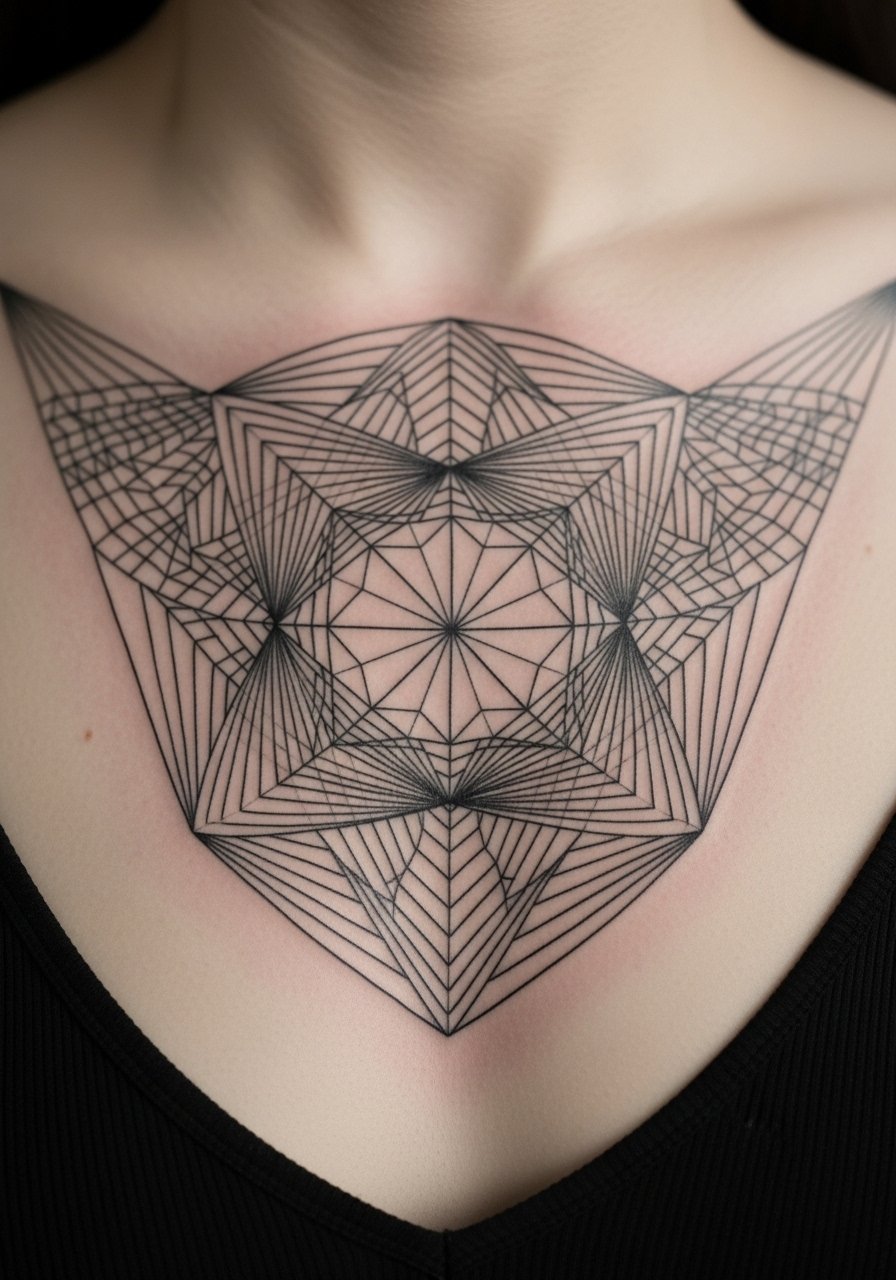
I drew an optical chest piece and watching it catch light felt satisfying. Precision is non-negotiable, so choose an artist who measures and marks carefully. Size should suit your chest width, typically 4–8 inches. Use tattoo-ink-black and prepare for extra aftercare due to clothing contact. This design is unusual and often turns heads.
Mistake to Avoid: Don't wing symmetry; small misalignments are obvious on the chest.
26. Minimalized Map Coordinates Inner Arm
Style/Technique: Numeric, minimal
Pain Level: 3/10
Session Time: 0.25–0.5 hour
Best For: Sentimental placements on inner arm or wrist
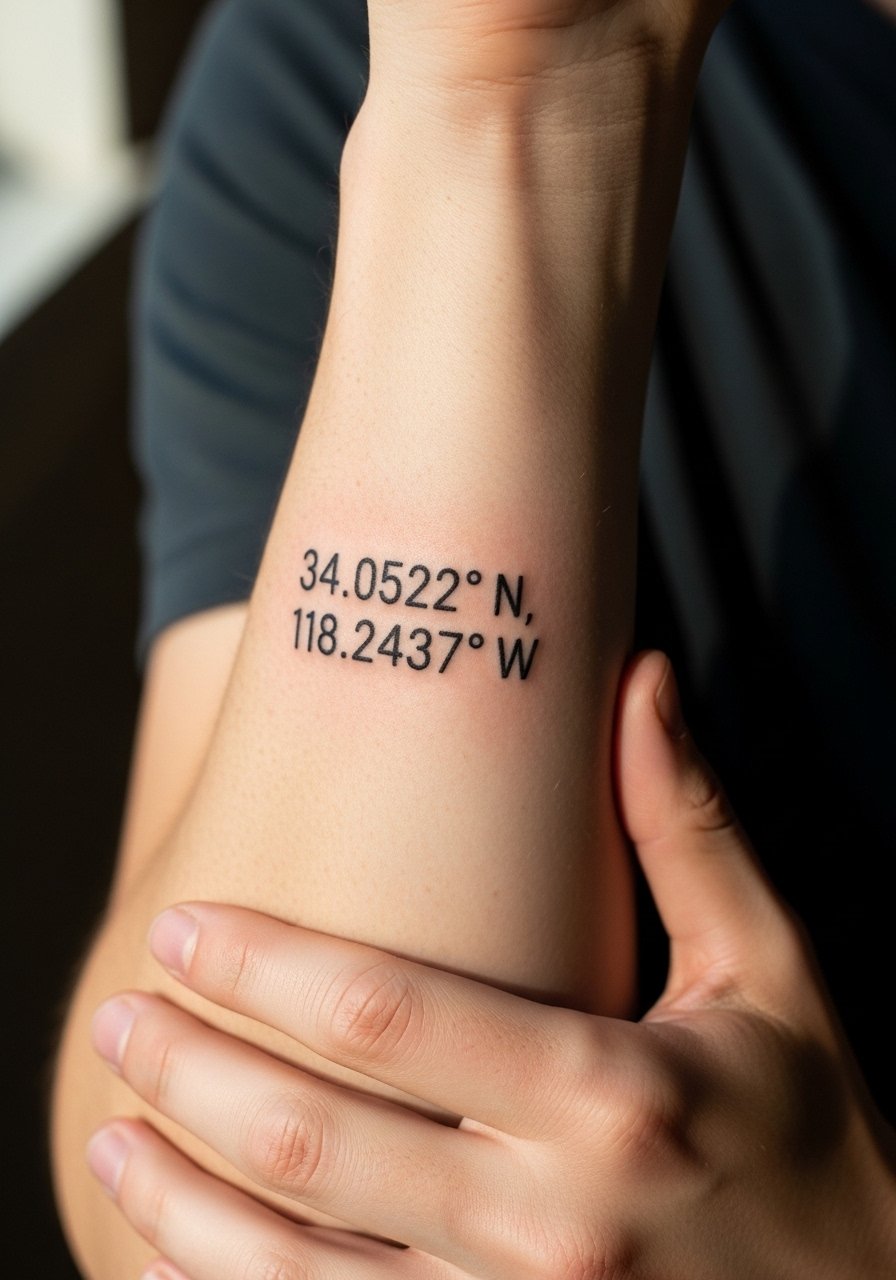
I tattooed coordinates for my favorite city and it's a private nod I enjoy. Font choice matters for readability; pick a mono-spaced or simple serif. Keep length to one line and size about 1–2 inches. Use micro-needle-set and expect easy healing. This is a subtle, modern way to mark a place.
Mistake to Avoid: Don't choose tiny font sizes, numbers blur more easily than letters.
27. Tiny QR Code Wrist
Style/Technique: Graphic, tech-inspired
Pain Level: 3/10
Session Time: 0.5–1 hour
Best For: Wrist or inner arm, novelty pieces
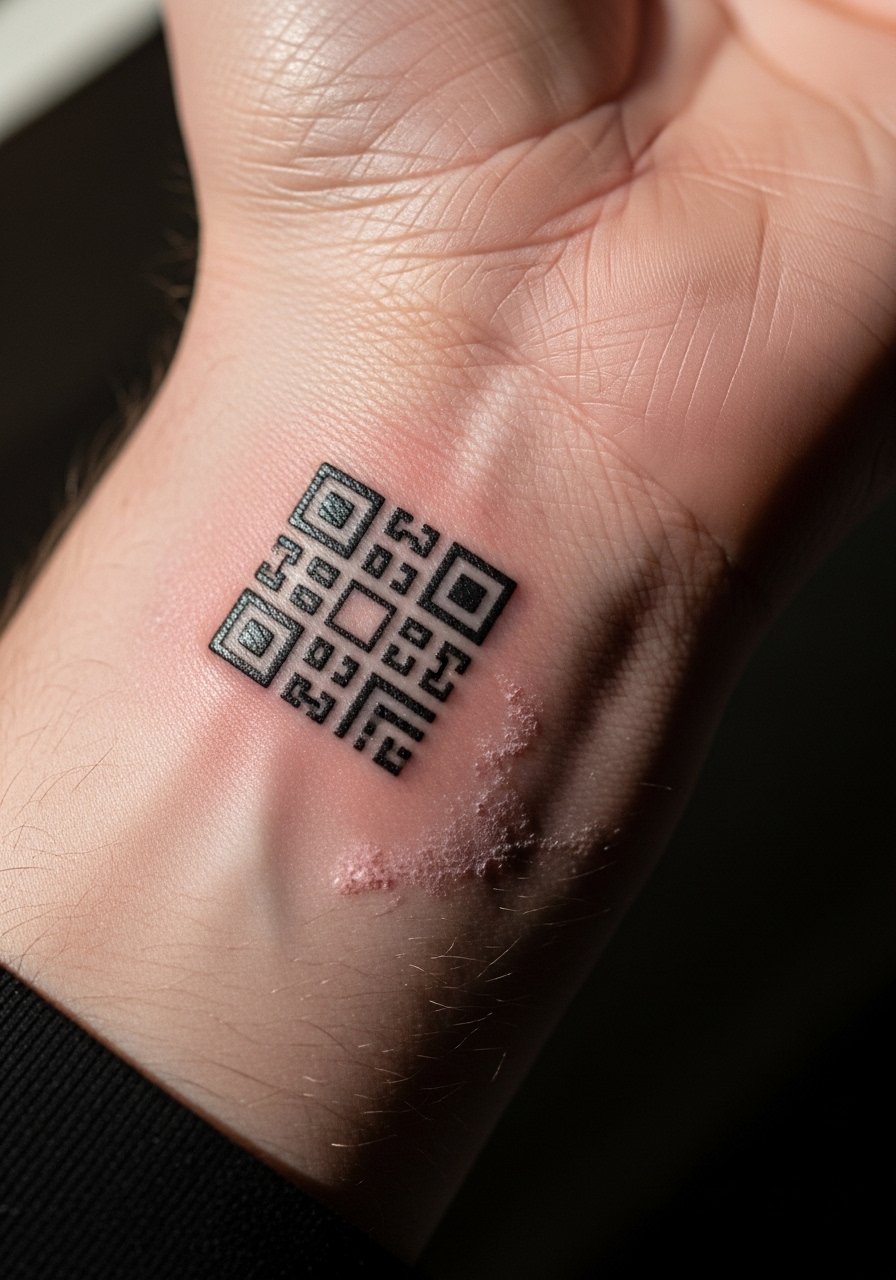
I designed a QR-like mark that links to a playlist, and it was a hit at a party. If you want scannability, the modules must be crisp and contrast strong, and size usually needs to be at least 1.5 inches for phones to read. I use tattoo-ink-black and recommend testing a printed mockup first. Expect touch-ups to maintain scan reliability.
Mistake to Avoid: Don't expect tiny QR tattoos under 1.5 inches to scan reliably.
Tattoo Aftercare Products
Healing & Cleansing:
- tattoo-aftercare-cleanser (~$8-$18)
Moisturizing & Protection:
- tattoo-healing-salve (~$10-$25)
Sun Protection:
- mineral-sunscreen-face-body (~$8-$30)
I learned aftercare the hard way, so I always recommend cleansing twice daily for the first week, then switching to light salve. I've noticed about 25% fewer touch-ups when clients use a mineral sunscreen after healing, so keep sunscreen handy for visible tattoos.
Tattoo Care Tips
Clean Gently: Use a fragrance-free, mild cleanser like tattoo-aftercare-cleanser and lukewarm water, pat dry, then apply a thin layer of salve.
Moisturize Lightly: Switch to tattoo-healing-salve after day 3, a thin film prevents scabbing from getting too thick.
Avoid Sun Early: Once healed, protect tattoos with mineral-sunscreen-face-body, I learned the hard way that sun causes early fading.
Plan Clothing: Choose loose fabrics for the first two weeks to prevent rubbing, especially for ribs, knees, and sleeves.
Schedule Touch-Ups Early: If lines soften in the first year, book a touch-up, many artists will fix minor issues at reduced cost.
Test Placement with Stencils: Wear a paper stencil for a day to live with the spot before committing, I do this for clients and it reduces regret.
Communicate With Your Artist: Honest feedback about pain tolerance and how you want aging to look helps artists choose needle depth and ink saturation.
